SpringMVC WebSocket Apache代理 相关技术点总结
2017-08-03 20:31
573 查看
SpringMVC + WebSocket这个技术的文章一大把,最后笔者发现对WebSocket一知半解的情况下使用这个技术,任然会存在问题,有时还会觉得莫名其妙,而且在直接使用别人代码的情况下更是如此。本文希望通过本篇文章介绍一下个人经验总结。
如果英语尚可,直接参考SpringMVC官方对WebSocket的支持文档,点击这里
客户端,使用WebSocket实现访问。
参考资料:JSR-356标准, TOMCAT 7.0 以上是支持该标准的。
ServerEndPoint文档点击这里
下面就一步步的通过Eclipse+Tomcat实现WebSocket通讯,建议新手像我一样先试试。
编写WebSocket服务端代码
上述代码参考了前面JSR-356的标准文档,ServerEndPoint文档,稍做修改,使用了带返回值的OnMessage注解的方法,这样就可以实现和前端通讯。
- 编写HTML测试代码
test/jsr356.html
以上代码需要修改的地方只有:WebSocket对象建立时指定的WEB服务器名称,端口,虚拟目录名称。笔者为本机9090, 项目名称为TestWebSocket, hello为websocket服务端口URL。
http://localhost:9090/TestWebSocket/test/jsr356.html
下面是WebSocket在浏览器工具中看到的通讯过程:
注意:WebSocket对象 IE 9以下不支持……“WebSocket”未定义
MAVEN项目需要包含如下依赖,以便让TOMCAT使用新版本的javeee api.
通过SpringMVC实现WebSocket好处多多,具体请看英文文档,主要是解决了协议兼容的问题。
使用SpringMVC需要的库有好几个,本文示例,就直接通过普通J2EE项目搭建示例,建议项目中采用maven或其他管理依赖。
本示例需要用到jar包:
commons-logging-1.2.jar; spring-aop-4.2.5.RELEASE.jar; spring-beans-4.2.5.RELEASE.jar; spring-context-4.2.5.RELEASE.jar; spring-context-support-4.2.5.RELEASE.jar; spring-core-4.2.5.RELEASE.jar; spring-expression-4.2.5.RELEASE.jar; spring-web-4.2.5.RELEASE.jar; spring-webmvc-4.2.5.RELEASE.jar; spring-websocket-4.2.5.RELEASE.jar.
实现WebSocket + SpringMVC的基本处理类:
test.websocket.MyHandler.java
通过注解实现WebSocket的配置类(直接用注解实现初始化):
test.websocket.WebSocketConfig
有两种方式通过Spring初始化WebSocket.
- 通过注解的方式(@EnableWebSocket)
- 通过XML配置文件的方式(websocket:handlers)
无论是通过上述哪种方式,都需要配置Spring.
- 在web.xml 配置文件中添加SpringMVC监听器,和分发器配置
web.xml
配置Spring配置文件applicationContext.xml
这个文件有两种配置,分别对于注解的方式和XML配置的方式,两种方式的任务主要是配置Bean的初始化,还有websocket的配置初始化。
笔者的applicationContext.xml如下:
component-scan 实现的注解的扫描,从而实现注解功能的实现,该功能是Spring AOP功能,需要AOP库。参考文档
如果没有采用注解实现,也可以手动在applicationContext.xml种配置websocket处理器,参见上面的配置文件。
SockJs是如何实现服务端/客户端兼容的?通过尝试服务器的支持能力,从而确认是否支持特定的协议,这些协议包括:websocket ,xhr-streaming,xdr-streaming,eventsource…这些在特定的环境下会依次采用,也可以由客户端指定。比如websocket需要ws协议,如果经过没有相关配置的apache/ngnix,协议就会退化到轮询的websocket实现。通过协议退化,就保重了功能的实现。
比如Aapache需要配置如下才可以访问后端的Tomcat的websocket:
如果英语尚可,直接参考SpringMVC官方对WebSocket的支持文档,点击这里
WebSocket
这个技术不神秘,而且简单易用,只需要使用@ServerEndpoint注解一个类即可,再使用@OnMessage, @OnOpen, @OnClose注解一下方法,实现对WebSocket的管理和消息处理。需要Tomcat 7.0以上。客户端,使用WebSocket实现访问。
参考资料:JSR-356标准, TOMCAT 7.0 以上是支持该标准的。
ServerEndPoint文档点击这里
下面就一步步的通过Eclipse+Tomcat实现WebSocket通讯,建议新手像我一样先试试。
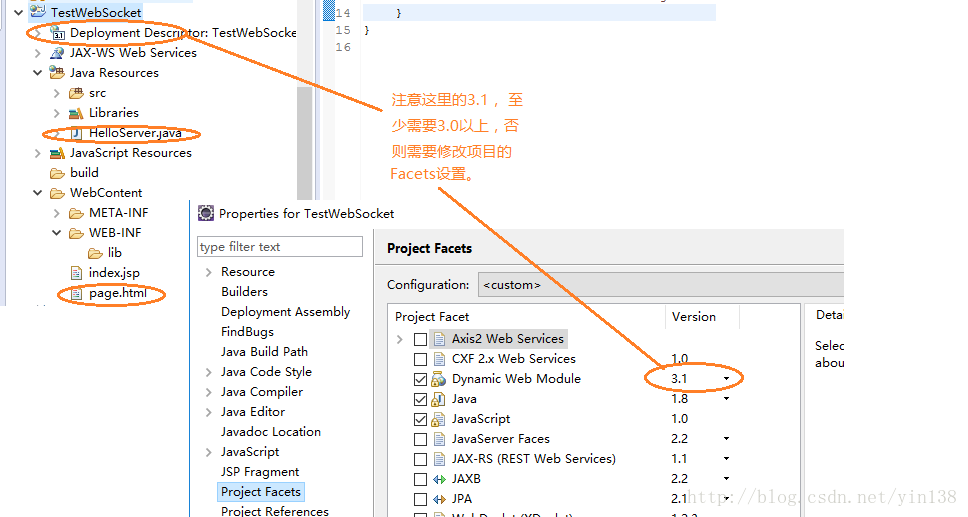
自己动手创建第一个WebSocket
Eclipse建立Web 3.0的项目(Eclipse4.5.1)编写WebSocket服务端代码
@ServerEndpoint("/hello")
public class HelloServer {
@OnMessage
public String processGreeting(String message, Session session) {
System.out.println("Greeting received:" + message);

return "Server echo:" + message + " at " + Calendar.getInstance().getTime().toString();
}
}
上述代码参考了前面JSR-356的标准文档,ServerEndPoint文档,稍做修改,使用了带返回值的OnMessage注解的方法,这样就可以实现和前端通讯。
- 编写HTML测试代码
test/jsr356.html
<!DOCTYPE html>
<html>
<head>
<title>Testing websockets using JSR-356</title>
<script type="text/javascript">
var webSocket =  new WebSocket('ws://localhost:9090/TestWebSocket/hello');

webSocket.onerror = function(e){onError(e)};
webSocket.onopen = function(e) {onOpen(e)};
webSocket.onmessage = function(e) {onMessage(e)};

function onMessage(event) {
document.getElementById('messages').innerHTML += '<br />' + event.data;
}

function onOpen(event) {
document.getElementById('messages').innerHTML  = 'Connection established';
}

function onError(e) {alert(e.data);}

function startWebSocket() { webSocket.send('hello'); return false; }
</script>
</head>
<body>
<div>
<input type="submit" value="Start" onclick="startWebSocket()" />
</div>
<div id="messages"></div>
</body>
</html>
以上代码需要修改的地方只有:WebSocket对象建立时指定的WEB服务器名称,端口,虚拟目录名称。笔者为本机9090, 项目名称为TestWebSocket, hello为websocket服务端口URL。
http://localhost:9090/TestWebSocket/test/jsr356.html
小结
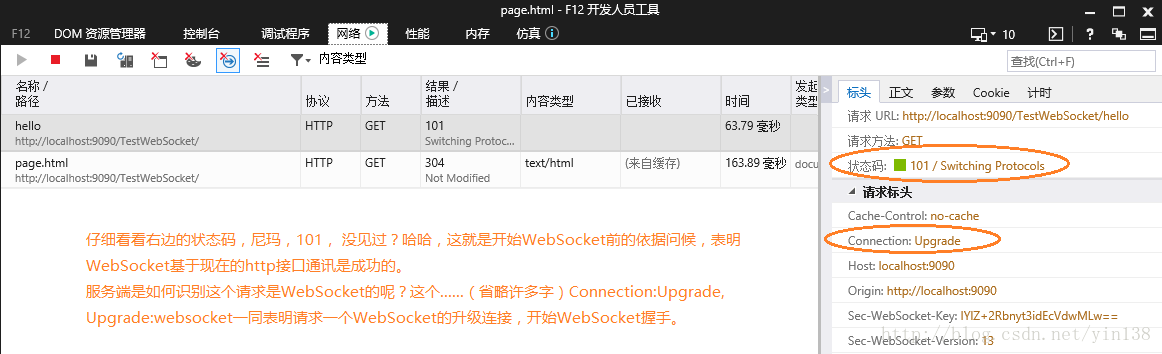
以上代码就是简要使用TOMCAT直接支持的方法和浏览器一同实现了WebSocket通讯,客户端提交hello消息,会从服务端就收消息。好像和一般的请求没啥区别啊!是啊!没有区别!Web请求,实现一个数据请求,就可以返回数据啊!WebSocket的关键在于,他的通讯是在水下面发生的,通过浏览器的工具没有办法直接查看WebSocket的数据报文,这是第一点,另外一点就是可以实现相互通讯,即通过服务器就可以直接和在线的客户端通讯,解决了以前客户端只能通过轮询实现数据更新。在JS4-356标准种,@OnOpen可以获得新打开的会话,从而实现和浏览器的关联,并可以实现服务器向客户端直接通讯。下面是WebSocket在浏览器工具中看到的通讯过程:
注意:WebSocket对象 IE 9以下不支持……“WebSocket”未定义
MAVEN项目需要包含如下依赖,以便让TOMCAT使用新版本的javeee api.
<dependency>
<groupId>javax</groupId>
<artifactId>javaee-api</artifactId>
<version>7.0</version>
<scope>provided</scope>
</dependency>
SpringMVC + WebSocket
参考文献:WebSocket Support通过SpringMVC实现WebSocket好处多多,具体请看英文文档,主要是解决了协议兼容的问题。
使用SpringMVC需要的库有好几个,本文示例,就直接通过普通J2EE项目搭建示例,建议项目中采用maven或其他管理依赖。
本示例需要用到jar包:
commons-logging-1.2.jar; spring-aop-4.2.5.RELEASE.jar; spring-beans-4.2.5.RELEASE.jar; spring-context-4.2.5.RELEASE.jar; spring-context-support-4.2.5.RELEASE.jar; spring-core-4.2.5.RELEASE.jar; spring-expression-4.2.5.RELEASE.jar; spring-web-4.2.5.RELEASE.jar; spring-webmvc-4.2.5.RELEASE.jar; spring-websocket-4.2.5.RELEASE.jar.
实现WebSocket + SpringMVC的基本处理类:
test.websocket.MyHandler.java
package test.websocket;

import java.io.IOException;
import java.util.Calendar;

import org.springframework.web.socket.TextMessage;
import org.springframework.web.socket.WebSocketSession;
import org.springframework.web.socket.handler.TextWebSocketHandler;

public class MyHandler extends TextWebSocketHandler{
public MyHandler(){
super();
System.out.println("MyHandler constractor...");
}
@Override
public void handleTextMessage(WebSocketSession session, TextMessage message) {
System.out.println("Client received:" + message.getPayload());
try {
session.sendMessage(new TextMessage("Server echo:" + message.getPayload() + " at " + Calendar.getInstance().getTime().toString()));
} catch (IOException e) {
// TODO Auto-generated catch block
e.printStackTrace();
}
}
}
通过注解实现WebSocket的配置类(直接用注解实现初始化):
test.websocket.WebSocketConfig
package test.websocket;

import org.springframework.context.annotation.Bean;
import org.springframework.context.annotation.Configuration;
import org.springframework.web.socket.WebSocketHandler;
import org.springframework.web.socket.config.annotation.EnableWebSocket;
import org.springframework.web.socket.config.annotation.WebSocketConfigurer;
import org.springframework.web.socket.config.annotation.WebSocketHandlerRegistry;

@Configuration
@EnableWebSocket
public class WebSocketConfig implements WebSocketConfigurer {

@Override
public void registerWebSocketHandlers(WebSocketHandlerRegistry registry) {
registry.addHandler(myHandler(), "/myHandler");
}

@Bean
public WebSocketHandler myHandler() {
return new MyHandler();
}

}
有两种方式通过Spring初始化WebSocket.
- 通过注解的方式(@EnableWebSocket)
- 通过XML配置文件的方式(websocket:handlers)
无论是通过上述哪种方式,都需要配置Spring.
- 在web.xml 配置文件中添加SpringMVC监听器,和分发器配置
web.xml
<?xml version="1.0" encoding="UTF-8"?>
<web-app xmlns:xsi="http://www.w3.org/2001/XMLSchema-instance" xmlns="http://xmlns.jcp.org/xml/ns/javaee" xsi:schemaLocation="http://xmlns.jcp.org/xml/ns/javaee http://xmlns.jcp.org/xml/ns/javaee/web-app_3_1.xsd" version="3.1">
<display-name>TestWebSocket</display-name>
<welcome-file-list>
<welcome-file>index.html</welcome-file>
<welcome-file>index.htm</welcome-file>
<welcome-file>index.jsp</welcome-file>
<welcome-file>default.html</welcome-file>
<welcome-file>default.htm</welcome-file>
<welcome-file>default.jsp</welcome-file>
</welcome-file-list>

<context-param>
<param-name>contextConfigLocation</param-name>
<param-value>/WEB-INF/applicationContext.xml</param-value>
</context-param>
<servlet>
<servlet-name>dispatcher</servlet-name>
<servlet-class>org.springframework.web.servlet.DispatcherServlet</servlet-class>
<init-param>
<param-name>contextConfigLocation</param-name>
<param-value></param-value>
</init-param>
<load-on-startup>1</load-on-startup>
</servlet>
<servlet-mapping>
<servlet-name>dispatcher</servlet-name>
<url-pattern>/*</url-pattern>
</servlet-mapping>
<servlet-mapping>
<servlet-name>default</servlet-name>
<url-pattern>/test/*</url-pattern>
</servlet-mapping>

<listener>
<listener-class>org.springframework.web.context.ContextLoaderListener</listener-class>
</listener>
</web-app>
配置Spring配置文件applicationContext.xml
这个文件有两种配置,分别对于注解的方式和XML配置的方式,两种方式的任务主要是配置Bean的初始化,还有websocket的配置初始化。
笔者的applicationContext.xml如下:
<beans xmlns="http://www.springframework.org/schema/beans"
xmlns:xsi="http://www.w3.org/2001/XMLSchema-instance"
xmlns:context="http://www.springframework.org/schema/context"
xmlns:websocket="http://www.springframework.org/schema/websocket"
xsi:schemaLocation=" http://www.springframework.org/schema/beans http://www.springframework.org/schema/beans/spring-beans.xsd http://www.springframework.org/schema/context http://www.springframework.org/schema/context/spring-context.xsd http://www.springframework.org/schema/websocket http://www.springframework.org/schema/websocket/spring-websocket.xsd">

<context:component-scan base-package="test.websocket"/>
<!--
<websocket:handlers>
<websocket:mapping path="/myHandler" handler="myHandler"/>
</websocket:handlers>

<bean id="myHandler" class="MyHandler"/>
-->
</beans>
component-scan 实现的注解的扫描,从而实现注解功能的实现,该功能是Spring AOP功能,需要AOP库。参考文档
如果没有采用注解实现,也可以手动在applicationContext.xml种配置websocket处理器,参见上面的配置文件。
SpringMVC + WebSocket + SockJs
客户端使用SockJs可以实现更好的浏览器兼容性, 示例参考官方网站,很简单,sockjs-client github链接SockJs是如何实现服务端/客户端兼容的?通过尝试服务器的支持能力,从而确认是否支持特定的协议,这些协议包括:websocket ,xhr-streaming,xdr-streaming,eventsource…这些在特定的环境下会依次采用,也可以由客户端指定。比如websocket需要ws协议,如果经过没有相关配置的apache/ngnix,协议就会退化到轮询的websocket实现。通过协议退化,就保重了功能的实现。
比如Aapache需要配置如下才可以访问后端的Tomcat的websocket:
RewriteEngine On
RewriteCond %{REQUEST_URI}  ^/JFGJ/sockjs/webSocketServer/.*/websocket$            [NC]
RewriteRule /(.*)           ws://localhost:9090/$1 [P,L]

ProxyPass /JFGJ/sockjs/webSocketServer http://localhost:9090/JFGJ/sockjs/webSocketServer ProxyPassReverse /JFGJ/sockjs/webSocketServer http://localhost:9090/JFGJ/sockjs/webSocketServer[/code]
笔者项目的sockjs的端点为:/JFGJ/sockjs/webSocketServer,/JFGJ/sockjs/webSocketServer/.*/websocket表达式标识对websocket的请求需要映射为ws协议(这个协议保护特殊的http头)。

如果遇到问题欢迎在留言区交流。

相关文章推荐
- spring+websocket整合(springMVC+spring+MyBatis即SSM框架和websocket技术的整合)
- springMVC+spring+MyBatis+websocket技术整合
- 自动化-Selenium WebDriver相关技术点总结
- Spring总结之Web MVC
- 【系列】使用springmvc+mybatis创建Web应用(一)—— 相关概念,工具,搭建Web应用
- MyBatis学习总结(二)——SpringMVC+Spring4+Mybatis3集成,开发简单Web项目+源码下载
- Spring Web MVC 关键技术点
- 服务器推送技术--spring websocket + 心跳保活重连 简易聊天室demo(一)
- springboot websocket使用过程中的一些总结
- web相关技术关系总结
- java SSM 框架 微信自定义菜单 快递接口 SpringMVC mybatis redis shiro ehcache websocket
- Spring Boot WebSocket技术
- Deploying Spring MVC Based Web Applications to OSGi Using Apache ServiceMix
- Extjs5 WebSocket Data Proxy 和 spring boot mvc
- 使用easyUI + SpringMVC 技术web项目开发 中文乱码
- Apache HttpClient调用Spring3 MVC Restful Web API演示
- Servlet.service() for servlet springmvc threw exception org.apache.jasper.JasperException: /WEB-INF/
- Spring技术内幕之Spring MVC与Web环境(02)- Spring Web MVC核心架构
- Spring MVC 框架pom.xml, web.xml, spring-mvc-servlet.xml, security.xml相关知识学习
- spring+websocket整合(springMVC+spring+MyBatis即SSM框架和