开始 Vue 之旅--开发项目(二)子组件与父组件的事
2017-08-03 16:32
806 查看
上篇讲得是简单案例开发(开始 Vue 之旅--开发项目(一)),但是我们都知道项目不可能那么简单,会越来越复杂的,这时候我们就要合理的分配,使其项目更加简单明了。
重要是这俩种划分,但是不管这么划分其做法是一样的。下面我们以页面区域划分来做介绍
props 组件之间的通讯
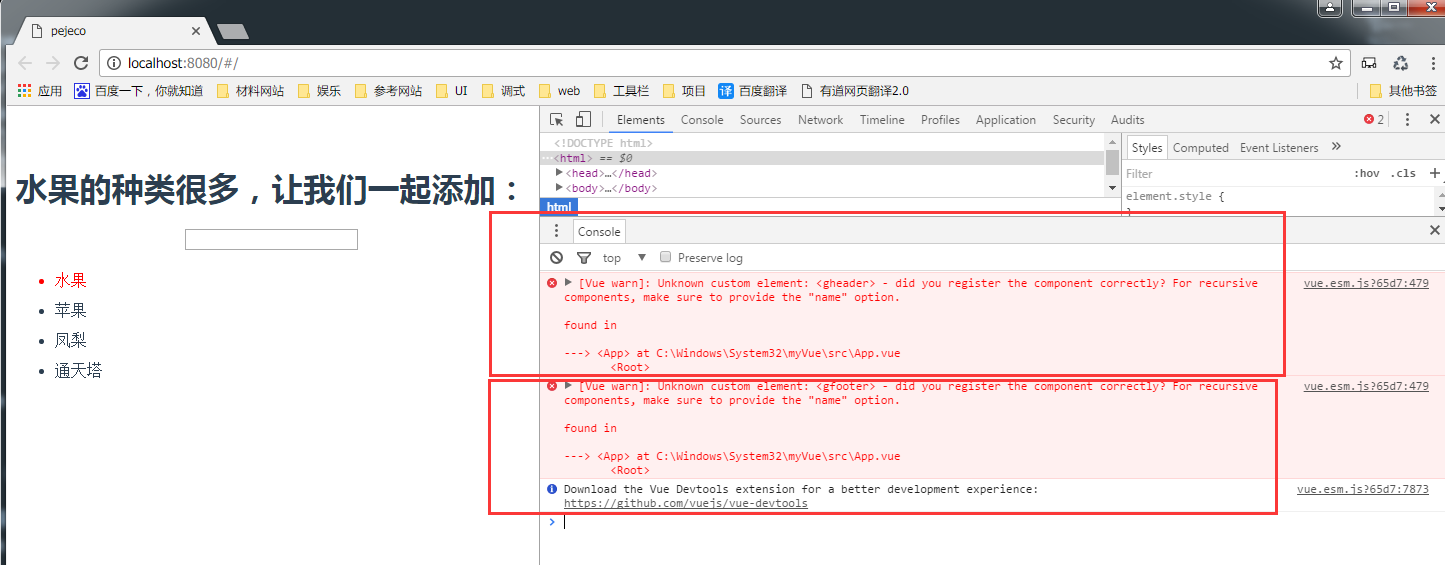
①在组件的components文件里,创建新的页面gfooter.vue/gheader.vue
A.这个文件系统默认标签,这会使组件冲突,vue不知道这是默认标签还是组件,所以不会渲染
B.命名尽量不要用“ - ”,否则也会出现错误
尽量在前面加上前缀,比如gfooter.vue (g表示组group)
②在入口文件app.vue模板中引入组件
要在<div id="app"></div>中插入
<gheader></gheader>
<gfooter></gfooter>
此时调试出出现如下错误,说明这俩个组件还没有注册
③在<script>里面注册组件
import gheader from './components/gheader.vue'
import gfooter from './components/gfooter.vue'
new Vue({
components:{gheader,gfooter},
})
注意:
(1).import 变量(在app中调用的) form 目录下的文件(可以用gheader.vue或是gheader)
(2). components与data,watch等并列
⑤渲染成功后,就会显示gheader.vue和gfooter.vue页面的内容
(1).gheader.vue
(2).gfooter.vue
(3).app.vue
(4).最终效果

(1).父组件(app.vue)传参数给子组件(gfooter.vue)
①只要在父组件
<gfooter fathercnt='hello! 这是父级传给子组件的内容'></gfooter>
fathercnt这个变量可以自行定义
②在子组件中
在<script>中传递参数
props: ['fathercnt']
在<template>模板中,引入
<p>{{fathercnt}}</p>
注意:props是数组,同时与与data,watch等并列

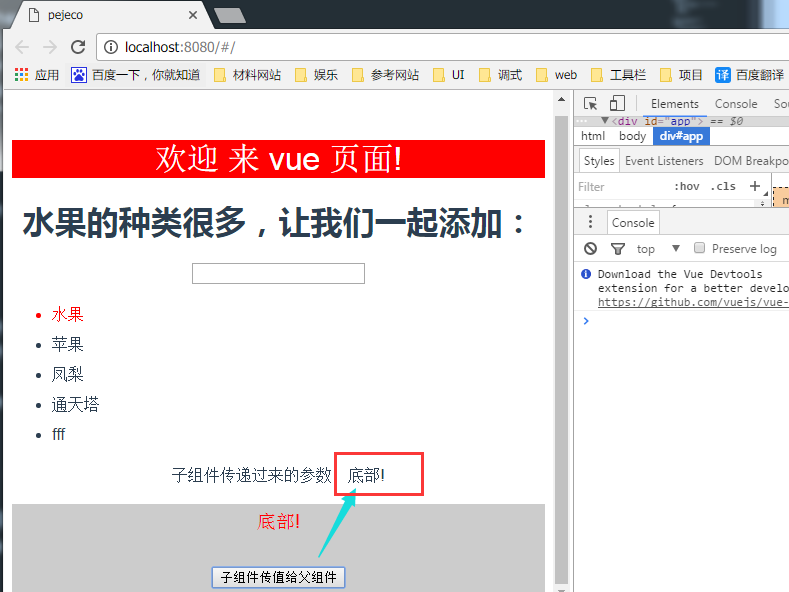
(2).子组件(gfooter.vue)传参数给父组件(app.vue)
子组件要把数据传递父组件,就得用自定义事件:
使用v-on绑定自定义事情
a.使用 $on(eventName) 监听事件
b.使用 $emit(eventName) 触发事件
注意:不能用 $on 侦听子组件抛出的事件,而必须在模板里直接用 v-on 绑定
①在app.vue模板中用v-on 绑定
在<template>模板中:
<p>子组件传递过来的参数:{{childwords}}</p>
<gfooter v-on:child-tell-me ="listenToMyBoy"></gfooter>
注意:这个child-tell-me可以自定义
在<script> 中:
methods:{
listenToMyBoy:function(msg){
this.childwords = msg;
}
}
②子组件gfooter.vue要触发事件
在<template>模板中:<button v-on:click="onClick">子组件传值给父组件</button>
在<script> 中:
methods:{
onClick:function(){
this.$emit('child-tell-me',this.msg)
}
}
代码:简单vue2开发
一.组件的分配
重要是这俩种划分,但是不管这么划分其做法是一样的。下面我们以页面区域划分来做介绍
二.页面区域划分---创建新项目
(一)知识点及步骤
app.vue是入口文件 components注册组件props 组件之间的通讯
①在组件的components文件里,创建新的页面gfooter.vue/gheader.vue
A.这个文件系统默认标签,这会使组件冲突,vue不知道这是默认标签还是组件,所以不会渲染
B.命名尽量不要用“ - ”,否则也会出现错误
尽量在前面加上前缀,比如gfooter.vue (g表示组group)
②在入口文件app.vue模板中引入组件
要在<div id="app"></div>中插入
<gheader></gheader>
<gfooter></gfooter>
<template>
<
4000
div id="app">
<gheader></gheader>
<div class="cnt">
中间内容
</div>
<gfooter></gfooter>
</div>
</template>
此时调试出出现如下错误,说明这俩个组件还没有注册
③在<script>里面注册组件
import gheader from './components/gheader.vue'
import gfooter from './components/gfooter.vue'
new Vue({
components:{gheader,gfooter},
})
注意:
(1).import 变量(在app中调用的) form 目录下的文件(可以用gheader.vue或是gheader)
(2). components与data,watch等并列
⑤渲染成功后,就会显示gheader.vue和gfooter.vue页面的内容
(二).事列
在之前的列子中操作(1).gheader.vue
<template>
<div class="header">
<h1>{{msg}}</h1>
</div>
</template>

<script>
export default {
name: 'header',
data () {
return {
msg: '欢迎 来 vue 页面!'
}
}
}
</script>

<!-- Add "scoped" attribute to limit CSS to this component only -->
<style scoped>
h1, h2 {
font-weight: normal;
}
.header h1{
background:#f00;
color:#fff;
text-align:center;
width:100%;
}
</style>
(2).gfooter.vue
<template>
<div class="footer">
<p>{{msg}}</p>
</div>
</template>

<script>
export default {
name: 'footer',
data () {
return {
msg: '底部!'
}
}
}
</script>

<!-- Add "scoped" attribute to limit CSS to this component only -->
<style scoped>
.footer p{
background:#ccc;
line-height:35px;
font-size:1.2rem;
color:#f00;
}
</style>
(3).app.vue
<template>
<div id="app">
<gheader></gheader>
<div class="index-cnt">
<h1 v-text="title"></h1>
<input v-model="newItem" v-on:keyup.enter="addNew"/>
<ul class="itemslist" >
<li v-for="(item,index) in items" v-bind:class="{active:index == num}"
v-on:click="itemactive(index)">{{item.label}}</li>
</ul>
</div>
<gfooter></gfooter>
</div>
</template>

<script>
import gheader  from './components/gheader.vue'
import gfooter  from './components/gfooter.vue'
//引入store.js
import Store from './store.js'
export default {
name: 'app',
data: function () {
return {
title: '水果的种类很多,让我们一起添加:',
items:Store.fetch(),
num:0,
newItem:''

}
},
components:{gheader,gfooter},
//watch对象监听的方法
watch:{
items: {
handler: function (items) {
Store.save(items);
},
deep: true
}
},
methods:{
//添加颜色
itemactive:function(index) {
this.num = index;
},
addNew:function(){
//因为列表是数组所以push()
this.items.push({
label:this.newItem
})
this.newItem=" ";//当enter完后,input的值自动消失(双向绑定的原因)
}
}
}
</script>

<style>
#app {
font-family: 'Avenir', Helvetica, Arial, sans-serif;
-webkit-font-smoothing: antialiased;
-moz-osx-font-smoothing: grayscale;
text-align: center;
color: #2c3e50;
margin-top: 60px;
}
.itemslist{
text-align:left;
line-height:30px;
}
.active{
color:#f00;
}
</style>
(4).最终效果
(三).参数传递
prop 是单向绑定的:当父组件的属性变化时,将传导给子组件,但是不会反过来。这是为了防止子组件无意修改了父组件的状态(1).父组件(app.vue)传参数给子组件(gfooter.vue)
①只要在父组件
<gfooter fathercnt='hello! 这是父级传给子组件的内容'></gfooter>
fathercnt这个变量可以自行定义
②在子组件中
在<script>中传递参数
props: ['fathercnt']
在<template>模板中,引入
<p>{{fathercnt}}</p>
注意:props是数组,同时与与data,watch等并列
(2).子组件(gfooter.vue)传参数给父组件(app.vue)
子组件要把数据传递父组件,就得用自定义事件:
使用v-on绑定自定义事情
a.使用 $on(eventName) 监听事件
b.使用 $emit(eventName) 触发事件
注意:不能用 $on 侦听子组件抛出的事件,而必须在模板里直接用 v-on 绑定
①在app.vue模板中用v-on 绑定
在<template>模板中:
<p>子组件传递过来的参数:{{childwords}}</p>
<gfooter v-on:child-tell-me ="listenToMyBoy"></gfooter>
注意:这个child-tell-me可以自定义
在<script> 中:
methods:{
listenToMyBoy:function(msg){
this.childwords = msg;
}
}
②子组件gfooter.vue要触发事件
在<template>模板中:<button v-on:click="onClick">子组件传值给父组件</button>
在<script> 中:
methods:{
onClick:function(){
this.$emit('child-tell-me',this.msg)
}
}
代码:简单vue2开发

相关文章推荐
- 从头开始开发一个vue幻灯片组件
- 如何Vue-cli开始使用在Vue.js项目中启动TDD(测试驱动开发)
- 打通前后端全栈开发node+vue进阶【课程学习系统项目实战详细讲解】(3):用户添加/修改/删除 vue表格组件 vue分页组件
- 如何Vue-cli开始使用在Vue.js项目中启动TDD(测试驱动开发)
- vue-cli开发(一)项目开始
- vue.js开发外卖App项目的组件拆分总结(五)
- vue.js开发外卖App项目的组件传值总结(七)
- vue-cli生成的项目配置开发和生产环境不同的接口
- 合格前端系列第二弹-Vue组件开发续篇
- 项目开发技巧(四):使用JspSmartupload实现文件上传下载(一):JspSmart之upload组件源码及使用
- require.js+vue+vue-router+vue-resource开发微信上传图片组件
- Vue拖拽组件开发实例详解
- 通达OA 公告管理模块增加管理项目,使用OA系统组件开发(图文)
- Java之JavaWeb项目开发开始准备
- html5 localstorage结合vue开发本地记事本项目源码
- vue组件开发练习--焦点图切换
- vue组件化挖矿之旅(二):vue-cli 项目的学习资料汇总
- vue 开发一个按钮组件的示例代码
- vue-star评星组件开发实例
- 从0开始简单使用git进行项目开发【SourceTree+Coding.net】