实践作业之LVS-DR模型的高性能集群搭建
2017-08-01 00:48
387 查看
题目:搭建一套LVS-DR模型的高性能集群,并实现以下功能:
(1) wordpress程序通过nfs共享给各个realserver;
(2) 后端realserver中的nginx和php分离
实验环境规划:
系统环境 ==> CentOS 7.x
IP地址规划 ==>
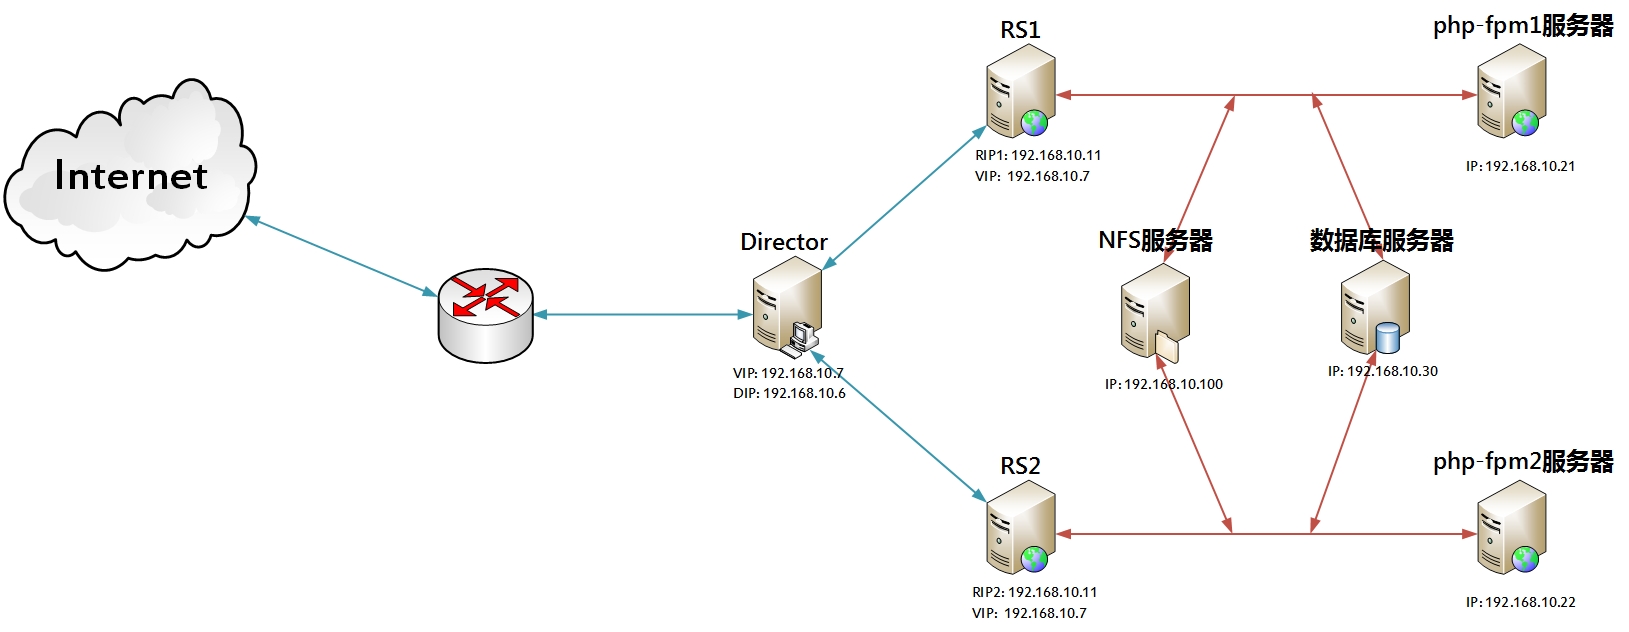
① VIP:192.168.10.7
② DIP:192.168.10.6
③ RIP1:192.168.10.11
④ RIP2:192.168.10.12
设计要点:
(1) 通过在Nginx Web服务器(后端Real Server)上将动态资源缓存下来,提高响应性能。
(2) 通过源地址哈希实现Session保持,将同一个IP地址的请求发往同一台RealServer。
(3) WordPress程序通过NFS共享给各个RealServer。
网络拓扑如下。
开始配置。
一、配置NFS服务器(192.168.10.100)
(1) 启动RPC服务和NFS服务。
(2) 编辑/etc/exports配置文件。
(3) 重载NFS配置。
二、配置RS1(192.168.10.11)
(1) 首先配置好VIP(192.168.10.7)和修改内核参数(arp_ignore, arp_announce)。这里编写为脚本处理。
(2) 将RS1配置为静态资源的Web服务器。
#首先编译安装Nginx,这里使用shell脚本编译安装Nginx。
静态资源访问测试成功,此处略过。
三、配置RS2(192.168.10.12)
(1) 首先配置好VIP(192.168.10.7)和修改内核参数(arp_ignore, arp_announce)。这里仍编写为脚本处理。
(2) 将RS2配置为静态资源的Web服务器。
静态资源访问测试成功,此处略过。
四、配置php-fpm1服务器(192.168.10.21)
(1) 编译安装php-fpm。脚本如下。
(2) 编辑php-fpm配置文件。
(3) 启动php-fpm服务。
(4) 挂载NFS文件系统。
(5) 在共享的文件系统上部署WordPress站点。
#解压wordpress-4.7.4-zh_CN.zip到/web共享目录下。
(6) 修改上传目录权限。
五、配置php-fpm2服务器(192.168.10.22)
(1) 使用yum安装php-fpm、php-mysql。
(2) 挂载NFS文件系统。
六、配置数据库服务器(192.168.10.30)
(1) 此处以通用二进制格式安装mysql,同样是通过脚本完成。
(2) 在mysql中创建数据库wpdb、授权数据库用户wpuser。
七、配置Director(192.168.10.7)
(1) 配置VIP(192.168.10.7)和DIP(192.168.10.6)。
(2) 首先检查内核是否有编译IPVS。
(3) 安装ipvsadm命令。
(4) 使用ipvsadm命令定义集群。
#首先清空netfilter的INPUT链上的规则,防止对ipvsadm在INPUT链上添加的集群产生干扰。
#测试。打开浏览器,输入http://192.168.10.7/index.php,看图说话。


#因为使用的是SH调度算法,因此保持Session方式是源地址哈希,此时可以查看前端调度器的负载情况。
#接着测试访问另外一台Web服务器(192.168.10.11)时,是否能够看到之前上传的图片。
#打开浏览器,直接访问http://192.168.10.11/index.php(如果访问前端调度器192.168.10.7,则根据源地址哈希,仍然会继续调度至192.168.10.12)。

可以发现,在192.168.10.11上也可以同步看到上传的图片。实验测试成功。
(1) wordpress程序通过nfs共享给各个realserver;
(2) 后端realserver中的nginx和php分离
实验环境规划:
系统环境 ==> CentOS 7.x
IP地址规划 ==>
① VIP:192.168.10.7
② DIP:192.168.10.6
③ RIP1:192.168.10.11
④ RIP2:192.168.10.12
设计要点:
(1) 通过在Nginx Web服务器(后端Real Server)上将动态资源缓存下来,提高响应性能。
(2) 通过源地址哈希实现Session保持,将同一个IP地址的请求发往同一台RealServer。
(3) WordPress程序通过NFS共享给各个RealServer。
网络拓扑如下。
开始配置。
一、配置NFS服务器(192.168.10.100)
(1) 启动RPC服务和NFS服务。
[root@nfs ~]# systemctl start rpcbind
systemctl start nfs.service
(2) 编辑/etc/exports配置文件。
[root@nfs ~]# vim /etc/exports
/web    192.168.10.0/24(rw,no_root_squash)
(3) 重载NFS配置。
[root@nfs ~]# exportfs -r
二、配置RS1(192.168.10.11)
(1) 首先配置好VIP(192.168.10.7)和修改内核参数(arp_ignore, arp_announce)。这里编写为脚本处理。
[root@rs1 ~]# cat skp.sh     # 查看配置脚本
#!/bin/bash
#
# 判断是否有带参数
[ "$1" == "" ] && echo "Please give parameter: start | stop " && exit 2

# 根据用户传递的参数修改内核相关参数
case $1 in
start )
echo 1 > /proc/sys/net/ipv4/conf/all/arp_ignore
echo 1 > /proc/sys/net/ipv4/conf/lo/arp_ignore
echo 2 > /proc/sys/net/ipv4/conf/all/arp_announce
echo 2 > /proc/sys/net/ipv4/conf/lo/arp_announce
;;
stop )
echo 0 > /proc/sys/net/ipv4/conf/all/arp_ignore
echo 0 > /proc/sys/net/ipv4/conf/lo/arp_ignore
echo 0 > /proc/sys/net/ipv4/conf/all/arp_announce
echo 0 > /proc/sys/net/ipv4/conf/lo/arp_announce
;;
esac

# 配置VIP和路由
ifconfig lo:0 192.168.10.7/32 broadcast 192.168.10.7
route add -host 192.168.10.7 dev lo:0
# 执行脚本
[root@rs1 ~]# ./skp.sh start
[root@rs1 ~]# ifconfig    # 查看配置好的RIP和VIP
eno16777736: flags=4163<UP,BROADCAST,RUNNING,MULTICAST>  mtu 1500
inet 192.168.10.11  netmask 255.255.255.0  broadcast 192.168.10.255
inet6 fe80::20c:29ff:fe66:ce8  prefixlen 64  scopeid 0x20<link>
ether 00:0c:29:66:0c:e8  txqueuelen 1000  (Ethernet)
RX packets 41231  bytes 20299143 (19.3 MiB)
RX errors 0  dropped 1  overruns 0  frame 0
TX packets 9634  bytes 1336853 (1.2 MiB)
TX errors 0  dropped 0 overruns 0  carrier 0  collisions 0
lo: flags=73<UP,LOOPBACK,RUNNING>  mtu 65536
inet 127.0.0.1  netmask 255.0.0.0
inet6 ::1  prefixlen 128  scopeid 0x10<host>
loop  txqueuelen 0  (Local Loopback)
RX packets 8  bytes 504 (504.0 B)
RX errors 0  dropped 0  overruns 0  frame 0
TX packets 8  bytes 504 (504.0 B)
TX errors 0  dropped 0 overruns 0  carrier 0  collisions 0
lo:0: flags=73<UP,LOOPBACK,RUNNING>  mtu 65536
inet 192.168.10.7  netmask 0.0.0.0
loop  txqueuelen 0  (Local Loopback)
[root@rs1 ~]# route -n    # 查看路由
Kernel IP routing table
Destination     Gateway         Genmask         Flags Metric Ref    Use Iface
0.0.0.0         192.168.10.2    0.0.0.0         UG    100    0        0 eno16777736
192.168.10.0    0.0.0.0         255.255.255.0   U     100    0        0 eno16777736
192.168.10.7    0.0.0.0         255.255.255.255 UH    0      0        0 lo
(2) 将RS1配置为静态资源的Web服务器。
#首先编译安装Nginx,这里使用shell脚本编译安装Nginx。
[root@rs1 ~]# vim compile_nginx.sh    # 查看编译安装Nginx的脚本
#!/bin/bash
#
# FTP Server
ftp_ip=192.168.10.99

# See if there is a parameter given#
! [ "$1" == "start" ] && echo "Please give parameter: start" && exit 1
echo "Let's Go!"

# download the nginx source
if ! [ -f ./nginx-${version}.tar.gz ]; then
if lftp ${ftp_ip} -e "mget upload/sources/nginx-${version}.tar.gz; exit"; then
echo "Download the Nginx package successfully."
else
echo "Failed to download the Nginx source package."
exit 2
fi
fi

# install the dependency package
if yum -y install pcre-devel openssl-devel zlib-devel gcc &> /dev/null; then
echo "Install the Nginx dependency package successfully."
else
echo "Failed to install the Nginx dependency package."
exit 3
fi

# compile the nginx
if tar xf nginx-${version}.tar.gz; then
cd nginx-${version}
./configure --prefix=/usr/local/nginx --conf-path=/etc/nginx/nginx.conf --user=nginx --group=nginx --error-log-path=/var/log/nginx/error.log --http-log-path=/var/log/nginx/access.log --pid-path=/var/run/nginx/nginx.pid --lock-path=/var/lock/nginx.lock --with-http_ssl_module --with-http_gzip_static_module --with-debug --with-http_stub_status_module
make -j 4 && make install && echo -e "\n Compile and Install Nginx completely!"
fi

# export the program path
echo 'export PATH=/usr/local/nginx/sbin:$PATH' > /etc/profile.d/nginx.sh
echo -e "\nPlease execute the following command:\n ==> source /etc/profile.d/nginx.sh\n\n "

[root@rs1 ~]# ./compile_nginx.sh start    # 执行脚本
...(以上输出信息省略)...

Please execute the following command:
source /etc/profile.d/nginx.sh

[root@rs1 ~]# source /etc/profile.d/nginx.sh#配置Web服务器,编辑nginx配置文件nginx.conf。[root@rs1 ~]# vim /etc/nginx/nginx.conf
...(其他省略)...
http {
fastcgi_cache_path /var/cache/nginx/fcgicache levels=1:2 keys_zone=fcgicache:10m;
...
server {
listen 80;
server_name www.itab.com;
location / { # 访问静态资源的location块
root /web; # 文档根目录设置为/web
index index.php index.html index.htm;
}
location ~ \.php$ { # 访问动态资源的location块
root /web; # 文档根目录设置为/web
fastcgi_cache fcgicache;
fastcgi_cache_key $request_uri;
fastcgi_cache_valid 200 302 10m;
fastcgi_cache_valid 301 1h;
fastcgi_cache_valid any 1m;
fastcgi_pass 192.168.10.21:9000; # php-fpm1服务器地址
fastcgi_index index.php;
fastcgi_param SCRIPT_FILENAME /web$fastcgi_script_name;
include fastcgi_params;
}
...
}
...
}#创建缓存目录/var/cache/nginx/fcgicache。[root@rs1 ~]# mkdir /var/cache/nginx/fagicache -p#检查nginx配置文件语法。
[root@rs1 ~]# nginx -t
nginx: the configuration file /etc/nginx/nginx.conf syntax is ok
nginx: configuration file /etc/nginx/nginx.conf test is successful
#启动Web服务器。
[root@rs1 ~]# nginx
[root@rs1 ~]# ss -tnl | grep :80
LISTEN     0      128          *:80                       *:*
#测试访问静态资源。
静态资源访问测试成功,此处略过。
三、配置RS2(192.168.10.12)
(1) 首先配置好VIP(192.168.10.7)和修改内核参数(arp_ignore, arp_announce)。这里仍编写为脚本处理。
[root@rs2 ~]# ./skp.sh start
[root@rs2 ~]# ifconfig
eno16777736: flags=4163<UP,BROADCAST,RUNNING,MULTICAST>  mtu 1500
inet 192.168.10.12  netmask 255.255.255.0  broadcast 192.168.10.255
inet6 fe80::20c:29ff:fe0f:40a0  prefixlen 64  scopeid 0x20<link>
ether 00:0c:29:0f:40:a0  txqueuelen 1000  (Ethernet)
RX packets 7144  bytes 7238190 (6.9 MiB)
RX errors 0  dropped 0  overruns 0  frame 0
TX packets 3037  bytes 326244 (318.5 KiB)
TX errors 0  dropped 0 overruns 0  carrier 0  collisions 0

lo: flags=73<UP,LOOPBACK,RUNNING>  mtu 65536
inet 127.0.0.1  netmask 255.0.0.0
inet6 ::1  prefixlen 128  scopeid 0x10<host>
loop  txqueuelen 0  (Local Loopback)
RX packets 0  bytes 0 (0.0 B)
RX errors 0  dropped 0  overruns 0  frame 0
TX packets 0  bytes 0 (0.0 B)
TX errors 0  dropped 0 overruns 0  carrier 0  collisions 0

lo:0: flags=73<UP,LOOPBACK,RUNNING>  mtu 65536
inet 192.168.10.7  netmask 0.0.0.0
loop  txqueuelen 0  (Local Loopback)
(2) 将RS2配置为静态资源的Web服务器。
[root@rs2 ~]# ./compile_nginx.sh start
...(以上输出信息省略)...

Please execute the following command:
source /etc/profile.d/nginx.sh

[root@rs2 ~]# source /etc/profile.d/nginx.sh
#配置Web服务器,编辑nginx配置文件nginx.conf(与RS1的配置相同,只改变了fastcgi_pass指令指向的php-fpm服务器地址)。
[root@rs2 ~]# vim /etc/nginx/nginx.conf

...(其他省略)...

http {
fastcgi_cache_path /var/cache/nginx/fcgicache levels=1:2 keys_zone=fcgicache:10m;
...
server {
listen       80;
server_name  www.itab.com;
location / {        # 访问静态资源的location块
root   /web;
index  index.php index.html index.htm;
}
location ~ \.php$ {        # 访问动态资源的location块
root           /web;
fastcgi_cache  fcgicache;
fastcgi_cache_key $request_uri;
fastcgi_cache_valid 200 302 10m;
fastcgi_cache_valid 301 1h;
fastcgi_cache_valid any 1m;
fastcgi_pass   192.168.10.22:9000;    # php-fpm2服务器地址
fastcgi_index  index.php;
fastcgi_param  SCRIPT_FILENAME  /web$fastcgi_script_name;
include        fastcgi_params;
}
...
}
...
}#创建缓存目录/var/cache/nginx/fcgicache。[root@rs2 ~]# mkdir /var/cache/nginx/fagicache -p#检查nginx配置文件语法。
[root@rs2 ~]# nginx -t
nginx: the configuration file /etc/nginx/nginx.conf syntax is ok
nginx: configuration file /etc/nginx/nginx.conf test is successful
#启动Web服务器。
[root@rs2 ~]# nginx
[root@rs2 ~]# ss -tnl | grep :80
LISTEN     0      128          *:80                       *:*
#测试访问静态资源。
静态资源访问测试成功,此处略过。
四、配置php-fpm1服务器(192.168.10.21)
(1) 编译安装php-fpm。脚本如下。
[root@fpm1 ~]# vim compile_php-fpm.sh     # 查看编译安装php-fpm的脚本
#!/bin/bash
#
# FTP Server
ftp_ip=192.168.10.99
php_version=5.5.38
SystemUser=php-fpm
fpm_listen_port=9000
web_server_ip=192.168.10.12

# Check
! [ "$1" == "start" ] &&  echo "Please input the parameter: start " && exit 2 || echo "Let's Go!"

# Install PHP-FPM
yum -y install gcc bzip2 libmcrypt-devel libxml2-devel bzip2-devel openssl-devel &> /dev/null

if ! [ -f php-${php_version}.tar.bz2 ]; then
lftp ${ftp_ip} -e "mget upload/sources/php-${php_version}.tar.bz2; exit"
fi

if [ -d php-${php_version} ]; then
cd php-${php_version}
make clean
cd -
rm -rf php-${php_version}
fi

tar xf php-${php_version}.tar.bz2
cd php-${php_version}/
make -j ${vcpus} && make install

# Install configuration for PHP-FPM
if [ -f /etc/php.ini ]; then
mv -f /etc/php.ini{,.bak}
fi
cp php.ini-production /etc/php.ini
cp /usr/local/php/etc/php-fpm.conf.default /usr/local/php/etc/php-fpm.conf
sed -i "/^listen/s/127.0.0.1:9000/${fpm_listen_ip}:${fpm_listen_port}/" /usr/local/php/etc/php-fpm.conf
sed -i "/listen.allowed_clients/{s/127.0.0.1/${web_server_ip}/;s/;//}" /usr/local/php/etc/php-fpm.conf
if ! id ${SystemUser} &> /dev/null; then
useradd -r ${SystemUser}
fi
sed -i "/^user/s/nobody/${SystemUser}/" /usr/local/php/etc/php-fpm.conf
sed -i "/^group/s/nobody/${SystemUser}/" /usr/local/php/etc/php-fpm.conf

# Start the PHP-FPM Service
if [ -f /etc/init.d/php-fpm ]; then
rm -rf /etc/init.d/php-fpm{,.bak}
fi
cp sapi/fpm/init.d.php-fpm /etc/init.d/php-fpm
chkconfig --add php-fpm
chmod +x /etc/init.d/php-fpm

if service php-fpm start &> /dev/null; then
if ss -tnl | grep :9000 &> /dev/null; then
echo -e "\nThe PHP-FPM Service is start!" && echo -e "\n Compile and install php-fpm successfully!\n"
fi
fi
(2) 编辑php-fpm配置文件。
[root@fpm1 ~]# vim /etc/php-fpm.d/www.conf
[www]
listen = 192.168.10.21:9000
listen.allowed_clients = 192.168.10.11
...(其他省略)...
(3) 启动php-fpm服务。
[root@fpm1 ~]# systemctl start php-fpm.service
[root@fpm1 ~]# ss -tnl | grep :9000
LISTEN     0      128    192.168.10.21:9000                     *:*
(4) 挂载NFS文件系统。
[root@fpm1 ~]# showmount -e 192.168.10.100    # 查看共享
Export list for 192.168.10.100:
/web 192.168.10.0/24
[root@fpm1 ~]#
[root@fpm1 ~]# mkdir /web        # 创建本地挂载目录
[root@fpm1 ~]# mount -t nfs 192.168.10.100:/web /web    # 挂载NFS文件系统
[root@fpm1 ~]# df
Filesystem              1K-blocks    Used Available Use% Mounted on
192.168.10.100:/web      19351552 1022528  18329024   6% /web
...(其他省略)...
(5) 在共享的文件系统上部署WordPress站点。
#解压wordpress-4.7.4-zh_CN.zip到/web共享目录下。
[root@fpm1 ~]# unzip wordpress-4.7.4-zh_CN.zip
[root@fpm1 ~]# mv wordpress/* /web/
#编辑wordpress程序的配置文件,修改数据库相关信息。
[root@fpm1 ~]# cd /web/
[root@fpm1 web]# cp wp-config-sample.php wp-config.php
[root@fpm1 web]# vim wp-config.php

// ** MySQL 设置 - 具体信息来自您正在使用的主机 ** //
/** WordPress数据库的名称 */
define('DB_NAME', 'wpdb');

/** MySQL数据库用户名 */
define('DB_USER', 'wpuser');

/** MySQL数据库密码 */
define('DB_PASSWORD', 'wppass');

/** MySQL主机 */
define('DB_HOST', '192.168.10.30');

...(其他省略)...
(6) 修改上传目录权限。
[root@fpm1 ~]# chown -R php-fpm.php-fpm /web/wp-content#注意要确保在两台php-fpm服务器上的php-fpm用户的UID和GID一致。
五、配置php-fpm2服务器(192.168.10.22)
(1) 使用yum安装php-fpm、php-mysql。
[root@fpm2 ~]# yum -y install php-fpm php-mysql
(2) 挂载NFS文件系统。
[root@fpm2 ~]# showmount -e 192.168.10.100
Export list for 192.168.10.100:
/web 192.168.10.0/24
[root@fpm2 ~]#
[root@fpm2 ~]# mkdir /web
[root@fpm2 ~]# mount -t nfs 192.168.10.100:/web /web
[root@fpm2 ~]# df
Filesystem              1K-blocks    Used Available Use% Mounted on
192.168.10.100:/web      19351552 1051072  18300480   6% /web
...(其他省略)...
#查看/web目录下的文件。
[root@fpm2 ~]# cd /web/
[root@fpm2 web]# ls
index.php    wp-activate.php     wp-comments-post.php  wp-content   wp-links-opml.php  wp-mail.php      wp-trackback.php
license.txt  wp-admin            wp-config.php         wp-cron.php  wp-load.php        wp-settings.php  xmlrpc.php
readme.html  wp-blog-header.php  wp-config-sample.php  wp-includes  wp-login.php       wp-signup.php
[root@fpm2 web]#
#可以发现,在配置php-fpm1服务器时就已经在共享文件系统上提供了php-fpm配置文件,因此此处无需做任何修改。
六、配置数据库服务器(192.168.10.30)
(1) 此处以通用二进制格式安装mysql,同样是通过脚本完成。
[root@mysql ~]# cat binary_mysql.sh    # 查看以通用二进制格式安装mysql的脚本
#!/bin/bash
#
# FTP Server
ftp_ip=192.168.10.99
mysql_version=5.5.56

# Check
! [ "$1" == "start" ] &&  echo "Please input the parameter: start " && exit 2 || echo "Let's Go!"

# Prepare datadir
if [ -d /mydata/data ]; then
mv -f /mydata/data{.bak}
else
mkdir -p /mydata/data
fi

# Install MySQL
if ! id mysql &> /dev/null; then
useradd -r mysql
fi

if ! [ -f mariadb-${mysql_version}-linux-x86_64.tar.gz ]; then
lftp ${ftp_ip} -e "mget upload/sources/mariadb-${mysql_version}-linux-x86_64.tar.gz; exit"
fi

if [ -d mariadb-${mysql_version}-linux-x86_64 ]; then
rm -rf mariadb-${mysql_version}-linux-x86_64
fi

tar xf mariadb-${mysql_version}-linux-x86_64.tar.gz -C /usr/local
cd /usr/local
if [ -d mysql ]; then
rm -rf mysql
fi

ln -sv mariadb-${mysql_version}-linux-x86_64 mysql
cd /usr/local/mysql
chown -R root:mysql ./*
scripts/mysql_install_db --user=mysql --datadir=/mydata/data
if [ -f /etc/init.d/mysqld ]; then
rm -f /etc/init.d/mysqld
fi
cp support-files/mysql.server /etc/init.d/mysqld
chkconfig --add mysqld

# Install configuration for MySQL
if [ -f /etc/my.cnf ]; then
mv -f /etc/my.cnf{.bak}
fi
cp support-files/my-large.cnf /etc/my.cnf

sed -i '42a \datadir = /mydata/data\ninnodb_file_per_table = ON\nskip_name_resolve = ON' /etc/my.cnf

# Start the MySQL Service
if service mysqld start | grep SUCCESS &> /dev/null; then
if ss -tnl | grep :3306 &> /dev/null; then
echo -e "\n Install MySQL completely!\n The MySQL Service is start!"
fi
fi

# Export the path
echo 'export PATH=/usr/local/mysql/bin:$PATH' > /etc/profile.d/mysql.sh
echo -e "Please execute the following command:\n ==> source /etc/profile.d/mysql.sh\n\n "#执行脚本,安装mysql。[root@mysql ~]# ./binary_mysql.sh start [root@mysql ~]# source /etc/profile.d/mysql.sh
(2) 在mysql中创建数据库wpdb、授权数据库用户wpuser。
[root@mysql ~]#
[root@mysql ~]# mysql
MariaDB [(none)]> GRANT ALL ON wpdb.* TO wpuser@'192.168.10.%' IDENTIFIED BY 'wppass';
MariaDB [(none)]> CREATE DATABASE wpdb;
MariaDB [(none)]> exit
七、配置Director(192.168.10.7)
(1) 配置VIP(192.168.10.7)和DIP(192.168.10.6)。
[root@node1 ~]# ifconfig eno16777736 192.168.10.6/24    # 配置DIP
[root@node1 ~]# ifconfig eno33554992 192.168.10.7/32 broadcast 192.168.10.7    # 配置VIP
(2) 首先检查内核是否有编译IPVS。
[root@node1 ~]# grep -i -A 11 'IPVS' /boot/config-3.10.0-327.el7.x86_64
CONFIG_NETFILTER_XT_MATCH_IPVS=m
CONFIG_NETFILTER_XT_MATCH_LENGTH=m
CONFIG_NETFILTER_XT_MATCH_LIMIT=m
CONFIG_NETFILTER_XT_MATCH_MAC=m
CONFIG_NETFILTER_XT_MATCH_MARK=m
CONFIG_NETFILTER_XT_MATCH_MULTIPORT=m
CONFIG_NETFILTER_XT_MATCH_NFACCT=m
CONFIG_NETFILTER_XT_MATCH_OSF=m
CONFIG_NETFILTER_XT_MATCH_OWNER=m
CONFIG_NETFILTER_XT_MATCH_POLICY=m
CONFIG_NETFILTER_XT_MATCH_PHYSDEV=m
CONFIG_NETFILTER_XT_MATCH_PKTTYPE=m
--
# IPVS transport protocol load balancing support    # 已经将IPVS编译进内核
#
CONFIG_IP_VS_PROTO_TCP=y
CONFIG_IP_VS_PROTO_UDP=y
CONFIG_IP_VS_PROTO_AH_ESP=y
CONFIG_IP_VS_PROTO_ESP=y
CONFIG_IP_VS_PROTO_AH=y
CONFIG_IP_VS_PROTO_SCTP=y

#
# IPVS scheduler
#
CONFIG_IP_VS_RR=m
CONFIG_IP_VS_WRR=m
CONFIG_IP_VS_LC=m
CONFIG_IP_VS_WLC=m
CONFIG_IP_VS_LBLC=m
CONFIG_IP_VS_LBLCR=m
CONFIG_IP_VS_DH=m
CONFIG_IP_VS_SH=m
CONFIG_IP_VS_SED=m
CONFIG_IP_VS_NQ=m
--
# IPVS SH scheduler
#
CONFIG_IP_VS_SH_TAB_BITS=8

#
# IPVS application helper
#
CONFIG_IP_VS_FTP=m
CONFIG_IP_VS_NFCT=y
CONFIG_IP_VS_PE_SIP=m
(3) 安装ipvsadm命令。
[root@node1 ~]# yum -y install ipvsadm
(4) 使用ipvsadm命令定义集群。
#首先清空netfilter的INPUT链上的规则,防止对ipvsadm在INPUT链上添加的集群产生干扰。
[root@node1 ~]# iptables -F#定义web集群服务。
[root@node1 ~]# ipvsadm -A -t 192.168.10.7:80 -s sh
[root@node1 ~]# ipvsadm -a -t 192.168.10.7:80 -r 192.168.10.11 -g -w 1
[root@node1 ~]# ipvsadm -a -t 192.168.10.7:80 -r 192.168.10.12 -g -w 2
[root@node1 ~]# ipvsadm -Ln
IP Virtual Server version 1.2.1 (size=4096)
Prot LocalAddress:Port Scheduler Flags
-> RemoteAddress:Port           Forward Weight ActiveConn InActConn
TCP  192.168.10.7:80 rr
-> 192.168.10.11:80             Route   1      0          0
-> 192.168.10.12:80             Route   2      0          0
#测试。打开浏览器,输入http://192.168.10.7/index.php,看图说话。
#因为使用的是SH调度算法,因此保持Session方式是源地址哈希,此时可以查看前端调度器的负载情况。
[root@node1 ~]# ipvsadm -Ln
IP Virtual Server version 1.2.1 (size=4096)
Prot LocalAddress:Port Scheduler Flags
-> RemoteAddress:Port           Forward Weight ActiveConn InActConn
TCP  192.168.10.7:80 sh
-> 192.168.10.11:80             Route   1      0          0
-> 192.168.10.12:80             Route   2      0          24
可以发现,所有请求都被调度到同一台主机(192.168.10.12),而不会调度到另一台主机(192.168.10.11)。
#接着测试访问另外一台Web服务器(192.168.10.11)时,是否能够看到之前上传的图片。
#打开浏览器,直接访问http://192.168.10.11/index.php(如果访问前端调度器192.168.10.7,则根据源地址哈希,仍然会继续调度至192.168.10.12)。
可以发现,在192.168.10.11上也可以同步看到上传的图片。实验测试成功。

相关文章推荐
- 搭建一套LVS-DR模型的高性能集群(LVS-DR+Nginx+Mariadb+Nfs+php-fpm+wordpress) 推荐
- LVS集群DR、NAT模型配置, 及使用ldirectord完成LVS DR模型集群搭建
- 一步一步搭建LVS-DR模型LB集群(一)
- 一步一步搭建LVS-DR模型LB集群(三)
- 一步一步搭建LVS-DR模型LB集群(二)
- 负载均衡集群LVS模式之DR模型
- 用keepalived+lvs_dr搭建高可用的负载均衡集群
- LVS之DR模型搭建wordpress服务及会话持久与绑定
- 使用LVS+DR搭建集群实现负载均衡
- CentOS6.2下搭建LVS(DR)+Keepalived实现高性能高可用负载均衡
- 使用LVS+DR搭建集群实现负载均衡
- LVS+keeplived+nginx+apache搭建高可用、高性能php集群
- 用 KVM 搭建web集群实验笔记 - LVS和Keeplived负载均衡(DR模式)
- LVS-DR模式的配置及Heartbeat+Ldirectord+DR高可用负载均衡集群的搭建
- LVS+keeplived+nginx+apache搭建高可用、高性能php集群
- linux集群之LVS DR模型简单实现
- 基于lvs的DR模型搭建高可用的web服务,并部署wordpress,(附有脚本实现健康状态检测的代码) 推荐
- 基于DR模型的HA高可用负载均衡集群搭建
- LVS+keeplived+nginx+apache搭建高可用、高性能php集群
- LVS+keeplived+nginx+apache搭建高可用、高性能php集群