MySQL+DBUtils+C3P0+ Servlet+HTML完成Web端登陆验证案例实现
2017-07-31 21:17
429 查看
1.技术分析
Web客户端采用HTML编写布局文件,利用Form表单标签完成Http请求的提交。服务器采用Tomcat服务器,利用Servlet来处理Http请求,后台数据库采用MySQL数据库,利用DBUtils+C3P0来完成JDBC操作。
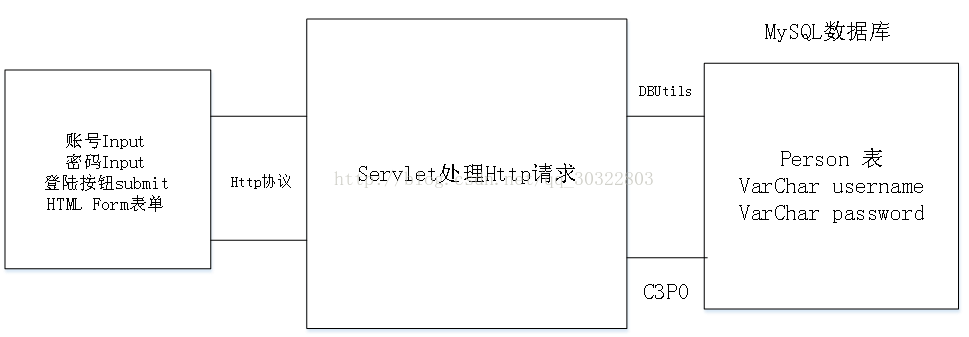
图1.1 案例架构
2.技术实现步骤
2.1后台数据库创建
1.创建数据库的SQL语句:CREATE DATABASE person;
2.选择指定的数据库:USE person;
3.创建数据库表用户表(Person表)
CREATE TABLE person(id INT PRIMARY KEY AUTO_INCREMENT,
username VARCHAR(20) ,
passworld VARCHAR(20) );
4.插入数据库的SQL语句:
INSERT INTO person(id,username,passworld) VALUES(1,'nuc','123');
INSERT INTO person(id,username,passworld) VALUES(2,'bupt','123');
图2.1 数据库建表情况
2.2 Web前端的布局代码
图2-2 Web前端代码
2.3 服务器Servlet代码
2.4 在利用好Servlet完成Http响应的时候,需要配置Web.xml文件,用来设计Servlet对应Url,这里贴出LoginServlet对应Web.xml文件配置内容
2.5 利用C3P0连接池的时候,同样需要填写配置文件,以下是配置文件的内容
Web客户端采用HTML编写布局文件,利用Form表单标签完成Http请求的提交。服务器采用Tomcat服务器,利用Servlet来处理Http请求,后台数据库采用MySQL数据库,利用DBUtils+C3P0来完成JDBC操作。
图1.1 案例架构
2.技术实现步骤
2.1后台数据库创建
1.创建数据库的SQL语句:CREATE DATABASE person;
2.选择指定的数据库:USE person;
3.创建数据库表用户表(Person表)
CREATE TABLE person(id INT PRIMARY KEY AUTO_INCREMENT,
username VARCHAR(20) ,
passworld VARCHAR(20) );
4.插入数据库的SQL语句:
INSERT INTO person(id,username,passworld) VALUES(1,'nuc','123');
INSERT INTO person(id,username,passworld) VALUES(2,'bupt','123');
图2.1 数据库建表情况
2.2 Web前端的布局代码
<!DOCTYPE html>
<html>
<head>
<meta charset="utf-8" />
<title></title>
<style>
#username{
width: 250px;
}
#password{
margin-left: 16px;
width: 250px;
}
</style>
</head>
<body>
<form action="http://localhost:8080/Web2/LoginServlet",method="post">
用户名<input id="username", name="username",rrequired="true"/><br/>
密码<input id="password" name="password",rrequired="true"//><br/>
<input type="submit",name",value="登陆"/><br/>
</form>
</body>
</html
图2-2 Web前端代码
2.3 服务器Servlet代码
public class LoginServlet extends HttpServlet {
public void doGet(HttpServletRequest request, HttpServletResponse response) throws ServletException, IOException
{
//1.设置发送数据的编码格式
response.setCharacterEncoding("utf-8");
response.setContentType("text/html;charset=utf-8");
//2.获取请求报文中携带的数据
Person person;
String userName = request.getParameter("username");
String password= request.getParameter("password");

a6d2
//3 利用DBUtils完成查询
QueryRunner qr= new QueryRunner(C3P0Utils.getDataSource());
String sqlString = "select * from person where username = ? and passworld=?";
//String[] paramString = new String []{userName,password};
//System.out.println(paramString[0]+paramString[1]);
try {
person =qr.query(sqlString, new BeanHandler<Person>(Person.class),userName,password);
} catch (SQLException e) {
// TODO Auto-generated catch block
e.printStackTrace();
response.getWriter().write("登陆错误");
System.out.println("登陆错误");
throw new RuntimeException();
}
if(person!=null)
{
System.out.println("登陆成功");
response.getWriter().write("登陆成功");
}
else
{
System.out.println("账号密码错误");
response.getWriter().write("账号密码错误");
}
}

public void doPost(HttpServletRequest request, HttpServletResponse response) throws ServletException, IOException {

this.doGet(request,response);
}
}
注1:Person是javaBean对象,其中具有id username passworld字段,设置了相应的无参/有参,get/set方法。
注2:C3P0Utils是对C3P0代码的封装,以下是其具体实现:
public class C3P0Utils
{
public static DataSource mDataSource;
static
{
mDataSource = new ComboPooledDataSource();
}
public static  Connection getConnection()
{
Connection connection;
try {
connection = mDataSource.getConnection();
} catch (SQLException e) {
// TODO Auto-generated catch block
e.printStackTrace();
throw new  RuntimeException();
}
return connection;
}
public static DataSource getDataSource()
{
return mDataSource;
}
}
2.4 在利用好Servlet完成Http响应的时候,需要配置Web.xml文件,用来设计Servlet对应Url,这里贴出LoginServlet对应Web.xml文件配置内容
<servlet>
<servlet-name>LoginServlet</servlet-name>
<servlet-class>com.butp.servlet.LoginServlet</servlet-class>
</servlet>
<servlet-mapping>
<servlet-name>LoginServlet</servlet-name>
<url-pattern>/LoginServlet</url-pattern>
</servlet-mapping>
2.5 利用C3P0连接池的时候,同样需要填写配置文件,以下是配置文件的内容
<?xml version="1.0" encoding="UTF-8"?>
<c3p0-config>
<default-config>
<property name="driverClass">com.mysql.jdbc.Driver</property>
<property name="jdbcUrl">jdbc:mysql://localhost:3306/person</property>
<property name="user">root</property>
<property name="password">123</property>
<property name="initialPoolSize">5</property>
<property name="maxPoolSize">20</property>
</default-config>

<named-config name="oracle">
<property name="driverClass">com.mysql.jdbc.Driver</property>
<property name="jdbcUrl">jdbc:mysql://localhost:3306/person</property>
<property name="user">root</property>
<property name="password">123</property>
</named-config>

</c3p0-config>

相关文章推荐
- HTML 实现注册小案例
- 在TOMCAT下实现基于表单验证的登陆方式
- angularjs中$http、$location、$watch及双向数据绑定学习实现简单登陆验证
- 图片登陆验证功能的实现
- 用struts2 完成一个简单的通讯录,实现增删改查,分页,文件上传(头像),表单验证(两种方法)
- net 实现三种验证码(汉字验证码,数字验证码,数字+英文验证)附带登陆验证实例
- Post,同步实现登陆验证(2)
- 【Java基础】采用Filter实现AOP完成统一登录验证
- 微信小程序 短信验证 功能的实现(附案例代码/前后端/直接用)
- Hibernate实现简单登陆验证
- 短信验证码60倒计时,jquery/js实现案例-短信平台验证码开发8
- Linux下实现SSH无密码验证登陆
- MVC3学习第七章 排山倒海第三变----利用MVC3实现数据验证以及完成用户数据的编辑
- Android:用SharePreferences实现记住密码功能 (登陆案例)
- 【IOS】利用ASIHTTPRequest 实现一个简单的登陆验证
- angularjs中$http、$location、$watch及双向数据绑定学习实现简单登陆验证
- 用html实现企业邮箱登陆界面
- android入门_采用android-async-http开源项目的GET方式或POST方式实现登陆案例
- Spring boot 整合shiro 实现登陆验证
- Spring3整合Struts2+Hibernate 实现注册、数据库验证登陆