Guava Cache 数据变化实现回调的监听器RemovalListener
2017-07-30 23:28
260 查看
上一篇介绍了guava的使用,实现了项目第一个需求定期清理cache数据,第二个需求,我们需要在缓存被移除的时候,得到通知产生回调,并做一些额外处理工作。这个时候RemovalListener就派上用场了。
下面是获得所有数据改变的监听
[java] view
plain copy
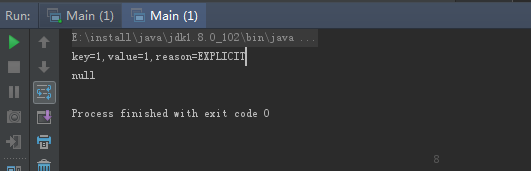
public class Main {
// 创建一个监听器
private static class MyRemovalListener implements RemovalListener<Integer, Integer> {
@Override
public void onRemoval(RemovalNotification<Integer, Integer> notification) {
String tips = String.format("key=%s,value=%s,reason=%s", notification.getKey(), notification.getValue(), notification.getCause());
System.out.println(tips);
}
}
public static void main(String[] args) {
// 创建一个带有RemovalListener监听的缓存
Cache<Integer, Integer> cache = CacheBuilder.newBuilder().removalListener(new MyRemovalListener()).build();
cache.put(1, 1);
// 手动清除
cache.invalidate(1);
System.out.println(cache.getIfPresent(1)); // null
}
}
使用invalidate()清除缓存数据之后,注册的回调被触发了。
下面是只有主动删除数据使的回调
public class CacheConnection {
public static RemovalListener<String, Connection> myRemovalListener = new RemovalListener<String, Connection>(){
@Override
public void onRemoval(RemovalNotification<String, Connection> notification) {
String tips = String.format("key=%s,value=%s,reason=%s in myRemovalListener", notification.getKey(), notification.getValue(), notification.getCause());
System.out.println(tips);
//when expireAfterAccess to do
if (notification.getCause().equals("EXPIRED") && notification.getValue() != null) {
try {
notification.getValue().close();
} catch (SQLException e) {
System.out.printf("Exception in myRemovalListener:\n");
e.printStackTrace();
}
System.out.printf("Remove %s in cacheConnection", notification.getKey());
}
}
};
public static Cache<String, Connection> cacheConnection = CacheBuilder.newBuilder()
//设置cache的初始大小为20000,要合理设置该值
.initialCapacity(20000)
//设置并发数为5,即同一时间最多只能有5个线程往cache执行写入操作
.concurrencyLevel(100)
//设置cache中的数据在600秒没有被读写将自动删除
.expireAfterAccess(600, TimeUnit.SECONDS)
//设置监听,当出现自动删除时的回调
.removalListener(myRemovalListener)
//构建cache实例
.build();
public static Connection getCache(String key) {
try {
Connection var = cacheConnection.getIfPresent(key);
return var;
} catch (Exception e) {
// TODO: handle exception
System.out.println("the value of cacheConnection is null");
e.printStackTrace();
return null;
}
}
public static void putCache(String key, Connection value) {
cacheConnection.put(key, value);
}
}
RemovalNotification中包含了缓存的key、value以及被移除的原因RemovalCause。通过源码可以看出,移除原因与容量管理方式是相对应的。下面是具体的消息
[java] view
plain copy
public enum RemovalCause {
/**
* The entry was manually removed by the user. This can result from the user invoking
* {@link Cache#invalidate}, {@link Cache#invalidateAll(Iterable)}, {@link Cache#invalidateAll()},
* {@link Map#remove}, {@link ConcurrentMap#remove}, or {@link Iterator#remove}.
*/
EXPLICIT {
@Override
boolean wasEvicted() {
return false;
}
},
/**
* The entry itself was not actually removed, but its value was replaced by the user. This can
* result from the user invoking {@link Cache#put}, {@link LoadingCache#refresh}, {@link Map#put},
* {@link Map#putAll}, {@link ConcurrentMap#replace(Object, Object)}, or
* {@link ConcurrentMap#replace(Object, Object, Object)}.
*/
REPLACED {
@Override
boolean wasEvicted() {
return false;
}
},
/**
* The entry was removed automatically because its key or value was garbage-collected. This
* can occur when using {@link CacheBuilder#weakKeys}, {@link CacheBuilder#weakValues}, or
* {@link CacheBuilder#softValues}.
*/
COLLECTED {
@Override
boolean wasEvicted() {
return true;
}
},
/**
* The entry's expiration timestamp has passed. This can occur when using
* {@link CacheBuilder#expireAfterWrite} or {@link CacheBuilder#expireAfterAccess}.
*/
EXPIRED {
@Override
boolean wasEvicted() {
return true;
}
},
/**
* The entry was evicted due to size constraints. This can occur when using
* {@link CacheBuilder#maximumSize} or {@link CacheBuilder#maximumWeight}.
*/
SIZE {
@Override
boolean wasEvicted() {
return true;
}
};
/**
* Returns {@code true} if there was an automatic removal due to eviction (the cause is neither
* {@link #EXPLICIT} nor {@link #REPLACED}).
*/
abstract boolean wasEvicted();
}
监听器使用很简单,有几个特点需要注意下:
1、默认情况下,监听器方法是被同步调用的(在移除缓存的那个线程中执行)。如果监听器方法比较耗时,会导致调用者线程阻塞时间变长。下面这段代码,由于监听器执行需要2s,所以main线程调用invalidate()要2s后才能返回。
[java] view
plain copy
public class Main {
// 创建一个监听器
private static class MyRemovalListener implements RemovalListener<Integer, Integer> {
@Override
public void onRemoval(RemovalNotification<Integer, Integer> notification) {
String tips = String.format("key=%s,value=%s,reason=%s", notification.getKey(), notification.getValue(), notification.getCause());
System.out.println(tips);
try {
// 模拟耗时
Thread.sleep(2000);
} catch (InterruptedException e) {
e.printStackTrace();
}
}
}
public static void main(String[] args) {
// 创建一个带有RemovalListener监听的缓存
final Cache<Integer, Integer> cache = CacheBuilder.newBuilder().removalListener(new MyRemovalListener()).build();
cache.put(1, 1);
cache.put(2, 2);
System.out.println("main...begin.");
cache.invalidate(1);// 耗时2s
System.out.println("main...over.");
}
}
解决这个问题的方法是:使用异步监听RemovalListeners.asynchronous(RemovalListener, Executor)。
[java] view
plain copy
public class Main {
// 创建一个监听器
private static class MyRemovalListener implements RemovalListener<Integer, Integer> {
@Override
public void onRemoval(RemovalNotification<Integer, Integer> notification) {
String tips = String.format("key=%s,value=%s,reason=%s", notification.getKey(), notification.getValue(), notification.getCause());
System.out.println(tips);
try {
// 模拟耗时
Thread.sleep(2000);
} catch (InterruptedException e) {
e.printStackTrace();
}
}
}
public static void main(String[] args) {
RemovalListener<Integer, Integer> async = RemovalListeners.asynchronous(new MyRemovalListener(), Executors.newSingleThreadExecutor());
// 创建一个带有RemovalListener监听的缓存
final Cache<Integer, Integer> cache = CacheBuilder.newBuilder().removalListener(async).build();
cache.put(1, 1);
cache.put(2, 2);
System.out.println("main...begin.");
cache.invalidate(1);// main线程立刻返回
System.out.println("main...over.");
}
}
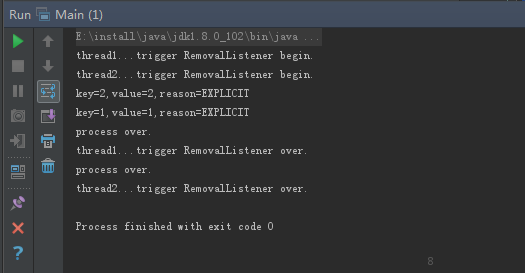
2、创建cache的时候只能添加1个监听器,这个监听器对象会被多个线程共享,所以如果监听器需要操作共享资源,那么一定要做好同步控制。下面这段代码可以看出:2个线程会交替执行监听器的发方法。
[java] view
plain copy
public class Main {
// 创建一个监听器
private static class MyRemovalListener implements RemovalListener<Integer, Integer> {
@Override
public void onRemoval(RemovalNotification<Integer, Integer> notification) {
String tips = String.format("key=%s,value=%s,reason=%s", notification.getKey(), notification.getValue(), notification.getCause());
System.out.println(tips);
try {
// 模拟耗时
Thread.sleep(2000);
} catch (InterruptedException e) {
e.printStackTrace();
}
System.out.println("process over.");
}
}
public static void main(String[] args) {
// 创建一个带有RemovalListener监听的缓存
final Cache<Integer, Integer> cache = CacheBuilder.newBuilder().removalListener(new MyRemovalListener()).build();
cache.put(1, 1);
cache.put(2, 2);
new Thread(new Runnable() {
@Override
public void run() {
System.out.println("thread1...trigger RemovalListener begin.");
cache.invalidate(1);
System.out.println("thread1...trigger RemovalListener over.");
}
}).start();
new Thread(new Runnable() {
@Override
public void run() {
System.out.println("thread2...trigger RemovalListener begin.");
cache.invalidate(2);
System.out.println("thread2...trigger RemovalListener over.");
}
}).start();
}
}
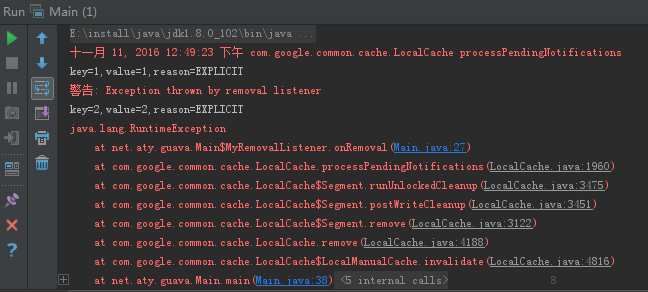
3、监听器中抛出的任何异常,在被记录到日志后,会被guava丢弃,不会导致监听器不可用。下面这段代码可以看到:监听器中抛出的异常只是被记录了(打印到了控制台),并没有导致JVM退出,之后缓存被移除一样可以再次触发。
[java] view
plain copy
public class Main {
// 创建一个监听器
private static class MyRemovalListener implements RemovalListener<Integer, Integer> {
@Override
public void onRemoval(RemovalNotification<Integer, Integer> notification) {
String tips = String.format("key=%s,value=%s,reason=%s", notification.getKey(), notification.getValue(), notification.getCause());
System.out.println(tips);
throw new RuntimeException();
}
}
public static void main(String[] args) {
// 创建一个带有RemovalListener监听的缓存
final Cache<Integer, Integer> cache = CacheBuilder.newBuilder().removalListener(new MyRemovalListener()).build();
cache.put(1, 1);
cache.put(2, 2);
cache.invalidate(1);
cache.invalidate(2);
}
}
下面是获得所有数据改变的监听
[java] view
plain copy
public class Main {
// 创建一个监听器
private static class MyRemovalListener implements RemovalListener<Integer, Integer> {
@Override
public void onRemoval(RemovalNotification<Integer, Integer> notification) {
String tips = String.format("key=%s,value=%s,reason=%s", notification.getKey(), notification.getValue(), notification.getCause());
System.out.println(tips);
}
}
public static void main(String[] args) {
// 创建一个带有RemovalListener监听的缓存
Cache<Integer, Integer> cache = CacheBuilder.newBuilder().removalListener(new MyRemovalListener()).build();
cache.put(1, 1);
// 手动清除
cache.invalidate(1);
System.out.println(cache.getIfPresent(1)); // null
}
}
使用invalidate()清除缓存数据之后,注册的回调被触发了。
下面是只有主动删除数据使的回调
public class CacheConnection {
public static RemovalListener<String, Connection> myRemovalListener = new RemovalListener<String, Connection>(){
@Override
public void onRemoval(RemovalNotification<String, Connection> notification) {
String tips = String.format("key=%s,value=%s,reason=%s in myRemovalListener", notification.getKey(), notification.getValue(), notification.getCause());
System.out.println(tips);
//when expireAfterAccess to do
if (notification.getCause().equals("EXPIRED") && notification.getValue() != null) {
try {
notification.getValue().close();
} catch (SQLException e) {
System.out.printf("Exception in myRemovalListener:\n");
e.printStackTrace();
}
System.out.printf("Remove %s in cacheConnection", notification.getKey());
}
}
};
public static Cache<String, Connection> cacheConnection = CacheBuilder.newBuilder()
//设置cache的初始大小为20000,要合理设置该值
.initialCapacity(20000)
//设置并发数为5,即同一时间最多只能有5个线程往cache执行写入操作
.concurrencyLevel(100)
//设置cache中的数据在600秒没有被读写将自动删除
.expireAfterAccess(600, TimeUnit.SECONDS)
//设置监听,当出现自动删除时的回调
.removalListener(myRemovalListener)
//构建cache实例
.build();
public static Connection getCache(String key) {
try {
Connection var = cacheConnection.getIfPresent(key);
return var;
} catch (Exception e) {
// TODO: handle exception
System.out.println("the value of cacheConnection is null");
e.printStackTrace();
return null;
}
}
public static void putCache(String key, Connection value) {
cacheConnection.put(key, value);
}
}
RemovalNotification中包含了缓存的key、value以及被移除的原因RemovalCause。通过源码可以看出,移除原因与容量管理方式是相对应的。下面是具体的消息
[java] view
plain copy
public enum RemovalCause {
/**
* The entry was manually removed by the user. This can result from the user invoking
* {@link Cache#invalidate}, {@link Cache#invalidateAll(Iterable)}, {@link Cache#invalidateAll()},
* {@link Map#remove}, {@link ConcurrentMap#remove}, or {@link Iterator#remove}.
*/
EXPLICIT {
@Override
boolean wasEvicted() {
return false;
}
},
/**
* The entry itself was not actually removed, but its value was replaced by the user. This can
* result from the user invoking {@link Cache#put}, {@link LoadingCache#refresh}, {@link Map#put},
* {@link Map#putAll}, {@link ConcurrentMap#replace(Object, Object)}, or
* {@link ConcurrentMap#replace(Object, Object, Object)}.
*/
REPLACED {
@Override
boolean wasEvicted() {
return false;
}
},
/**
* The entry was removed automatically because its key or value was garbage-collected. This
* can occur when using {@link CacheBuilder#weakKeys}, {@link CacheBuilder#weakValues}, or
* {@link CacheBuilder#softValues}.
*/
COLLECTED {
@Override
boolean wasEvicted() {
return true;
}
},
/**
* The entry's expiration timestamp has passed. This can occur when using
* {@link CacheBuilder#expireAfterWrite} or {@link CacheBuilder#expireAfterAccess}.
*/
EXPIRED {
@Override
boolean wasEvicted() {
return true;
}
},
/**
* The entry was evicted due to size constraints. This can occur when using
* {@link CacheBuilder#maximumSize} or {@link CacheBuilder#maximumWeight}.
*/
SIZE {
@Override
boolean wasEvicted() {
return true;
}
};
/**
* Returns {@code true} if there was an automatic removal due to eviction (the cause is neither
* {@link #EXPLICIT} nor {@link #REPLACED}).
*/
abstract boolean wasEvicted();
}
监听器使用很简单,有几个特点需要注意下:
1、默认情况下,监听器方法是被同步调用的(在移除缓存的那个线程中执行)。如果监听器方法比较耗时,会导致调用者线程阻塞时间变长。下面这段代码,由于监听器执行需要2s,所以main线程调用invalidate()要2s后才能返回。
[java] view
plain copy
public class Main {
// 创建一个监听器
private static class MyRemovalListener implements RemovalListener<Integer, Integer> {
@Override
public void onRemoval(RemovalNotification<Integer, Integer> notification) {
String tips = String.format("key=%s,value=%s,reason=%s", notification.getKey(), notification.getValue(), notification.getCause());
System.out.println(tips);
try {
// 模拟耗时
Thread.sleep(2000);
} catch (InterruptedException e) {
e.printStackTrace();
}
}
}
public static void main(String[] args) {
// 创建一个带有RemovalListener监听的缓存
final Cache<Integer, Integer> cache = CacheBuilder.newBuilder().removalListener(new MyRemovalListener()).build();
cache.put(1, 1);
cache.put(2, 2);
System.out.println("main...begin.");
cache.invalidate(1);// 耗时2s
System.out.println("main...over.");
}
}
解决这个问题的方法是:使用异步监听RemovalListeners.asynchronous(RemovalListener, Executor)。
[java] view
plain copy
public class Main {
// 创建一个监听器
private static class MyRemovalListener implements RemovalListener<Integer, Integer> {
@Override
public void onRemoval(RemovalNotification<Integer, Integer> notification) {
String tips = String.format("key=%s,value=%s,reason=%s", notification.getKey(), notification.getValue(), notification.getCause());
System.out.println(tips);
try {
// 模拟耗时
Thread.sleep(2000);
} catch (InterruptedException e) {
e.printStackTrace();
}
}
}
public static void main(String[] args) {
RemovalListener<Integer, Integer> async = RemovalListeners.asynchronous(new MyRemovalListener(), Executors.newSingleThreadExecutor());
// 创建一个带有RemovalListener监听的缓存
final Cache<Integer, Integer> cache = CacheBuilder.newBuilder().removalListener(async).build();
cache.put(1, 1);
cache.put(2, 2);
System.out.println("main...begin.");
cache.invalidate(1);// main线程立刻返回
System.out.println("main...over.");
}
}
2、创建cache的时候只能添加1个监听器,这个监听器对象会被多个线程共享,所以如果监听器需要操作共享资源,那么一定要做好同步控制。下面这段代码可以看出:2个线程会交替执行监听器的发方法。
[java] view
plain copy
public class Main {
// 创建一个监听器
private static class MyRemovalListener implements RemovalListener<Integer, Integer> {
@Override
public void onRemoval(RemovalNotification<Integer, Integer> notification) {
String tips = String.format("key=%s,value=%s,reason=%s", notification.getKey(), notification.getValue(), notification.getCause());
System.out.println(tips);
try {
// 模拟耗时
Thread.sleep(2000);
} catch (InterruptedException e) {
e.printStackTrace();
}
System.out.println("process over.");
}
}
public static void main(String[] args) {
// 创建一个带有RemovalListener监听的缓存
final Cache<Integer, Integer> cache = CacheBuilder.newBuilder().removalListener(new MyRemovalListener()).build();
cache.put(1, 1);
cache.put(2, 2);
new Thread(new Runnable() {
@Override
public void run() {
System.out.println("thread1...trigger RemovalListener begin.");
cache.invalidate(1);
System.out.println("thread1...trigger RemovalListener over.");
}
}).start();
new Thread(new Runnable() {
@Override
public void run() {
System.out.println("thread2...trigger RemovalListener begin.");
cache.invalidate(2);
System.out.println("thread2...trigger RemovalListener over.");
}
}).start();
}
}
3、监听器中抛出的任何异常,在被记录到日志后,会被guava丢弃,不会导致监听器不可用。下面这段代码可以看到:监听器中抛出的异常只是被记录了(打印到了控制台),并没有导致JVM退出,之后缓存被移除一样可以再次触发。
[java] view
plain copy
public class Main {
// 创建一个监听器
private static class MyRemovalListener implements RemovalListener<Integer, Integer> {
@Override
public void onRemoval(RemovalNotification<Integer, Integer> notification) {
String tips = String.format("key=%s,value=%s,reason=%s", notification.getKey(), notification.getValue(), notification.getCause());
System.out.println(tips);
throw new RuntimeException();
}
}
public static void main(String[] args) {
// 创建一个带有RemovalListener监听的缓存
final Cache<Integer, Integer> cache = CacheBuilder.newBuilder().removalListener(new MyRemovalListener()).build();
cache.put(1, 1);
cache.put(2, 2);
cache.invalidate(1);
cache.invalidate(2);
}
}

相关文章推荐
- 设计技巧10:监听器回调 Listener Callback 架构去调用客户端代码,实现反调用
- ****Android开发教程:OnScrollListener实现ListView滚屏时不加载数据
- [MySQL] 行列转换变化各种方法实现总结(行变列报表统计、列变行数据记录统计等)
- [MySQL] 行列转换变化各种方法实现总结(行变列报表统计、列变行数据记录统计等
- Android bind 回调实现Service向activity传递数据
- 展示主数据的历史变化的几种业务需求及其实现方法
- camera framwork的控制实现,以及数据回调
- js玩具——UI组件:PropertyChangeEventListener 属性改变事件监听器及默认实现
- 本地缓存实现之Guava Cache
- Adapter数据变化改变现有View的实现原理及案例
- 在spring中利用Guava实现本地Cache的具体配置 第一篇<一>
- Android学习笔记之数据的内部存储方式实习数据的读写、存储到Cache实现读写
- Vue实现动态响应数据变化
- 继承Volley的Request<T>,创造自己的Request,实现cookie回调和指定返回数据类型回调
- 大数据WEB阶段(十六)JavaEE三大 核心技术之监听器Listener
- 使用Listener实现Cache
- tomcat监听器ServletContextListener加载web应用数据
- MySQL] 行列转换变化各种方法实现总结(行变列报表统计、列变行数据记录统计等)
- WPF Label控件在数据绑定Content属性变化触发TargetUpdated事件简单实现类似TextChanged 事件效果
- 利用回调接口实现activity之前传数据