spring+mybatis的简单配置示例
2017-07-28 14:04
465 查看
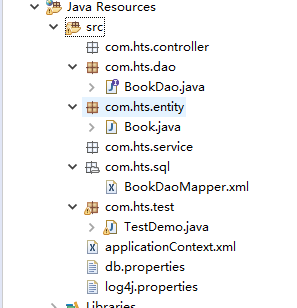
简单代码结构:
①:applicationContext.xml的配置:
②:BookDaoMapper.xml中的配置
③:数据库表的表名book,有id,bookName,bookAuthor三个字段
④:junit运行TestDemo中testBookAdd方法,发现数据已经插入数据库
//Book.java

package com.hts.entity;

public class Book {
private String id;
private String bookName;
private String bookAuthor;
public String getId() {
return id;
}
public void setId(String id) {
this.id = id;
}
public String getBookName() {
return bookName;
}
public void setBookName(String bookName) {
this.bookName = bookName;
}
public String getBookAuthor() {
return bookAuthor;
}
public void setBookAuthor(String bookAuthor) {
this.bookAuthor = bookAuthor;
}
public Book() {

}
@Override
public String toString() {
return "Book [id=" + id + ", bookName=" + bookName + ", bookAuthor=" + bookAuthor + "]";
}
}
//接口BookDao.java
package com.hts.dao;
import org.springframework.stereotype.Component;
import com.hts.entity.Book;
@Component
public interface BookDao {
public void add(Book b);
}//TestDemo.java
package com.hts.test;
import org.junit.Test;
import org.springframework.context.ApplicationContext;
import org.springframework.context.support.ClassPathXmlApplicationContext;
import com.hts.dao.BookDao;
import com.hts.entity.Book;
public class TestDemo {
@Test
public void testBookAdd(){
ApplicationContext ac= new ClassPathXmlApplicationContext("applicationContext.xml");
BookDao bd=ac.getBean("bookDao",BookDao.class);
Book b=new Book();
b.setId("3");
b.setBookName("美好的明天");
b.setBookAuthor("hts");
bd.add(b);
}
}//db.properties,mysql数据库 user=root password=****** url=jdbc:mysql://ip/数据库名 driver=com.mysql.jdbc.Driver//驱动 maxActive=5//连接池的最大数据库连接数 maxWait=5000//最大等待时间
①:applicationContext.xml的配置:
<?xml version="1.0" encoding="UTF-8"?>
<beans xmlns="http://www.springframework.org/schema/beans" xmlns:xsi="http://www.w3.org/2001/XMLSchema-instance"
xmlns:context="http://www.springframework.org/schema/context" xmlns:util="http://www.springframework.org/schema/util"
xmlns:jee="http://www.springframework.org/schema/jee" xmlns:tx="http://www.springframework.org/schema/tx"
xmlns:aop="http://www.springframework.org/schema/aop"
xmlns:jpa="http://www.springframework.org/schema/data/jpa" xmlns:mvc="http://www.springframework.org/schema/mvc"
xsi:schemaLocation=" http://www.springframework.org/schema/beans http://www.springframework.org/schema/beans/spring-beans-3.2.xsd http://www.springframework.org/schema/context http://www.springframework.org/schema/context/spring-context-3.2.xsd http://www.springframework.org/schema/util http://www.springframework.org/schema/util/spring-util-3.2.xsd http://www.springframework.org/schema/jee http://www.springframework.org/schema/jee/spring-jee-3.2.xsd http://www.springframework.org/schema/tx http://www.springframework.org/schema/tx/spring-tx-3.2.xsd http://www.springframework.org/schema/aop http://www.springframework.org/schema/aop/spring-aop-3.2.xsd http://www.springframework.org/schema/data/jpa http://www.springframework.org/schema/data/jpa/spring-jpa-1.3.xsd http://www.springframework.org/schema/mvc http://www.springframework.org/schema/mvc/spring-mvc-3.2.xsd">

<!--连入db.properties-->
<util:properties  id="jdbc" location="classpath:db.properties"></util:properties>

<!--配置数据库连接池信息-->
<bean id="ds" class="org.apache.commons.dbcp.BasicDataSource">
<property name="url" value="#{jdbc.url}"></property>
<property name="driverClassName" value="#{jdbc.driver}"></property>
<property name="username" value="#{jdbc.user}"></property>
<property name="password" value="#{jdbc.password}"></property>
<property name="maxActive" value="#{jdbc.maxActive}"></property>
<property name="maxWait" value="#{jdbc.maxWait}"></property>
</bean>

<!--配置  mybatis 的session 工厂-->
<bean id="sqlSessionFactory" class="org.mybatis.spring.SqlSessionFactoryBean">
<property name="dataSource" ref="ds"></property>
<property name="mapperLocations" value="classpath:com/hts/sql/*.xml"></property>//sqlMapper.xml所在的位置
</bean>

<!-- 扫描指定包下面的所有接口,匹配和映射sql数据   -->
<bean class="org.mybatis.spring.mapper.MapperScannerConfigurer">
<property name="basePackage" value="com.hts.dao"></property>
</bean>

<!--开启注解扫描    -->
<context:component-scan base-package="com.hts"></context:component-scan>

</beans>
②:BookDaoMapper.xml中的配置
<?xml version="1.0" encoding="UTF-8" ?>
<!DOCTYPE mapper PUBLIC "-//ibatis.apache.org//DTD Mapper 3.0//EN"
"http://ibatis.apache.org/dtd/ibatis-3-mapper.dtd">
<!-- namespace必须和对应的接口想对应 ,方法名和id对应 -->
<mapper namespace="com.hts.dao.BookDao">
<insert id="add"  parameterType="com.hts.entity.Book">
insert into book(id,bookName,bookAuthor) values(#{id},#{bookName},#{bookAuthor})
</insert>
</mapper>
③:数据库表的表名book,有id,bookName,bookAuthor三个字段
④:junit运行TestDemo中testBookAdd方法,发现数据已经插入数据库

相关文章推荐
- 以一个简单JDBC示例对比Mybatis环境配置和Spring的数据库环境配置
- 使用idea搭建一个简单的SSM框架:(3)配置spring+mybatis
- Spring面向切面的简单示例(基于XML文件配置)
- 使用SpringMVC+mybatis+事务控制+JSON 配置最简单WEB
- spring data jpa 分页配置 及简单示例
- Spring面向切面的简单示例(基于Annotation配置)
- MyBatis-Spring配置简单了解
- spring-boot配置MySQL数据库连接、Hikari连接池、和Mybatis的简单方法
- Activiti环境配置、项目搭建、与Spring集成、简单示例
- 简单配置spring+springmvc+mybatis之整合
- spring加mybatis(Maven构建项目)简单篇---旨在探究spring配置方法和spring项目出现的异常分析
- spring+Mybatis+ memcached简单示例
- MyBatis-Spring配置简单了解
- Spring+SpringMVC+Mybatis简单配置和使用
- MyBatis+Spring+MySql简单配置
- springboot + mybatis配置多数据源示例
- MyBatis-Spring配置简单了解
- springboot + mybatis配置多数据源示例
- spring整合mybatis的简单配置
- easyui 1.5+spring 4.2+mybatis 3.4 Web示例(三) 项目搭建之配置的导入