高效使用Eclipse开发微服务-注册中心(二)
2017-07-26 15:37
603 查看
上篇高效使用Eclipse开发微服务-环境准备(一)已经讲述了如何搭建开发环境,这篇文章将讲述如何开发微服务的注册核心
第一章:
微服务最重要也是最需要解决的一个问题就是服务治理问题,那么注册中心由此而生,注册中心顾名思义为集中管理系统,当然注册中心是非必需的,除非你能在脑海中或者通过其它方式完全记住每个服务实例相关信息并且提供发现服务也是可以的,如图:
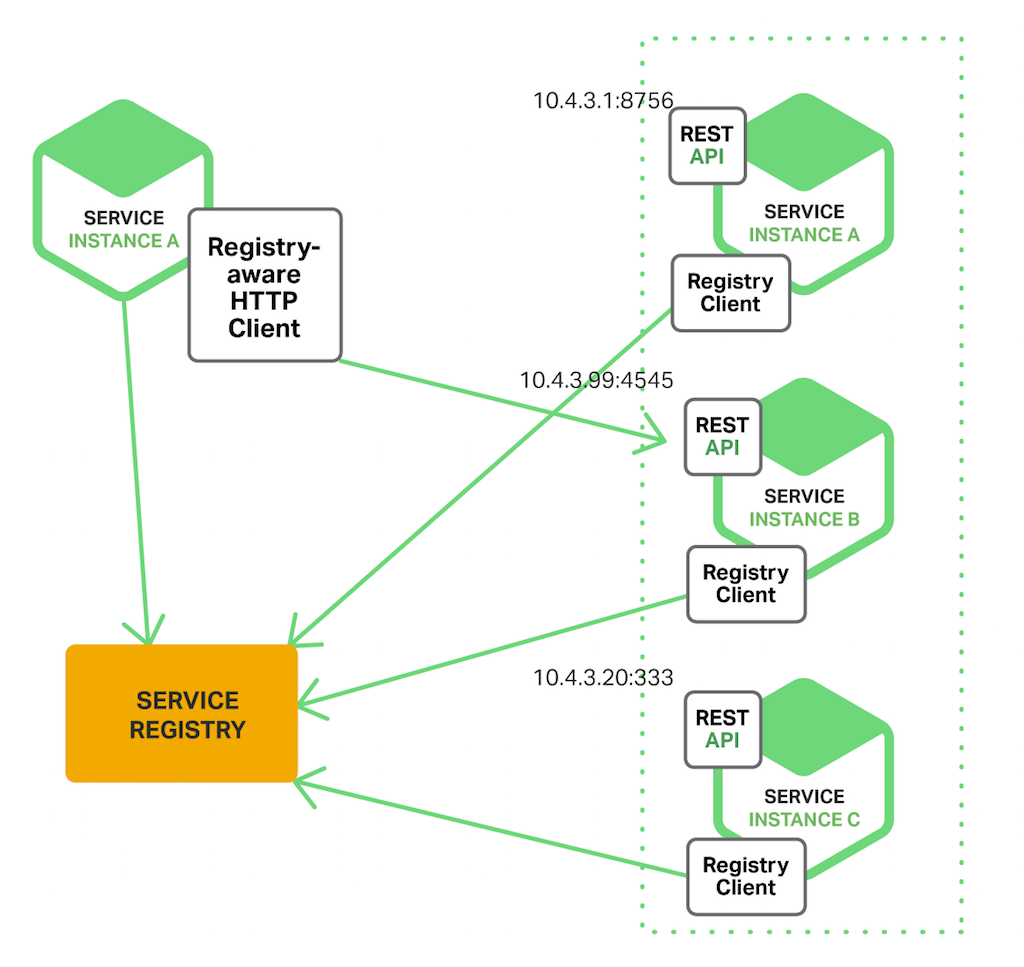
上图讲述的就是多个服务实例注册到注册中心,并且注册中心提供服务管理和发现服务,话不多说,大家了解了这个注册中心的含义就行了,有兴趣的可以去了解一下源码,笔者虽然看了源码,但是每个人的理解会不一样,所以在这里不在阐述其原理。
之前我们的环境已经搭建完成,第一步我们通过Eclipse创建一个Gradle工程,如图:
创建完毕后初始化的目录结构是这样的:
接下来我们打开build.gradle文件,笔者默认的文件是这样的:
我们需要修改几个地方达到我们需要的引入以及相关环境定义:
1、首先构建插件变成了:
2、第一行插入spring boot版本定义:
3、构建版本定义变成了:
4、增加资源文件目录定义(非必须,可以使用默认):
5、增加spring cloud依赖引入:
至此,一个可用的注册中心构建依赖配置完毕,笔者这边完整的配置如下:
保存好gradle构建文件后,我们选择工程根目录右键刷新整个工程,如图所示:

刷新过程中会自动去maven中央仓库下载对应jar引入,等待过程根据大家网速来定,接下来我们需要开始开发和配置注册中心了。
第二章:
我们知道spring初始化的过程中需要定义一些初始化参数,那么我们这些参数的定义就包含在了application.yml
文件当中,我们需要定义服务实例名,端口,以及作用域,那么我们定义注册中心需要哪些呢,非常简单,只需要定义如下参数即可:
第一章:
微服务最重要也是最需要解决的一个问题就是服务治理问题,那么注册中心由此而生,注册中心顾名思义为集中管理系统,当然注册中心是非必需的,除非你能在脑海中或者通过其它方式完全记住每个服务实例相关信息并且提供发现服务也是可以的,如图:
上图讲述的就是多个服务实例注册到注册中心,并且注册中心提供服务管理和发现服务,话不多说,大家了解了这个注册中心的含义就行了,有兴趣的可以去了解一下源码,笔者虽然看了源码,但是每个人的理解会不一样,所以在这里不在阐述其原理。
之前我们的环境已经搭建完成,第一步我们通过Eclipse创建一个Gradle工程,如图:
创建完毕后初始化的目录结构是这样的:
接下来我们打开build.gradle文件,笔者默认的文件是这样的:
apply plugin: 'java'
apply plugin: 'eclipse'

sourceCompatibility = 1.5
version = '1.0'
jar {
manifest {
attributes 'Implementation-Title': 'Gradle Quickstart',
'Implementation-Version': version
}
}

repositories {
mavenCentral()
}

dependencies {
compile group: 'commons-collections', name: 'commons-collections', version: '3.2'
testCompile group: 'junit', name: 'junit', version: '4.+'
}

test {
systemProperties 'property': 'value'
}

uploadArchives {
repositories {
flatDir {
dirs 'repos'
}
}
}
我们需要修改几个地方达到我们需要的引入以及相关环境定义:
1、首先构建插件变成了:
apply plugin: 'java'
apply plugin: 'eclipse'
apply plugin: 'org.springframework.boot'
2、第一行插入spring boot版本定义:
buildscript {
ext {
springBootVersion = '1.5.4.RELEASE'
}
repositories {
mavenCentral()
}
dependencies {
classpath("org.springframework.boot:spring-boot-gradle-plugin:${springBootVersion}")
}
}
3、构建版本定义变成了:
sourceCompatibility = 1.8
version = '1.0.1-SNAPSHOT'
4、增加资源文件目录定义(非必须,可以使用默认):
sourceSets {
main {
resources {
srcDir 'src/main/config'
}
}
}
5、增加spring cloud依赖引入:
dependencies {
compile('org.springframework.boot:spring-boot-starter-parent:+')
compile('org.springframework.boot:spring-boot-starter-test:+')
compile('org.springframework.cloud:spring-cloud-starter-eureka-server:+')
compile('org.springframework.cloud:spring-cloud-starter-config:+')
compile('org.springframework.cloud:spring-cloud-dependencies:Brixton.SR7')
compile group: 'commons-collections', name: 'commons-collections', version: '3.2'
testCompile group: 'junit', name: 'junit', version: '4.+'
}
至此,一个可用的注册中心构建依赖配置完毕,笔者这边完整的配置如下:
buildscript {
ext {
springBootVersion = '1.5.4.RELEASE'
}
repositories {
maven {
url 'http://192.168.18.99:48081/nexus/content/groups/public/'
}
ivy {
url 'http://192.168.18.99:48081/nexus/content/repositories/thirdparty/'
}
}
dependencies {
classpath("org.springframework.boot:spring-boot-gradle-plugin:${springBootVersion}")
}
}

apply plugin: 'java'
apply plugin: 'eclipse'
apply plugin: 'org.springframework.boot'

sourceCompatibility = 1.8
version = '1.0.1-SNAPSHOT'
jar {
manifest {
attributes 'Implementation-Title': 'Gradle Quickstart',
'Implementation-Version': version
}
}

repositories {
maven {
url 'http://192.168.18.99:48081/nexus/content/groups/public/'
}
ivy {
url 'http://192.168.18.99:48081/nexus/content/repositories/thirdparty/'
}
}

sourceSets {
main {
resources {
srcDir 'src/main/config'
}
}
}

dependencies {
compile('org.springframework.boot:spring-boot-starter-parent:+')
compile('org.springframework.boot:spring-boot-starter-test:+')
compile('org.springframework.cloud:spring-cloud-starter-eureka-server:+')
compile('org.springframework.cloud:spring-cloud-starter-config:+')
compile('org.springframework.cloud:spring-cloud-dependencies:Brixton.SR7')
compile group: 'commons-collections', name: 'commons-collections', version: '3.2'
testCompile group: 'junit', name: 'junit', version: '4.+'
}

test {
systemProperties 'property': 'value'
}

uploadArchives {
repositories {
flatDir {
dirs 'repos'
}
}
}
保存好gradle构建文件后,我们选择工程根目录右键刷新整个工程,如图所示:
刷新过程中会自动去maven中央仓库下载对应jar引入,等待过程根据大家网速来定,接下来我们需要开始开发和配置注册中心了。
第二章:
我们知道spring初始化的过程中需要定义一些初始化参数,那么我们这些参数的定义就包含在了application.yml
文件当中,我们需要定义服务实例名,端口,以及作用域,那么我们定义注册中心需要哪些呢,非常简单,只需要定义如下参数即可:
server: port: 1111 eureka: client: register-with-eureka: false fetch-registry: false service-url: defaultZone: http://localhost:1111/eureka/[/code]eureka的默认端口为8761,笔者这里改为了1111,为了方便管理和记忆。eureka有很多的参数,一般只需要定义笔者所示参数即可,大概解释一下这几个参数的含义:register-with-eureka表示是否注册自身到eureka服务器,因为当前这个应用就是eureka服务器,没必要注册自身,所以这里是falsefetch-registry表示是否从eureka服务器获取注册信息,同上,这里不需要defaultZone就比较重要了,是设置eureka服务器所在的地址,查询服务和注册服务都需要依赖这个地址
配置定义好了以后,我要开发启动类了,先给大家看下笔者这边的目录结构:
图中EurekaApplication就是我们的启动类,启动类也非常简单,总共的代码就如下一点点:@EnableEurekaServer @SpringBootApplication public class EurekaApplication { /** * Title: main<br/> * Description: <br/> * @author hejun * @date 2017年6月30日下午4:28:57 * * @param args */ public static void main(String[] args) { SpringApplication.run(EurekaApplication.class, args); } }
我们来启动我们刚刚写的注册中心,因为我们的spring boot已经内嵌了tomcat作为服务器,所以启动方式如图:
启动完毕后,我们在浏览器中输入:http://localhost:1111,即可看到如图:


相关文章推荐
- 高效使用Eclipse开发微服务-环境准备(一)
- 使用Eclipse-Maven-git做Java开发(12)--使用osc的git服务托管代码
- 不使用VS.NET集成开发环境,调用微软的WebService注册服务
- java-dubbo-使用Multicast注册中心提供服务
- 使用Eclipse+MyEclipse+MySql开发一个用户注册登录模块
- Spring Cloud 中使用zookeeper作为服务注册中心与配置中心
- 使用Eclipse+MyEclipse+MySql开发一个用户注册登录系统
- 使用 Apache Wink、Eclipse 和 Maven 开发 RESTful Web 服务
- Eureka 2.X 停止开发,但注册中心还有更多选择:Consul 使用详解
- 使用SpringCloud搭建微服务<三>---------使用EureKa编写服务的注册中心
- 用Eclipse集成GT3开发网格服务--使用SWT开发GUI界面
- 微服务管理平台如何防止开发人员的本地环境污染注册中心
- Spring Cloud使用zookeeper作为服务注册中心与配置中心
- 使用 Apache Wink、Eclipse 和 Maven 开发 RESTful Web 服务
- Spring Cloud Consul使用——服务注册与发现(注册中心)
- 第三章 SpringCloud 使用Erueak服务注册中心
- 使用 Apache Wink、Eclipse 和 Maven 开发 RESTful Web 服务
- spring cloud使用zookeeper作为服务注册中心和配置中心
- Linux下使用Eclipse高效开发C/C++
- 阿里dubbo框架使用系列:开发环境搭建之zookeeper注册中心(单节点)