开源个.NetCore写的 - 并发请求工具PressureTool
2017-07-25 23:24
369 查看
本篇和大家分享的是一个 并发请求工具,并发往往代表的就是压力,对于一些订单量比较多的公司这种情况很普遍,也因此出现了很多应对并发的解决方案如:分布式,队列,数据库锁等;
对于没有遇到过或者不可能线上来处理并发问题的我们来说,需要模拟这种环境,不错这就是写并发请求工具的目的:
. 对于api接口做并发请求
. NetCore来写的能跨平台运行
. 允许配置多个目标地址,进行同时并发请求
. 支持Get,Post请求方式(post参数支持:xml,json格式)
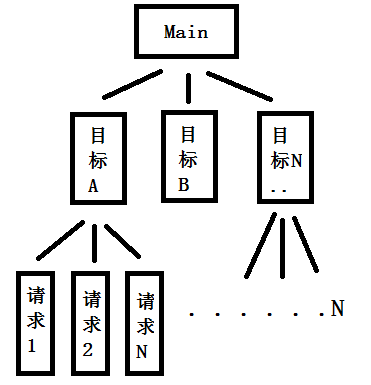
由上图可以看出,该工具主要有3层树形结构,最底层是真实发出对目标url地址的请求,使用的Task,Task对于多核CPU来说效果更显著;在讲解例子前咋们先来看看配置文件对应的实体类:
httpget应该是最简单的请求方式了,如果你需要传递什么参数,就直接往您url上追加就行了,get请求方式是用不到Param参数的:
这里为了测试我写了一个简单的api接口,分别接收json和xml的参数,测试api接口代码如下:
我们往测试api地址 http://localhost:5000/api/Values/PostJson 发出请求,传递学生基本信息参数,然后通过api的get接口看看效果:
这里演示的只请求一次api,如果你想测试你自己api接口并发情况,你可以设置参数: "LinkNum": 10 或者跟多:

然后通过api的get接口获取下效果:

好了到这里演示就完了,如果您觉得该工具可以你可以去git源码:https://github.com/shenniubuxing3/PressureTool ,或者加入 NineskyQQ官方群:428310563 获取Framework版本的工具。
对于没有遇到过或者不可能线上来处理并发问题的我们来说,需要模拟这种环境,不错这就是写并发请求工具的目的:
. 对于api接口做并发请求
. NetCore来写的能跨平台运行
. 允许配置多个目标地址,进行同时并发请求
. 支持Get,Post请求方式(post参数支持:xml,json格式)
工具设计的原理
工具的全部代码都开源至:https://github.com/shenniubuxing3/PressureTool(不妨标个*),下面将举例演示如何使用;工具设计的原理主要采用Task,通过配置目标地址,请求数量来拆分成多个Task,以此完成并行的请求:由上图可以看出,该工具主要有3层树形结构,最底层是真实发出对目标url地址的请求,使用的Task,Task对于多核CPU来说效果更显著;在讲解例子前咋们先来看看配置文件对应的实体类:
#region 配置信息

public class MoToolConf
{
/// <summary>
/// 执行结果日志记录路径(全局,默认程序根目录)
/// </summary>
public string ResultLogPath { get; set; }

/// <summary>
/// 多个任务
/// </summary>
public List<MoTaskInfo> MoTaskInfoes { get; set; }
}

/// <summary>
/// 任务信息
/// </summary>
public class MoTaskInfo
{

/// <summary>
/// 请求方式,目前支持:httpget,httppost
/// </summary>
public string Method { get; set; }

/// <summary>
/// 请求地址
/// </summary>
public string Url { get; set; }

/// <summary>
/// 连接数
/// </summary>
public int LinkNum { get; set; }

/// <summary>
/// 参数(post使用)
/// </summary>
public string Param { get; set; }

/// <summary>
/// 执行结果日志记录路径(私有>全局)
/// </summary>
public string ResultLogPath { get; set; }
}
#endregion
httpget请求的配置
首先我们需要在根目录下找到配置文件:PressureTool.json,然后配置成如下get请求设置:{
"ResultLogPath": "",//默认不设置,日志记录在根目录
"MoTaskInfoes": [
{
"Method": "httpget",
"Url": "https://www.baidu.com/",
"LinkNum": 10,
"Param": "",
"ResultLogPath": ""
},
{
"Method": "httpget",
"Url": "https://cloud.baidu.com/",
"LinkNum": 10,
"Param": "",
"ResultLogPath": ""
}
]
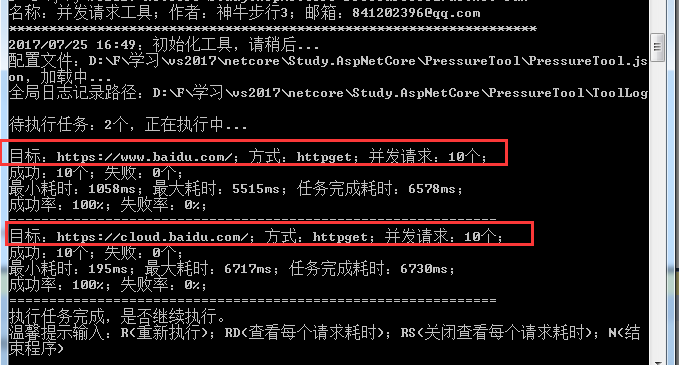
}httpget应该是最简单的请求方式了,如果你需要传递什么参数,就直接往您url上追加就行了,get请求方式是用不到Param参数的:
httppost请求的配置 - 参数为json
post的配置与get不同的是设置不同的Method参数( "Method": "httppost_json" ),并且如果你有参数那么还需要配置Param节点( "Param": "{\"Number\": 1,\"Name\": \"张三\"}" ),参考如下配置:{
"ResultLogPath": "", //默认不设置,日志记录在根目录
"MoTaskInfoes": [
{
"Method": "httpget",
"Url": "https://www.baidu.com/",
"LinkNum": 10,
"Param": "",
"ResultLogPath": ""
},
{
"Method": "httppost_json",
"Url": "http://localhost:5000/api/Values/PostJson",
"LinkNum": 1,
"Param": "{\"Number\": 1,\"Name\": \"张三\"}",
"ResultLogPath": ""
}
]
}这里为了测试我写了一个简单的api接口,分别接收json和xml的参数,测试api接口代码如下:
[Route("api/[controller]/[action]")]
public class ValuesController : Controller
{
public static List<MoStudent> _students = new List<MoStudent>();
// GET api/values
[HttpGet]
public async Task<MoBaseResponse> Get()
{
return new MoBaseResponse { Data = _students };
}
// GET api/values/5
[HttpGet("{id}")]
public string Get(int id)
{
return "value";
}
// POST api/values
[HttpPost]
public MoBaseResponse PostJson([FromBody]MoStudent student)
{
var response = new MoBaseResponse() { Msg = "添加失败" };
if (student == null) { return response; }
_students.Add(student);
response.Msg = "添加成功";
response.Status = 1;
return response;
}
[HttpPost]
public async Task<MoBaseResponse> PostXml()
{
var response = new MoBaseResponse() { Msg = "添加失败" };
var strReq = string.Empty;
using (var stream = Request.Body)
{
using (var reader = new StreamReader(stream))
{
strReq = await reader.ReadToEndAsync();
}
}
if (string.IsNullOrWhiteSpace(strReq)) { return response; }
var match = Regex.Match(strReq, "<Number>(?<number>[^<]+)</Number>[^<]*<Name>(?<name>[^<]+)</Name>");
if (match == null || match.Groups.Count <= 0) { return response; }
var student = new MoStudent();
student.Number = Convert.ToInt32(match.Groups["number"].Value);
student.Name = match.Groups["name"].Value;
_students.Add(student);
response.Msg = "添加成功";
response.Status = 1;
return response;
}
}
public class MoBaseResponse
{
public int Status { get; set; }
public string Msg { get; set; }
public object Data { get; set; }
}
public class MoStudent
{
public int Number { get; set; }
public string Name { get; set; }
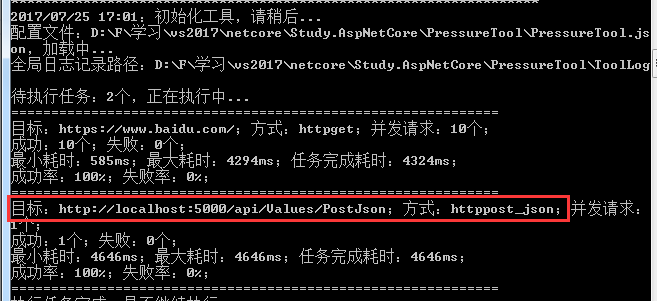
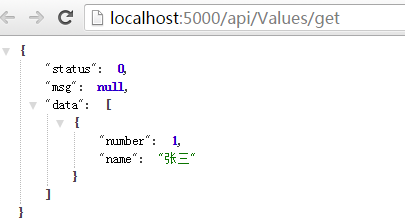
}我们往测试api地址 http://localhost:5000/api/Values/PostJson 发出请求,传递学生基本信息参数,然后通过api的get接口看看效果:
这里演示的只请求一次api,如果你想测试你自己api接口并发情况,你可以设置参数: "LinkNum": 10 或者跟多:
httppost请求的配置 - 参数为xml
post方式传递xml参数的配置和json差不多,需要注意的是需要修改Method( "Method": "httppost_xml" ),因为工具吧xml和json的配置区分开了,下面来演示下json和xml分别配置5次请求数的效果:然后通过api的get接口获取下效果:
好了到这里演示就完了,如果您觉得该工具可以你可以去git源码:https://github.com/shenniubuxing3/PressureTool ,或者加入 NineskyQQ官方群:428310563 获取Framework版本的工具。

相关文章推荐
- 开源个.NetCore写的 - 并发请求工具PressureTool
- 数据层交换和高性能并发处理(开源ETL大数据治理工具--KETTLE使用及二次开发 )
- 数据层交换和高性能并发处理(开源ETL大数据治理工具--KETTLE使用及二次开发 )
- MapGuide应用开发系列(一)----MapGuide的开源地图编辑(Authoring Tool)工具Meastro介绍
- apiDebug-API接口调试插件,开源API接口调试插件、API & HTTP 请求调试工具
- 数据层交换和高性能并发处理(开源ETL大数据治理工具--KETTLE使用及二次开发 )
- 关于apache的ab工具测试请求数及并发数
- HOYI ER TOOL 中国开源ER工具+代码生成器
- [开源]开放域实体抽取泛用工具 NetCore2.1
- 使用apache-jmeter工具发起大量并发请求测试服务器性能
- 介绍一个开源的在线管理SQLServer的小工具--SQLEntMan
- java封装httpClient工具(支持http和https,包含get和post请求)
- 【apache】apache模拟高并发请求
- 开源大数据处理工具汇总(上)
- -------------【keytool jarsigner工具的使用】Android 使用JDK1.7的工具 进行APK文件的签名,以及keystore文件的使用
- 开源数据库中间件 Vitess:一组旨在使 web 应用的 MySql 数据库的水平扩展简单化的服务器和工具集
- Java并发和多线程4:使用通用同步工具CountDownLatch实现线程等待
- 浅谈使用Fiddler工具发送post请求(带有json数据)以及get请求(Header方式传参)
- Unreal Engine 4 性能优化工具(Profiler Tool)
- 开源工具:实现了二十来种视频前景提取的算法(bgslibrary)