翻译:Pong Game Tutorial
2017-07-19 23:45
393 查看
各位阅读本节之前,请先阅读这两个网址:
http://blog.csdn.net/u013147872/article/details/75212817 http://blog.csdn.net/u013147872/article/details/75137125
This tutorial will teach you how to write pong using Kivy. We’ll start witha basic application like the one described in theCreate
an application and turnit into a playable pong game, describing each step along the way.
Here is a check list before starting this tutorial:
You have a working Kivy installation. See the
Installationsection for detailed descriptions
You know how to run a basic Kivy application. See
Create an applicationif you don’t.
If you have read the programming guide, and understand both basic Widgetconcepts (A Simple Paint App) and basic
concepts of the kv language(Kv language), you can probably skip the first 2steps and go straight to step 3.
Note
You can find the entire source code, and source code files for each step inthe Kivy examples directory undertutorials/pong/
Ready? Sweet, let’s get started!
Let’s start by getting a really simple Kivy app up and running. Create adirectory for the game and a file namedmain.py
Go ahead and run the application. It should just show a black window at thispoint. What we’ve done is create a very simple Kivy
creates an instance of our
widget-tree in thedefault Window. In the next step, we will draw thePong background and scores by defining how the
运行这个文件,它应该只是展示一个黑色窗口。我们刚刚做的只是一个最简单的app,它创建了我们的PongGame Widget类和返回这个类为根元素widget,在这里你应该想象成Widget的分层树。Kivy把这个widget类放在默认的Window。下一步,我们将绘制Pong的背景并且定义PongGame widget得分的样子
We will use a .kv file to define the look and feel of the
in the same directory that will be automatically loadedwhen the application is run. So create a new file called``pong.kv`` and addthe following contents.
我们将使用kv文件去定义PongGame类的样子和感官。自从我们的App类被PongApp call了以来,我们可以简单地在同样目录下创建一个文件(pong.kv),它将会在应用运行的时候自动地去加载。所以创建一个新的文件命名为pong.kv并且添加接下来的内容:

Note
COMMON ERROR: The name of the kv file, e.g. pong.kv, must match the name of the app,e.g. PongApp (the part before the App ending).
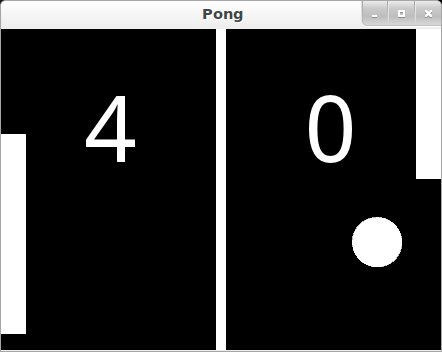
If you run the app now, you should see a vertical bar in the middle, and twozeros where the player scores will be displayed.
一般性错误:kv文件的名称,例如pong.kv,必须映射app的名称,例如PongApp(App前头的部分Pong)。如果你现在运行这个app,你应该看见一个垂直的菜单栏在中间,并且有两个0的得分。
在进行下一步之前,你可能想要更加深入了解kv文件的内容并搞懂发生了什么。
On the very first line we have:
This first line is required in every kv file. It should start with
After that, we begin defining rules that are applied to all
在那之后,我们开始定义规则,这个规则将应用到PongGame的所有实例:
Like Python, kv files use indentation to define nested blocks. A block definedwith a class name inside the
rule. It will be applied to any instance ofthe named class. If you replaced
all Widget instances.
如Python那样,kv文件使用了缩进去定义嵌套语句块。一个语句块用<>定义的是一个 Widget规则。它将会被应用到任何这个类命名的实例。如果在这个例子中你用Widget代替PongGame,所有的widget实例将会有竖线并且两个Label widget在里面。因为它会定义这些规则给所有widgets实例。
Inside a rule section, you can add various blocks to define the style andcontents of the widgets they will be applied to. You can:
在rule 这一部分,你可以添加大量的语句块去定义样式和widgets的内容。
set property values,设置属性值
add child widgets添加子widget
define a canvas section in which you can add Graphics instructions thatdefine how the widget is rendered.定义canvas画布里边你可以加个图形说明,定义widget如何表达。
The first block inside the
第一个块是一个canvas块:
So this canvas block says that the
horizontal center ofthe widget, and 0 for y. The size of the rectangle is set to 10 pixelsin width, and the widget’s height in height. The nice thing about defining thegraphics like this, is that the rendered rectangle will be automaticallyupdated when the
properties of any widgets used in the value expression change.
所以这个canvas块表示PongGame widget应该画一些图形原型。在这个情况,我们加了个长方形给到canvas。我们设置它的pos(位置和尺寸的单位是像素)在widget视图中心的左移5个像素点,y就等于0.长方形的大小设置为10 像素点的宽度,使用widget的宽度作为宽度。好玩的是像这样定义图形,就是已给的长方形,会自动地随着任意widget使用的属性值变化而变化
Note
Try to resize the application window and notice what happens. That’sright, the entire UI resizes automatically. The standard behaviour of theWindow is to resize an element based on its propertysize_hint. Thedefault widget size_hint
is (1,1), meaning it will be stretched 100% in bothx-direction and y-direction and hence fill the available space.Since the pos and size of the rectangle and center_x and top of the scorelabels were defined withinthe context of the
试着重置应用窗口的大小并观察有什么事情发生。这就对啦,整个ui 也会自动的改变大小。窗口调整大小的基准基于它的属性:size_hint.默认的widget size_hint是(1,1),意味着它在x方向和y方向延伸100%并且因此充满剩余空间。自从长方形的pos和size,center_x 和得分label的顶部被定义在PongGame类的语境,这些属性将在widget 属性改变的时候自动更新。使用KV语言,给你自动化的属性绑定
The last two sections we add look pretty similar. Each of them adds a Labelwidget as a child widget to the
that up to the actualscore once we have the logic implemented, but the labels alreadylook good since we set a bigger font_size, and positioned them relativelyto the root widget. The
can be used inside the child block torefer back to the parent/root widget the rule applies to (
最后我们添加的两个部分看起来简洁美观。它们每一个都加了个Label widget 作为子widget 给到PongGame widget。眼下,它们两个的文本仅设置成0.一旦有逻辑执行,我们将会hook它到实际的得分,但是自从我们设置了一个更大的font_size,并相对地安置它们到根widget,labels看起来 已经很好。root 这个 keyword可被用作子语句块里头,以至于转至parent/root widget。
Ok, so we have a basic pong arena to play in, but we still need the players anda ball to hit around. Let’s start with the ball. We’ll add a newPongBallclass to create a widget that will be our ball and make it bounce around.
好,我们有了基本pong表演场地去玩,但是我们仍需要玩家和球来打。先从球开始,我们将会增加一个 新的PongBall类去创建一个widget,它会是我们的球并且会反弹
And here is the kv rule used to draw the ball as a white circle:
kv语言用白色的圆作为球:
To make it all work, you also have to add the imports for theProperties Property classes used and the
为了让其工作起来,你也必须添加一个导入动作:Properties Property classes used and the
Here is the entire updated python code and kv file for this step:
整个代码
main.py:
pong.kv:
Note that not only a <PongBall> widget rule has been added, but also achild widgetPongBall in the
<PongGame> widget rule.
Cool, so now we have a ball, and it even has a
球没有动啊!
and specifying the interval:
我们需要这个球的 move方法被call,幸运地是,kivy 把他做的很简单,通过让我们对方法做出适合我们自己的时间安排,使用的是clock并且定义时间间隔:
This line for example, would cause the
这行举个例,将导致这个game对象的 update方法以每秒60次的频率被call
via the kv fileinside the kv rule for the
尽管我们有其他的问题产生。我们更愿意确定PongBall有它自己的方法被常规地call,但是在我们的代码中,自从我们只是通过kv文件里头的kv规则添加它给PongGame类,我们不会有任何的引用到这个ball对象。唯一的引用到我们的game就是我们应用内置方法的一个返回项。
Since we’re going to have to do more than just move the ball (e.g.bounce it off the walls and later the players racket), we’ll probably needan
class anyway. Furthermore, given thatwe have a reference to the game object already, we can easily schedule its new
自从我们打算必须做更多的动作(不仅仅是移动球),例如到墙反弹并且之后玩家拍打,我们很可能需要update方法给我们的PongGame类。而且,我们已经有个到game对象的引用给到它,我们很容易在应用得到建立的时候可以时间规划它的update方法
However, that still doesn’t change the fact that we don’t have a reference to the
the PongGame class, and hook it up to the widget created inthe kv rule. Once that’s done, we can easily reference the ball propertyinside the
但是,还是无法改变事实:我们没有一个引用指向kv文件创建的PongBall 的子widget ,为了解决这,我们可以添加一个
类,并且连接它到这个widget(kv文件创建的PongBall 的子widget)。一旦完成这步,我们很容易可以引用ball的属性到update方法体,并且甚至做成墙面反弹:
Don’t forget to hook it up in the kv file, by giving the child widget an idand setting the PongGame’s
别忘了在kv文件里头的连接,给与这个子widget 一个id,并 设置PongGame的ball
ObjectProperty到这个 id
Note
At this point everything is hooked up for the ball to bounce around. Ifyou’re coding along as we go, you might be wondering why the ball isn’tmoving anywhere. The ball’s velocity is set to 0 on both x and y.In the code listing below, a
method isadded to the
the position, so wecan use it later to reset the ball when a player has scored a point.
在这里,所有都已经连接了这个ball去做反弹。如果你随着我们来敲代码,可能想知道为什么ball 并没移动。这ball的速率在x轴和y轴上速率被设置成0。下面的代码显示,一个serve_ball方法体被添加到PongGame类,并被app的build方法call。它设置随机的x轴和y轴上的速率给到ball,而且也重置它的位置,所以我们之后当一个玩家得分后,使用它去重置。
Here is the entire code for this step:
main.py:
pong.kv:
Sweet, our ball is bouncing around. The only things missing now are the movableplayer rackets and keeping track of the score. We won’t go over all thedetails of creating the class and kv rules again, since those concepts werealready covered in the previous
steps. Instead, let’s focus on how to move thePlayer widgets in response to user input. You can get the whole code and kvrules for the
In Kivy, a widget can react to input by implementing the
the
and the
By default, the Widget classimplements these methods by just calling the corresponding method on all itschild widgets to pass on the event until one of the children returns
Pong is pretty simple. The rackets just need to move up and down. In fact it’sso simple, we don’t even really need to have the player widgets handle theevents themselves. We’ll just implement the
function for the
Check the
We’ll keep the score for each player in a
The score labels of the
child labels text property. This bindingoccurs because Kivy
automatically bind to any referencesin their corresponding kv files. When the ballescapes out of the sides, we’ll update the score and serve the ballagain by changing the
a
Note
This algorithm for ball bouncing is very simple, but will have strange behaviorif the ball hits the paddle from the side or bottom…this is something you couldtry to fix yourself if you like.
And here it is in context. Pretty much done:
main.py:
pong.kv:
Well, the pong game is pretty much complete. If you understood all of thethings that are covered in this tutorial, give yourself a pat on the back andthink about how you could improve the game. Here are a few ideas of thingsyou could do:
Add some nicer graphics / images. (Hint: check out the
property onthe graphics instructions like
to set an image as thetexture.)
Make the game end after a certain score. Maybe once a player has 10points, you can display a large “PLAYER 1 WINS” label and/or add a main menuto start, pause and reset the game. (Hint: check out the
and
and figure out how to use their add_widget and remove_widgetfunctions to add or remove widgets dynamically.
Make it a 4 player Pong Game. Most tablets have Multi-Touch support, sowouldn’t it be cool to have a player on each side and have fourpeople play at the same time?
Fix the simplistic collision check so hitting the ball with an end ofthe paddle results in a more realistic bounce.
Note
You can find the entire source code and source code files for each step inthe Kivy examples directory under tutorials/pong/
http://blog.csdn.net/u013147872/article/details/75212817 http://blog.csdn.net/u013147872/article/details/75137125
Introduction
Welcome to the Pong tutorial 乒乓球游戏?This tutorial will teach you how to write pong using Kivy. We’ll start witha basic application like the one described in theCreate
an application and turnit into a playable pong game, describing each step along the way.
Here is a check list before starting this tutorial:
You have a working Kivy installation. See the
Installationsection for detailed descriptions
You know how to run a basic Kivy application. See
Create an applicationif you don’t.
If you have read the programming guide, and understand both basic Widgetconcepts (A Simple Paint App) and basic
concepts of the kv language(Kv language), you can probably skip the first 2steps and go straight to step 3.
Note
You can find the entire source code, and source code files for each step inthe Kivy examples directory undertutorials/pong/
Ready? Sweet, let’s get started!
Getting Started
Getting StartedLet’s start by getting a really simple Kivy app up and running. Create adirectory for the game and a file namedmain.py
1 2 3 4 5 6 7 8 9 10 11 12 13 14 15 | from kivy.app import App from kivy.uix.widget import Widget class PongGame(Widget): pass class PongApp(App): def build(self): return PongGame() if __name__ == '__main__': PongApp().run() |
App,which
creates an instance of our
PongGameWidget class and returns it asthe root element for the applications UI, which you should imagine at thispoint as a hierarchical tree of Widgets. Kivy places this
widget-tree in thedefault Window. In the next step, we will draw thePong background and scores by defining how the
PongGame
widget
looks.
运行这个文件,它应该只是展示一个黑色窗口。我们刚刚做的只是一个最简单的app,它创建了我们的PongGame Widget类和返回这个类为根元素widget,在这里你应该想象成Widget的分层树。Kivy把这个widget类放在默认的Window。下一步,我们将绘制Pong的背景并且定义PongGame widget得分的样子
Add Simple Graphics¶添加一个简单的图
Creation of pong.kvWe will use a .kv file to define the look and feel of the
PongGameclass.Since our
Appclass is called
PongApp, we can simply create a filecalled
pong.kv
in the same directory that will be automatically loadedwhen the application is run. So create a new file called``pong.kv`` and addthe following contents.
我们将使用kv文件去定义PongGame类的样子和感官。自从我们的App类被PongApp call了以来,我们可以简单地在同样目录下创建一个文件(pong.kv),它将会在应用运行的时候自动地去加载。所以创建一个新的文件命名为pong.kv并且添加接下来的内容:
1 2 3 4 5 6 7 8 9 10 11 12 13 14 15 | #:kivy 1.0.9 <PongGame>: canvas: Rectangle: pos: self.center_x - 5, 0 size: 10, self.height Label: font_size: 70 center_x: root.width / 4 top: root.top - 50 text: "0" Label: font_size: 70 center_x: root.width * 3 / 4 top: root.top - 50 text: "0" |
Note
COMMON ERROR: The name of the kv file, e.g. pong.kv, must match the name of the app,e.g. PongApp (the part before the App ending).
If you run the app now, you should see a vertical bar in the middle, and twozeros where the player scores will be displayed.
一般性错误:kv文件的名称,例如pong.kv,必须映射app的名称,例如PongApp(App前头的部分Pong)。如果你现在运行这个app,你应该看见一个垂直的菜单栏在中间,并且有两个0的得分。
Explaining the Kv File Syntax¶解释Kv文件的语句
Before going on to the next step, you might want to take a closer look atthe contents of the kv file we just created and figure out what is going on.If you understand what’s happening, you can probably skip ahead to the nextstep.在进行下一步之前,你可能想要更加深入了解kv文件的内容并搞懂发生了什么。
On the very first line we have:
#:kivy 1.0.9
This first line is required in every kv file. It should start with
#:kivyfollowed by a space and the Kivy version it is intended for (so Kivy can makesure you have at least the required version, or handle backwards compatibilitylater on).
After that, we begin defining rules that are applied to all
PongGameinstances:
在那之后,我们开始定义规则,这个规则将应用到PongGame的所有实例:
<PongGame>:
...
Like Python, kv files use indentation to define nested blocks. A block definedwith a class name inside the
<and
>characters is a
Widget
rule. It will be applied to any instance ofthe named class. If you replaced
PongGamewith
Widgetin our example, allWidget instances would have the vertical line and the two Label widgets insidethem because it would define these rules for
all Widget instances.
如Python那样,kv文件使用了缩进去定义嵌套语句块。一个语句块用<>定义的是一个 Widget规则。它将会被应用到任何这个类命名的实例。如果在这个例子中你用Widget代替PongGame,所有的widget实例将会有竖线并且两个Label widget在里面。因为它会定义这些规则给所有widgets实例。
Inside a rule section, you can add various blocks to define the style andcontents of the widgets they will be applied to. You can:
在rule 这一部分,你可以添加大量的语句块去定义样式和widgets的内容。
set property values,设置属性值
add child widgets添加子widget
define a canvas section in which you can add Graphics instructions thatdefine how the widget is rendered.定义canvas画布里边你可以加个图形说明,定义widget如何表达。
The first block inside the
<PongGame>rule we have is acanvas block:
第一个块是一个canvas块:
<PongGame>:
canvas:
Rectangle:
pos: self.center_x - 5, 0
size: 10, self.height
So this canvas block says that the
PongGamewidget should draw somegraphics primitives. In this case, we add a rectangle to the canvas. We setthe pos of the rectangle to be 5 pixels left of the
horizontal center ofthe widget, and 0 for y. The size of the rectangle is set to 10 pixelsin width, and the widget’s height in height. The nice thing about defining thegraphics like this, is that the rendered rectangle will be automaticallyupdated when the
properties of any widgets used in the value expression change.
所以这个canvas块表示PongGame widget应该画一些图形原型。在这个情况,我们加了个长方形给到canvas。我们设置它的pos(位置和尺寸的单位是像素)在widget视图中心的左移5个像素点,y就等于0.长方形的大小设置为10 像素点的宽度,使用widget的宽度作为宽度。好玩的是像这样定义图形,就是已给的长方形,会自动地随着任意widget使用的属性值变化而变化
Note
Try to resize the application window and notice what happens. That’sright, the entire UI resizes automatically. The standard behaviour of theWindow is to resize an element based on its propertysize_hint. Thedefault widget size_hint
is (1,1), meaning it will be stretched 100% in bothx-direction and y-direction and hence fill the available space.Since the pos and size of the rectangle and center_x and top of the scorelabels were defined withinthe context of the
PongGameclass, these properties will automaticallyupdate when the corresponding widget properties change. Using the Kvlanguage gives you automatic property binding. :)
试着重置应用窗口的大小并观察有什么事情发生。这就对啦,整个ui 也会自动的改变大小。窗口调整大小的基准基于它的属性:size_hint.默认的widget size_hint是(1,1),意味着它在x方向和y方向延伸100%并且因此充满剩余空间。自从长方形的pos和size,center_x 和得分label的顶部被定义在PongGame类的语境,这些属性将在widget 属性改变的时候自动更新。使用KV语言,给你自动化的属性绑定
The last two sections we add look pretty similar. Each of them adds a Labelwidget as a child widget to the
PongGamewidget. For now, the text onboth of them is just set to“0”. We’ll hook
that up to the actualscore once we have the logic implemented, but the labels alreadylook good since we set a bigger font_size, and positioned them relativelyto the root widget. The
rootkeyword
can be used inside the child block torefer back to the parent/root widget the rule applies to (
PongGamein thiscase):
最后我们添加的两个部分看起来简洁美观。它们每一个都加了个Label widget 作为子widget 给到PongGame widget。眼下,它们两个的文本仅设置成0.一旦有逻辑执行,我们将会hook它到实际的得分,但是自从我们设置了一个更大的font_size,并相对地安置它们到根widget,labels看起来 已经很好。root 这个 keyword可被用作子语句块里头,以至于转至parent/root widget。
<PongGame>:
# ...

Label:
font_size: 70
center_x: root.width / 4
top: root.top - 50
text: "0"

Label:
font_size: 70
center_x: root.width * 3 / 4
top: root.top - 50
text: "0"
Add the Ball¶添加个球
Add the BallOk, so we have a basic pong arena to play in, but we still need the players anda ball to hit around. Let’s start with the ball. We’ll add a newPongBallclass to create a widget that will be our ball and make it bounce around.
好,我们有了基本pong表演场地去玩,但是我们仍需要玩家和球来打。先从球开始,我们将会增加一个 新的PongBall类去创建一个widget,它会是我们的球并且会反弹
PongBall Class
Here is the Python code for the PongBall class:1 2 3 4 5 6 7 8 9 10 11 12 13 14 | class PongBall(Widget): # velocity of the ball on x and y axis球在x轴与y轴的速率 velocity_x = NumericProperty(0) velocity_y = NumericProperty(0) # referencelist property so we can use ball.velocity as # a shorthand, just like e.g. w.pos for w.x and w.y参考列表属性,我们可以使用 ball.velocity作为速记,例如velocity = ReferenceListProperty(velocity_x, velocity_y) # ``move`` function will move the ball one step. This # will be called in equal intervals to animate the ball。move方法将移动球一步,这个会在相同的间隔时间被call去让球运动起来 def move(self): self.pos = Vector(*self.velocity) + self.pos |
kv语言用白色的圆作为球:
<PongBall>: size: 50, 50 canvas: Ellipse: pos: self.pos size: self.size
To make it all work, you also have to add the imports for theProperties Property classes used and the
Vector.
为了让其工作起来,你也必须添加一个导入动作:Properties Property classes used and the
Vector.
Here is the entire updated python code and kv file for this step:
整个代码
main.py:
1 2 3 4 5 6 7 8 9 10 11 12 13 14 15 | from kivy.app import App from kivy.uix.widget import Widget from kivy.properties import NumericProperty, ReferenceListProperty from kivy.vector import Vector class PongBall(Widget): velocity_x = NumericProperty(0) velocity_y = NumericProperty(0) velocity = ReferenceListProperty(velocity_x, velocity_y) def move(self): self.pos = Vector(*self.velocity) + self.pos class PongGame(Widget): pass class PongApp(App): def build(self): return PongGame() if __name__ == '__main__': PongApp().run() |
1 2 3 4 5 6 7 8 9 10 11 12 13 14 15 | #:kivy 1.0.9 |
<PongGame> widget rule.
Adding Ball Animation
Making the ball moveCool, so now we have a ball, and it even has a
movefunction… but it’s notmoving yet. Let’s fix that.
球没有动啊!
Scheduling Functions on the Clock¶时间安排功能
We need themovemethod of our ball to be called regularly. Luckily, Kivymakes this pretty easy by letting us schedule any function we want using the
Clock
and specifying the interval:
我们需要这个球的 move方法被call,幸运地是,kivy 把他做的很简单,通过让我们对方法做出适合我们自己的时间安排,使用的是clock并且定义时间间隔:
Clock.schedule_interval(game.update, 1.0/60.0)
This line for example, would cause the
updatefunction of the game object tobe called once every 60th of a second (60 times per second)
这行举个例,将导致这个game对象的 update方法以每秒60次的频率被call
Object Properties/References¶对象属性/引用
We have another problem though. We’d like to make sure the PongBall has itsmovefunction called regularly, but in our code we don’t have any referencesto the ball object since we just added it
via the kv fileinside the kv rule for the
PongGameclass. The only reference to ourgame is the one we return in the applications build method.
尽管我们有其他的问题产生。我们更愿意确定PongBall有它自己的方法被常规地call,但是在我们的代码中,自从我们只是通过kv文件里头的kv规则添加它给PongGame类,我们不会有任何的引用到这个ball对象。唯一的引用到我们的game就是我们应用内置方法的一个返回项。
Since we’re going to have to do more than just move the ball (e.g.bounce it off the walls and later the players racket), we’ll probably needan
updatemethod for our
PongGame
class anyway. Furthermore, given thatwe have a reference to the game object already, we can easily schedule its new
updatemethod when the application gets built:
自从我们打算必须做更多的动作(不仅仅是移动球),例如到墙反弹并且之后玩家拍打,我们很可能需要update方法给我们的PongGame类。而且,我们已经有个到game对象的引用给到它,我们很容易在应用得到建立的时候可以时间规划它的update方法
1 2 3 4 5 6 7 8 9 10 11 12 | class PongGame(Widget): |
PongBallchild widget created by the kv rule. To fix this, we can add an
ObjectPropertyto
the PongGame class, and hook it up to the widget created inthe kv rule. Once that’s done, we can easily reference the ball propertyinside the
updatemethod and even make it bounce off the edges:
但是,还是无法改变事实:我们没有一个引用指向kv文件创建的PongBall 的子widget ,为了解决这,我们可以添加一个
ObjectProperty到这个PongGame
类,并且连接它到这个widget(kv文件创建的PongBall 的子widget)。一旦完成这步,我们很容易可以引用ball的属性到update方法体,并且甚至做成墙面反弹:
1 2 3 4 5 6 7 8 9 10 11 12 | class PongGame(Widget): ball = ObjectProperty(None) def update(self, dt): self.ball.move() # bounce off top and bottom if (self.ball.y < 0) or (self.ball.top > self.height): self.ball.velocity_y *= -1 # bounce off left and right if (self.ball.x < 0) or (self.ball.right > self.width): self.ball.velocity_x *= -1 |
ballObjectProperty to that id:
别忘了在kv文件里头的连接,给与这个子widget 一个id,并 设置PongGame的ball
ObjectProperty到这个 id
<PongGame>: ball: pong_ball # ... (canvas and Labels) PongBall: id: pong_ball center: self.parent.center
Note
At this point everything is hooked up for the ball to bounce around. Ifyou’re coding along as we go, you might be wondering why the ball isn’tmoving anywhere. The ball’s velocity is set to 0 on both x and y.In the code listing below, a
serve_ball
method isadded to the
PongGameclass and called in the app’s
buildmethod. It sets arandom x and y velocity for the ball, and also resets
the position, so wecan use it later to reset the ball when a player has scored a point.
在这里,所有都已经连接了这个ball去做反弹。如果你随着我们来敲代码,可能想知道为什么ball 并没移动。这ball的速率在x轴和y轴上速率被设置成0。下面的代码显示,一个serve_ball方法体被添加到PongGame类,并被app的build方法call。它设置随机的x轴和y轴上的速率给到ball,而且也重置它的位置,所以我们之后当一个玩家得分后,使用它去重置。
Here is the entire code for this step:
main.py:
1 2 3 4 5 6 7 8 9 10 11 12 13 14 15 | from kivy.app import App from kivy.uix.widget import Widget from kivy.properties import NumericProperty, ReferenceListProperty,\ ObjectProperty from kivy.vector import Vector from kivy.clock import Clock from random import randint class PongBall(Widget): velocity_x = NumericProperty(0) velocity_y = NumericProperty(0) velocity = ReferenceListProperty(velocity_x, velocity_y) def move(self): self.pos = Vector(*self.velocity) + self.pos class PongGame(Widget): ball = ObjectProperty(None) def serve_ball(self): self.ball.center = self.center self.ball.velocity = Vector(4, 0).rotate(randint(0, 360)) def update(self, dt): self.ball.move() # bounce off top and bottom if (self.ball.y < 0) or (self.ball.top > self.height): self.ball.velocity_y *= -1 # bounce off left and right if (self.ball.x < 0) or (self.ball.right > self.width): self.ball.velocity_x *= -1 class PongApp(App): def build(self): game = PongGame() game.serve_ball() Clock.schedule_interval(game.update, 1.0 / 60.0) return game if __name__ == '__main__': PongApp().run() |
1 2 3 4 5 6 7 8 9 10 11 12 13 14 15 | #:kivy 1.0.9 |
Connect Input Events
Adding Players and reacting to touch inputSweet, our ball is bouncing around. The only things missing now are the movableplayer rackets and keeping track of the score. We won’t go over all thedetails of creating the class and kv rules again, since those concepts werealready covered in the previous
steps. Instead, let’s focus on how to move thePlayer widgets in response to user input. You can get the whole code and kvrules for the
PongPaddleclass at the end of this section.
In Kivy, a widget can react to input by implementing the
on_touch_down,
the
on_touch_move
and the
on_touch_upmethods.
By default, the Widget classimplements these methods by just calling the corresponding method on all itschild widgets to pass on the event until one of the children returns
True.
Pong is pretty simple. The rackets just need to move up and down. In fact it’sso simple, we don’t even really need to have the player widgets handle theevents themselves. We’ll just implement the
on_touch_move
function for the
PongGameclass and have it set the position of the left or right player basedon whether the touch occurred on the left or right side of the screen.
Check the
on_touch_movehandler:
1 2 3 4 5 | def on_touch_move(self, touch): if touch.x < self.width/3: self.player1.center_y = touch.y if touch.x > self.width - self.width/3: self.player2.center_y = touch.y |
NumericProperty.
The score labels of the
PongGameare kept updated by changing the NumericProperty
score, which in turnupdates the
PongGame
child labels text property. This bindingoccurs because Kivy
properties
automatically bind to any referencesin their corresponding kv files. When the ballescapes out of the sides, we’ll update the score and serve the ballagain by changing the
updatemethod in the
PongGameclass. The
PongPaddleclass also implements
a
bounce_ball
method
, so that the ball bouncesdifferently based on where it hits the racket. Here is the code for thePongPaddle class:
1 2 3 4 5 | class PongPaddle(Widget): score = NumericProperty(0) def bounce_ball(self, ball): if self.collide_widget(ball): speedup = 1.1 offset = 0.02 * Vector(0, ball.center_y-self.center_y) ball.velocity = speedup * (offset - ball.velocity) |
This algorithm for ball bouncing is very simple, but will have strange behaviorif the ball hits the paddle from the side or bottom…this is something you couldtry to fix yourself if you like.
And here it is in context. Pretty much done:
main.py:
1 2 3 4 5 6 7 8 9 10 11 12 13 14 15 | from kivy.app import App from kivy.uix.widget import Widget from kivy.properties import NumericProperty, ReferenceListProperty,\ ObjectProperty from kivy.vector import Vector from kivy.clock import Clock class PongPaddle(Widget): score = NumericProperty(0) def bounce_ball(self, ball): if self.collide_widget(ball): vx, vy = ball.velocity offset = (ball.center_y - self.center_y) / (self.height / 2) bounced = Vector(-1 * vx, vy) vel = bounced * 1.1 ball.velocity = vel.x, vel.y + offset class PongBall(Widget): velocity_x = NumericProperty(0) velocity_y = NumericProperty(0) velocity = ReferenceListProperty(velocity_x, velocity_y) def move(self): self.pos = Vector(*self.velocity) + self.pos class PongGame(Widget): ball = ObjectProperty(None) player1 = ObjectProperty(None) player2 = ObjectProperty(None) def serve_ball(self, vel=(4, 0)): self.ball.center = self.center self.ball.velocity = vel def update(self, dt): self.ball.move() # bounce of paddles self.player1.bounce_ball(self.ball) self.player2.bounce_ball(self.ball) # bounce ball off bottom or top if (self.ball.y < self.y) or (self.ball.top > self.top): self.ball.velocity_y *= -1 # went of to a side to score point? if self.ball.x < self.x: self.player2.score += 1 self.serve_ball(vel=(4, 0)) if self.ball.x > self.width: self.player1.score += 1 self.serve_ball(vel=(-4, 0)) def on_touch_move(self, touch): if touch.x < self.width / 3: self.player1.center_y = touch.y if touch.x > self.width - self.width / 3: self.player2.center_y = touch.y class PongApp(App): def build(self): game = PongGame() game.serve_ball() Clock.schedule_interval(game.update, 1.0 / 60.0) return game if __name__ == '__main__': PongApp().run() |
1 2 3 4 5 6 7 8 9 10 11 12 13 14 15 | #:kivy 1.0.9 |
Where To Go Now?
Have some funWell, the pong game is pretty much complete. If you understood all of thethings that are covered in this tutorial, give yourself a pat on the back andthink about how you could improve the game. Here are a few ideas of thingsyou could do:
Add some nicer graphics / images. (Hint: check out the
source
property onthe graphics instructions like
circleor
Rectangle,
to set an image as thetexture.)
Make the game end after a certain score. Maybe once a player has 10points, you can display a large “PLAYER 1 WINS” label and/or add a main menuto start, pause and reset the game. (Hint: check out the
Button
and
Labelclasses,
and figure out how to use their add_widget and remove_widgetfunctions to add or remove widgets dynamically.
Make it a 4 player Pong Game. Most tablets have Multi-Touch support, sowouldn’t it be cool to have a player on each side and have fourpeople play at the same time?
Fix the simplistic collision check so hitting the ball with an end ofthe paddle results in a more realistic bounce.
Note
You can find the entire source code and source code files for each step inthe Kivy examples directory under tutorials/pong/

相关文章推荐
- Cheat Engine Tutorial v3--翻译Cheat Engine 6.1 tutorial(5)
- 【译】TetroGL: An OpenGL Game Tutorial in C++ for Win32 Platforms - Part 1
- C#开发WPF/Silverlight动画及游戏系列教程(Game Tutorial):(四十二)制作精美的Mini地图②
- C#开发WPF/Silverlight动画及游戏系列教程(Game Tutorial):(四十一)制作精美的Mini地图①
- C#开发WPF/Silverlight动画及游戏系列教程(Game Tutorial):(四)实现2D人物动画①
- C#开发WPF/Silverlight动画及游戏系列教程(Game Tutorial):(九) 2D游戏角色在地图上的移动
- C#开发WPF/Silverlight动画及游戏系列教程(Game Tutorial):(二十) 第一部分拓展小结篇
- [翻译]XNA 3.0 Game Programming Recipes之five
- C#开发WPF/Silverlight动画及游戏系列教程(Game Tutorial):(二十四) Be careful!前方怪物出没
- Apache OFBiz Development The Beginners Tutorial 翻译 前言
- C#开发WPF/Silverlight动画及游戏系列教程(Game Tutorial):(三十五)地图编辑器的初步使用
- C#开发WPF/Silverlight动画及游戏系列教程(Game Tutorial):(三十六)地图自定义切片与导出
- A Tutorial on Pointers and Arrays in C - General Programming - Articles - Articles - GameDev.net
- C#开发WPF/Silverlight动画及游戏系列教程(Game Tutorial):(四十)向Silverlight移植②
- C#开发WPF/Silverlight动画及游戏系列教程(Game Tutorial):(四十三)制作游戏主菜单面板及鼠标左右键快捷技能栏
- C#开发WPF/Silverlight动画及游戏系列教程(Game Tutorial):(四十四)制作主角属性面板及加点器
- C#开发WPF/Silverlight动画及游戏系列教程(Game Tutorial):(四十九) 落雷!治疗!陷阱!连锁闪电!多段群伤!魔法之终极五重奏②
- Axure RP Pro - 翻译 - 5.5 Tutorial教程 - AXURE 201 Article 3: Rich Interactions复杂交互 - Menus菜单
- TensorFlow 神经机器翻译教程-TensorFlow Neural Machine Translation Tutorial
- (翻译)Shaders for Game Programming and Artists--Chapter 1