调用webService的几种方式
2017-06-27 10:10
375 查看
目录(?)[+]
一、概览
方式1:
HttpClient:可以用来调用webservie服务,也可以抓取网页数据
版本1:HttpClient3.0.x
版本2:HttpClient4.x.x(目前最新4.5.2)
这2个版本的使用方式不一样;变动较大
方式2:纯Java(自带API) jws
方式3:cxf框架
方式4:axis2框架
准备工作:
1.了解wsimport java自带的一个命令(建议使用jdk7,稳定支持)
作用:将wsdl文件生成本地代理(java代码),方便调用
语法 wsimport [opations] <wsdl_uri>
- wsdl_uri:wsdl 的统一资源标识符
- d :指定要输出的文件的位置
- s :表示要解析java的源码 ,默认解析出的是class字节码
- p : 指定输出的包名
1. 获取服务路径:比如
http://ws.webxml.com.cn/WebServices/MobileCodeWS.asmx?WSDL
2. 获取wsdl文件.建议使用JDK1.6以上的版本的wsimport命令
进入dos的桌面:
方式1:wsimport http://ws.webxml.com.cn/WebServices/MobileCodeWS.asmx?WSDL
这种默认只会生成class,且会生成默认的包
方式2:生成源码,指定包和路径
wsimport -s ./ -p cn.aa http://ws.webxml.com.cn/WebServices/MobileCodeWS.asmx?WSDL
3.可以把class文件打成jar包 jar cvf test.jar 打包目录
4.放在你的项目中进行调用:
[html] view
plain copy
public static void main(String[] args) {
MobileCodeWS mobileCodeWs=new MobileCodeWS();
MobileCodeWSSoap mobileCodeWSSoap=mobileCodeWs.getMobileCodeWSSoap();
String tel=mobileCodeWSSoap.getMobileCodeInfo("183735xxxx",null);
System.out.println(tel);
}
2.规范了解
JAVA 中共有三种WebService 规范,分别是JAX-WS(JAX-RPC)、JAXM&SAAJ、JAX-RS。
For XML-RemoteProcedure Call)目前已经被JAX-WS 规范取代。从java5开始支持JAX-WS2.0版本,Jdk1.6.0_13以后的版本支持2.1版本,jdk1.7支持2.2版本。
Jaxws开发的webservice传输soap协议。
更加抽象,隐藏了更多的细节,更加面向对象,实现起来你基本上不需要关心SOAP 的任何细节
Rest定义可以自行搜索
jax-RS可以发布 rest风格webservice,因为rest的webservice不采用soap传输,直接采用http传输,可以返回xml或json,比较轻量。
以后可能会流行Rest风格的
二、简单例子
1.httpClient3.x.x
此方式不需要wsimport命令
[html] view
plain copy
// 通过Http-Client 框架来模拟实现 Http请求--get
public static String getMobileCodeInfo1(String mobileCode, String userID)
throws HttpException, IOException {
HttpClient client = new HttpClient();
GetMethod getMethod=new GetMethod("http://ws.webxml.com.cn/WebServices/MobileCodeWS.asmx/getMobileCodeInfo?mobileCode="
+ mobileCode + "&userID=" + userID);
//执行,得到消息码
int code = client.executeMethod(getMethod);
System.out.println("消息码:"+code);
String result="";
if (code==HttpURLConnection.HTTP_OK) {
//得到执行结果
result = getMethod.getResponseBodyAsString();
System.out.println(result);
}
return result;
}
// 通过Http-Client 框架来模拟实现 Http请求--post
// 需要导入3个jar包,本demo的jar包版本是3.1.0
// 目前最新的是4.5.2,使用方式也发生了变化
public static String getMobileCodeInfo2(String mobileCode, String userID)
throws HttpException, IOException {
// 输入服务网址
HttpClient client = new HttpClient();
// GetMethod
PostMethod post = new PostMethod(
"http://ws.webxml.com.cn/WebServices/MobileCodeWS.asmx/getMobileCodeInfo");
// 设置参数
post.setParameter("mobileCode", mobileCode);
post.setParameter("userID", userID);
// client.setTimeout(newTimeoutInMilliseconds);
// 执行,返回一个结果码
int code = client.executeMethod(post);
System.out.println("结果码:" + code);
// 获取xml结果
String result = post.getResponseBodyAsString();
System.out.println("结果:" + result);
//释放连接
post.releaseConnection();
return result;
}
// Post请求 :通过Http-Client 框架来模拟实现 Http请求
//从xml中获取请求参数
//SOAP1.1方式
//问题:soap怎么定义,这里已经返回接结果,但是没有手机号信息,也就返回的结果匹配,不知道为什么
//估计是配置文件有问题
//soap1.1
@Test
public void soap() throws Exception{
HttpClient client=new HttpClient();
PostMethod postMethod=new PostMethod("http://ws.webxml.com.cn/WebServices/MobileCodeWS.asmx");
//3.设置请求参数
postMethod.setRequestBody(new FileInputStream("D:/soap.xml")); //文件名自定义
//修改请求的头部
postMethod.setRequestHeader("Content-Type", "text/xml; charset=utf-8");
//4.执行请求 ,结果码
int code=client.executeMethod(postMethod);
System.out.println("结果码:"+code);
//5. 获取结果
String result=postMethod.getResponseBodyAsString();
System.out.println("Post请求的结果:"+result);
}
public static void main(String[] args) throws IOException {
// getMobileInfo("13476699xxx", "");
getMobileCodeInfo1("13476699xxx", "");//
// getMobileCodeInfo2("13476699xxx", "");//
//soap,利用xml传输参数
}
其中:请求参数封装在soap.xml中
请求规范服务方会提供给你的
soap.xml请求内容如下:
[html] view
plain copy
<?xml version="1.0" encoding="utf-8"?>
<soap:Envelope xmlns:xsi="http://www.w3.org/2001/XMLSchema-instance" xmlns:xsd="http://www.w3.org/2001/XMLSchema" xmlns:soap="http://schemas.xmlsoap.org/soap/envelope/">
<soap:Body>
<getMobileCodeInfo xmlns="http://WebXml.com.cn/">
<mobileCode>1347669xxxx</mobileCode>
<userID></userID>
</getMobileCodeInfo>
</soap:Body>
</soap:Envelope>
httpClient4.x.x不做演示,感兴趣的可以去查查,资料很多
2.java自带API实现
2.1 类发布
2.1.1 使用默认设置
[html] view
plain copy
@WebService
//默认服务名会加上Service
public class PhoneInfoWS {
//默认方法名getPhoneInfo
//默认参数名arg0
//默认返回值名字:return
//targetNamespace默认情况下为倒置的包名
public Phone getPhoneInfo(String OSName) {
Phone p=new Phone();
if ("Android".equalsIgnoreCase(OSName)) {
p.setOS(OSName);
p.setOwn("Google");
p.setScale(80);
}else if("IOS".equalsIgnoreCase(OSName)){
p.setOS(OSName);
p.setOwn("Apple");
p.setScale(14);
}else if("windows Phone".equalsIgnoreCase(OSName)){
p.setOS(OSName);
p.setOwn("Microsoft");
p.setScale(4);
}else{
p.setOS("others");
p.setOwn("others");
p.setScale(2);
}
return p;
}
//静态,非public方法不会被自动发布
public static String say(String city){
return "hello"+city;
}
//访问时自动生成一个描述文件xml+xsd约束文件
public static void main(String[] args) {
//implementor要发布的对象,一般是接口的实现类
String address1="http://127.0.0.1/PhoneInfoWS1?WSDL";
// String address2="http://127.0.0.1/PhoneInfoWS2?WSDL";
Endpoint point = Endpoint.publish(address1, new PhoneInfoWS());
Endpoint.publish(address1, new PhoneInfoWS());
// Endpoint.publish(address2, new PhoneInfoWS());
//关闭发布
// point.stop();
}
}
2.1.2自定义设置
[html] view
plain copy
@WebService(serviceName="PhoneInfoService",targetNamespace="http://PhoneService.web.com/")
//默认服务名会加上Service
public class PhoneInfoWS1 {
@WebMethod(operationName="getPhoneInfo")
public @WebResult(name="phone") Phone getPhoneInfo(@WebParam(name="OSName") String OSName) {
Phone p=new Phone();
if ("Android".equalsIgnoreCase(OSName)) {
p.setOS(OSName);
p.setOwn("Google");
p.setScale(80);
}else if("IOS".equalsIgnoreCase(OSName)){
p.setOS(OSName);
p.setOwn("Apple");
p.setScale(14);
}else if("windows Phone".equalsIgnoreCase(OSName)){
p.setOS(OSName);
p.setOwn("Microsoft");
p.setScale(4);
}else{
p.setOS("others");
p.setOwn("others");
p.setScale(2);
}
return p;
}
//静态,非public方法不会被自动发布
public static String say(String city){
return "hello"+city;
}
//屏蔽要发布的方法
@WebMethod(exclude=true)
public String say1(String city){
return "hello"+city;
}
public String say2(String city){
return "hello"+city;
}
//访问时自动生成一个描述文件xml+xsd约束文件
public static void main(String[] args) {
//implementor要发布的对象,一般是接口的实现类
String address1="http://127.0.0.1/PhoneInfoWS1?WSDL";
// String address2="http://127.0.0.1/PhoneInfoWS2?WSDL";
Endpoint point = Endpoint.publish(address1, new PhoneInfoWS1());
point.toString();
Endpoint.publish(address1, new PhoneInfoWS1());
// Endpoint.publish(address2, new PhoneInfoWS1());
//关闭发布
// point.stop();
}
}
注意:
1. 在类上添加@WebService注解,代表发布一个WebService服务
2. 通过EndPoint(端点服务)发布一个webService。Endpoint也是jdk提供的一个专门用于发布服务的类,它的publish方法接收两个参数,
一个是本地的服务地址,二是提供服务的类。它位于javax.xml.ws.*包中。
3. Endpoint.publish(String address, Object implementor) 静态方法在给定地址处针对指定的实现者对象创建并发布端点
4. 默认public修饰的方法自动发布,静态方法不会公布
5. 如果希望某个方法不对外公开,可以在方法上添加@WebMethod(exclude=true),阻止对外公开。
6. 如果一个类上,被添加了@WebService注解,则必须此类至少有一个可以公开的方法,否则将会启动失败。
7.异常处理:
报错:
com.sun.xml.internal.ws.model.RuntimeModelerException: runtime modeler error: Wrapper class com.web.PhoneService.jaxws.GetPhoneInfo is not found.
Have you run APT to generate them?
解决办法:jdk7就可以了
8.测试方法:
a.利用上面说的wsimport生成本地代理,然后调用里面的代码进行测试就可以了,这里就省略了
b.更方便的测试是使用Eclipse的Web Services Explorer 或者Myeclipse的SOAP Web Services Explorer进行测试
把链接:比如 http://127.0.0.1/PhoneInfoWS1?WSDL 放入到浏览器的WSDL地址栏就可以了
2.2接口发布
[html] view
plain copy
@WebService
public interface JobService {
public String getJobInfo();
}
/*
* 默认只会发布接口的方法,实现类自定义的方法不会被发布了
* 接口和实现类都需要加注解修饰
*
* 联想Spring的注入只需在实现类加入注解即可
*/
@WebService(serviceName="JobServiceImplService",
endpointInterface="com.web.InterfaceService.JobService")
public class JobServiceImpl implements JobService{
@Override
public String getJobInfo() {
// TODO Auto-generated method stub
return "java开发|前端开发|数据库开发";
}
// 实现类自定义的方法不会被发布
public String say(String name){
return "hello "+name;
}
public static void main(String[] args) {
String address="http://127.0.0.1/JobServiceImpl?WSDL";
Endpoint.publish(address, new JobServiceImpl());
System.out.println(address);
}
}
3.CXF框架
Apache CXF 是一个开源的 Services 框架,是XFire和Celtix项目的结合产品,CXF 帮助您来构建和开发 Services 这些 Services 可以支持多种协议,比如:SOAP、POST/HTTP、RESTful HTTP CXF 大大简化了 Service可以天然地和 spring 进行无缝集成。
3.1最简单的接口发布
这里先不与Spring集成,需要的jar包
asm-3.3.jar
commons-logging-1.1.1.jar
cxf-2.4.2.jar
jetty-continuation-7.4.5.v20110725.jar
jetty-http-7.4.5.v20110725.jar
jetty-io-7.4.5.v20110725.jar
jetty-security-7.4.5.v20110725.jar
jetty-server-7.4.5.v20110725.jar
jetty-util-7.4.5.v20110725.jar
neethi-3.0.1.jar
wsdl4j-1.6.2.jar
xmlschema-core-2.0.jar
这里用的是2.4.2的,老版本,不要介意,最新版本3.1.6,可以自行下载
[html] view
plain copy
@WebService
//声明soap1.2
//@BindingType(value=SOAPBinding.SOAP12HTTP_BINDING)
public interface LanguageService {
public String getLanguage(int num);
}
//开发语言排行榜
@WebService
public class LanguageServiceImpl implements LanguageService {
@Override
public String getLanguage(int num) {
String language="";
switch (num) {
case 1:
language="java语言";
break;
case 2:
language="C语言";
break;
case 3:
language="Objective-C语言";
break;
case 4:
language="C#语言";
break;
default:
language="没有找到你要排名的语言";
break;
}
return language;
}
/*
* 方式1:ServerFactoryBean
* 不支持注解,就算你添加了注解也不起作用
* 所以你不能修改服务名,方法名,参数名,工作空间等
* 另外不支持拦截器
* 方式2:JaxWsServerFactoryBean为ServerFactoryBean的子类(功能扩展)
* 特点:
* 1、支持注解,如果你没有使用@webService,运行后,是不会发布方法的。。,所以注解必须加
* 如果有接口实现,只需要在接口加上注解即可,命名注解也要在接口里面做
* 这跟之前的纯java开发webservice有些不一样,纯java开发接口和实现类要改名必须都加上注解才行
* 2、支持拦截器
* 3、生成的wsdl更加规范
* 两者的wsdl区别:
* a.方式1 默认不加servcie 方式2:默认加Service,比如<wsdl:definitions name="LanguageServiceService"
* b.方式1 元素前缀 xsd 方式2 元素前缀xs
* c.方式1
<wsdl:portType name="LanguageServicePortType">
方式2
<wsdl:portType name="LanguageService">没有加PortType
webService访问流程:
1.首先进行握手,检查本地代理与服务端的wsdl是否一致,采用的是get请求验证
2.采用post请求,封装请求参数到xml中,采用soap通信,将这个请求xml传输到服务端
3.封装结果为xml,采用soap通信返回xml,再到客户端解析得到方法的返回值
*/
//方式1:不通过注解发布
//这种方式没有添加webService注解,也就是说没有注解也可以发布webService服务,
// 但是这种方式不是很规范,比如我们不可以通过注解的方式来修改WSDL的标签信息
private static void publishServie1(){
LanguageService languageService=new LanguageServiceImpl();
ServerFactoryBean bean=new ServerFactoryBean();
//Endpoint :地址 , 实现对象
// bean.setAddress("http://192.168.8.178:9999/ws/cxf/languangeService");
bean.setAddress("http://127.0.0.1:9999/ws/cxf/languangeService?WSDL");
//注册服务器地址和端口
bean.setServiceClass(LanguageService.class);//对外提供webservcie的业务类或者接口
//注册哪个实现类提供服务
bean.setServiceBean(languageService);//服务的实现bean
Server server = bean.create();//创建,发布webservice
//10秒有效
// Thread.sleep(1*10*1000);
// server.stop();
// System.exit(0);
}
//JaxWsServerFactoryBean是ServerFactoryBean的子类
//可以提供拦截器
private static void publishServie2(){
JaxWsServerFactoryBean bean=new JaxWsServerFactoryBean();
//地址WSDL加不加都可以,访问时加上就可以了,不加端口也可以发布
bean.setAddress("http://127.0.0.1:8888/ws/cxf/languangeService?WSDL");
// bean.setAddress("http://127.0.0.1/ws/cxf/languangeService?WSDL");
//设置服务接口
bean.setServiceClass(LanguageService.class);
//设置服务的类
bean.setServiceBean(new LanguageServiceImpl());
//输入信息拦截器
bean.getInInterceptors().add(new LoggingInInterceptor());
//输出信息拦截器
bean.getOutInterceptors().add(new LoggingOutInterceptor());
Server server = bean.create();
}
public static void main(String[] args) throws Exception{
// publishServie1();
publishServie2();
}
}
3.2 结合Spring发布服务
这里重点是如何配置发布服务,业务逻辑仅仅是演示(辅助),不必参考
要发布的服务:保存和根据姓名查询员工
saveEmployee findEmployeeByName
步骤:
3.2.1.导包cxf2.7.18里面的所有jar包 ,其中jetty包不需要,因为应用是部署在tomcat里面
3.2. 2.建实体类,DB类(模拟)
[html] view
plain copy
public class Employee {
private String name;
private Integer age;
@DateTimeFormat(pattern="yyyy-MM-dd")
private Date birthday;
public Employee() {
super();
}
public Employee(String name, Integer age, Date birthday) {
super();
this.name = name;
this.age = age;
this.birthday = birthday;
}
public String getName() {
return name;
}
public void setName(String name) {
this.name = name;
}
public Integer getAge() {
return age;
}
public void setAge(Integer age) {
this.age = age;
}
public Date getBirthday() {
return birthday;
}
public void setBirthday(Date birthday) {
this.birthday = birthday;
}
@Override
public String toString() {
return "Employee [name=" + name + ", age=" + age + ", birthday="
+ birthday + "]";
}
}
[html] view
plain copy
//运行时如果报错Unsupported major.minor version 51.0
//这说明jdk版本不对,即tomcat的jdk版本跟项目版本不一致
@Repository
public class EmployeeDB {
public EmployeeDB(){}
private static List<Employee> list=new ArrayList<Employee>();
static{
list.add(new Employee("小米", 12, new Date()));
}
public void save(Employee employee){
list.add(employee);
}
public Employee findByName(String name){
if (list.size()>0) {
for(Employee e:list){
if (e.getName().equals(name)) {
return e;
}
}
}
return null;
}
public List<Employee> findAll(){
return list;
}
public void deleteByName(String name) throws Exception{
if (name.length()==0||name==null) {
throw new Exception("删除用户异常");
}
for (int i = 0; i < list.size(); i++) {
if (name.equals(list.get(i).getName())) {
list.remove(list.get(i));
break;
}
}
}
}
3.2.3.建立服务类
[html] view
plain copy
@WebService(serviceName="EmployeeService")
public interface EmployeeService {
public void saveEmployee(@WebParam(name="employee")Employee employee );
public @WebResult(name="Employee")Employee findEmployeeByName(@WebParam(name="name")String name);
}
public class EmployeeServiceImpl implements EmployeeService{
@Autowired
private EmployeeDB db;
@Override
public void saveEmployee(Employee employee) {
System.out.println("EmployeeDB:"+db);
db.save(employee);
}
@Override
public Employee findEmployeeByName(String name) {
if (name.length()==0||name==null) {
return null;
}
return db.findByName(name);
}
}
3.2. 4.写页面,写Servlet(如果单纯为了测试发布的服务,这些可以不需要)
[html] view
plain copy
<%@ page language="java" import="java.util.*" pageEncoding="UTF-8"%>
<!DOCTYPE HTML PUBLIC "-//W3C//DTD HTML 4.01 Transitional//EN">
<html>
<head>
<title>添加员工</title>
<meta http-equiv="pragma" content="no-cache">
<meta http-equiv="cache-control" content="no-cache">
<meta http-equiv="expires" content="0">
<meta http-equiv="keywords" content="keyword1,keyword2,keyword3">
<meta http-equiv="description" content="This is my page">
<!--
<link rel="stylesheet" type="text/css" href="styles.css">
-->
</head>
<body>
<form action="${pageContext.request.contextPath}/AddServlet" method="post">
用户名:<input type="text" name="name" /><br/>
年龄:<input type="text" name="age" /><br/>
生日:<input type="text" name="birthday" /><br/>
<input type="submit" value="提交" />
</form>
</body>
</html>
[html] view
plain copy
public class AddServlet extends HttpServlet {
private EmployeeService employeeService;
@Override
public void init() throws ServletException {
WebApplicationContext context=WebApplicationContextUtils.getWebApplicationContext(this.getServletContext());
//得到的是实现类对象
employeeService=(EmployeeService) context.getBean("employeeService");
System.out.println("employeeService:"+employeeService);
}
public void doGet(HttpServletRequest request, HttpServletResponse response)
throws ServletException, IOException {
response.setContentType("text/html;charset=utf-8");
String name=request.getParameter("name");
String age=request.getParameter("age");
String birthday=request.getParameter("birthday");
Employee employee=new Employee();
employee.setName(name);
employee.setAge(Integer.parseInt(age));
employee.setBirthday(DateUtil.stringToDate(birthday, "yyyy-MM-dd"));
employeeService.saveEmployee(employee);
//检查是否存进去进去了
EmployeeDB db=new EmployeeDB();
System.out.println("db.size():"+db.findAll().size());
}
public void doPost(HttpServletRequest request, HttpServletResponse response)
throws ServletException, IOException {
doGet(request, response);
}
}
3.2.5.配置applicationContext.xml和web.xml
[html] view
plain copy
<?xml version="1.0" encoding="UTF-8"?>
<beans
xmlns="http://www.springframework.org/schema/beans"
xmlns:xsi="http://www.w3.org/2001/XMLSchema-instance"
xmlns:p="http://www.springframework.org/schema/p"
xmlns:context="http://www.springframework.org/schema/context"
xmlns:jaxws="http://cxf.apache.org/jaxws"
xsi:schemaLocation="http://www.springframework.org/schema/beans http://www.springframework.org/schema/beans/spring-beans-3.1.xsd http://www.springframework.org/schema/context http://www.springframework.org/schema/context/spring-context.xsd http://cxf.apache.org/jaxws http://cxf.apache.org/schemas/jaxws.xsd">
<context:component-scan base-package="com.demo.*"></context:component-scan>
<bean id="employeeService" class="com.demo.webService.EmployeeServiceImpl"></bean>
<!-- 配置cxf
地址: 比如: http://192.168.114.10:8080/CXF_Server/ws/employeeManager
组成 : http://192.168.114.10:8080 +CXF_Server( 项目名)+ws(过滤的路径)+/employeeManager(自定义部分)
服务类 :
服务的实现类:
拦截器
-->
<jaxws:server serviceClass="com.demo.webService.EmployeeService" address="/employeeService">
<jaxws:serviceBean>
<ref bean="employeeService"/>
</jaxws:serviceBean>
<jaxws:inInterceptors>
<bean class="org.apache.cxf.interceptor.LoggingInInterceptor"></bean>
</jaxws:inInterceptors>
<jaxws:outInterceptors>
<bean class="org.apache.cxf.interceptor.LoggingOutInterceptor"/>
</jaxws:outInterceptors>
</jaxws:server>
</beans>
web.xml
[html] view
plain copy
<?xml version="1.0" encoding="UTF-8"?>
<web-app xmlns:xsi="http://www.w3.org/2001/XMLSchema-instance" xmlns="http://java.sun.com/xml/ns/javaee" xsi:schemaLocation="http://java.sun.com/xml/ns/javaee http://java.sun.com/xml/ns/javaee/web-app_3_0.xsd" id="WebApp_ID" version="3.0">
<display-name>CXFDemo1</display-name>
<welcome-file-list>
<welcome-file>index.jsp</welcome-file>
</welcome-file-list>
<!-- 配置CXF的Servlet,用来处理webService的请求 -->
<servlet>
<servlet-name>cxf</servlet-name>
<servlet-class>org.apache.cxf.transport.servlet.CXFServlet</servlet-class>
<load-on-startup>1</load-on-startup>
</servlet>
<servlet>
<servlet-name>AddServlet</servlet-name>
<servlet-class>com.demo.web.AddServlet</servlet-class>
</servlet>
<servlet-mapping>
<servlet-name>cxf</servlet-name>
<url-pattern>/ws/*</url-pattern>
</servlet-mapping>
<servlet-mapping>
<servlet-name>AddServlet</servlet-name>
<url-pattern>/AddServlet</url-pattern>
</servlet-mapping>
<listener>
<listener-class>org.springframework.web.context.ContextLoaderListener</listener-class>
</listener>
<context-param>
<param-name>contextConfigLocation</param-name>
<param-value>classpath:applicationContext.xml</param-value>
</context-param>
</web-app>
3.2.6.工具类
[html] view
plain copy
public class DateUtil {
private DateUtil() {
}
public static String dateToString(Date d, String format) {
return new SimpleDateFormat(format).format(d);
}
public static Date stringToDate(String s, String format) {
try {
return new SimpleDateFormat(format).parse(s);
} catch (ParseException e) {
e.printStackTrace();
}
return null;
}
}
3.2.7.访问:http://localhost:8080/CXFDemo2/ws
4.Axis2发布服务
4.1比较
Axis2是从Axis1.x系列发展而来。CXF则是XFire和Celtix项目的结合产品。Axis2是从底层全部重新实现,使用了新的扩展性更好模块架构。 CXF也重新的深化了XFire和Celtix这两个开发工具。
1.CXF支持 WS-Addressing,WS-Policy, WS-RM, WS-Security和WS-I Basic Profile。Axis2不支持WS-Policy,现在应该支持了。
2. CXF可以很好支持Spring。Axis2不能(没测试过,现在应该可以吧,待测。。)
3. AXIS2支持更广泛的数据并对,如XMLBeans,JiBX,JaxMe和JaxBRI和它自定义的数据绑定ADB。注意JaxME和JaxBRI都还是试验性的。CXF只支持JAXB和Aegis。
4. Axis2支持多语言-除了Java,他还支持C/C++版本
如何抉择:
1、如果应用程序需要多语言的支持,Axis2 应当是首选了;
2、如果应用程序是遵循 Spring 哲学路线的话,Apache CXF 是一种更好的选择,特别对嵌入式的 Web Services 来说;
目前asix2最新版本1.7.1
4.2安装插件
4.2.1Eclipse
axis2-eclipse-codegen-plugin-1.7.1.zip
axis2-eclipse-service-plugin-1.7.1.zip
解压的jar包放入Eclipse的dropins目录
4.2.2Myeclipse
axis2-eclipse-codegen-wizard.zip
axis2-eclipse-service-archiver-wizard.zip
解压放入到Myeclipse的dropins目录
4.3 实现方式有很多
这里简单说明下最快速的2种方式,Eclipse实现
方式1:不使用插件实现
1.配置环境变量(不是必须的)

2.配置webService环境

2.建立一个动态web项目


方式2:使用插件实现
建一个普通的动态项目,不选择webService环境
这个实现网上有很多,实现参考:http://blog.csdn.NET/wangchangpen62/article/details/45171001
好了,先写到这吧
以上做了个简单的小结,深入应用还待学习。。。。
转自:http://blog.csdn.net/u011165335/article/details/51345224#comments
一、概览
方式1:
HttpClient:可以用来调用webservie服务,也可以抓取网页数据
版本1:HttpClient3.0.x
版本2:HttpClient4.x.x(目前最新4.5.2)
这2个版本的使用方式不一样;变动较大
方式2:纯Java(自带API) jws
方式3:cxf框架
方式4:axis2框架
准备工作:
1.了解wsimport java自带的一个命令(建议使用jdk7,稳定支持)
作用:将wsdl文件生成本地代理(java代码),方便调用
语法 wsimport [opations] <wsdl_uri>
- wsdl_uri:wsdl 的统一资源标识符
- d :指定要输出的文件的位置
- s :表示要解析java的源码 ,默认解析出的是class字节码
- p : 指定输出的包名
1. 获取服务路径:比如
http://ws.webxml.com.cn/WebServices/MobileCodeWS.asmx?WSDL
2. 获取wsdl文件.建议使用JDK1.6以上的版本的wsimport命令
进入dos的桌面:
方式1:wsimport http://ws.webxml.com.cn/WebServices/MobileCodeWS.asmx?WSDL
这种默认只会生成class,且会生成默认的包
方式2:生成源码,指定包和路径
wsimport -s ./ -p cn.aa http://ws.webxml.com.cn/WebServices/MobileCodeWS.asmx?WSDL
3.可以把class文件打成jar包 jar cvf test.jar 打包目录
4.放在你的项目中进行调用:
[html] view
plain copy
public static void main(String[] args) {
MobileCodeWS mobileCodeWs=new MobileCodeWS();
MobileCodeWSSoap mobileCodeWSSoap=mobileCodeWs.getMobileCodeWSSoap();
String tel=mobileCodeWSSoap.getMobileCodeInfo("183735xxxx",null);
System.out.println(tel);
}
2.规范了解
JAVA 中共有三种WebService 规范,分别是JAX-WS(JAX-RPC)、JAXM&SAAJ、JAX-RS。
1. Jaxws(掌握)
JAX-WS 的全称为 Java API for XML-Based Webservices ,早期的基于SOAP 的JAVA 的Web 服务规范JAX-RPC(java APIFor XML-RemoteProcedure Call)目前已经被JAX-WS 规范取代。从java5开始支持JAX-WS2.0版本,Jdk1.6.0_13以后的版本支持2.1版本,jdk1.7支持2.2版本。
Jaxws开发的webservice传输soap协议。
2JAXM&SAAJ(了解)
JAXM(JAVA API For XML Message)主要定义了包含了发送和接收消息所需的API,SAAJ(SOAP With Attachment APIFor Java,JSR 67)是与JAXM 搭配使用的API,为构建SOAP 包和解析SOAP 包提供了重要的支持,支持附件传输等,JAXM&SAAJ 与JAX-WS 都是基于SOAP 的Web 服务,相比之下JAXM&SAAJ 暴漏了SOAP更多的底层细节,编码比较麻烦,而JAX-WS更加抽象,隐藏了更多的细节,更加面向对象,实现起来你基本上不需要关心SOAP 的任何细节
3. JAX-RS(掌握)
JAX-RS 是JAVA 针对REST(Representation State Transfer)风格制定的一套Web 服务规范,由于推出的较晚,该规范(JSR 311,目前JAX-RS 的版本为1.0)并未随JDK1.6 一起发行。Rest定义可以自行搜索
jax-RS可以发布 rest风格webservice,因为rest的webservice不采用soap传输,直接采用http传输,可以返回xml或json,比较轻量。
以后可能会流行Rest风格的
二、简单例子
1.httpClient3.x.x
此方式不需要wsimport命令
[html] view
plain copy
// 通过Http-Client 框架来模拟实现 Http请求--get
public static String getMobileCodeInfo1(String mobileCode, String userID)
throws HttpException, IOException {
HttpClient client = new HttpClient();
GetMethod getMethod=new GetMethod("http://ws.webxml.com.cn/WebServices/MobileCodeWS.asmx/getMobileCodeInfo?mobileCode="
+ mobileCode + "&userID=" + userID);
//执行,得到消息码
int code = client.executeMethod(getMethod);
System.out.println("消息码:"+code);
String result="";
if (code==HttpURLConnection.HTTP_OK) {
//得到执行结果
result = getMethod.getResponseBodyAsString();
System.out.println(result);
}
return result;
}
// 通过Http-Client 框架来模拟实现 Http请求--post
// 需要导入3个jar包,本demo的jar包版本是3.1.0
// 目前最新的是4.5.2,使用方式也发生了变化
public static String getMobileCodeInfo2(String mobileCode, String userID)
throws HttpException, IOException {
// 输入服务网址
HttpClient client = new HttpClient();
// GetMethod
PostMethod post = new PostMethod(
"http://ws.webxml.com.cn/WebServices/MobileCodeWS.asmx/getMobileCodeInfo");
// 设置参数
post.setParameter("mobileCode", mobileCode);
post.setParameter("userID", userID);
// client.setTimeout(newTimeoutInMilliseconds);
// 执行,返回一个结果码
int code = client.executeMethod(post);
System.out.println("结果码:" + code);
// 获取xml结果
String result = post.getResponseBodyAsString();
System.out.println("结果:" + result);
//释放连接
post.releaseConnection();
return result;
}
// Post请求 :通过Http-Client 框架来模拟实现 Http请求
//从xml中获取请求参数
//SOAP1.1方式
//问题:soap怎么定义,这里已经返回接结果,但是没有手机号信息,也就返回的结果匹配,不知道为什么
//估计是配置文件有问题
//soap1.1
@Test
public void soap() throws Exception{
HttpClient client=new HttpClient();
PostMethod postMethod=new PostMethod("http://ws.webxml.com.cn/WebServices/MobileCodeWS.asmx");
//3.设置请求参数
postMethod.setRequestBody(new FileInputStream("D:/soap.xml")); //文件名自定义
//修改请求的头部
postMethod.setRequestHeader("Content-Type", "text/xml; charset=utf-8");
//4.执行请求 ,结果码
int code=client.executeMethod(postMethod);
System.out.println("结果码:"+code);
//5. 获取结果
String result=postMethod.getResponseBodyAsString();
System.out.println("Post请求的结果:"+result);
}
public static void main(String[] args) throws IOException {
// getMobileInfo("13476699xxx", "");
getMobileCodeInfo1("13476699xxx", "");//
// getMobileCodeInfo2("13476699xxx", "");//
//soap,利用xml传输参数
}
其中:请求参数封装在soap.xml中
请求规范服务方会提供给你的
soap.xml请求内容如下:
[html] view
plain copy
<?xml version="1.0" encoding="utf-8"?>
<soap:Envelope xmlns:xsi="http://www.w3.org/2001/XMLSchema-instance" xmlns:xsd="http://www.w3.org/2001/XMLSchema" xmlns:soap="http://schemas.xmlsoap.org/soap/envelope/">
<soap:Body>
<getMobileCodeInfo xmlns="http://WebXml.com.cn/">
<mobileCode>1347669xxxx</mobileCode>
<userID></userID>
</getMobileCodeInfo>
</soap:Body>
</soap:Envelope>
httpClient4.x.x不做演示,感兴趣的可以去查查,资料很多
2.java自带API实现
2.1 类发布
2.1.1 使用默认设置
[html] view
plain copy
@WebService
//默认服务名会加上Service
public class PhoneInfoWS {
//默认方法名getPhoneInfo
//默认参数名arg0
//默认返回值名字:return
//targetNamespace默认情况下为倒置的包名
public Phone getPhoneInfo(String OSName) {
Phone p=new Phone();
if ("Android".equalsIgnoreCase(OSName)) {
p.setOS(OSName);
p.setOwn("Google");
p.setScale(80);
}else if("IOS".equalsIgnoreCase(OSName)){
p.setOS(OSName);
p.setOwn("Apple");
p.setScale(14);
}else if("windows Phone".equalsIgnoreCase(OSName)){
p.setOS(OSName);
p.setOwn("Microsoft");
p.setScale(4);
}else{
p.setOS("others");
p.setOwn("others");
p.setScale(2);
}
return p;
}
//静态,非public方法不会被自动发布
public static String say(String city){
return "hello"+city;
}
//访问时自动生成一个描述文件xml+xsd约束文件
public static void main(String[] args) {
//implementor要发布的对象,一般是接口的实现类
String address1="http://127.0.0.1/PhoneInfoWS1?WSDL";
// String address2="http://127.0.0.1/PhoneInfoWS2?WSDL";
Endpoint point = Endpoint.publish(address1, new PhoneInfoWS());
Endpoint.publish(address1, new PhoneInfoWS());
// Endpoint.publish(address2, new PhoneInfoWS());
//关闭发布
// point.stop();
}
}
2.1.2自定义设置
[html] view
plain copy
@WebService(serviceName="PhoneInfoService",targetNamespace="http://PhoneService.web.com/")
//默认服务名会加上Service
public class PhoneInfoWS1 {
@WebMethod(operationName="getPhoneInfo")
public @WebResult(name="phone") Phone getPhoneInfo(@WebParam(name="OSName") String OSName) {
Phone p=new Phone();
if ("Android".equalsIgnoreCase(OSName)) {
p.setOS(OSName);
p.setOwn("Google");
p.setScale(80);
}else if("IOS".equalsIgnoreCase(OSName)){
p.setOS(OSName);
p.setOwn("Apple");
p.setScale(14);
}else if("windows Phone".equalsIgnoreCase(OSName)){
p.setOS(OSName);
p.setOwn("Microsoft");
p.setScale(4);
}else{
p.setOS("others");
p.setOwn("others");
p.setScale(2);
}
return p;
}
//静态,非public方法不会被自动发布
public static String say(String city){
return "hello"+city;
}
//屏蔽要发布的方法
@WebMethod(exclude=true)
public String say1(String city){
return "hello"+city;
}
public String say2(String city){
return "hello"+city;
}
//访问时自动生成一个描述文件xml+xsd约束文件
public static void main(String[] args) {
//implementor要发布的对象,一般是接口的实现类
String address1="http://127.0.0.1/PhoneInfoWS1?WSDL";
// String address2="http://127.0.0.1/PhoneInfoWS2?WSDL";
Endpoint point = Endpoint.publish(address1, new PhoneInfoWS1());
point.toString();
Endpoint.publish(address1, new PhoneInfoWS1());
// Endpoint.publish(address2, new PhoneInfoWS1());
//关闭发布
// point.stop();
}
}
注意:
1. 在类上添加@WebService注解,代表发布一个WebService服务
2. 通过EndPoint(端点服务)发布一个webService。Endpoint也是jdk提供的一个专门用于发布服务的类,它的publish方法接收两个参数,
一个是本地的服务地址,二是提供服务的类。它位于javax.xml.ws.*包中。
3. Endpoint.publish(String address, Object implementor) 静态方法在给定地址处针对指定的实现者对象创建并发布端点
4. 默认public修饰的方法自动发布,静态方法不会公布
5. 如果希望某个方法不对外公开,可以在方法上添加@WebMethod(exclude=true),阻止对外公开。
6. 如果一个类上,被添加了@WebService注解,则必须此类至少有一个可以公开的方法,否则将会启动失败。
7.异常处理:
报错:
com.sun.xml.internal.ws.model.RuntimeModelerException: runtime modeler error: Wrapper class com.web.PhoneService.jaxws.GetPhoneInfo is not found.
Have you run APT to generate them?
解决办法:jdk7就可以了
8.测试方法:
a.利用上面说的wsimport生成本地代理,然后调用里面的代码进行测试就可以了,这里就省略了
b.更方便的测试是使用Eclipse的Web Services Explorer 或者Myeclipse的SOAP Web Services Explorer进行测试
把链接:比如 http://127.0.0.1/PhoneInfoWS1?WSDL 放入到浏览器的WSDL地址栏就可以了
2.2接口发布
[html] view
plain copy
@WebService
public interface JobService {
public String getJobInfo();
}
/*
* 默认只会发布接口的方法,实现类自定义的方法不会被发布了
* 接口和实现类都需要加注解修饰
*
* 联想Spring的注入只需在实现类加入注解即可
*/
@WebService(serviceName="JobServiceImplService",
endpointInterface="com.web.InterfaceService.JobService")
public class JobServiceImpl implements JobService{
@Override
public String getJobInfo() {
// TODO Auto-generated method stub
return "java开发|前端开发|数据库开发";
}
// 实现类自定义的方法不会被发布
public String say(String name){
return "hello "+name;
}
public static void main(String[] args) {
String address="http://127.0.0.1/JobServiceImpl?WSDL";
Endpoint.publish(address, new JobServiceImpl());
System.out.println(address);
}
}
3.CXF框架
Apache CXF 是一个开源的 Services 框架,是XFire和Celtix项目的结合产品,CXF 帮助您来构建和开发 Services 这些 Services 可以支持多种协议,比如:SOAP、POST/HTTP、RESTful HTTP CXF 大大简化了 Service可以天然地和 spring 进行无缝集成。
3.1最简单的接口发布
这里先不与Spring集成,需要的jar包
asm-3.3.jar
commons-logging-1.1.1.jar
cxf-2.4.2.jar
jetty-continuation-7.4.5.v20110725.jar
jetty-http-7.4.5.v20110725.jar
jetty-io-7.4.5.v20110725.jar
jetty-security-7.4.5.v20110725.jar
jetty-server-7.4.5.v20110725.jar
jetty-util-7.4.5.v20110725.jar
neethi-3.0.1.jar
wsdl4j-1.6.2.jar
xmlschema-core-2.0.jar
这里用的是2.4.2的,老版本,不要介意,最新版本3.1.6,可以自行下载
[html] view
plain copy
@WebService
//声明soap1.2
//@BindingType(value=SOAPBinding.SOAP12HTTP_BINDING)
public interface LanguageService {
public String getLanguage(int num);
}
//开发语言排行榜
@WebService
public class LanguageServiceImpl implements LanguageService {
@Override
public String getLanguage(int num) {
String language="";
switch (num) {
case 1:
language="java语言";
break;
case 2:
language="C语言";
break;
case 3:
language="Objective-C语言";
break;
case 4:
language="C#语言";
break;
default:
language="没有找到你要排名的语言";
break;
}
return language;
}
/*
* 方式1:ServerFactoryBean
* 不支持注解,就算你添加了注解也不起作用
* 所以你不能修改服务名,方法名,参数名,工作空间等
* 另外不支持拦截器
* 方式2:JaxWsServerFactoryBean为ServerFactoryBean的子类(功能扩展)
* 特点:
* 1、支持注解,如果你没有使用@webService,运行后,是不会发布方法的。。,所以注解必须加
* 如果有接口实现,只需要在接口加上注解即可,命名注解也要在接口里面做
* 这跟之前的纯java开发webservice有些不一样,纯java开发接口和实现类要改名必须都加上注解才行
* 2、支持拦截器
* 3、生成的wsdl更加规范
* 两者的wsdl区别:
* a.方式1 默认不加servcie 方式2:默认加Service,比如<wsdl:definitions name="LanguageServiceService"
* b.方式1 元素前缀 xsd 方式2 元素前缀xs
* c.方式1
<wsdl:portType name="LanguageServicePortType">
方式2
<wsdl:portType name="LanguageService">没有加PortType
webService访问流程:
1.首先进行握手,检查本地代理与服务端的wsdl是否一致,采用的是get请求验证
2.采用post请求,封装请求参数到xml中,采用soap通信,将这个请求xml传输到服务端
3.封装结果为xml,采用soap通信返回xml,再到客户端解析得到方法的返回值
*/
//方式1:不通过注解发布
//这种方式没有添加webService注解,也就是说没有注解也可以发布webService服务,
// 但是这种方式不是很规范,比如我们不可以通过注解的方式来修改WSDL的标签信息
private static void publishServie1(){
LanguageService languageService=new LanguageServiceImpl();
ServerFactoryBean bean=new ServerFactoryBean();
//Endpoint :地址 , 实现对象
// bean.setAddress("http://192.168.8.178:9999/ws/cxf/languangeService");
bean.setAddress("http://127.0.0.1:9999/ws/cxf/languangeService?WSDL");
//注册服务器地址和端口
bean.setServiceClass(LanguageService.class);//对外提供webservcie的业务类或者接口
//注册哪个实现类提供服务
bean.setServiceBean(languageService);//服务的实现bean
Server server = bean.create();//创建,发布webservice
//10秒有效
// Thread.sleep(1*10*1000);
// server.stop();
// System.exit(0);
}
//JaxWsServerFactoryBean是ServerFactoryBean的子类
//可以提供拦截器
private static void publishServie2(){
JaxWsServerFactoryBean bean=new JaxWsServerFactoryBean();
//地址WSDL加不加都可以,访问时加上就可以了,不加端口也可以发布
bean.setAddress("http://127.0.0.1:8888/ws/cxf/languangeService?WSDL");
// bean.setAddress("http://127.0.0.1/ws/cxf/languangeService?WSDL");
//设置服务接口
bean.setServiceClass(LanguageService.class);
//设置服务的类
bean.setServiceBean(new LanguageServiceImpl());
//输入信息拦截器
bean.getInInterceptors().add(new LoggingInInterceptor());
//输出信息拦截器
bean.getOutInterceptors().add(new LoggingOutInterceptor());
Server server = bean.create();
}
public static void main(String[] args) throws Exception{
// publishServie1();
publishServie2();
}
}
3.2 结合Spring发布服务
这里重点是如何配置发布服务,业务逻辑仅仅是演示(辅助),不必参考
要发布的服务:保存和根据姓名查询员工
saveEmployee findEmployeeByName
步骤:
3.2.1.导包cxf2.7.18里面的所有jar包 ,其中jetty包不需要,因为应用是部署在tomcat里面
3.2. 2.建实体类,DB类(模拟)
[html] view
plain copy
public class Employee {
private String name;
private Integer age;
@DateTimeFormat(pattern="yyyy-MM-dd")
private Date birthday;
public Employee() {
super();
}
public Employee(String name, Integer age, Date birthday) {
super();
this.name = name;
this.age = age;
this.birthday = birthday;
}
public String getName() {
return name;
}
public void setName(String name) {
this.name = name;
}
public Integer getAge() {
return age;
}
public void setAge(Integer age) {
this.age = age;
}
public Date getBirthday() {
return birthday;
}
public void setBirthday(Date birthday) {
this.birthday = birthday;
}
@Override
public String toString() {
return "Employee [name=" + name + ", age=" + age + ", birthday="
+ birthday + "]";
}
}
[html] view
plain copy
//运行时如果报错Unsupported major.minor version 51.0
//这说明jdk版本不对,即tomcat的jdk版本跟项目版本不一致
@Repository
public class EmployeeDB {
public EmployeeDB(){}
private static List<Employee> list=new ArrayList<Employee>();
static{
list.add(new Employee("小米", 12, new Date()));
}
public void save(Employee employee){
list.add(employee);
}
public Employee findByName(String name){
if (list.size()>0) {
for(Employee e:list){
if (e.getName().equals(name)) {
return e;
}
}
}
return null;
}
public List<Employee> findAll(){
return list;
}
public void deleteByName(String name) throws Exception{
if (name.length()==0||name==null) {
throw new Exception("删除用户异常");
}
for (int i = 0; i < list.size(); i++) {
if (name.equals(list.get(i).getName())) {
list.remove(list.get(i));
break;
}
}
}
}
3.2.3.建立服务类
[html] view
plain copy
@WebService(serviceName="EmployeeService")
public interface EmployeeService {
public void saveEmployee(@WebParam(name="employee")Employee employee );
public @WebResult(name="Employee")Employee findEmployeeByName(@WebParam(name="name")String name);
}
public class EmployeeServiceImpl implements EmployeeService{
@Autowired
private EmployeeDB db;
@Override
public void saveEmployee(Employee employee) {
System.out.println("EmployeeDB:"+db);
db.save(employee);
}
@Override
public Employee findEmployeeByName(String name) {
if (name.length()==0||name==null) {
return null;
}
return db.findByName(name);
}
}
3.2. 4.写页面,写Servlet(如果单纯为了测试发布的服务,这些可以不需要)
[html] view
plain copy
<%@ page language="java" import="java.util.*" pageEncoding="UTF-8"%>
<!DOCTYPE HTML PUBLIC "-//W3C//DTD HTML 4.01 Transitional//EN">
<html>
<head>
<title>添加员工</title>
<meta http-equiv="pragma" content="no-cache">
<meta http-equiv="cache-control" content="no-cache">
<meta http-equiv="expires" content="0">
<meta http-equiv="keywords" content="keyword1,keyword2,keyword3">
<meta http-equiv="description" content="This is my page">
<!--
<link rel="stylesheet" type="text/css" href="styles.css">
-->
</head>
<body>
<form action="${pageContext.request.contextPath}/AddServlet" method="post">
用户名:<input type="text" name="name" /><br/>
年龄:<input type="text" name="age" /><br/>
生日:<input type="text" name="birthday" /><br/>
<input type="submit" value="提交" />
</form>
</body>
</html>
[html] view
plain copy
public class AddServlet extends HttpServlet {
private EmployeeService employeeService;
@Override
public void init() throws ServletException {
WebApplicationContext context=WebApplicationContextUtils.getWebApplicationContext(this.getServletContext());
//得到的是实现类对象
employeeService=(EmployeeService) context.getBean("employeeService");
System.out.println("employeeService:"+employeeService);
}
public void doGet(HttpServletRequest request, HttpServletResponse response)
throws ServletException, IOException {
response.setContentType("text/html;charset=utf-8");
String name=request.getParameter("name");
String age=request.getParameter("age");
String birthday=request.getParameter("birthday");
Employee employee=new Employee();
employee.setName(name);
employee.setAge(Integer.parseInt(age));
employee.setBirthday(DateUtil.stringToDate(birthday, "yyyy-MM-dd"));
employeeService.saveEmployee(employee);
//检查是否存进去进去了
EmployeeDB db=new EmployeeDB();
System.out.println("db.size():"+db.findAll().size());
}
public void doPost(HttpServletRequest request, HttpServletResponse response)
throws ServletException, IOException {
doGet(request, response);
}
}
3.2.5.配置applicationContext.xml和web.xml
[html] view
plain copy
<?xml version="1.0" encoding="UTF-8"?>
<beans
xmlns="http://www.springframework.org/schema/beans"
xmlns:xsi="http://www.w3.org/2001/XMLSchema-instance"
xmlns:p="http://www.springframework.org/schema/p"
xmlns:context="http://www.springframework.org/schema/context"
xmlns:jaxws="http://cxf.apache.org/jaxws"
xsi:schemaLocation="http://www.springframework.org/schema/beans http://www.springframework.org/schema/beans/spring-beans-3.1.xsd http://www.springframework.org/schema/context http://www.springframework.org/schema/context/spring-context.xsd http://cxf.apache.org/jaxws http://cxf.apache.org/schemas/jaxws.xsd">
<context:component-scan base-package="com.demo.*"></context:component-scan>
<bean id="employeeService" class="com.demo.webService.EmployeeServiceImpl"></bean>
<!-- 配置cxf
地址: 比如: http://192.168.114.10:8080/CXF_Server/ws/employeeManager
组成 : http://192.168.114.10:8080 +CXF_Server( 项目名)+ws(过滤的路径)+/employeeManager(自定义部分)
服务类 :
服务的实现类:
拦截器
-->
<jaxws:server serviceClass="com.demo.webService.EmployeeService" address="/employeeService">
<jaxws:serviceBean>
<ref bean="employeeService"/>
</jaxws:serviceBean>
<jaxws:inInterceptors>
<bean class="org.apache.cxf.interceptor.LoggingInInterceptor"></bean>
</jaxws:inInterceptors>
<jaxws:outInterceptors>
<bean class="org.apache.cxf.interceptor.LoggingOutInterceptor"/>
</jaxws:outInterceptors>
</jaxws:server>
</beans>
web.xml
[html] view
plain copy
<?xml version="1.0" encoding="UTF-8"?>
<web-app xmlns:xsi="http://www.w3.org/2001/XMLSchema-instance" xmlns="http://java.sun.com/xml/ns/javaee" xsi:schemaLocation="http://java.sun.com/xml/ns/javaee http://java.sun.com/xml/ns/javaee/web-app_3_0.xsd" id="WebApp_ID" version="3.0">
<display-name>CXFDemo1</display-name>
<welcome-file-list>
<welcome-file>index.jsp</welcome-file>
</welcome-file-list>
<!-- 配置CXF的Servlet,用来处理webService的请求 -->
<servlet>
<servlet-name>cxf</servlet-name>
<servlet-class>org.apache.cxf.transport.servlet.CXFServlet</servlet-class>
<load-on-startup>1</load-on-startup>
</servlet>
<servlet>
<servlet-name>AddServlet</servlet-name>
<servlet-class>com.demo.web.AddServlet</servlet-class>
</servlet>
<servlet-mapping>
<servlet-name>cxf</servlet-name>
<url-pattern>/ws/*</url-pattern>
</servlet-mapping>
<servlet-mapping>
<servlet-name>AddServlet</servlet-name>
<url-pattern>/AddServlet</url-pattern>
</servlet-mapping>
<listener>
<listener-class>org.springframework.web.context.ContextLoaderListener</listener-class>
</listener>
<context-param>
<param-name>contextConfigLocation</param-name>
<param-value>classpath:applicationContext.xml</param-value>
</context-param>
</web-app>
3.2.6.工具类
[html] view
plain copy
public class DateUtil {
private DateUtil() {
}
public static String dateToString(Date d, String format) {
return new SimpleDateFormat(format).format(d);
}
public static Date stringToDate(String s, String format) {
try {
return new SimpleDateFormat(format).parse(s);
} catch (ParseException e) {
e.printStackTrace();
}
return null;
}
}
3.2.7.访问:http://localhost:8080/CXFDemo2/ws
4.Axis2发布服务
4.1比较
Axis2是从Axis1.x系列发展而来。CXF则是XFire和Celtix项目的结合产品。Axis2是从底层全部重新实现,使用了新的扩展性更好模块架构。 CXF也重新的深化了XFire和Celtix这两个开发工具。
1.CXF支持 WS-Addressing,WS-Policy, WS-RM, WS-Security和WS-I Basic Profile。Axis2不支持WS-Policy,现在应该支持了。
2. CXF可以很好支持Spring。Axis2不能(没测试过,现在应该可以吧,待测。。)
3. AXIS2支持更广泛的数据并对,如XMLBeans,JiBX,JaxMe和JaxBRI和它自定义的数据绑定ADB。注意JaxME和JaxBRI都还是试验性的。CXF只支持JAXB和Aegis。
4. Axis2支持多语言-除了Java,他还支持C/C++版本
如何抉择:
1、如果应用程序需要多语言的支持,Axis2 应当是首选了;
2、如果应用程序是遵循 Spring 哲学路线的话,Apache CXF 是一种更好的选择,特别对嵌入式的 Web Services 来说;
目前asix2最新版本1.7.1
4.2安装插件
4.2.1Eclipse
axis2-eclipse-codegen-plugin-1.7.1.zip
axis2-eclipse-service-plugin-1.7.1.zip
解压的jar包放入Eclipse的dropins目录
4.2.2Myeclipse
axis2-eclipse-codegen-wizard.zip
axis2-eclipse-service-archiver-wizard.zip
解压放入到Myeclipse的dropins目录
4.3 实现方式有很多
这里简单说明下最快速的2种方式,Eclipse实现
方式1:不使用插件实现
1.配置环境变量(不是必须的)
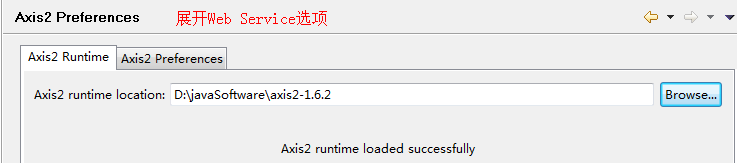
2.配置webService环境
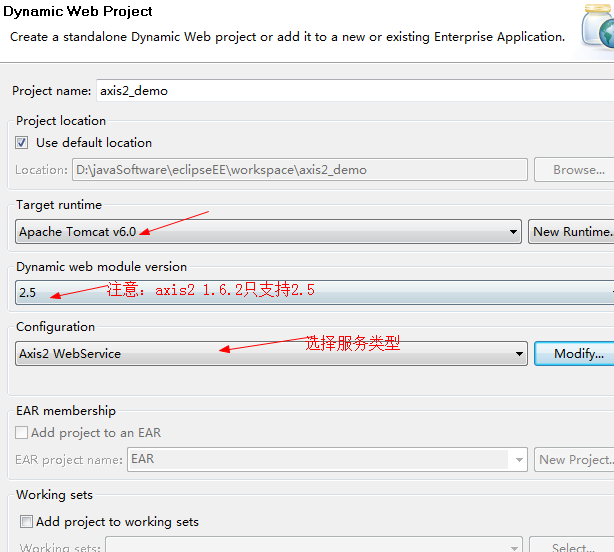
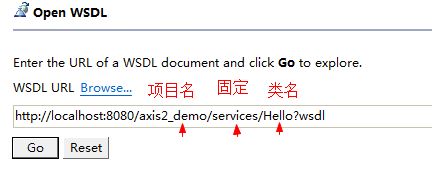
2.建立一个动态web项目
方式2:使用插件实现
建一个普通的动态项目,不选择webService环境
这个实现网上有很多,实现参考:http://blog.csdn.NET/wangchangpen62/article/details/45171001
好了,先写到这吧
以上做了个简单的小结,深入应用还待学习。。。。
转自:http://blog.csdn.net/u011165335/article/details/51345224#comments

相关文章推荐
- Java调用.NET webservice方法的几种方式
- 调用webService的几种方式
- WebService客户端调用的几种方式
- java调用webservice几种方式
- 调用webService的几种方式
- 调用WebService的几种方式
- [z]Java调用.NET webservice方法的几种方式
- 调用webService的几种方式
- 调用WebService的几种方式
- jquery调用webservice传递参数的几种方式
- Java调用WebService的几种方式
- webservice中的wsdl文件的剖析,已经swebservice客户端调用的几种方式
- axis2调用webService几种方式
- WebService客户端的几种调用方式
- Java调用.NET webservice方法的几种方式
- webservice中的wsdl文件的剖析,已经swebservice客户端调用的几种方式
- ASP调用带参数存储过程的几种方式
- ASP调用带参数存储过程的几种方式 (转)
- ASP.NET中异步调用WebService方式!(转)
- 几种调用WebService的方法