Azure VM从ASM迁移到ARM(二)
2017-06-23 23:18
441 查看
在一中讨论了通过Azure平台的工具进行迁移的方案。
本文将讨论另外一种迁移方式。通过磁盘复制的方式,把部分VM迁移到ARM的Managed Disk模式。
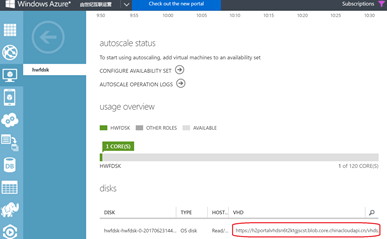
一. 获得ASM中Disk的信息
在管理界面上,获取VM的Disk信息
二. 通过这个Disk的URL,创建Managed Disk
此时可以通过命令行获得这个Disk的信息:
因为创建是没有制定sku,所以默认创建了Premium的Disk。是在Managed Disk的管理模式下,非常方便的可以更改其SKU。具体命令如下:
此时Disk已经变成HDD的了。
三 通过这个Disk创建VM
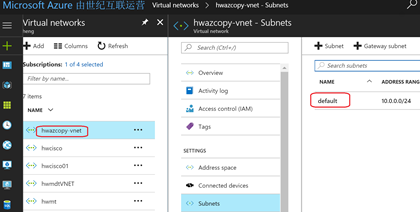
创建VM前,先查询在ARM中的VNet信息:
在Portal页面上找到Vnet信息:
然后,用命令行创建VM:
命令格式非常简单,由于是已经有的Disk,所以不用指定用户名和密码,只需要指定:
机器名称
资源组
挂载的OSDisk信息
VM的Size
Vnet信息,包括Subnet信息
OS类型
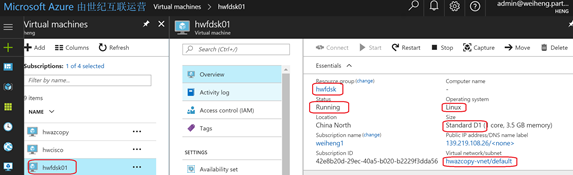
Protal上可以看到机器已经运行起来了,并且刚刚配置的几个参数,都可以找到:
四 总结
通过ASM中VM的VHD链接创建Managed Disk,在通过这个Manage Disk方便的创建一台VM。实现快速的VM从ASM到ARM的迁移。
本文将讨论另外一种迁移方式。通过磁盘复制的方式,把部分VM迁移到ARM的Managed Disk模式。
一. 获得ASM中Disk的信息
在管理界面上,获取VM的Disk信息
二. 通过这个Disk的URL,创建Managed Disk
root@hw-surfacebook:~# az disk create -g hwfdsk -n hwmd01 --source https://h2portalvhdsn6t2ktgjscst.blob.core.chinacloudapi.cn/vhds/hwfdsk-hwfdsk-2017-06-23.vhd {/ Finished ..
"accountType": "Premium_LRS",
"creationData": {
"createOption": "Import",
"imageReference": null,
"sourceResourceId": null,
"sourceUri": "https://h2portalvhdsn6t2ktgjscst.blob.core.chinacloudapi.cn/vhds/hwfdsk-hwfdsk-2017-06-23.vhd",
"storageAccountId": null
},
"diskSizeGb": null,
"encryptionSettings": null,
"id": "/subscriptions/xxxx/resourceGroups/hwfdsk/providers/Microsoft.Compute/disks/hwmd01",
"location": "chinanorth",
"name": "hwmd01",
"osType": null,
"ownerId": null,
"provisioningState": "Succeeded",
"resourceGroup": "hwfdsk",
"tags": {},
"timeCreated": "2017-06-23T14:52:46.629909+00:00",
"type": "Microsoft.Compute/disks"
}
此时可以通过命令行获得这个Disk的信息:
root@hw-surfacebook:~# az disk list -o table
AccountType    Location    Name               ProvisioningState    ResourceGroup    TimeCreated                         DiskSizeGb  OsType    OwnerId
-------------  ----------  -----------------  -------------------  ---------------  --------------------------------  ------------  --------  ---------------------------------------------------------------------------------------------------------------------------
Premium_LRS    chinanorth  hwmd01             Succeeded            HWFDSK           2017-06-23T14:52:46.629909+00:00
因为创建是没有制定sku,所以默认创建了Premium的Disk。是在Managed Disk的管理模式下,非常方便的可以更改其SKU。具体命令如下:
root@hw-surfacebook:~# az disk update -n hwmd01 -g hwfdsk --sku Standard_LRS
{
"accountType": "Standard_LRS",
"creationData": {
"createOption": "Import",
"imageReference": null,
"sourceResourceId": null,
"sourceUri": "https://h2portalvhdsn6t2ktgjscst.blob.core.chinacloudapi.cn/vhds/hwfdsk-hwfdsk-2017-06-23.vhd",
"storageAccountId": null
},
"diskSizeGb": null,
"encryptionSettings": null,
"id": "/subscriptions/xxxx/resourceGroups/hwfdsk/providers/Microsoft.Compute/disks/hwmd01",
"location": "chinanorth",
"name": "hwmd01",
"osType": null,
"ownerId": null,
"provisioningState": "Succeeded",
"resourceGroup": "hwfdsk",
"tags": {},
"timeCreated": "2017-06-23T14:52:46.629909+00:00",
"type": "Microsoft.Compute/disks"
}
此时Disk已经变成HDD的了。
三 通过这个Disk创建VM
创建VM前,先查询在ARM中的VNet信息:
在Portal页面上找到Vnet信息:
然后,用命令行创建VM:
root@hw-surfacebook:~# az vm create -n hwfdsk01 -g hwfdsk --attach-os-disk hwmd01  --size Standard_D1  --vnet-name hwazcopy-vnet  --subnet default --os-type linux
{/ Finished ..
"fqdns": "",
"id": "/subscriptions/xxxx/resourceGroups/hwfdsk/providers/Microsoft.Compute/virtualMachines/hwfdsk01",
"location": "chinanorth",
"macAddress": "00-17-FA-00-A7-B6",
"powerState": "VM running",
"privateIpAddress": "10.0.0.4",
"publicIpAddress": "139.219.108.26",
"resourceGroup": "hwfdsk"
}
命令格式非常简单,由于是已经有的Disk,所以不用指定用户名和密码,只需要指定:
机器名称
资源组
挂载的OSDisk信息
VM的Size
Vnet信息,包括Subnet信息
OS类型
Protal上可以看到机器已经运行起来了,并且刚刚配置的几个参数,都可以找到:
四 总结
通过ASM中VM的VHD链接创建Managed Disk,在通过这个Manage Disk方便的创建一台VM。实现快速的VM从ASM到ARM的迁移。

相关文章推荐
- Azure ARM (18) 将传统的ASM VM迁移到ARM VM (1)
- Azure ARM (19) 将传统的ASM VM迁移到ARM VM (2)
- Azure ASM到ARM迁移 (三) Reserved IP的迁移
- Azure PowerShell (15) 批量导出Azure ASM/ARM VM信息
- PowerShell迁移Azure虚拟机从ASM到ARM
- 把Azure专线从Class模式迁移到ARM模式
- 将ASM资源迁移至ARM
- 从ASM迁移到ARM(1):平台支持的迁移服务
- Azure ARM (13) 从现有VHD文件,创建新的ARM VM
- Azure ARM (20) 将非托管磁盘虚拟机(Unmanage Disk),迁移成托管磁盘虚拟机(Manage Disk)
- 在Global Azure上用Azure CLI创建ARM的VM和面向公网的负载均衡
- [Azure]使用Powershell获取ASM和ARM存储的实际使用量
- 在Azure New Portal上创建基于ARM的带SLB的VM
- 手动将经典 VM 从 VHD 迁移到新的 ARM 托管磁盘 VM
- Azure ASM/ARM比较
- 手动将经典 VM 从 VHD 迁移到新的 ARM 托管磁盘 VM
- Azure ARM (14) 设置ARM VM的Availability Set