iOS 使用贝塞尔曲线绘制路径
2017-06-23 11:43
441 查看
使用贝塞尔曲线绘制路径
大多数时候,我们在开发中使用的控件的边框是矩形,或者做一点圆角,是使得矩形的角看起来更加的圆滑。 但是如果我们想要一个不规则的图形怎么办?有人说,叫UI妹子做,不仅省事,还可以趁机接近她们(_:D)。这又时候确实可以。但是如果是一个时刻变动的不规则图形,这样如果做成动图或者剪出很多张图,再叫UI妹子做的话,似乎也能解决, 但是实际效果吧,呵呵。好吧,iOS中我们其实不需要担心这个问题。使用UIBezierPath可以很容易的会址出一些复杂的图形。UIBezierPath 属于UIkit,可以用于绘制路径。 说到绘制,大家很快想到了大名鼎鼎的Core Graphics,同学们直接使用 Core Graphics绘制图形也完全没有问题,Core Graphics具有更多的绘制途径,它是一套强大的API,但是其函数之多异常绝对会让不熟悉的你头晕脑胀,iOS 很人性化的对 Core Graphics进行封装。也即是UIBezierPath。这篇文章主要讲解下如何使用UIBezierPath结合CAShapeLayer在一个UIView上绘制简单的路径。
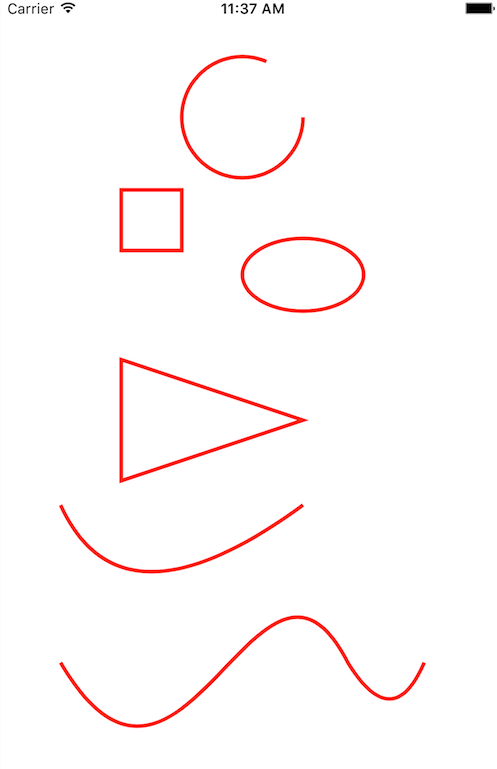
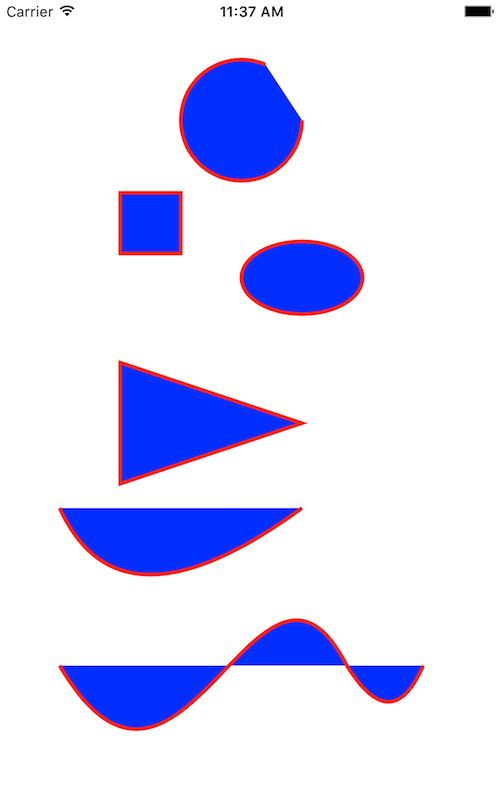
对于路径的绘制两种方式,一种是填充(fill ),一种是描绘(stroke)。直接上代码吧,毕竟也不是什么高深的知识。
import UIKit

class ViewController: UIViewController {

override func viewDidLoad() {
super.viewDidLoad()
self.userBezier()
}

override func didReceiveMemoryWarning() {
super.didReceiveMemoryWarning()
}

func userBezier(){
// 绘制一段圆弧   如果是合起来的就是圆了
let criclePath: UIBezierPath = UIBezierPath.init(arcCenter: CGPoint.init(x: 200, y: 100), radius: 50, startAngle: 0, endAngle: 5.12, clockwise: true)
criclePath.stroke()

// 绘制一个矩形
let rectPath: UIBezierPath = UIBezierPath.init(rect: CGRect.init(x: 100, y: 160, width: 50, height: 50))
criclePath.append(rectPath)

// 绘制一个椭圆  原理是内接矩形,如果矩形的长宽相等那么绘制的就是圆
let ovalPath:UIBezierPath = UIBezierPath.init(ovalIn: CGRect.init(x: 200, y: 200, width: 100, height: 60))
criclePath.append(ovalPath)

//绘制直线多边形  可以让多条直线拼接 组合成复杂的形状  比如绘制一个三角形
let trianglePath :UIBezierPath = UIBezierPath.init()
trianglePath.move(to: CGPoint.init(x: 100, y: 300))  //绘制起始点
trianglePath.addLine(to: CGPoint.init(x: 100, y: 400))  //从起点绘制一条直线到指定点
trianglePath.addLine(to: CGPoint.init(x: 250, y: 350))  //
trianglePath.close()   //闭合路径
trianglePath.lineWidth = 3.0
criclePath.append(trianglePath)

//添加一个二阶的曲线  二阶曲线一共是三个点, 起点/终点/折点(控制点)
let cruvePath :UIBezierPath = UIBezierPath.init()

cruvePath.move(to: CGPoint.init(x: 50, y: 420))
cruvePath.addQuadCurve(to: CGPoint.init(x: 250, y: 420), controlPoint: CGPoint.init(x: 100, y: 530))
criclePath.append(cruvePath)

//添加一个三阶的曲线  起点 终点  两个控制点 后面可以无限添加 二阶曲线  形成一个很长的三阶曲线
let path :UIBezierPath = UIBezierPath.init()
path.move(to: CGPoint.init(x: 50, y: 550))
path.addCurve(to: CGPoint.init(x: 287, y: 550), controlPoint1: CGPoint.init(x: 150, y: 720), controlPoint2: CGPoint.init(x: 215, y: 410))
path.addQuadCurve(to: CGPoint.init(x: 350, y: 550), controlPoint: CGPoint.init(x: 324, y: 610))
criclePath.append(path)

//创建一个CAShapelayer  用于显示这些路径
let shPl: CAShapeLayer = CAShapeLayer.init()
shPl.path = criclePath.cgPath
shPl.lineWidth = 3.0
shPl.fillColor = UIColor.clear.cgColor  //填充路径

shPl.strokeColor = UIColor.red.cgColor   //描绘路径 根据线宽来描绘

self.view.layer.addSublayer(shPl)
self.view.layer.backgroundColor = UIColor.white.cgColor

}

}
根据绘制的方式不同,运行下面两张图片:

相关文章推荐
- iOS:使用贝塞尔曲线绘制图表(折线图、柱状图、饼状图)
- iOS 雷达图的绘制 贝塞尔曲线的使用UIBezierPath
- 【深入浅出IOS开发】使用路径进行绘制图形
- iOS 雷达图的绘制 贝塞尔曲线的使用UIBezierPath
- iOS 雷达图的绘制 贝塞尔曲线的使用UIBezierPath
- 【深入浅出IOS开发】使用路径进行绘制图形
- iOS 雷达图的绘制 贝塞尔曲线的使用UIBezierPath
- iOS 雷达图的绘制 贝塞尔曲线的使用UIBezierPath
- Firemonkey扩展增强:iOS/Android使用贝塞尔曲线绘制签名(笔迹)
- iOS 雷达图的绘制 贝塞尔曲线的使用UIBezierPath
- 【IOS 开发学习总结-OC-65】Quartz 2D绘图(4-2)——绘制文本+设置阴影+使用路径
- iOS 雷达图的绘制 贝塞尔曲线的使用UIBezierPath
- iOS中使用Core Plot绘制统计图入门
- iOS开发的2D绘制--CoreGraphics的简单使用二(画图形)
- iOS沙盒路径的查看和使用
- 使用Xcode修改iOS项目工程名和路径名
- iOS 使用 Core Plot 绘制统计图表入门
- 路径设置IOS开发(82)之绘制矩形
- iOS Cllocationmanger定位, 使用Google Map API在mapview上画路径
- iOS 使用 Core Plot 绘制统计图表入门