计算机图形学——光线追踪
2017-06-15 14:19
746 查看
计算机图形学——光线追踪
参考资料 :用JavaScript玩转计算机图形学实验内容:使用光线追踪进行场景渲染。
实验效果:
1、简介
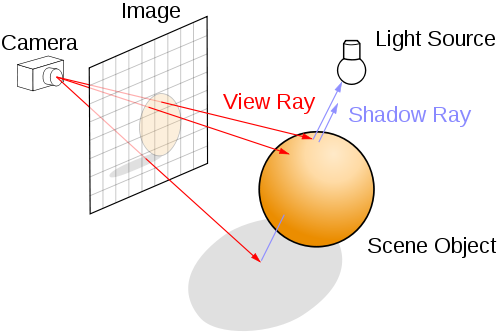
光线跟踪(ray tracing)是一个在二维(2D)屏幕上呈现三维(3D)图像的方法。从摄影机的位置,通过影像平面上的像素位置(比较正确的说法是取样(sampling)位置),发射一束光线到场景,求光线和几何图形间最近的交点,再求该交点的著色。如果该交点的材质是反射性的,可以在该交点向反射方向继续追踪。光线追踪除了容易支持一些全局光照效果外,亦不局限于三角形作为几何图形的单位。任何几何图形,能与一束光线计算交点(intersectionpoint),就能支持。
要计算一点是否在阴影之内,也只须发射一束光线到光源,检测中间有没有障碍物而已。不过光源和阴影留待下回分解,如下图:
2、光线
所谓光线(ray),从一点向某方向发射也。数学上可用参数函数(parametric function)表示:当中,o即发谢起点(origin),d为方向。
在C++中定义光线struct
#ifndef _Ray3_h_
#define _Ray3_h_

#include "Vector3.h"

struct Ray3 {
Vector3 origin;
Vector3 direction;

inline Ray3(const Ray3& r):origin(r.origin),direction(r.direction){}
inline Ray3(const Vector3& _origin,const Vector3& _direction):origin(_origin),direction(_direction){}
inline Vector3 getPoint(float t)const{ return origin.add(direction.multiply(t)); }
};

#endif
3、球体
球体(sphere)是其中一个最简单的立体几何图形。这里只考虑球体的表面(surface),中心点为c、半径为r的球体表面可用等式(equation)表示:如前文所述,需要计算光线和球体的最近交点。只要把光线x = r(t)代入球体等式,把该等式求解就是交点。为简化方程,设v=o - c,则:
因为d为单位向量,所以二次方的系数可以消去。 t的二次方程式的解为
若根号内为负数,即相交不发生。另外,由于这里只需要取最近的交点,因此正负号只需取负号。代码实现如下:
#ifndef _Sphere_h_
#define _Sphere_h_

#include "IGeometry.h"

struct Sphere:public IGeometry{
Vector3 center;
float   radius;
inline Sphere(const Sphere& s):center(s.center),radius(s.radius) {  }
inline Sphere(const Vector3& _center,float _radius):center(_center),radius(_radius) {  }
inline float sqrRadius()const{ return radius*radius; }

virtual IntersectResult intersect(const Ray3& ray){
Vector3 v = ray.origin.subtract(this->center);
float a0 = v.sqrLength() - this->sqrRadius();
float DdotV = ray.direction.dot(v);

if (DdotV <= 0) {
float discr = DdotV * DdotV - a0;
if (discr >= 0) {
IntersectResult result;
result.geometry = this;
result.distance = -DdotV - sqrt(discr);
result.position = ray.getPoint(result.distance);
result.normal = result.position.subtract(this->center).normalize();
return result;
}
}

return IntersectResult::noHit();
}

};

#endif
4、透视摄影机
透视摄影机比较像肉眼和真实摄影机的原理,能表现远小近大的观察方式。透视投影从视点(eye position),向某个方向观察场景,观察的角度范围称为视野(field of view, FOV)。除了定义观察的向前(forward)是那个方向,还需要定义在影像平面中,何谓上下和左右。为简单起见,暂时不考虑宽高不同的影像,FOV同时代表水平和垂直方向的视野角度。
上图显示,从摄影机上方显示的几个参数。 forward和right分别是向前和向右的单位向量。
因为视点是固定的,光线的起点不变。要生成光线,只须用取样座标(sx, sy)计算其方向d。留意FOV和s的关系为:
把sx从[0, 1]映射到[-1,1],就可以用right向量和s,来计算r向量,代码如下:
#ifndef _PerspectiveCamera_h_
#define _PerspectiveCamera_h_
#include "Ray3.h"
struct PerspectiveCamera{
Vector3 eye;
Vector3 front;
Vector3 refUp;
float   fov;

Vector3 right;
Vector3 up;
float   fovScale;

inline PerspectiveCamera(const Vector3& _eye,const Vector3& _front,const Vector3& _refUp,float _fov)
:eye(_eye),front(_front),refUp(_refUp),fov(_fov),
right(Vector3::zero()),up(Vector3::zero()),fovScale(0) { }

inline void initialize(){
right = front.cross(refUp);
up = right.cross(front);
fovScale = tan(fov* (PI  * 0.5f / 180)) * 2;
}

inline Ray3 generateRay(float x,float y)const{
Vector3 r = right.multiply((x - 0.5f) * fovScale);
Vector3 u = up.multiply((y - 0.5f) * fovScale);
return Ray3(eye,front.add(r).add(u).normalize());
}
};
#endif
5、渲染深度
深度(depth)就是从IntersectResult取得最近相交点的距离,因深度的范围是从零至无限,为了把它显示出来,可以把它的一个区间映射到灰阶。这里用[0, maxDepth]映射至[255,0],即深度0的像素为白色,深度达maxDepth的像素为黑色。
效果如下:
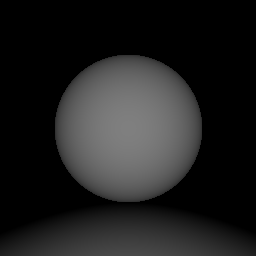
代码如下:
void renderDepth(const TPixels32Ref& ctx) {
if (ctx.getIsEmpty())
return;

Union scene;
scene.push(new Sphere(Vector3(0, 10, -10), 10));
scene.push(new Plane(Vector3(0, 1, 0), 0));

PerspectiveCamera camera( Vector3(0, 10, 10),Vector3(0, 0, -1),Vector3(0, 1, 0), 90);
long maxDepth=20;

long w = ctx.width;
long h = ctx.height;
ctx.fillColor(Color32(0,0,0,0));

Color32* pixels = ctx.pdata;

scene.initialize();
camera.initialize();

float dx=1.0f/w;
float dy=1.0f/h;
float dD=255.0f/maxDepth;
for (long y = 0; y < h; ++y){
float sy = 1 - dy*y;
for (long x = 0; x < w; ++x){
float sx =dx*x;
Ray3 ray(camera.generateRay(sx, sy));
IntersectResult result = scene.intersect(ray);
if (result.geometry) {
UInt8 depth = (UInt8)( 255 - std::min(result.distance*dD,255.0f) );
pixels[x].r = depth;
pixels[x].g = depth;
pixels[x].b = depth;
pixels[x].a = 255;
}
}
(UInt8*&)pixels+=ctx.byte_width;
}
}
6、渲染法向量
相交测试也计算了几何物件在相交位置的法向量,这里也可把它视觉化。法向量是一个单位向量,其每个元素的范围是[-1, 1]。把单位向量映射到颜色的常用方法为,把(x, y, z)映射至(r,g, b),范围从[-1, 1]映射至[0, 255]。
效果如下:
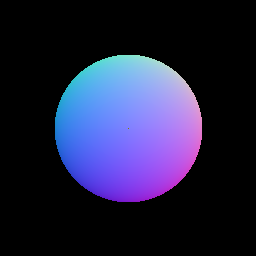
代码如下:
void renderNormal(const TPixels32Ref& ctx) {
if (ctx.getIsEmpty())
return;

Sphere scene(Vector3(0, 10, -10), 10);
PerspectiveCamera camera( Vector3(0, 10, 10),Vector3(0, 0, -1),Vector3(0, 1, 0), 90);
long maxDepth=20;

long w = ctx.width;
long h = ctx.height;
ctx.fillColor(Color32(0,0,0,0));

Color32* pixels = ctx.pdata;

scene.initialize();
camera.initialize();

float dx=1.0f/w;
float dy=1.0f/h;
float dD=255.0f/maxDepth;
for (long y = 0; y < h; ++y){
float sy = 1 - dy*y;
for (long x = 0; x < w; ++x){
float sx =dx*x;
Ray3 ray(camera.generateRay(sx, sy));
IntersectResult result = scene.intersect(ray);
if (result.geometry) {
pixels[x].r = (UInt8)( (result.normal.x + 1) * 128);
pixels[x].g = (UInt8)( (result.normal.y + 1) * 128);
pixels[x].b = (UInt8)( (result.normal.z + 1) * 128);
pixels[x].a = 255;
}
}
(UInt8*&)pixels+=ctx.byte_width;
}
}
7、材质
1、颜色
颜色在CG里最简单是用红、绿、蓝三个通道(color channel)。#ifndef _Color_h_
#define _Color_h_
struct Color{
float r;
float g;
float b;
inline Color(float _r,float _g,float _b):r(_r),g(_g),b(_b) { };
inline Color add(const Color& c)const { return Color(r + c.r, g + c.g, b + c.b); }
inline Color multiply(float s) const { return Color(r * s, g * s, b * s); }
inline Color modulate(const Color& c) const { return Color(r * c.r, g * c.g, b * c.b); }
inline void saturate() { r = std::min(r, (float)1); g = std::min(g, (float)1); b = std::min(b, (float)1); }
static inline Color black(){ return Color(0,0,0); }
static inline Color white(){ return Color(1,1,1); }
static inline Color red() { return Color(1,0,0); }
static inline Color green(){ return Color(0,1,0); }
static inline Color blue() { return Color(0,0,1); }
};
#endif2、格子材质
CG世界里,国际象棋棋盘是最常见的测试用纹理(texture)。这里不考虑纹理贴图(texture mapping)的问题,只凭(x, z)坐标计算某位置发出黑色或白色的光。#ifndef _IMaterial_h_
#define _IMaterial_h_
#include "Vector3.h"
#include "Color.h"
struct IMaterial{
float reflectiveness;
inline IMaterial(float _reflectiveness=0):reflectiveness(_reflectiveness){}
virtual Color sample(const Ray3& ray,const Vector3& position,const Vector3& normal)=0;
virtual ~IMaterial(){}
};
#endif3、Phong材质
Phong光照模型参考前面的文章,这里不多说。#ifndef _PhongMaterial_h_
#define _PhongMaterial_h_
#include "IMaterial.h"
// global temp
static Vector3 lightDir = Vector3(1, 1, 1).normalize();
static Color lightColor = Color::white();
struct PhongMaterial:public IMaterial{
Color diffuse;
Color specular;
float shininess;
inline PhongMaterial(const Color& _diffuse,const Color& _specular,const float& _shininess,float _reflectiveness=0)
:IMaterial(_reflectiveness),diffuse(_diffuse),specular(_specular),shininess(_shininess){ }
virtual Color sample(const Ray3& ray,const Vector3& position,const Vector3& normal){
float NdotL = normal.dot(lightDir);
Vector3 H = (lightDir.subtract(ray.direction)).normalize();
float NdotH = normal.dot(H);
Color diffuseTerm = this->diffuse.multiply(std::max(NdotL, (float)0));
Color specularTerm = this->specular.multiply(pow(std::max(NdotH, (float)0), this->shininess));
return lightColor.modulate(diffuseTerm.add(specularTerm));
}
};
#endif8、渲染材质
当碰到相交时,就向几何对象取得material属性,并调用sample方法函数取得颜色。IntersectResult result = scene.intersect(ray);
if (result.geometry) {
Color color = result.geometry->material->sample(ray, result.position, result.normal);
color.saturate();
pixels[x].r = (UInt8)( color.r*255);
pixels[x].g = (UInt8)( color.g*255);
pixels[x].b = (UInt8)( color.b*255);
pixels[x].a = 255;
}9、渲染多个几何物体
只渲染一个几何物件太乏味,这节再加入一个无限平面,和介绍如何组合多个几何物件。1、平面
一个(无限)平面(Plane)在数学上可用等式定义:其中n为平面的法向量,d为空间原点至平面的最短距离。光线和平面的相交计算很简单,这里不详述了。
#ifndef _Plane_h_
#define _Plane_h_

#include "IGeometry.h"

struct Plane:public IGeometry{
Vector3 normal;
float   d;

Vector3 position;

inline Plane(const Plane& p):normal(p.normal),d(p.d), position(Vector3::zero()) {  }
inline Plane(const Vector3& _normal,float _d):normal(_normal),d(_d), position(Vector3::zero()) {  }

inline void initialize() {
position = normal.multiply(d);
}

virtual IntersectResult intersect(const Ray3& ray){
float a = ray.direction.dot(this->normal);
if (a >= 0)
return IntersectResult::noHit();

float b = this->normal.dot(ray.origin.subtract(this->position));
IntersectResult result;
result.geometry = this;
result.distance = -b / a;
result.position = ray.getPoint(result.distance);
result.normal = this->normal;
return result;
}

};

#endif
2、并集
把多个几何物件结合起来,可以使用集(set)的概念。这里最容易实现的操作,就是并集(union),即光线要找到一组几个图形的最近交点。无需改其他代码,只加入一个Union就可以实现:#ifndef _Union_h_
#define _Union_h_
#include "IGeometry.h"
#include <vector>
struct Union:public IGeometry{
std::vector<IGeometry*> geometries;
inline Union() { }
void push(IGeometry* geometry){
geometries.push_back(geometry);
}
inline void initialize() {
long size=geometries.size();
for (long i=0;i<size;++i)
geometries[i]->initialize();
}
virtual IntersectResult intersect(const Ray3& ray){
const float Infinity=1e30;
float minDistance = Infinity;
IntersectResult minResult = IntersectResult::noHit();
long size=this->geometries.size();
for (long i=0;i<size;++i){
IntersectResult result = this->geometries[i]->intersect(ray);
if (result.geometry && (result.distance < minDistance)) {
minDistance = result.distance;
minResult = result;
}
}
return minResult;
}
inline void clear(){
long size=geometries.size();
for (long i=0;i<size;++i)
delete geometries[i];
geometries.clear();
}
virtual ~Union(){
clear();
}
};
#endif10、反射
以上实现的,也只是局部照明。只要再加入一点点代码,就可以实现反射。下图说明反射向量的计算方法:

把d投射到n上(因n是单位向量,只需要点乘即可),就可以计算d在n上的长度,把d减去这长度两倍的法向量,就是反射向量r。数学上可写成:
一般材质并非完全反射(镜子除外),因此这里为材质加上一个反射度(reflectiveness)的属性。反射的功能很简单,只要在碰到反射度非零的材质,就继续向反射方向追踪,并把结果按反射度来混合。例如一个材质的反射度为25%,则它传回的颜色是75%本身颜色,加上25%反射传回来的颜色。
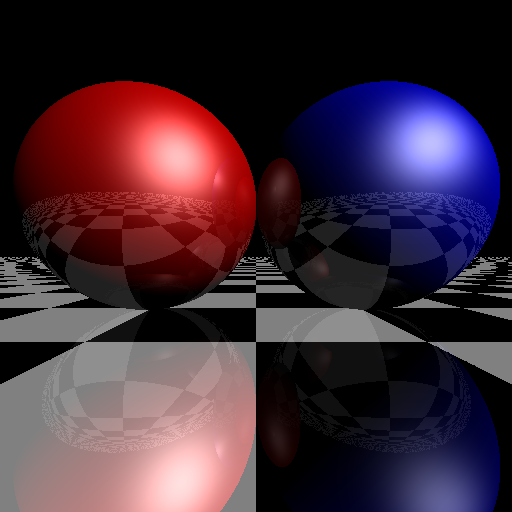
另外,不断反射会做成大量的运算,甚至乎永远不能停止(考虑摄影机在两个镜子中间)。因此要限制反射的次数。含反射功能的光线追踪代码如下:
void rayTraceRecursive(const TPixels32Ref& ctx) {
if (ctx.getIsEmpty())
return;

Plane*  plane = new Plane(Vector3(0, 1, 0), 0);
Sphere* sphere1 = new Sphere(Vector3(-10, 10, -10), 10);
Sphere* sphere2 = new Sphere(Vector3(10, 10, -10), 10);
plane->material = new CheckerMaterial(0.1f,0.5);
sphere1->material = new PhongMaterial(Color::red(), Color::white(), 16,0.25);
sphere2->material = new PhongMaterial(Color::blue(), Color::white(), 16,0.25);
Union scene;
scene.push(plane);
scene.push(sphere1);
scene.push(sphere2);
PerspectiveCamera camera( Vector3(0, 5, 15),Vector3(0, 0, -1),Vector3(0, 1, 0), 90);
long maxReflect=3;

long w = ctx.width;
long h = ctx.height;
ctx.fillColor(Color32(0,0,0,0));

Color32* pixels = ctx.pdata;

scene.initialize();
camera.initialize();

float dx=1.0f/w;
float dy=1.0f/h;
for (long y = 0; y < h; ++y){
float sy = 1 - dy*y;
for (long x = 0; x < w; ++x){
float sx =dx*x;
Ray3 ray(camera.generateRay(sx, sy));
Color color = rayTraceRecursive(&scene, ray, maxReflect);
color.saturate();
pixels[x].r = (UInt8)( color.r*255);
pixels[x].g = (UInt8)( color.g*255);
pixels[x].b = (UInt8)( color.b*255);
pixels[x].a = 255;
}
(UInt8*&)pixels+=ctx.byte_width;
}
}

相关文章推荐
- 图形学基础(1)——光线追踪
- 图形学笔记:光线追踪
- 用emacs玩转图形学的光线追踪
- [图形学] 光线追踪中的数学方法
- PBRT阅读:第一章 1.2 具有照片真实感的渲染和光线追踪算法
- 计算机图形学中的常用模型
- 计算机图形学名词解释
- 光线追踪技术的理论和实践(面向对象)
- 数学在计算机图形学中的应用
- 计算机图形学的数学基础
- 计算机图形学 -- 基本图形函数练习
- 思考:计算机图形学中的左上像素填充约定(top-left filling convention for filling geometry)
- 学习shader之前必须知道的东西之计算机图形学——渲染管线
- 图像处理、计算机图形学、计算机视觉和模式识别领域的区别和联系
- 光线追踪(RayTracing)算法理论与实践(三)光照
- 【《Real-Time Rendering 3rd》 提炼总结】(八) 第九章 · 全局光照:光线追踪、路径追踪与GI技术进化编年史
- [OpenGL]计算机图形学:二叉空间分割(BSP)树
- 计算机图形学:中点划线法(任意斜率)
- VC6.0 计算机图形学
- 计算机图形学DDA算法中点Bresenham算法改进的Bresenham算法