[置顶] Android开发之Path的高级用法用贝塞尔曲线绘制波浪线
2017-06-14 22:28
549 查看
前言:贝塞尔曲线分为一级曲线,二级曲线,三级曲线和多级曲线,利用贝塞尔曲线可以做出很多有意思的动画和图形,今天我们就来实现一个比较简单的波浪线。
-----------------分割线---------------
初步认识贝塞尔曲线:
mPath.moveTo:设置起点。
mPath.rQuadTo:绘制曲线。
注意:第二个mPath.rQuadTo相对于自己的起始点--也即是上一个曲线的终点。
mPath.lineTo:闭合。
我们也可以使用path.quadTo(x1, y1, x2, y2)绘制二级贝塞尔曲线。
ok看完整代码:
import android.content.Context;
import android.graphics.Canvas;
import android.graphics.Color;
import android.graphics.Paint;
import android.graphics.Path;
import android.view.View;
/**
* Created by Fly on 2017/6/14.
*/
public class MyView extends View {
Paint mPaint;
Path mPath;
public MyView(Context context) {
super(context);
mPaint = new Paint();
mPaint.setColor(Color.RED);
mPaint.setStyle(Paint.Style.STROKE);
mPaint.setStrokeWidth(10);
mPath = new Path();
}
@Override
protected void onDraw(Canvas canvas) {
super.onDraw(canvas);
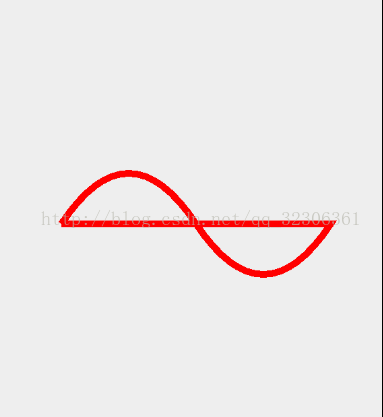
mPath.moveTo(100, 400);
mPath.rQuadTo(100, -150, 200, 0);
mPath.rQuadTo(100, 150, 200, 0);
mPath.lineTo(100, 400);
canvas.drawPath(mPath, mPaint);
}
}效果图:
---------------分割线---------------
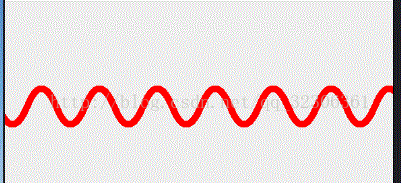
如果想画动态的波浪线,需要我们不断的改变起点,废话不说直接看代码:import android.animation.ValueAnimator;
import android.content.Context;
import android.graphics.Canvas;
import android.graphics.Color;
import android.graphics.Paint;
import android.graphics.Path;
import android.util.AttributeSet;
import android.view.View;
import android.view.animation.LinearInterpolator;
import java.util.Random;
/**
* Created by Fly on 2017/6/13.
*/
public class WaveView2 extends View {
private Paint mPaint;
private Path mPath;
private int mWaveLength = 100;
private int dx;
private int dy;
public WaveView2(Context context) {
super(context);
init();
}
public WaveView2(Context context, AttributeSet attrs) {
super(context, attrs);
init();
}
private void init() {
mPaint = new Paint();
mPaint.setColor(Color.RED);
mPaint.setStyle(Paint.Style.STROKE);
mPaint.setStrokeWidth(10);
mPath = new Path();
}
int s = 50;
@Override
protected void onDraw(Canvas canvas) {
super.onDraw(canvas);
mPath.reset();
int originY = 300;
int mWaveHalfLength = mWaveLength / 2;
mPath.moveTo(-mWaveLength + dx, originY);
int max = 60;
int min = 40;
int maxW = 120;
int minW = 80;
Random random = new Random();
try {
Thread.sleep(500);
s = random.nextInt(max) % (max - min + 1) + min;
mWaveLength = random.nextInt(maxW) % (maxW - minW + 1) + minW;
} catch (InterruptedException e) {
e.printStackTrace();
}
//屏幕的宽度里面放多少个波长
for (int i = -mWaveLength; i < getWidth() + mWaveLength; i += mWaveLength) {
//相对绘制二阶贝塞尔曲线(相对于自己的起始点--也即是上一个曲线的终点 的距离dx1)
mPath.rQuadTo(mWaveHalfLength / 2, -s, mWaveHalfLength, 0);
mPath.rQuadTo(mWaveHalfLength / 2, s, mWaveHalfLength, 0);
// path.quadTo(x1, y1, x2, y2)
}
//颜色填充
//画一个封闭的空间
// mPath.lineTo(getWidth(), getHeight());
// mPath.lineTo(0, getHeight());
// mPath.close();
canvas.drawPath(mPath, mPaint);
}
public void startAnimation() {
ValueAnimator animator = ValueAnimator.ofInt(0, mWaveLength);
animator.setDuration(1000);
animator.setInterpolator(new LinearInterpolator());
//无限循环
animator.setRepeatCount(ValueAnimator.INFINITE);
animator.addUpdateListener(new ValueAnimator.AnimatorUpdateListener() {
@Override
public void onAnimationUpdate(ValueAnimator animation) {
dx = (int) animation.getAnimatedValue();
postInvalidate();
}
});
animator.start();
}
}
然后在MainActivity中开启动画:
---------------------完-----------------
-----------------分割线---------------
初步认识贝塞尔曲线:
mPath.moveTo:设置起点。
mPath.rQuadTo:绘制曲线。
注意:第二个mPath.rQuadTo相对于自己的起始点--也即是上一个曲线的终点。
mPath.lineTo:闭合。
我们也可以使用path.quadTo(x1, y1, x2, y2)绘制二级贝塞尔曲线。
ok看完整代码:
import android.content.Context;
import android.graphics.Canvas;
import android.graphics.Color;
import android.graphics.Paint;
import android.graphics.Path;
import android.view.View;
/**
* Created by Fly on 2017/6/14.
*/
public class MyView extends View {
Paint mPaint;
Path mPath;
public MyView(Context context) {
super(context);
mPaint = new Paint();
mPaint.setColor(Color.RED);
mPaint.setStyle(Paint.Style.STROKE);
mPaint.setStrokeWidth(10);
mPath = new Path();
}
@Override
protected void onDraw(Canvas canvas) {
super.onDraw(canvas);
mPath.moveTo(100, 400);
mPath.rQuadTo(100, -150, 200, 0);
mPath.rQuadTo(100, 150, 200, 0);
mPath.lineTo(100, 400);
canvas.drawPath(mPath, mPaint);
}
}效果图:
---------------分割线---------------
如果想画动态的波浪线,需要我们不断的改变起点,废话不说直接看代码:import android.animation.ValueAnimator;
import android.content.Context;
import android.graphics.Canvas;
import android.graphics.Color;
import android.graphics.Paint;
import android.graphics.Path;
import android.util.AttributeSet;
import android.view.View;
import android.view.animation.LinearInterpolator;
import java.util.Random;
/**
* Created by Fly on 2017/6/13.
*/
public class WaveView2 extends View {
private Paint mPaint;
private Path mPath;
private int mWaveLength = 100;
private int dx;
private int dy;
public WaveView2(Context context) {
super(context);
init();
}
public WaveView2(Context context, AttributeSet attrs) {
super(context, attrs);
init();
}
private void init() {
mPaint = new Paint();
mPaint.setColor(Color.RED);
mPaint.setStyle(Paint.Style.STROKE);
mPaint.setStrokeWidth(10);
mPath = new Path();
}
int s = 50;
@Override
protected void onDraw(Canvas canvas) {
super.onDraw(canvas);
mPath.reset();
int originY = 300;
int mWaveHalfLength = mWaveLength / 2;
mPath.moveTo(-mWaveLength + dx, originY);
int max = 60;
int min = 40;
int maxW = 120;
int minW = 80;
Random random = new Random();
try {
Thread.sleep(500);
s = random.nextInt(max) % (max - min + 1) + min;
mWaveLength = random.nextInt(maxW) % (maxW - minW + 1) + minW;
} catch (InterruptedException e) {
e.printStackTrace();
}
//屏幕的宽度里面放多少个波长
for (int i = -mWaveLength; i < getWidth() + mWaveLength; i += mWaveLength) {
//相对绘制二阶贝塞尔曲线(相对于自己的起始点--也即是上一个曲线的终点 的距离dx1)
mPath.rQuadTo(mWaveHalfLength / 2, -s, mWaveHalfLength, 0);
mPath.rQuadTo(mWaveHalfLength / 2, s, mWaveHalfLength, 0);
// path.quadTo(x1, y1, x2, y2)
}
//颜色填充
//画一个封闭的空间
// mPath.lineTo(getWidth(), getHeight());
// mPath.lineTo(0, getHeight());
// mPath.close();
canvas.drawPath(mPath, mPaint);
}
public void startAnimation() {
ValueAnimator animator = ValueAnimator.ofInt(0, mWaveLength);
animator.setDuration(1000);
animator.setInterpolator(new LinearInterpolator());
//无限循环
animator.setRepeatCount(ValueAnimator.INFINITE);
animator.addUpdateListener(new ValueAnimator.AnimatorUpdateListener() {
@Override
public void onAnimationUpdate(ValueAnimator animation) {
dx = (int) animation.getAnimatedValue();
postInvalidate();
}
});
animator.start();
}
}
然后在MainActivity中开启动画:
public class MainActivity extends AppCompatActivity {

@Override
protected void onCreate(Bundle savedInstanceState) {
super.onCreate(savedInstanceState);
setContentView(R.layout.activity_main);
WaveView2 waveView = (WaveView2) findViewById(R.id.wv);
waveView.startAnimation();
}
}布局:<?xml version="1.0" encoding="utf-8"?> <LinearLayout xmlns:android="http://schemas.android.com/apk/res/android" xmlns:app="http://schemas.android.com/apk/res-auto" xmlns:tools="http://schemas.android.com/tools" android:layout_width="match_parent" android:layout_height="match_parent" tools:context=".MainActivity"> <com.fly.lsn35_waveview.WaveView2 android:id="@+id/wv" android:layout_width="match_parent" android:layout_height="match_parent" /> </LinearLayout>效果:
---------------------完-----------------

相关文章推荐
- Android绘图:自定义View——路径(Path)、贝塞尔曲线(绘制可动的波浪线)、Bitmap
- Android开发:canvas.drawTextOnPath()无效----Android4.03的又一个bug!!!!(关于Canvas绘制的方方面面) .
- Android 绘图基础:Path(绘制三角形、贝塞尔曲线、正余弦)
- Android开发高级组件之自动完成文本框(AutoCompleteTextView)用法示例【附源码下载】
- [置顶] Android 高级开发 源码 UI 缓存 网络
- Android自定义view Path 的高级用法之搜索按钮动画
- Android开发中Gradle的高级用法
- [置顶] Android 高级开发 源码 UI 缓存 网络
- [置顶] Android开发——View绘制过程源码解析(二)
- Android编程开发之在Canvas中利用Path绘制基本图形(圆形,矩形,椭圆,三角形等)
- Android游戏开发25:Android中贝塞尔曲线的绘制方法
- android自定义View创建一个Path绘制多边形,贝塞尔曲线,
- Android Path绘制贝塞尔曲线实现QQ拖拽泡泡
- [置顶] Android开发——View绘制过程源码解析(一)
- Android开发中Gradle的高级用法---productflavors, buildTypes
- Android开发之PathMeasure的基本用法
- Android开发中Gradle的高级用法
- [置顶] Android开发之数据存储——SharedPreferences基础知识详解,饿补学会基本知识,开发者必会它的用法。
- Android软件开发:在Canvas中利用Path绘制基本图形
- Android开发:canvas.drawTextOnPath()无效----Android4.03的又一个bug!!!!(关于Canvas绘制的方方面面)