实现后台管理登陆
2017-06-07 20:52
239 查看
servlet+jdbc+html+css实现后台管理登陆

这个简洁的界面,大家可以自己去加以修改完善。
好了,开始步入正题。
这个web工程的思路是什么呢?
登陆界面点击登陆
登陆成功,跳转到登陆成功界面
登陆失败,跳转到登陆失败界面
好了,我们的具体思路呢?
三个jsp文件,一个登陆界面,一个登陆成功后跳转的界面,一个登陆失败后跳转的界面。
一个servlet,用来处理点击登陆后的逻辑处理
一个css文件夹,一个jsp文件夹
连接sql server数据库,进行查询,对结果进行逻辑判断
如果查询到的账号和密码与登陆输入的一致,则登陆成功,反之,登陆失败。
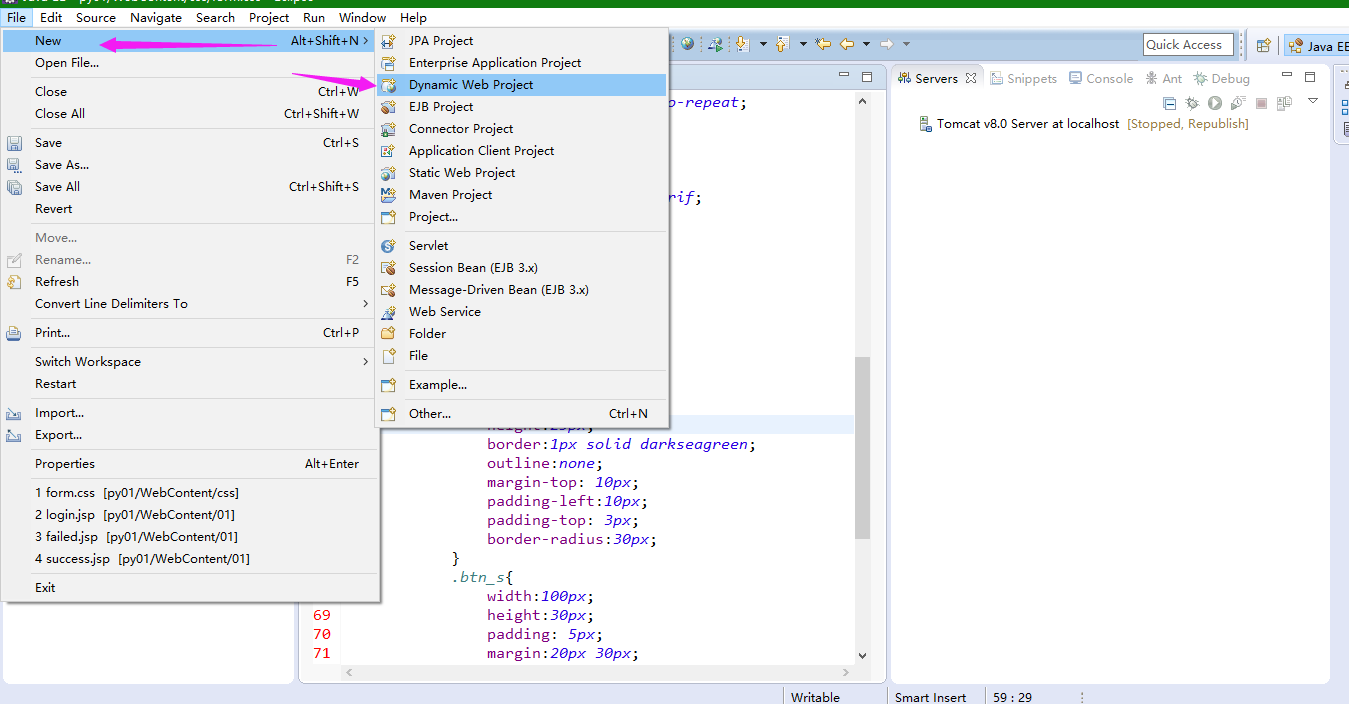
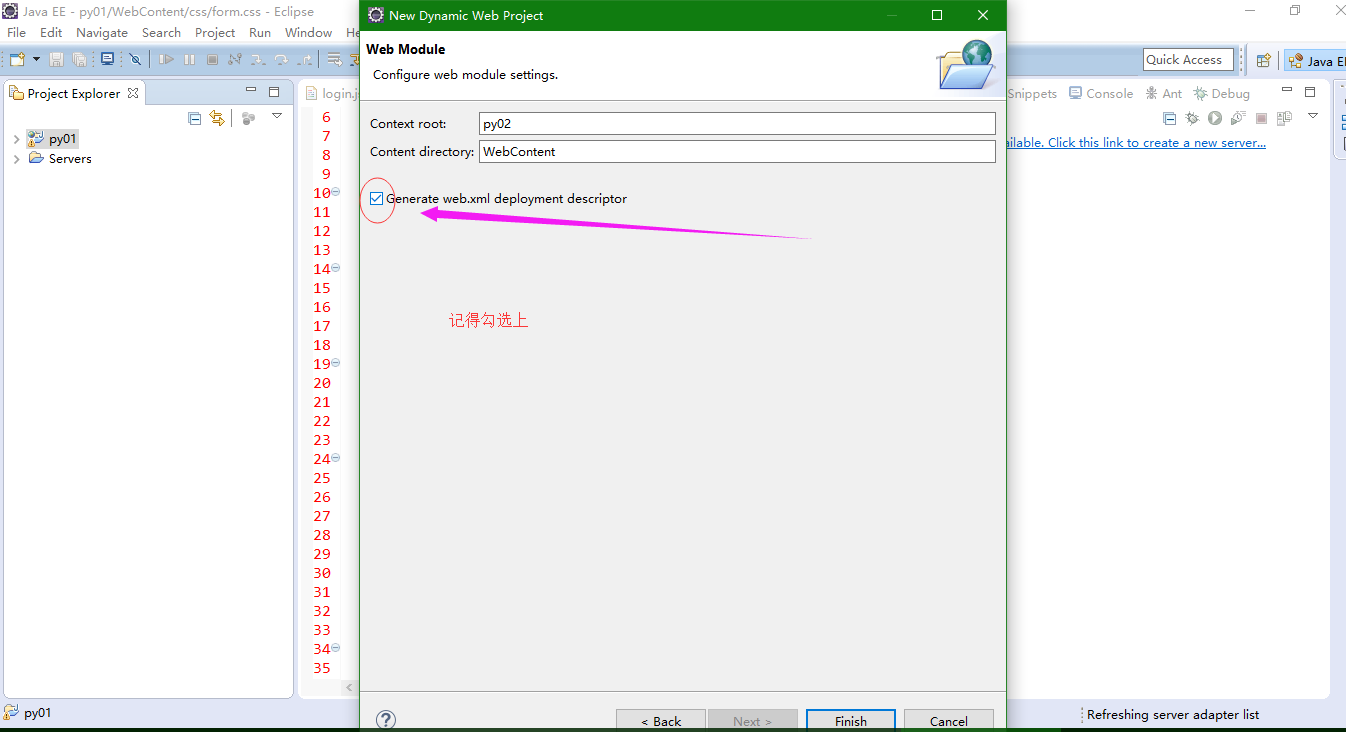
首先,我们新创建一个web项目,点击new—>>>Dynamic Web Project—>>>输入项目名称—>>>最后勾选上自动生成web.xml文件。具体看下图:
注意:记得勾选上web.xml配置文件
web工程的结构图如下:
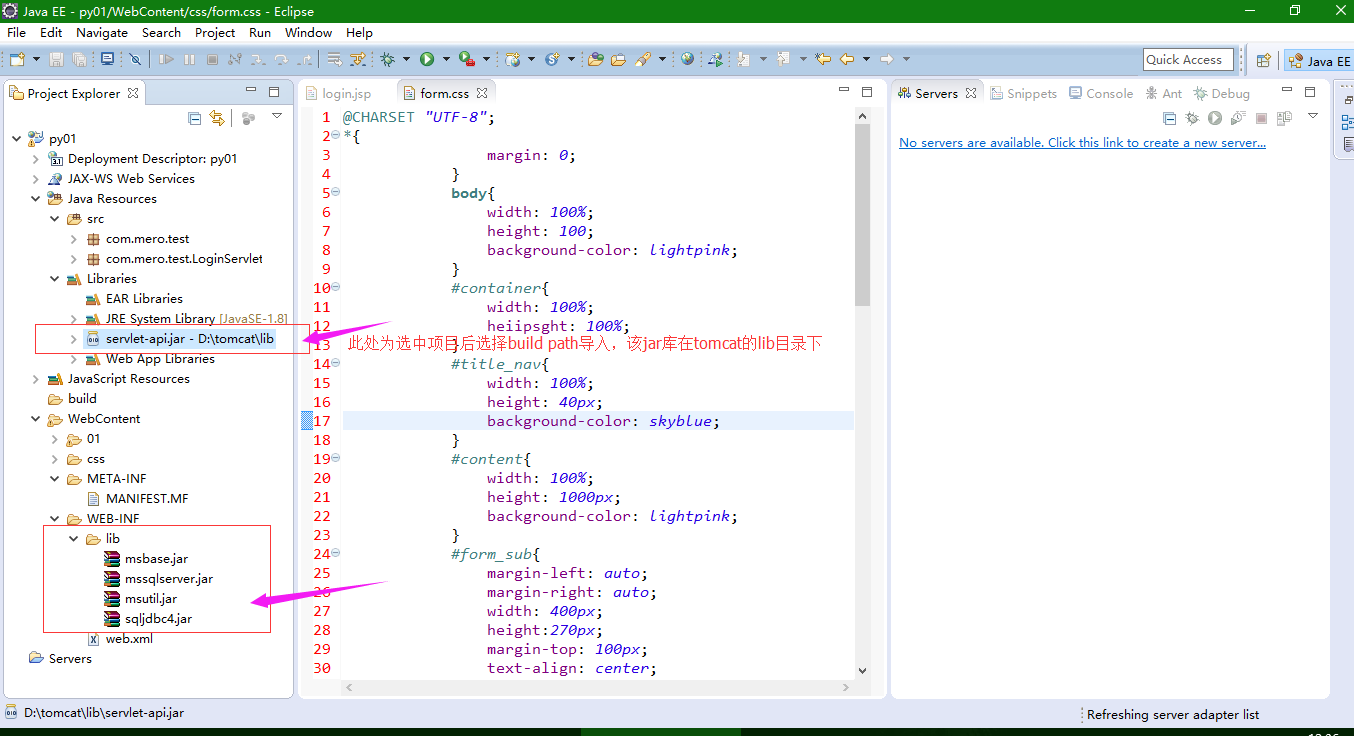
在开始我们的项目前,因为要用到jdbc连接数据库。我们先干两件事,导入servlet-api.jar包,导入数据库驱动包。这是必须的。否则报错。
sql server 2008的jdbc驱动jar包下载地址:
SQl server 2008 的jdbc驱动下载地址: 密码:55o3
第一步:导入servlet-api.jar包,该包在tomcat的lib目录下。
第二步:窗口(windows)—>>>首选项(preferences)—->>>>选择Java—>>>选择已安装的JRES(Installed JRES)—>>>选中standard
VM—->>>选择编辑(Edit)—->>>>选择增加额外的包(Add External Jars)—>>>选择你的servlet-api.jar包导入—->>>确定完成导入。演示操作如下:

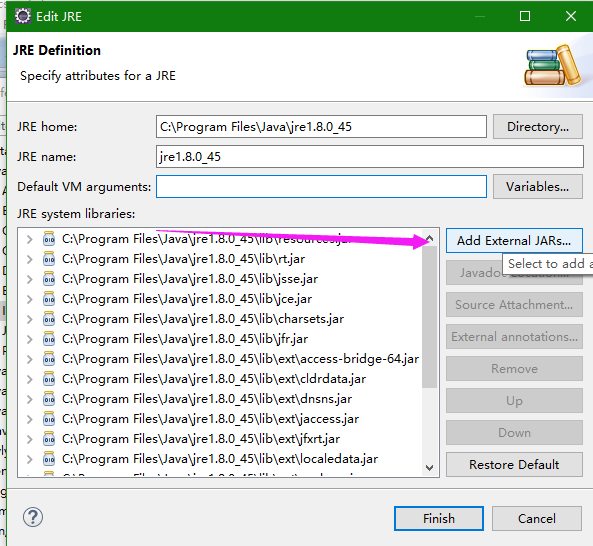
build path为编译环境的导入。而以上操作为全局操作,该操作不可少。
在上面操作完成后,我们开始正式地编写代码。
首先新建一个01文件夹,new—>>>folder—>>>01—ok;该文件夹用来保存jsp文件。然后我们创建一个login.jsp文件。
代码如下:
<%@ page language="java" contentType="text/html; charset=UTF-8"
pageEncoding="UTF-8"%>
<!DOCTYPE html PUBLIC "-//W3C//DTD HTML 4.01 Transitional//EN" "http://www.w3.org/TR/html4/loose.dtd">
<html>
<head>
<meta charset="UTF-8">
<title>表单提交</title>
<link rel="stylesheet" href="../css/form.css"/>
</head>
<body>
<div id="container">
<div id="title_nav"></div>

<div id="content">
<div id="form_sub">
<p id="manage_tx">管理员登陆面板</p>
<form id="form_sub_a" action="<%=request.getContextPath()%>/mylogin" method="post">
<p class="tx_01">账号:  <input class="input_va" type="text" name="user" /></p>
<p class="tx_01">密码:  <input class="input_va" type="password" name="password" /></p>
<input class="btn_s" type="submit" value="登陆" />
<input class="btn_s" type="reset" value="取消" />
</form>
</div>
</div>
</div>

</body>
</html>
1
2
3
4
5
6
7
8
9
10
11
12
13
14
15
16
17
18
19
20
21
22
23
24
25
26
27
28
29
1
2
3
4
5
6
7
8
9
10
11
12
13
14
15
16
17
18
19
20
21
22
23
24
25
26
27
28
29
从上面的代码中截取关键进行讲解:
<p id="manage_tx">管理员登陆面板</p>
<form id="form_sub_a" action="<%=request.getContextPath()%>/mylogin" method="post">
<p class="tx_01">账号:  <input class="input_va" type="text" name="user" /></p>
<p class="tx_01">密码:  <input class="input_va" type="password" name="password" /></p>
<input class="btn_s" type="submit" value="登陆" />
<input class="btn_s" type="reset" value="取消" />
</form>
1
2
3
4
5
6
7
1
2
3
4
5
6
7
看到该段代码,这是一个form表单,里面四个input控件。一个输入框,一个密码框。一个提交按钮,一个重置密码。
form中的action的值为上下文的路径加上servlet的映射地址。该映射地址在web.xml配置中的<servlet-mapping>中。下面我们会讲到servlet在web.xml中的配置。
上下文的路径我们通过下面这个函数得到:
<%=request.getContextPath()%>1
1
那么我们的action的完整路径就是
action="<%=request.getContextPath()%>/mylogin"1
1
然后在写完了登陆页面后,我们开始配置下一个servlet。
在WebContent目录下的Web-INF下的web.xml文件中,增加一个servlet。
<?xml version="1.0" encoding="UTF-8"?>
<web-app xmlns:xsi="http://www.w3.org/2001/XMLSchema-instance"
xmlns="http://xmlns.jcp.org/xml/ns/javaee"
xsi:schemaLocation="http://xmlns.jcp.org/xml/ns/javaee http://xmlns.jcp.org/xml/ns/javaee/web-app_3_1.xsd" id="WebApp_ID" version="3.1">
<display-name>py01</display-name>
<servlet>
<servlet-name>LoginTest</servlet-name>
<servlet-class>com.mero.test.LoginServlet.LoginTest</servlet-class>
</servlet>
<welcome-file-list>
<welcome-file>index.html</welcome-file>
<welcome-file>index.htm</welcome-file>
<welcome-file>index.jsp</welcome-file>
<welcome-file>default.html</welcome-file>
<welcome-file>default.htm</welcome-file>
<welcome-file>default.jsp</welcome-file>
</welcome-file-list>
<servlet-mapping>
<servlet-name>LoginTest</servlet-name>
<url-pattern>/mylogin</url-pattern>
</servlet-mapping>
</web-app>
1
2
3
4
5
6
7
8
9
10
11
12
13
14
15
16
17
18
19
20
21
22
1
2
3
4
5
6
7
8
9
10
11
12
13
14
15
16
17
18
19
20
21
22
我们截取关键代码讲解下:
<servlet>
<servlet-name>LoginTest</servlet-name>
<servlet-class>com.mero.test.LoginServlet.LoginTest</servlet-class>
</servlet>
1
2
3
4
1
2
3
4
这个servlet标签中有两子标签,<servlet-name>是该servlet的名字,<servlet-calss>是servlet的类逻辑地址。我们采取包名+servlet类名。windows下采取按住ctrl+鼠标右键移动到该地址上,如果变深色,则代表该<servlet-class>标签欸之正确。
我们再看到<servlet-mapping>标签,这个是配置servlet的映射地址。里面同样有两个子标签,一个<servlet-name>,另外一个是<url-pattern>标签。这个<url-pattern>标签可以随便填写。
<servlet-mapping>
<servlet-name>LoginTest</servlet-name>
<url-pattern>/mylogin</url-pattern>
</servlet-mapping>
1
2
3
4
1
2
3
4
配置好了web.xml后,我们创建该名为LoginTest的servlet。
在src目录下新建一个包,再创建一个servlet。右键—>new—->servlet。在这里,我们新建的servlet和之前在web.xml中配置的名称一样。取名LoginTest.java。
LoginTest.java具体代码如下:
package com.mero.test.LoginServlet;
import java.io.IOException;
import java.sql.Connection;
import java.sql.ResultSet;
import java.sql.SQLException;
import java.sql.Statement;

import javax.servlet.RequestDispatcher;
import javax.servlet.ServletException;
import javax.servlet.annotation.WebServlet;
import javax.servlet.http.HttpServlet;
import javax.servlet.http.HttpServletRequest;
import javax.servlet.http.HttpServletResponse;

import com.mero.test.DbDao;

/**
* Servlet implementation class LoginTest
*/
@WebServlet("/LoginTest")
public class LoginTest extends HttpServlet {
public Connection conn=null;
public static String username;
public static String password;
private static final long serialVersionUID = 1L;

/**
* @see HttpServlet#HttpServlet()
*/
public LoginTest() {
super();
// TODO Auto-generated constructor stub
}

/**
* @see HttpServlet#doGet(HttpServletRequest request, HttpServletResponse response)
*/
protected void doGet(HttpServletRequest request, HttpServletResponse response) throws ServletException, IOException {
doPost(request, response);
}

/**
* @see HttpServlet#doPost(HttpServletRequest request, HttpServletResponse response)
*/
protected void doPost(HttpServletRequest request, HttpServletResponse response) throws ServletException, IOException {
// TODO Auto-generated method stub
//获得表单提交的数据
username=request.getParameter("user");
password=request.getParameter("password");
System.out.println(username);
System.out.println(password);
System.out.println("得到request请求参数成功");
try {
conn=DbDao.getConnection();
//得到Statement对象
Statement statement=conn.createStatement();
ResultSet set=statement.executeQuery("select username,password from userInfo where username=790710371");
while(set.next()){
String name=set.getString(1);
String pwd=set.getString(2);
if(username!=null&&password!=null&&username.equals(name)&&password.equals(pwd)){
String forward="/01/success.jsp";
RequestDispatcher df=request.getRequestDispatcher(forward);
df.forward(request, response);
}else{
String forward="/01/failed.jsp";
RequestDispatcher df=request.getRequestDispatcher(forward);
df.forward(request, response);
}
}
} catch (ClassNotFoundException e1) {
// TODO Auto-generated catch block
e1.printStackTrace();
} catch (SQLException e) {
// TODO Auto-generated catch block
e.printStackTrace();
}
//将表单中的数据与数据库中的数据进行查询
}
}12
3
4
5
6
7
8
9
10
11
12
13
14
15
16
17
18
19
20
21
22
23
24
25
26
27
28
29
30
31
32
33
34
35
36
37
38
39
40
41
42
43
44
45
46
47
48
49
50
51
52
53
54
55
56
57
58
59
60
61
62
63
64
65
66
67
68
69
70
71
72
73
74
75
76
77
78
79
80
1
2
3
4
5
6
7
8
9
10
11
12
13
14
15
16
17
18
19
20
21
22
23
24
25
26
27
28
29
30
31
32
33
34
35
36
37
38
39
40
41
42
43
44
45
46
47
48
49
50
51
52
53
54
55
56
57
58
59
60
61
62
63
64
65
66
67
68
69
70
71
72
73
74
75
76
77
78
79
80
挑选关键代码进行讲解:
我们看到下面这段代码。我们先通过数据库工具类得到connection连接对象,再通过如下方法获取Statement对象。
Statement statement=conn.createStatement();1
1
我们通过下面方法得到结果集对象 ,Statement对象执行sql语句得到结果集
String sql="select * From table"
ResultSet set=statement.excuteQuery(sql);
1
2
1
2
然后遍历数据库查询得到账号密码:
while(set.next()){
String username=set.getString(1);
String password=set.getString(2);
.....
}12
3
4
5
6
1
2
3
4
5
6
我们再将得到的字符串与请求得到的参数进行对比。如果参数一致则d登陆成功跳转到success.jsp界面,否则登陆失败跳转到failed。
逻辑判断如下:
if(username!=null&&password!=null&&username.equals(name)&&password.equals(pwd)){
String forward="/01/success.jsp";
RequestDispatcher df=request.getRequestDispatcher(forward);
df.forward(request, response);
}else{
String forward="/01/failed.jsp";
RequestDispatcher df=request.getRequestDispatcher(forward);
df.forward(request, response);
}12
3
4
5
6
7
8
9
1
2
3
4
5
6
7
8
9
这里的jsp转发请点击查看上篇文章:Java web第九课(登陆后的转发)
然后看到我们的工具类,这个类中只包含了得到connection对象以及关闭Statement对象和关闭connection对象的三个方法。
DbDao.java代码如下:
package com.mero.test;

import java.sql.Connection;
import java.sql.DriverManager;
import java.sql.SQLException;
import java.sql.Statement;

public class DbDao {
public static Connection conn=null;
public static Connection getConnection() throws ClassNotFoundException{
//加载驱动
Class.forName("com.microsoft.jdbc.sqlserver.SQLServerDriver");
System.out.println("加载驱动成功");
try {
Class.forName("com.microsoft.jdbc.sqlserver.SQLServerDriver");//加载数据库驱动
if(null==conn){
System.out.println("暂时未连接");
//得到数据库驱动连接流

//下面的参数格式如下:jdbc连接方式:数据库类型:带端口的主机地址;"数据库名称","数据库登陆名","数据库密码";
conn=DriverManager.getConnection("jdbc:sqlserver://localhost:1433;DatabaseName=Test","sa", "adadadada");
//
return conn;
}
} catch (ClassNotFoundException e) {
// TODO Auto-generated catch block
e.printStackTrace();
} catch (SQLException e) {
// TODO Auto-generated catch block
e.printStackTrace();
}
return conn;

}
public static void closeStatement(Statement statement){
if(statement!=null){
try {
statement.close();
} catch (SQLException e) {
// TODO Auto-generated catch block
e.printStackTrace();
}
}
}
public static void closeConnection(Connection conn){
if(conn!=null){
try {
conn.close();
} catch (SQLException e) {
// TODO Auto-generated catch block
e.printStackTrace();
}
}
}
}12
3
4
5
6
7
8
9
10
11
12
13
14
15
16
17
18
19
20
21
22
23
24
25
26
27
28
29
30
31
32
33
34
35
36
37
38
39
40
41
42
43
44
45
46
47
48
49
50
51
52
53
54
55
56
1
2
3
4
5
6
7
8
9
10
11
12
13
14
15
16
17
18
19
20
21
22
23
24
25
26
27
28
29
30
31
32
33
34
35
36
37
38
39
40
41
42
43
44
45
46
47
48
49
50
51
52
53
54
55
56
Class.forName(String arg0);1
1
这个方法用来加载数据库驱动,不同的数据库以及数据库版本的不同填写的不一样。请注意你的数据库版本。我采用的是SQL server 2008.
String Url="jdbc连接方式:数据库类型:带端口的主机地址"
Connection conn=DriverManager.getConnection(Url,Datebase,username,password);
1
2
1
2
最后编写我们的登陆成功和登陆失败的两个跳转界面的jsp文件。分别为success.jsp和failed.jsp文件。
success.jsp文件和failed.jsp文件中的代码几乎相同。如下:
success.jsp代码:
<%@ page language="java" contentType="text/html; charset=UTF-8"
pageEncoding="UTF-8"%>
<!DOCTYPE html PUBLIC "-//W3C//DTD HTML 4.01 Transitional//EN" "http://www.w3.org/TR/html4/loose.dtd">
<html>
<head>
<meta http-equiv="Content-Type" content="text/html; charset=UTF-8">
<title>登陆成功提示</title>
</head>
<body>
登陆成功 <br/>
你的登陆信息如下:<br/>
账号:<%=request.getParameter("user") %><br/>
密码:<%=request.getParameter("password") %><br/>
<a href="<%=request.getContextPath()%>/01/login.jsp">返回登陆界面</a>
</body>
</html>12
3
4
5
6
7
8
9
10
11
12
13
14
15
16
1
2
3
4
5
6
7
8
9
10
11
12
13
14
15
16
failed.jsp代码如下:
<%@ page language="java" contentType="text/html; charset=UTF-8"
pageEncoding="UTF-8"%>
<!DOCTYPE html PUBLIC "-//W3C//DTD HTML 4.01 Transitional//EN" "http://www.w3.org/TR/html4/loose.dtd">
<html>
<head>
<meta http-equiv="Content-Type" content="text/html; charset=UTF-8">
<title>登陆失败提示</title>
</head>
<body>
登陆失败 <br/>
你的登陆信息如下:<br/>
账号:<%=request.getParameter("user") %><br/>
密码:<%=request.getParameter("password") %><br/>
<a href="<%=request.getContextPath()%>/01/login.jsp">返回登陆界面</a>
</body>
</html>12
3
4
5
6
7
8
9
10
11
12
13
14
15
16
1
2
3
4
5
6
7
8
9
10
11
12
13
14
15
16
这样,再给出最后一个CSS样式文件 :
form.css代码如下:
@CHARSET "UTF-8";
*{
margin: 0;
}
body{
width: 100%;
height: 100;
background-color: lightpink;
}
#container{
width: 100%;
heiipsght: 100%;
}
#title_nav{
width: 100%;
height: 40px;
background-color: skyblue;
}
#content{
width: 100%;
height: 1000px;
background-color: lightpink;
}
#form_sub{
margin-left: auto;
margin-right: auto;
width: 400px;
height:270px;
margin-top: 100px;
text-align: center;
font-family: 微软雅黑;
background-color: #008AB8;
}
#manage_tx{
padding-top: 20px;
padding-bottom: 20px;
font-size: 25px;
outline-width:2px;
outline-style:dashed;
color:blanchedalmond;
background-color:#95CAE4;
background-repeat: no-repeat;
}
#form_sub_a{
margin-top: 30px;
margin-bottom: 30px;
font-family: sans-serif;
font-size: 15px;
color:purple;
outline-width: 1px;
}
.tx_01{
color:#95CAE4;
font-size:18px;
font-family: 微软雅黑;
}
.input_va{
width:60%;
height:25px;
border:1px solid darkseagreen;
outline:none;
margin-top: 10px;
padding-left:10px;
padding-top: 3px;
border-radius:30px;
}
.btn_s{
width:100px;
height:30px;
padding: 5px;
margin:20px 30px;
border-radius:5px;
background: transparent;
color: white;
}
.btn_s:hover{
color:red;
opacity:0.5;

}
.btn_s:ACTIVE{
color: orange;
}
.btn_s:visited{
color: red;}
.btn_s:left{
color:white;}

}12
3
4
5
6
7
8
9
10
11
12
13
14
15
16
17
18
19
20
21
22
23
24
25
26
27
28
29
30
31
32
33
34
35
36
37
38
39
40
41
42
43
44
45
46
47
48
49
50
51
52
53
54
55
56
57
58
59
60
61
62
63
64
65
66
67
68
69
70
71
72
73
74
75
76
77
78
79
80
81
82
83
84
85
86
87
88
89
1
2
3
4
5
6
7
8
9
10
11
12
13
14
15
16
17
18
19
20
21
22
23
24
25
26
27
28
29
30
31
32
33
34
35
36
37
38
39
40
41
42
43
44
45
46
47
48
49
50
51
52
53
54
55
56
57
58
59
60
61
62
63
64
65
66
67
68
69
70
71
72
73
74
75
76
77
78
79
80
81
82
83
84
85
86
87
88
89
ok了,以上便是所有的文件讲解。
代码写完之后。我们导出该项目到桌面,格式为war。然后把war文件放到我们的tomcat目录的webapps下。然后双击bin目录下的startup.bat文件开启服务器,服务器将自动解压缩该war文件。
打开浏览器,输入localhost:8080/py01/01/login.jsp
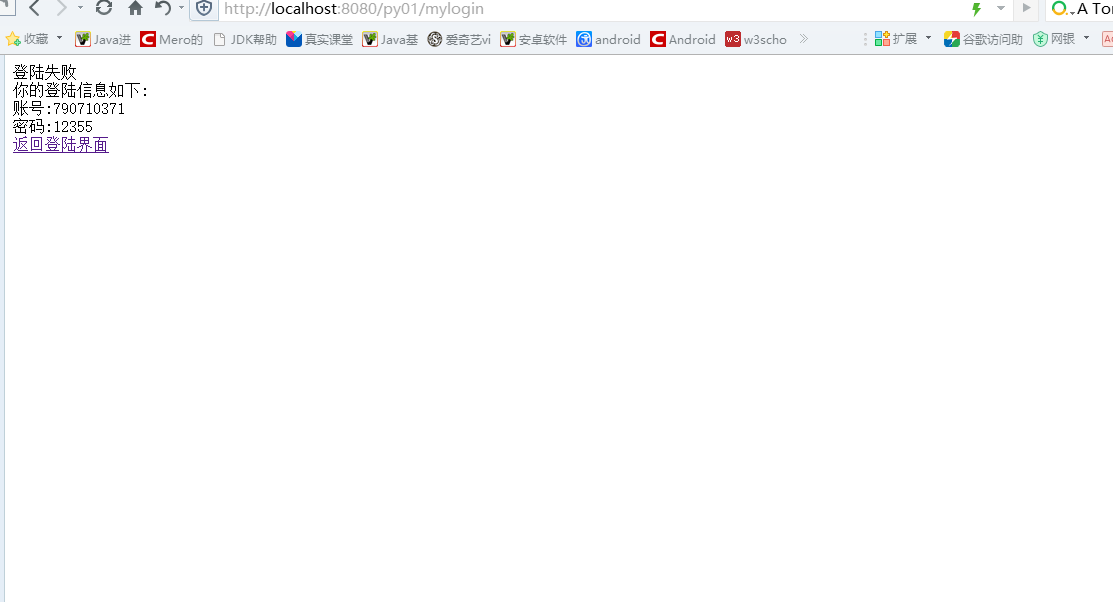
最后上两张效果图: 这两个jsp非常简单,为了简单此Demo并未增加样式。


相关文章推荐
- EasyUI+MVC4实现后台管理系统一:登陆和进入后台界面
- 实现只能同时一个人登陆管理后台
- PHPCMS V9两步实现修改后台管理登陆路径方法分享
- 超详细servlet+jdbc+html+css实现后台管理登陆
- PHPCMS V9两步实现修改后台管理登陆路径方法分享
- phpcms v9实现修改后台管理登陆路径的简单方法
- 一步一步实现web程序信息管理系统之二----后台框架实现跳转登陆页面
- HTML常用模板:用DIV实现网站首页、后台管理首页(整理)
- dede登陆后台直接转跳转首页而不是管理中心解决办法
- 在ecshop中添加页面,并且实现后台管理
- 基于YIi的三栏frameset框架后台管理页面的实现
- WAMP Server 安装dedeCMS 后,登陆后台管理页面空白解决方案
- 在ecshop中添加页面,并且实现后台管理
- dede登陆后台直接转跳转首页而不是管理中心解决办法
- 实现网上购物系统的后台管理(增、删、改、查图书)。
- 整合公司3个网站后台管理子系统的经验总结 - 实现多系统的单点登录(ASP.NET + ASP) 推荐
- 毕业设计(十二)---后台用户管理(2)之- 分页 实现上一页,下一页,跳页功能
- 如何实现在Joomla!后台管理的控制面板(control panel)中添加图标 【转】
- 整合公司3个网站后台管理子系统的经验总结 - 实现多系统的单点登录(ASP.NET + ASP)
- 实现类似于wp的后台的登陆摇头效果和ajax提交验证的效果