OpenCV双目标定
2017-06-07 00:00
731 查看
首先我们看看双目测距原理的算法
learnOpenCV资料库
参考blog
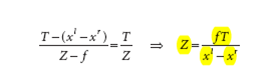
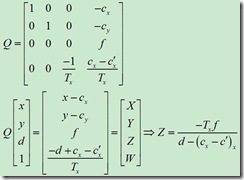
公式如下
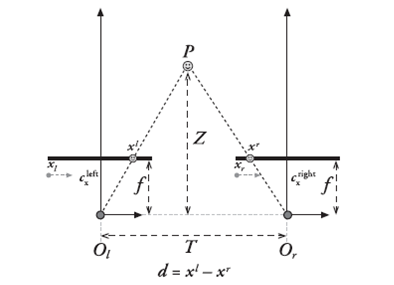
摄像机俯视图
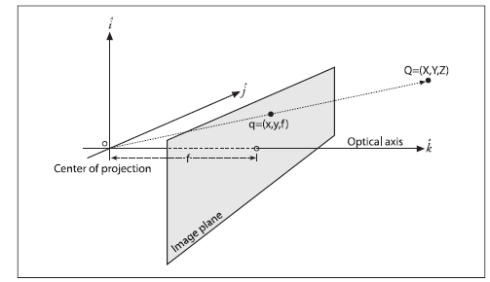
计算原理效应如下
learnOpenCV资料库
参考blog
公式如下
摄像机俯视图
计算原理效应如下
#include "opencv2/video/tracking.hpp"
#include "opencv2/imgproc/imgproc.hpp"
#include "opencv2/highgui/highgui.hpp"
//#include <cv.h>
#include <cxmisc.h>
#include <highgui.h>
#include <cvaux.h>
#include <iostream>
#include <ctype.h>
#include <stdlib.h>

#include <vector>
#include <string>
#include <algorithm>
#include <ctype.h>
#include <stdarg.h>
#include <string.h>

#include <stdio.h>

using namespace cv;
using namespace std;

//vector<Point2f> point1, point2;
bool left_mouse = false;
Point2f point;
int pic_info[4];
Mat gray, prevGray, image, image1;
const Scalar GREEN = Scalar(0, 255, 0);
int rect_width = 0, rect_height = 0;
Point tmpPoint;
int num = 0;
int m_frameWidth = 640;
int m_frameHeight = 480;
bool    m_Calib_Data_Loaded;        // 是否成功载入定标参数
cv::Mat m_Calib_Mat_Q;              // Q 矩阵
cv::Mat m_Calib_Mat_Remap_X_L;      // 左视图畸变校正像素坐标映射矩阵 X
cv::Mat m_Calib_Mat_Remap_Y_L;      // 左视图畸变校正像素坐标映射矩阵 Y
cv::Mat m_Calib_Mat_Remap_X_R;      // 右视图畸变校正像素坐标映射矩阵 X
cv::Mat m_Calib_Mat_Remap_Y_R;      // 右视图畸变校正像素坐标映射矩阵 Y
cv::Mat m_Calib_Mat_Mask_Roi;       // 左视图校正后的有效区域
cv::Rect m_Calib_Roi_L;             // 左视图校正后的有效区域矩形
cv::Rect m_Calib_Roi_R;             // 右视图校正后的有效区域矩形
double          m_FL;
//CvStereoBMState *BMState = cvCreateStereoBMState();
int m_numberOfDisparies;            // 视差变化范围
cv::StereoBM    m_BM;
CvMat* vdisp = cvCreateMat(480, 640, CV_8U);
cv::Mat img1, img2, img1p, img2p, disp, disp8u, pointClouds, imageLeft, imageRight, disparityImage, imaget1;
static IplImage *framet1 = NULL;
static IplImage *framet2 = NULL;
static IplImage *framet3 = NULL;
static IplImage *framet = NULL;

static void onMouse(int event, int x, int y, int /*flags*/, void* /*param*/){

Mat mouse_show;
image.copyTo(mouse_show);

//char buffer[100];
//sprintf(buffer, "D:\\l%d.jpg", num);
//string t1(buffer);

//sprintf(buffer, "D:\\r%d.jpg", num);
//string t(buffer);

if (event == CV_EVENT_LBUTTONDOWN)
{
pic_info[0] = x;
pic_info[1] = y;
cout << "x:" << pic_info[0] << "y:" << pic_info[1] << endl;
left_mouse = true;

//用于存储打印图片
//imwrite(t, image);
//  imwrite(t1, image1);
//  num = num++;

}
else if (event == CV_EVENT_LBUTTONUP)
{
left_mouse = false;
}
else if ((event == CV_EVENT_MOUSEMOVE) && (left_mouse == true))
{
}
}

int loadCalibData()
{
// 读入摄像头定标参数 Q roi1 roi2 mapx1 mapy1 mapx2 mapy2
try
{
cv::FileStorage fs("calib_paras.xml", cv::FileStorage::READ);
cout << fs.isOpened() << endl;

if (!fs.isOpened())
{
return (0);
}

cv::Size imageSize;
cv::FileNodeIterator it = fs["imageSize"].begin();

it >> imageSize.width >> imageSize.height;
//  if (imageSize.width != m_frameWidth || imageSize.height != m_frameHeight)   {           return (-1);        }

vector<int> roiVal1;
vector<int> roiVal2;

fs["leftValidArea"] >> roiVal1;

m_Calib_Roi_L.x = roiVal1[0];
m_Calib_Roi_L.y = roiVal1[1];
m_Calib_Roi_L.width = roiVal1[2];
m_Calib_Roi_L.height = roiVal1[3];

fs["rightValidArea"] >> roiVal2;
m_Calib_Roi_R.x = roiVal2[0];
m_Calib_Roi_R.y = roiVal2[1];
m_Calib_Roi_R.width = roiVal2[2];
m_Calib_Roi_R.height = roiVal2[3];

fs["QMatrix"] >> m_Calib_Mat_Q;
fs["remapX1"] >> m_Calib_Mat_Remap_X_L;
fs["remapY1"] >> m_Calib_Mat_Remap_Y_L;
fs["remapX2"] >> m_Calib_Mat_Remap_X_R;
fs["remapY2"] >> m_Calib_Mat_Remap_Y_R;

cv::Mat lfCamMat;
fs["leftCameraMatrix"] >> lfCamMat;
m_FL = lfCamMat.at<double>(0, 0);

m_Calib_Mat_Q.at<double>(3, 2) = -m_Calib_Mat_Q.at<double>(3, 2);

m_Calib_Mat_Mask_Roi = cv::Mat::zeros(m_frameHeight, m_frameWidth, CV_8UC1);
cv::rectangle(m_Calib_Mat_Mask_Roi, m_Calib_Roi_L, cv::Scalar(255), -1);

m_BM.state->roi1 = m_Calib_Roi_L;
m_BM.state->roi2 = m_Calib_Roi_R;

m_Calib_Data_Loaded = true;

string method;
fs["rectifyMethod"] >> method;
if (method != "BOUGUET")
{
return (-2);
}

}
catch (std::exception& e)
{
m_Calib_Data_Loaded = false;
return (-99);
}

return 1;

}
void updatebm()
{
m_BM.state->preFilterCap = 31;
m_BM.state->SADWindowSize = 19;
m_BM.state->minDisparity = 0;
m_BM.state->numberOfDisparities = 96;
m_BM.state->textureThreshold = 10;
m_BM.state->uniquenessRatio = 25;
m_BM.state->speckleWindowSize = 100;
m_BM.state->speckleRange = 32;

m_BM.state->disp12MaxDiff = -1;

}
int  bmMatch(cv::Mat& frameLeft, cv::Mat& frameRight, cv::Mat& disparity, cv::Mat& imageLeft, cv::Mat& imageRight)
{

// 输入检查
if (frameLeft.empty() || frameRight.empty())
{
disparity = cv::Scalar(0);
return 0;
}
if (m_frameWidth == 0 || m_frameHeight == 0)
{
//if (init(frameLeft.cols, frameLeft.rows, "calib_paras.xml"/*待改为由本地设置文件确定*/) == 0) //执行类初始化
//  {
return 0;
//}
}

// 转换为灰度图
cv::Mat img1proc, img2proc;
cvtColor(frameLeft, img1proc, CV_BGR2GRAY);
cvtColor(frameRight, img2proc, CV_BGR2GRAY);

// 校正图像,使左右视图行对齐
cv::Mat img1remap, img2remap;
//cout << m_Calib_Data_Loaded << endl;

if (m_Calib_Data_Loaded)
{
remap(img1proc, img1remap, m_Calib_Mat_Remap_X_L, m_Calib_Mat_Remap_Y_L, cv::INTER_LINEAR);     // 对用于视差计算的画面进行校正
remap(img2proc, img2remap, m_Calib_Mat_Remap_X_R, m_Calib_Mat_Remap_Y_R, cv::INTER_LINEAR);
}
else
{
img1remap = img1proc;
img2remap = img2proc;
}

// 对左右视图的左边进行边界延拓,以获取与原始视图相同大小的有效视差区域
cv::Mat img1border, img2border;
if (m_numberOfDisparies != m_BM.state->numberOfDisparities)
m_numberOfDisparies = m_BM.state->numberOfDisparities;
copyMakeBorder(img1remap, img1border, 0, 0, m_BM.state->numberOfDisparities, 0, IPL_BORDER_REPLICATE);
copyMakeBorder(img2remap, img2border, 0, 0, m_BM.state->numberOfDisparities, 0, IPL_BORDER_REPLICATE);

// 计算视差
cv::Mat dispBorder;

m_BM(img1border, img2border, dispBorder);
//cvFindStereoCorrespondenceBM(img1border, img2border, dispBorder,BMState);
// 截取与原始画面对应的视差区域(舍去加宽的部分)
cv::Mat disp;
disp = dispBorder.colRange(m_BM.state->numberOfDisparities, img1border.cols);
disp.copyTo(disparity, m_Calib_Mat_Mask_Roi);

//reprojectImageTo3D(dispBorder, pointClouds, m_Calib_Mat_Q, true);

// 输出处理后的图像
//cout << m_Calib_Data_Loaded << endl;
if (m_Calib_Data_Loaded)
{
remap(frameLeft, imageLeft, m_Calib_Mat_Remap_X_L, m_Calib_Mat_Remap_Y_L, cv::INTER_LINEAR);
rectangle(imageLeft, m_Calib_Roi_L, CV_RGB(0, 0, 255), 3);
}

else
frameLeft.copyTo(imageLeft);

if (m_Calib_Data_Loaded)
remap(frameRight, imageRight, m_Calib_Mat_Remap_X_R, m_Calib_Mat_Remap_Y_R, cv::INTER_LINEAR);
else
frameRight.copyTo(imageRight);
rectangle(imageRight, m_Calib_Roi_R, CV_RGB(0, 0, 255), 3);

return 1;
}

int getDisparityImage(cv::Mat& disparity, cv::Mat& disparityImage, bool isColor)
{
// 将原始视差数据的位深转换为 8 位
cv::Mat disp8u;
if (disparity.depth() != CV_8U)
{
if (disparity.depth() == CV_8S)
{
disparity.convertTo(disp8u, CV_8U);
}
else
{
disparity.convertTo(disp8u, CV_8U, 255 / (m_numberOfDisparies*16.));
}
}
else
{
disp8u = disparity;
}

// 转换为伪彩色图像 或 灰度图像
if (isColor)
{
if (disparityImage.empty() || disparityImage.type() != CV_8UC3 || disparityImage.size() != disparity.size())
{
disparityImage = cv::Mat::zeros(disparity.rows, disparity.cols, CV_8UC3);
}

for (int y = 0; y<disparity.rows; y++)
{
for (int x = 0; x<disparity.cols; x++)
{
uchar val = disp8u.at<uchar>(y, x);
uchar r, g, b;

if (val == 0)
r = g = b = 0;
else
{
r = 255 - val;
g = val < 128 ? val * 2 : (uchar)((255 - val) * 2);
b = val;
}

disparityImage.at<cv::Vec3b>(y, x) = cv::Vec3b(r, g, b);

}
}
}
else
{
disp8u.copyTo(disparityImage);
}

return 1;
}

int getPointClouds(cv::Mat& disparity, cv::Mat& pointClouds)
{
if (disparity.empty())
{
return 0;
}

//计算生成三维点云
//  cv::reprojectImageTo3D(disparity, pointClouds, m_Calib_Mat_Q, true);

reprojectImageTo3D(disparity, pointClouds, m_Calib_Mat_Q, true);

pointClouds *= 1.6;

for (int y = 0; y < pointClouds.rows; ++y)
{
for (int x = 0; x < pointClouds.cols; ++x)
{
cv::Point3f point = pointClouds.at<cv::Point3f>(y, x);
point.y = -point.y;
pointClouds.at<cv::Point3f>(y, x) = point;
}
}

return 1;
}

void detectDistance(cv::Mat& pointCloud)
{
if (pointCloud.empty())
{
return;
}

// 提取深度图像
vector<cv::Mat> xyzSet;
split(pointCloud, xyzSet);
cv::Mat depth;
xyzSet[2].copyTo(depth);

// 根据深度阈值进行二值化处理
double maxVal = 0, minVal = 0;
cv::Mat depthThresh = cv::Mat::zeros(depth.rows, depth.cols, CV_8UC1);
cv::minMaxLoc(depth, &minVal, &maxVal);
double thrVal = minVal * 1.5;
threshold(depth, depthThresh, thrVal, 255, CV_THRESH_BINARY_INV);
depthThresh.convertTo(depthThresh, CV_8UC1);
//imageDenoising(depthThresh, 3);

double  distance = depth.at<float>(pic_info[0], pic_info[1]);
cout << "distance:" << distance << endl;
}

int main(int argc, char** argv)
{
//读取摄像头
VideoCapture cap(0);
VideoCapture cap1(1);

if (!cap.isOpened())
{
cout << "error happened while open cam 1"<<endl;
return -1;
}
if (!cap1.isOpened())
{
cout << "error happened while open cam 2" << endl;
return -1;
}

namedWindow("left", 1);
namedWindow("right", 1);
namedWindow("disparitycolor", 1);

setMouseCallback("disparitycolor", onMouse, 0);

loadCalibData();

cout << m_Calib_Data_Loaded << endl;

while (true)
{

Mat frame;
Mat frame1;
cap.read(frame);
cap1.read(frame1);
if (frame.empty())          break;
if (frame1.empty())         break;

frame.copyTo(image);
frame1.copyTo(image1);
updatebm();
bmMatch(frame, frame1, disp, imageLeft, imageRight);
imshow("left", imageLeft);
imshow("right", imageRight);

getDisparityImage(disp, disparityImage, true);
//  framet2 = &IplImage(disparityImage);
//  cvShowImage("disparitycolor", framet2);

getPointClouds(disp, pointClouds);

imshow("disparitycolor", disparityImage);

detectDistance(pointClouds);

waitKey(100);

}
//std::swap(point2, point1);
//  cv::swap(prevGray, gray);

return 0;

}

相关文章推荐
- Opencv双目标定
- opencv 双目标定程序
- OpenCV双目标定
- 双目相机标定之OpenCV获取左右相机图像+MATLAB单目标定+双目标定
- 双目相机标定以及立体测距原理及OpenCV实现
- 基于Opencv2.4.9的双目相机标定代码
- opencv 双目摄像头标定
- opencv与两个摄像头实现双目标定与测距
- 【计算机视觉】 opencv双目视觉标定、匹配和测量 (附代码)
- 双目相机标定以及立体测距原理及OpenCV实现
- matlab与opencv双目相机标定对比
- 【OpenCV】双目测距(双目标定、双目校正和立体匹配)
- opencv双目视觉标定、匹配和测量
- 【opencv学习】使用opencv与两个摄像头实现双目标定与测距
- 【计算机视觉】 双目相机标定以及立体测距原理及OpenCV实现
- 基于matlab标定数据,使用opencv实现双目立体摄像头的标定(源代码)
- 【OpenCV】双目测距(双目标定、双目校正和立体匹配)
- Opencv中的双目标定和校正
- 单目相机 双目相机 OpenCV 标定求内外参数 笔记留着需要的时候用
- 基于opencv的双目标定