自制Java虚拟机(四)-对象、new、invokespecial
2017-06-04 09:32
323 查看
自制Java虚拟机(四)-对象、new、invokespecial
一、对象的表示
刚开始学Java的时候,图书馆各种教程,书名往往都是“Java面向对象高级编程”,通常作者都会与C++做个比较,列出的优点往往都有纯面向对象、自动垃圾收集(不用管理内存)、跨平台(Write once, run everywhere 是宣传的重点,前提是需要在每个平台上安装jvm)、没有指针(后来证明是有的)、安全等。本篇文章就来实现面向对象(简单版,暂不考虑继承),涉及的指令主要有:new创建一个对象
getfield获取对象的一个实例属性(field),push到操作数栈
putfield通过对象的引用和指向常量池
CONSTANT_Fieldref_info类型的索引,给对象的属性赋值
invokespecial调用构造函数、实例化方法
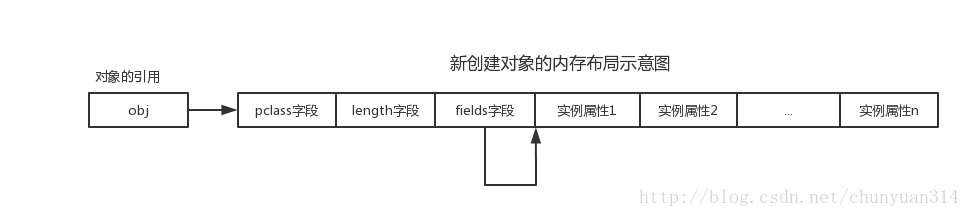
存储对象主要是存储它的实例属性和类型信息,可用如下结构体表示一个对象:
typedef struct _Object {
Class* pclass;
int length;
char* fields;
} Object;

typedef Object* Reference;
其中,pclass字段为创建该对象使用的类,length为该对象的属性个数,fields为字段数组指针,指向实例属性数组的起始地址。
创建对象的代码可以如下:
Object* newObject(OPENV *env, Class* pclass) {
Object *obj;
int total_size;
total_size = (pclass->fields_size+1)<<2;

obj = (Object*)malloc(sizeof(Object) + total_size);
obj->fields = (char*)(obj+1);
obj->pclass = pclass;
obj->length = total_size;
return obj;
}
new指令的实现:
Opreturn do_new(OPENV *env)
{
Class* pclass;
PRINTSD(TO_SHORT(env->pc));
short index = TO_SHORT(env->pc);
Object *obj;

if (env->current_class->this_class == index) {
pclass = env->current_class;
} else {
// TODO: create object of non-current-class
}

obj = newObject(env, pclass);
PUSH_STACKR(env->current_stack, obj, Reference);

INC2_PC(env->pc);
}
由于
getfield和
putfield指令是通过对象的引用和常量池索引来操作的,我们若操作对象的属性,需要唯一定位每个属性,当前方法是通过给每个对象的实例字段分配一个唯一的索引来实现的。假设我们已经知道每个属性的索引:
#define GET_FIELD_OFFSET(index) ((index) << 2)
#define GET_FIELD(obj, findex, ftype) *((ftype*)(obj->fields + GET_FIELD_OFFSET(findex)))
#define PUT_FIELD(obj, findex, fvalue, ftype) *((ftype*)(obj->fields + GET_FIELD_OFFSET(findex)))=fvalue
通过对象的引用(obj)、属性的索引(findex)、属性的类型(ftype),我们就可以存取一个对象的属性了(保存的时候需要知道值 fvalue)。
实际上
getfield、
putfield指令涉及到操作数栈:
#define OP_GET_FIELDI(obj, findex, ftype) PUSH_STACK(env->current_stack, GET_FIELD(obj, findex, ftype), int)
#define OP_GET_FIELDF(obj, findex, ftype) PUSH_STACK(env->current_stack, GET_FIELD(obj, findex, ftype), float)
#define OP_GET_FIELDL(obj, findex, ftype) PUSH_STACKL(env->current_stack, GET_FIELD(obj, findex, ftype), ftype)

#define OP_PUT_FIELDI(obj, findex, ftype) obj=PICK_STACKL(env->current_stack, Reference);\
SP_DOWNL(env->current_stack);\
PUT_FIELD(obj, findex, PICK_STACKU(env->current_stack, ftype), int)

#define OP_PUT_FIELDF(obj, findex, ftype) obj=PICK_STACKL(env->current_stack, Reference);\
SP_DOWNL(env->current_stack);\
PUT_FIELD(obj, findex, PICK_STACKU(env->current_stack, ftype), float)

#define OP_PUT_FIELDL(obj, findex, ftype) obj=PICK_STACKIL(env->current_stack, Reference);\
SP_DOWNIL(env->current_stack);\
PUT_FIELD(obj, findex, PICK_STACKU(env->current_stack, ftype), ftype)
以上宏可用在
getfield、
putfield的实现函数中放心使用。
PICK_STACKU、
PICK_STACKL、
PICK_STACKIL的定义如下:
#define PICK_STACKU(stack, vtype) (*(vtype*)(stack->sp+SP_STEP)) // 往上4个字节
#define PICK_STACKL(stack, vtype) (*(vtype*)(stack->sp-SP_STEP_LONG)) // 往下8个字节
#define PICK_STACKIL(stack, vtype) (*(vtype*)(stack->sp-SP_STEP_ILONG)) // 往下12个字节
二、解析实例属性
考虑以下程序:Point.java
package test;

public class Point{
private double x;
private double y;

public Point(double x, double y)
{
this.x = x;
this.y = y;
}

private double distance(Point p)
{
double dx = p.x - this.x;
double dy = p.y - this.y;

return dx*dx + dy *dy;
}

public static void main(String[] args)
{
Point p1 = new Point(0,0);
Point p2 = new Point(3.0, 4.0);

double dist = p1.distance(p2);
}
}
构造函数
Point(double,double)的字节码为:
0: aload_0
1: invokespecial #1
4: aload_0
5: dload_1
6: putfield #2
9: aload_0
10: dload_3
11: putfield #3
14: return
其中
putfield #2,2为常量池的索引,内容为一个
CONSTANT_Fieldref_info类型的结构:
常量池#2、#3的内容:
#2 Fieldref #4.#26 // test/Point.x:D
#3 Fieldref #4.#27 // test/Point.y:D
我们需要通过常量池的索引解析到具体的
field_info,从而唯一确定每个字段(属性)在对象中的索引,它们在常量池中的引用关系如下:
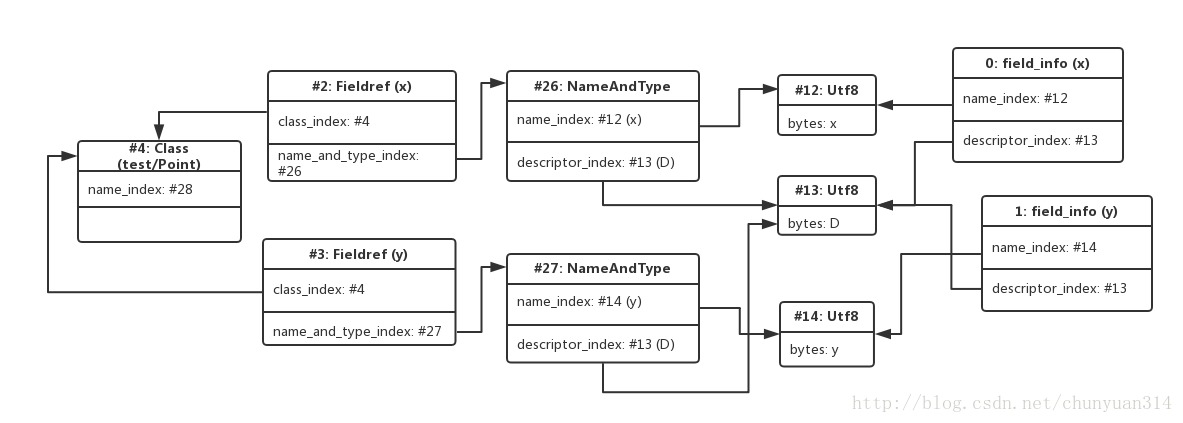
由上图可见,
Fieldref对应的
NameAndType的name_index字段、descriptor_index字段与
field_info对应的字段相等,我们就从
Class的
fields数组中找到了实际的字段。
解析实例属性的代码大致如下:
void resolveClassInstanceField(Class* caller_class, CONSTANT_Fieldref_info **pfield_ref)
{
Class* callee_class;
cp_info callee_cp, caller_cp;
CONSTANT_Fieldref_info* field_ref = *pfield_ref;
CONSTANT_NameAndType_info* field_nt_info;
CONSTANT_Utf8_info* field_name_utf8, *tmp_field_name_utf8;
CONSTANT_Class_info *field_ref_class_info;
field_info *field;
int i, found =0, fields_count;

caller_cp = caller_class->constant_pool;
field_ref_class_info = (CONSTANT_Class_info*)(caller_cp[field_ref->class_index]);
callee_class = field_ref_class_info->pclass;
if (NULL == callee_class) {
printf("NULL class");exit(1);
}

field_nt_info = (CONSTANT_NameAndType_info*)(caller_cp[field_ref->name_and_type_index]);

callee_cp = callee_class->constant_pool;
fields_count = callee_class->fields_count;
for (i = 0; i < fields_count; i++) {
field = (field_info*)(callee_class->fields[i]);
if (NOT_ACC_STATIC(field->access_flags) &&
field_nt_info->name_index == field->name_index &&
field_nt_info->descriptor_index == field->descriptor_index) {
field_ref->ftype  = field->ftype;  // 实例属性的类型
field_ref->findex = field->findex; // 实例属性在对象中的索引
found = 1;
break;
}
}

if (!found) {
field_name_utf8 = (CONSTANT_Utf8_info*)(caller_cp[field_nt_info->name_index]);
printf("Error! cannot resolve field: %s.%s", field_name_utf8->bytes);
exit(1);
}
}
这里我们只考虑这个类本身定义的实例属性(暂不考虑继承过来的属性),实例属性的类型以及在对象中的索引是在解析class文件的fields中确定的:
void parseFields(FILE *fp, Class *pclass)
{
...
ftype = *(char*)(get_utf8(pclass->constant_pool[tmp_field->descriptor_index]));
tmp_field->ftype = ftype;

if (NOT_ACC_STATIC(tmp_field->access_flags)) { // 过滤掉静态属性
tmp_field->findex = last_index;
if (ftype == 'J' || ftype == 'D') {
last_index+=2; // long、double要占两个单元
} else {
last_index+=1; // 其它数据类型占一个单元
}
}
...
}
因此,
getfield指令的实现可以这样子:
Opreturn do_getfield(OPENV *env)
{
CONSTANT_Fieldref_info *fieldref;
cp_info cp;
Object *obj;
short index = TO_SHORT(env->pc);
PRINTSD(TO_SHORT(env->pc));
cp = env->current_class->constant_pool;
fieldref = (CONSTANT_Fieldref_info*)(cp[index]);
GET_STACKR(env->current_stack, obj, Reference);
if (0 == fieldref->ftype) {
// TODO: resolve this field
resolveClassInstanceField(env->current_class, &fieldref);
}

switch (fieldref->ftype) {
...
case 'S': // short
OP_GET_FIELDI(obj, fieldref->findex, short);
break;
case 'I': // integer
OP_GET_FIELDI(obj, fieldref->findex, int);
break;
case 'D': // double
OP_GET_FIELDL(obj, fieldref->findex, double);
break;
default:
printf("Error: getfield, ftype=%d\n", fieldref->ftype);
exit(1);
break;
}

INC2_PC(env->pc);
}putfield指令也可以类似实现。
三、解析实例方法
还是上面的Point.java,main函数的字节码为:
0: new           #4                  // class test/Point
3: dup
4: dconst_0
5: dconst_0
6: invokespecial #5                  // Method "<init>":(DD)V
9: astore_1
10: new           #4                  // class test/Point
13: dup
14: ldc2_w        #6                  // double 3.0d
17: ldc2_w        #8                  // double 4.0d
20: invokespecial #5                  // Method "<init>":(DD)V
23: astore_2
24: aload_1
25: aload_2
26: invokespecial #10                 // Method distance:(Ltest/Point;)D
29: dstore_3
30: return
其中的
invokespecial #10就是调用Point的distance方法,#10是常量池中的索引,对应的是一个
CONSTANT_Methodref_info类型的结构,在常量池中的关系图如下:
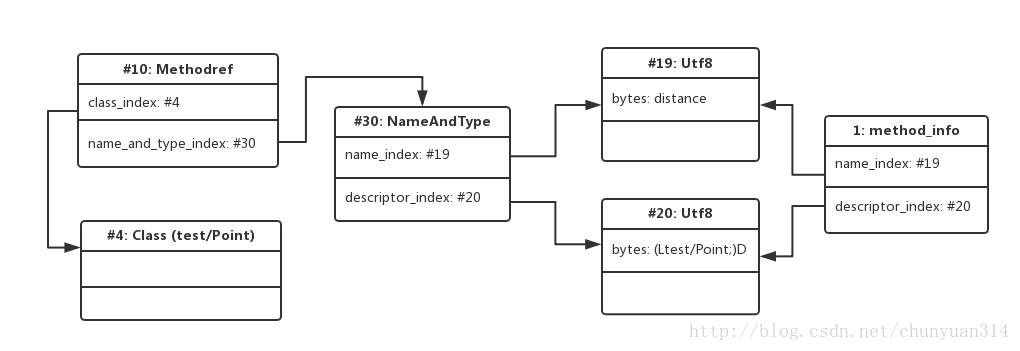
这个与
Fieldref的可以说是一模一样,通过
Methodref的name_and_type_index字段,找到对应的NameAndType结构,然后遍历methods数组,method_info的name_index字段、descriptor_index字段与NameAndType相应字段相等,就说明解析到了对象的实例方法。(该方法也适用于构造函数
<init>的解析)
所以,
invokespecial指令的实例可以如下:
Opreturn do_invokespecial(OPENV *env)
{
PRINTSD(TO_SHORT(env->pc));
short mindex = TO_SHORT(env->pc);
INC2_PC(env->pc);

callClassSpecialMethod(env, mindex);
}callClassSpecialMethod大致如下:
void callClassSpecialMethod(OPENV* current_env, int mindex)
{
Class* current_class = current_env->current_class;
CONSTANT_Methodref_info* method_ref = (CONSTANT_Methodref_info*)(current_class->constant_pool[mindex]);

if (method_ref->class_index != current_env->current_class->this_class) {
printf("skip other method"); // 跳过其它类的实例方法
return;
}
if (NULL == method_ref->ref_addr) {
// 这个与resolveClassInstanceField类似
resolveClassSpecialMethod(current_class, &method_ref);
}
// 调用该方法 [见下一节]
callResolvedClassSpecialMethod(current_env, method_ref);
}
四、调用方法
上面一节,我们解析出了实例方法,接下来就要调用它。一个方法/函数(称为被调用方法)调用,需要做以下几件事情:
新建一个帧/栈帧
从方法调用者(invoker)的操作数栈中复制参数到新的帧的局部变量数组中(如果有参数的话)
保存方法调用者(invoker)的执行上下文(指令指针位置、当前类等)
设置被调用方法的执行上下文,把指令指针指向被调用方法的第一条指令
方法调用完成后,需要:
把返回参数复制到方法调用者的操作数栈上,如果有的话
恢复调用前的执行上下文
销毁调用该方法时创建的帧
上节中
callResolvedClassSpecialMethod可以实现为如下:
void callResolvedClassSpecialMethod(OPENV* current_env, CONSTANT_Methodref_info* method_ref)
{
StackFrame* stf, *last_stack;
CONSTANT_Class_info* class_info;
method_info* method;
Code_attribute* code_attr;
int real_args_len =0;
last_stack= current_env->current_stack;
// 1. create new stack frame
method = (method_info*)(method_ref->ref_addr);
code_attr = (Code_attribute*)(method->code_attribute_addr);
stf = newStackFrame(last_stack, code_attr);
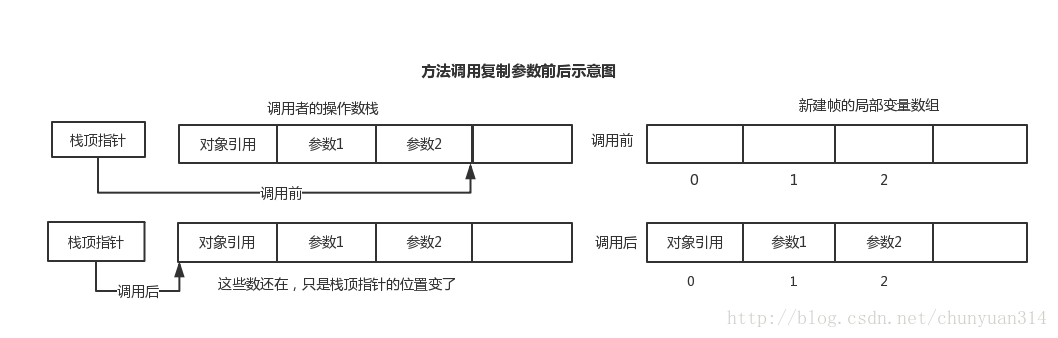
// 2. copy args
real_args_len = method->args_len + SZ_REF;
last_stack->sp -= real_args_len;
memcpy(stf->localvars, last_stack->sp, real_args_len);
// 3. save current environment
stf->last_pc = current_env->pc;
stf->last_pc_end = current_env->pc_end;
stf->last_pc_start = current_env->pc_start;
stf->last_class = current_env->current_class;
// 4. set new environment
class_info = (CONSTANT_Class_info*)(current_env->current_class->constant_pool[method_ref->class_index]);
current_env->pc = current_env->pc_start = code_attr->code;
current_env->pc_end = code_attr->code + code_attr->code_length;
current_env->current_class = class_info->pclass;
current_env->current_stack = stf;
}复制参数的时候,要注意,实例方法有个隐含参数,为调用该方法的对象引用,该参数是作为第一个参数传给方法的,需要放在新建帧的局部变量数组的第一个位置。
调用结束后(即遇到
return系列指令),这里定义成一个宏,给
return系列指令调用:
#define FUNC_RETURN(env) StackFrame* stf = env->current_stack;\
env->current_stack = stf->prev;\
env->pc = stf->last_pc;\
env->pc_end = stf->last_pc_end;\
env->pc_start = stf->last_pc_start;\
env->current_class = stf->last_class;\
free(stf);\
if (env->current_stack == NULL) {\
exit(0);\
}
在本文的例子中,Point.java中Point类的的distance方法是返回一个double类型的值,对应的指令为
dreturn:
Opreturn do_dreturn(OPENV *env)
{
double v;
GET_STACKL(env->current_stack,v, double);
PUSH_STACKL(env->current_stack->prev, v, double); // 把结果保存到前一个帧的操作数栈
FUNC_RETURN(env); // 方法调用完成的逻辑:恢复上下文,销毁帧
}
五、测试
把Point.java编译成的Point.class文件,测试,java源代码以及输出的调试结果如下:
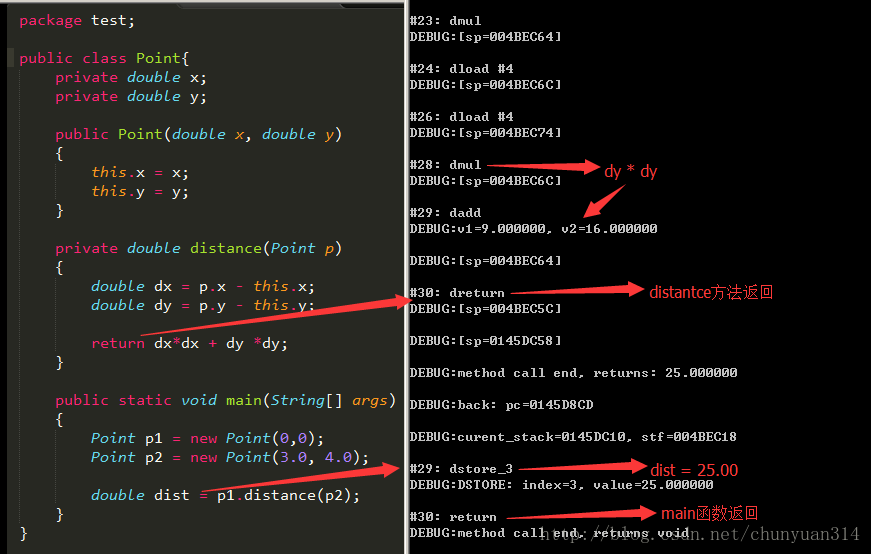
心算一下,对比调试输出,可知结果正确。(距离计算故意没有开平方)
六、总结
总结一下,本章,我们:能够表示以及创建一个对象,实现了
new指令
实现了对象属性操作指令
getfield、
putfield
能够解析实例属性
能够解析实例方法
实现了
invokespecial指令
在测试例子中,用带参数构造函数创建了两个Point对象,用其中一个对象调用实例方法distance,另一个对象作为参数,计算距离的平方,运行正确。

相关文章推荐
- Java虚拟机——new关键字创建对象的过程
- new创建对象和直接定义的区别
- String s = new String("xyz");创建了几个对象?
- c++ 用布局NEW 管理类对象
- (8) 一个死循环一直不停的new对象过程中的垃圾回收的情况
- 问个比较菜的问题,在JAVA中new完对象后有没有办法消除对象,节省手机内存。
- 【转】new对象时,类名后加括号和不加括号的区别
- java面试要点---ArrayList list = new ArrayList(); 在这个泛型为Integer的ArrayList中存放一个String类型的对象。
- 在spring 中如果使用new创建一个对象时 这个对象将不在受spring管理器管理
- PowerShell小技巧之使用New-Module命令动态创建对象
- 深入理解Java虚拟机---(4)对象是否“死亡”的判断和GC的相关收集算法
- String s = new String("abc")创建了几个对象?
- String a=new String("abc")产生几个对象?
- JAVA虚拟机中对象创建
- JavaScript--new创建对象的过程
- String s = new String("abc");创建了几个String对象
- java通过原型创建对象真的比new创建对象快吗
- new和delete 基类指针指向继承类的对象时,delete的过程
- java 反射机制 / 反射new 对象 / 反射方式调用方法
- (Siverlight应用程序之间)通过宿主(B屏)New对象,进行的交互消息(反射)