【CPU + GPU版】Ubuntu16.04 + caffe + Anaconda2 + OpenCV3.x(附:问题集锦+测试案例)
2017-06-02 00:43
561 查看
【UpdateTime:20180105 - 12:30】
【CPU版】Ubuntu + caffe + Anaconda2 + OpenCV3.x
2017.06.02:整理出第一个版本。
2018.01.05:整理libhdf5_hl.so.100和libopencv_highgui.so等两个问题。
2018.01.05:Ubuntu 16.04中使用Matlab R2016b编译Caffe接口出错的解决方法。
一、本文目的
本文基于上一篇博文《Ubuntu 常用软件安装:Matlab + XX-net + ... + TeamViewer + Tensorflow + Caffe》中的caffe环境的搭建部分进行完善,更详细的进行整理,主要贡献如下:
1、根据本人实践过程进行记录,更加完善记录整个“caffe环境搭建”的过程。
2、归纳总结问题集锦:caffe环境的搭建过程确实很多细节需要处理,本文尽可能收集一些相关的参考资料。
3、本文会尽可能详细的列出每个步骤,图文结合,并附上参考网址。
4、贴出【CPU版本】和【GPU版本】的Makefile.configure配置文件。
5、总结归纳测试案例。
参考网址:
1)caffe的配置过程:http://blog.csdn.net/brightming/article/details/51106629
2)【深度学习】 Ubuntu16.04 caffe Opencv2.4.13 GPU环境配置:http://blog.csdn.net/sinat_17196995/article/details/53466524
3)Ubuntu 常用软件安装:Matlab + XX-net + ... + TeamViewer + Tensorflow + Caffe
4)caffe安装:http://blog.csdn.net/lanxuecc/article/details/51997919
新增参考网址(20180105)
3D - caffe:https://github.com/faustomilletari/3D-Caffe.git
深度学习之常用软件(ubuntu):http://blog.csdn.net/houchaoqun_xmu/article/details/78869052
发表过CVPR-2017的作者的博客:http://zongweiz.leanote.com/post/Install-caffe-in-Ubuntu
cuda-8.0 + cudnn-5.1 的安装步骤请参考这里:http://blog.csdn.net/houchaoqun_xmu/article/details/78869052
OpenCV-3.3.0(Ubuntu-16.06)请参考这里:http://blog.csdn.net/houchaoqun_xmu/article/details/78565
二、G[b]PU版caffe配置过程[/b]
1、更新安装必要的软件包,去除不必要的包
2、查看系统GPU信息:lspci | grep -i nvidia
注:如果当前系统尚未安装NVIDIA驱动,需先进行安装,可参考这里。
3、安装并配置CUDA8.0
1)下载对应版本的CUDA安装包(.deb文件):https://developer.nvidia.com/cuda-downloads
2)cd到文件所在路径,并执行如下命令:
3)sudo dpkg -i cuda-repo-<distro>_<version>_<architecture>.deb
4)sudo apt-get update
5)sudo apt-get install cuda
=== 配置环境变量 ===
1)export PATH=“/usr/local/cuda-8.0/bin:$PATH”
2)export LD_LIBRARY_PATH=”/usr/local/cuda-8.0/lib64:$LD_LIBRARY_PATH“
3)配置环境变量和动态链接库,在命令行输入【sudo gedit /etc/profile】在文件末尾加入【export PATH = “/usr/local/cuda/bin:$PATH”】,保存后关闭文件。
4)保存之后,创建链接文件,输入【sudo gedit /etc/ld.so.conf.d/cuda.conf】在打开的文件中添加如下语句【/usr/local/cuda/lib64】执行【sudo ldconfig】。
5)查看显卡的驱动版本: cat /proc/driver/nvidia/version
6)查看nvcc编译器的版本: nvcc -V
=== 编译CUDA Sample(可选) ===
1)参考网址:http://blog.csdn.net/sinat_17196995/article/details/53466524
2)【cd /usr/local/cuda-8.0/samples/bin/x86_64/linux/release】,然后执行【sudo ./deviceQuery】,出现如下信息,表示成功:
4、安装Anaconda2
1)到官网下载安装包(此处选择for Linux):https://www.continuum.io/downloads/
2)cd到安装包文件所在的目录下并执行:bash Anaconda2-4.3.1-Linux-x86_64.sh
3)配置环境变量:
== sudo gedit ~/.bashrc
== export PATH="/home/hcq/anaconda2/bin:$PATH"
== source ~/.bashrc
5、安装、编译OpenCV3.x
1)sudo git clone https://github.com/jayrambhia/Install-OpenCV
2)在Install-OpenCV/Ubuntu目录下:
== 先执行命令:sudo chmod +x *
== 然后执行sudo ./opencv_latest.sh(此过程需要一段时间,最后出现OpenCV 3.2.0 ready to be used表示成功)
3)cd /home/hcq/Install-OpenCV/Ubuntu/OpenCV/opencv-3.2.0
4)sudo mkdir release
5)cd release
6)sudo cmake -D CMAKE_BUILD_TYPE=RELEASE -D CMAKE_INSTALL_PREFIX=/usr/local ..
7)sudo make(编译过程需要一段时间,要到100%才算是是成功)
8)sudo make install
编译完,环境也自动加上了。
===== 配置文件 =====
1)sudo gedit /etc/ld.so.conf.d/opencv.conf #配置相关文件
2)复制如下代码加入到文件
PKG_CONFIG_PATH=$PKG_CONFIG_PATH:/usr/local/lib/pkgconfig
export PKG_CONFIG_PATH
3)source /etc/bash.bashrc
6、安装依赖项
1)安装google-glog:参考这里
== 下载地址:https://pan.baidu.com/s/1slpjjeH
== 将glog‐0.3.3.tar.gz这个文件拷贝到主文件夹下,即/home/yourname 文件夹下,点击鼠标右键,选择提取到此处(也就是解压该文件)解压后在终端输入如下命令:
2)安装其他依赖项:
3)安装OpenBLAS
参考网址:https://github.com/xianyi/OpenBLAS#set-the-number-of-threads-with-environment-variables
注:如果在sudo make runtest 的时候出现错误【libopenblas.so.0: cannot open shared object file: No such file or directory】,第四部分有介绍解决方案。
7、安装其他所需工具(可能导致错误的一些安装,建议读者先跳过本节的安装,遇到问题后再进行安装,印象会比较深刻)
1)conda install libgcc 参考网址:http://blog.csdn.net/u010734277/article/details/70195043
2)sudo apt install ffmpeg 参考网址:http://f.dataguru.cn/thread-738610-1-1.html
8、安装并配置CUDNN(一定要看好对应的版本!!否则后面一些链接库会出错):https://developer.nvidia.com/rdp/cudnn-download
====================== cudnn-5.1-8.0 ========================
1)切换到安装包所在的目录下:sudo tar xvf cudnn-8.0-linux-x64-v5.1.tgz
2)切换到 cuda/lib64 目录下:sudo cp lib* /usr/local/cuda-8.0/lib64/
3)切换到 cuda/include 目录下:sudo cp *.h /usr/local/cuda-8.0/include/
4)切换到 /usr/local/lib 目录下:sudo chmod +r libcudnn.so.5.1.10 && sudo ln -sf libcudnn.so.5.1.10 libcudnn.so.5 && sudo ln -sf libcudnn.so.5 libcudnn.so && sudo ldconfig
9、下载caffe源码、配置、编译:
=== 下载caffe源码 ===
1)cd到home/hcq/目录,下载caffe源码:sudo git clone https://github.com/BVLC/caffe.git
=== 配置相关文件 ===
1)cd到home/hcq/caffe,复制配置文件:sudo
cp Makefile.config.example Makefile.config
2)配置Makefile.config文件:sudo
gedit Makefile.config,去掉注释并修改的部分如下所示:
3)修改Makefile文件:sudo
gedit Makefile,进行如下修改:
4)进入/usr/lib/x86_64-linux-gnu目录下,执行如下命令(否则会提示:/usr/bin/ld:
找不到 -lhdf5_hl 和 /usr/bin/ld: 找不到 -lhdf5)
5)caffe源码中,python的一些必要安装:
注:如果需要执行权限问题,就改变caffe文件的执行权限 sudo chown -R 'hcq' xxx
=== 编译caffe(期间遇到问题可以到第四部分查看是否有相关的解决方案)===
1)cd /home/hcq/caffe:进入caffe的根目录下
2)sudo make clean
3)sudo make all -j4 (-j4表示使用4核处理器执行当前指令)
4)sudo make test -j4(最好加上sudo防止有些文件的访问权限不够)
5)sudo make runtest -j4
6)sudo make pycaffe -j4(配置pycaffe)
=== 效果图展示 ===
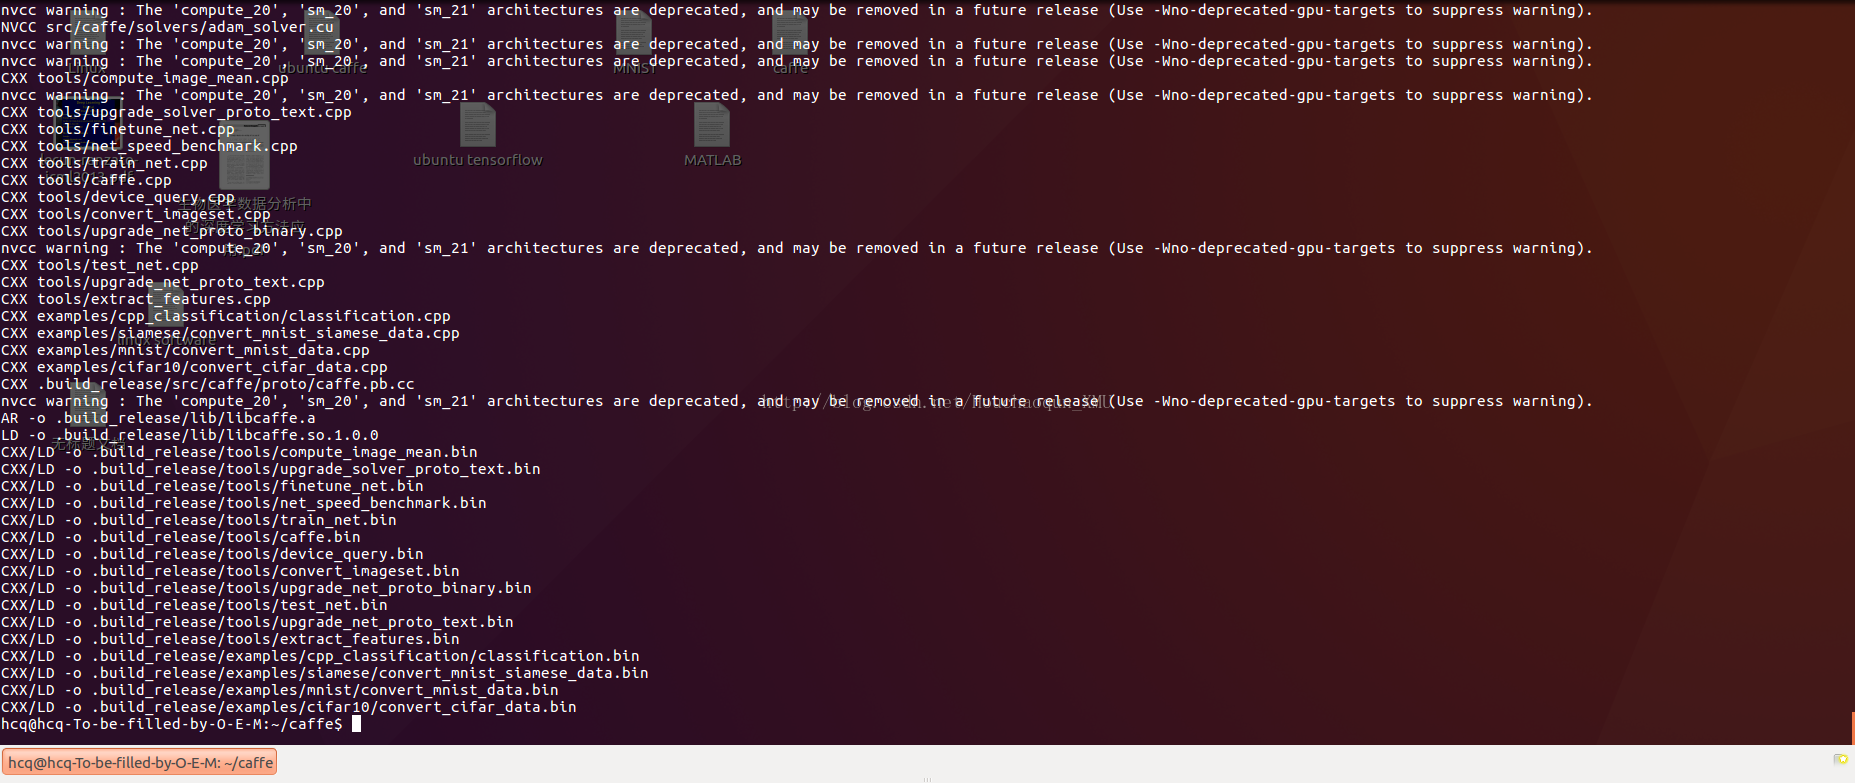
1)sudo make all 成功后的效果图,如下所示:
2)sudo make runtest 成功后的效果图,如下所示:
10、caffe的[b]测试案例:[/b]
参考网址:http://caffe.berkeleyvision.org/gathered/examples/mnist.html
1)import caffe,输入如下命令:
== cd /home/hcq/caffe
== python
== import caffe
== 第一次成功后如下所示:
2)MNIST 模型
== cd /home/hcq/caffe(确保当前目录是caffe目录),执行如下命令:
== sudo ./data/mnist/get_mnist.sh
== sudo ./examples/mnist/create_mnist.sh
== sudo ./examples/mnist/train_lenet.sh
== 训练完成后如下所示:
3)Cifar-10 模型
== cd /home/hcq/caffe #cd到caffe源码的根目录下
== sudo ./data/cifar10/get_cifar10.sh #该脚本会下载二进制的cifar,并解压,会在/data/cifar10中出现很多batch文件
== sudo ./examples/cifar10/create_cifar10.sh #运行后将会在examples中出现数据集./cifar10_xxx_lmdb和数据集图像均值./mean.binaryproto
注:CIFAR-10的卷积神经网络模型由卷积层,pooling层,ReLU,非线性变换层,局部对比归一化线性分类器组成。该模型定义在CAFFE_ROOT/examples/cifar10/cifar10_quick_train_test.prototxt中。
== sudo ./examples/cifar10/train_quick.sh #先以0.001的学习率迭代4000次,再以0.01的学习率接着再迭代1000次,共5000次
注:同理可以训练full模型,full模型比quick模型迭代次数多,一共迭代70000次,前60000次学习率是0.001,中间5000次学习率是0.0001,最后5000次学习率是0.00001。full模型的网络层数也比quick模型多,输入如下命令训练full模型
== sudo ./examples/cifar10/train_full.sh
参考网址:
== caffe示例实现之1在CIFAR-10数据集上训练与测试Caffe:http://blog.csdn.net/liumaolincycle/article/details/47258937
== caffe官网:http://caffe.berkeleyvision.org/
训练成功后,提示如下所示,以sudo ./examples/cifar10/train_quick.sh为例:
4)使用训练的模型来分类新数据:
== 确保 sudo make pycaffe 已经编译成功。
== 打开终端,在caffe源码的根目录下,执行如下命令:
错误原因:
解决方案:
1)cd /home/hcq/caffe/script
2)python download_model_binary.py /home/hcq/caffe/models/bvlc_reference_caffenet
参考网址:http://blog.csdn.net/u011636440/article/details/52441519
解决上述问题后,又出现新问题提示如下所示:
解决方案:修改了 ./python/caffe/io.py
文件,如下
将:
修改为:
参考网址:http://blog.csdn.net/gzljss/article/details/45849013
运行成功后,提示如下所示:
== 使用cifar10_quick_iter_4000.caffemodel.h5模型:
== 错误提示如下:
解决方案:到目录/home/hcq/caffe/examples/cifar10下查看已有的模型,然后把指定的模型换成已有的模型,已有的模型如下所示(因人而异):
== 选择【cifar10_quick_iter_5000.caffemodel.h5】作为指定模型,再次运行如下命令:
注:默认的classify脚本不会直接输出结果,而是会把结果输入到foo文件里,不太直观,网上有一个修改版,添加了一些参数,可以输出概率最高的分类。
替换Python/classify.py,下载地址:
这个脚本添加了两个参数,可以指定labels_file,然后可以直接把分类结果输出出来:
Caffe学习资料:
1、Classification: Instant Recognition with Caffe:http://nbviewer.jupyter.org/github/BVLC/caffe/blob/master/examples/00-classification.ipynb
三、CPU版caffe环境配置过程
1、CPU和GPU版本的一些区别:
1)CPU版本的话,不需要NVIDIA驱动,不需要安装CUDA,不需要配置CUDNN
2)caffe目录下的Makefile.configure配置不一样
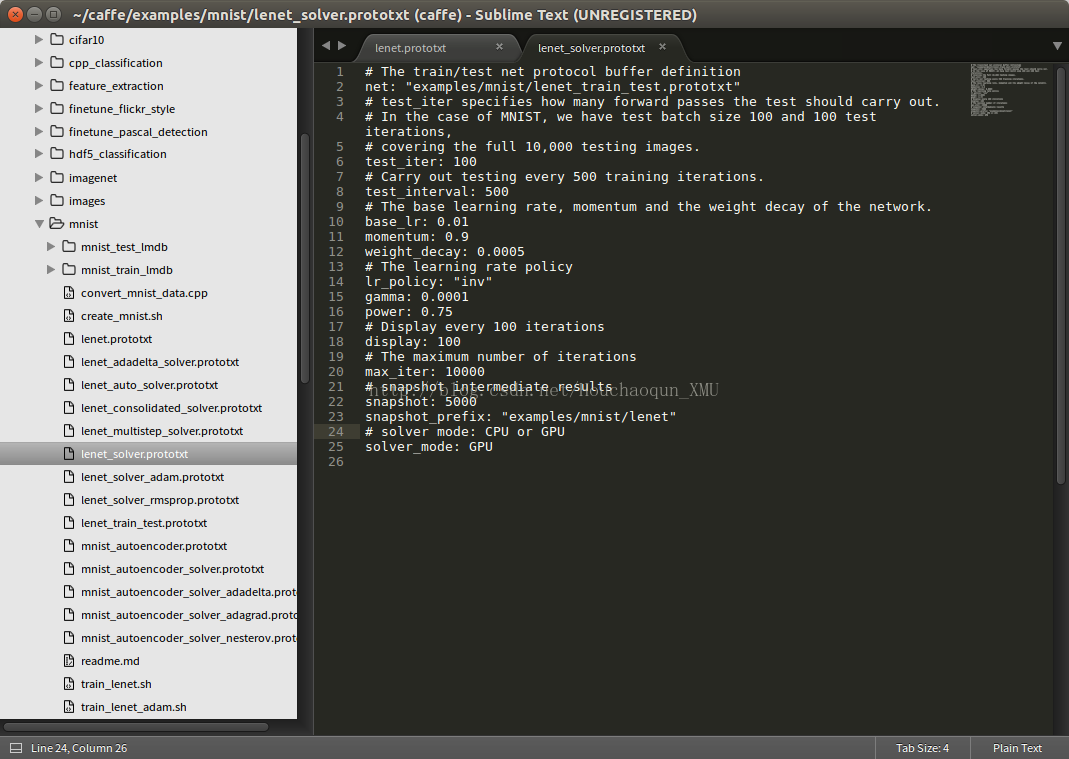
3)配置模型的时候,solver_mode: CPU,变成CPU(如果没改的话会报错),如下所示:
2、CPU版本的Makefile.configure配置,未注释掉的部分,如下所示:
3、测试案例跟GPU的类似,只不过需要把solver_mode: CPU改为CPU。
四、问题集锦
1、sudo make all 编译过程遇到的错误,【conda install libgcc】安装libgcc即可,错误提示如下所示:
或者如下所示:
2、sudo make runtest 时遇到的错误,【sudo apt install ffmpeg】安装ffmpeg即可,错误提示如下所示:
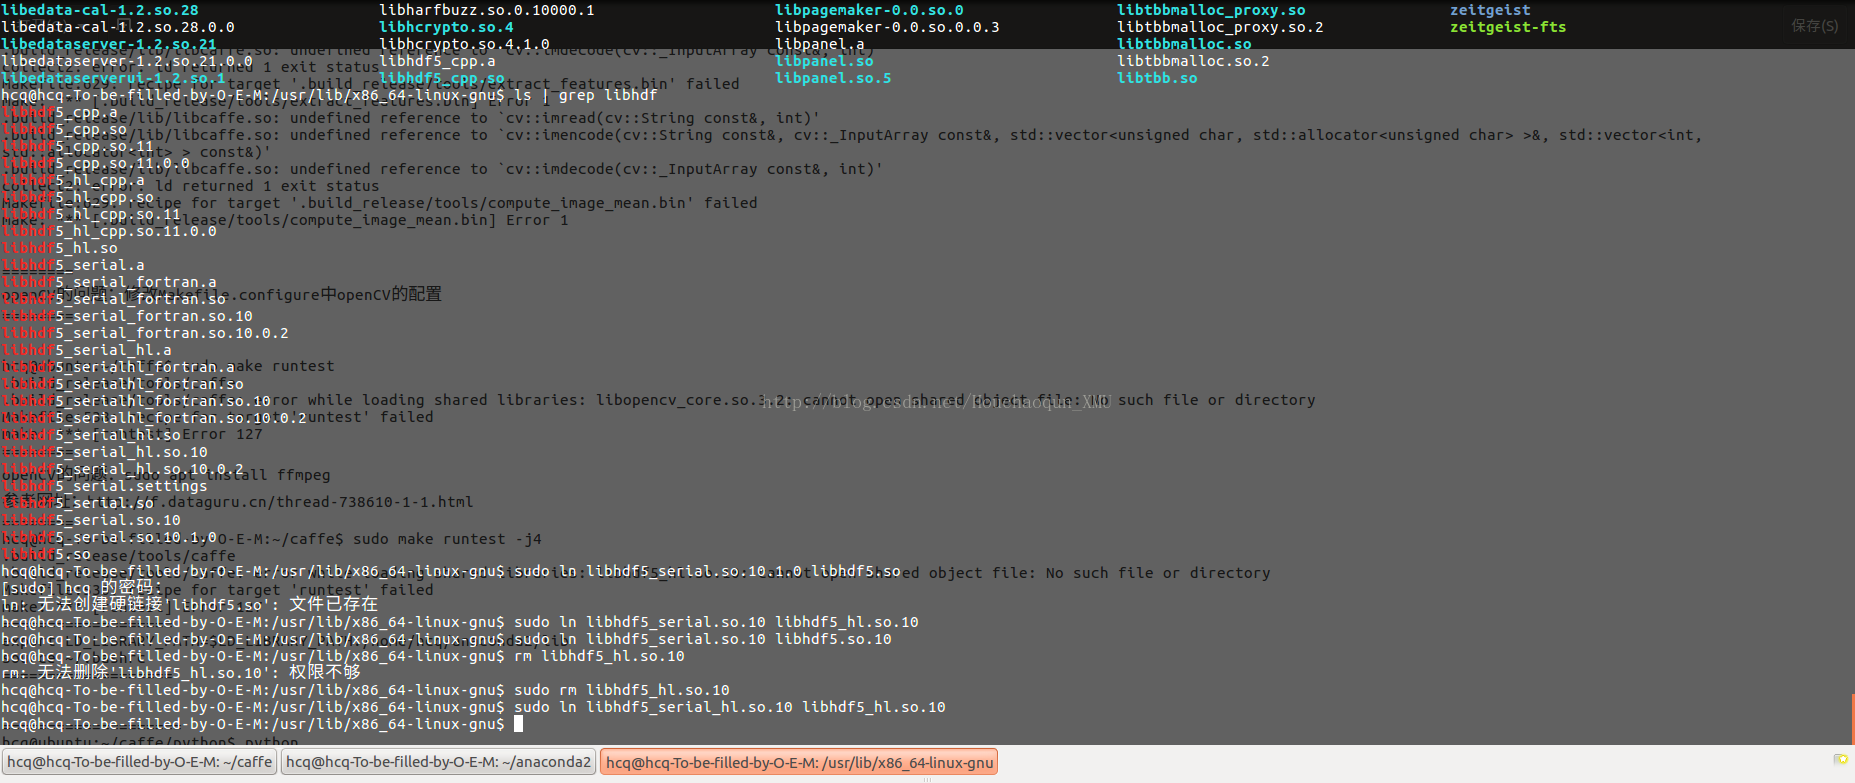
3、sudo make runtest 时遇到的错误,缺失一些相关的so链接:
原因:目录/usr/lib/x86_64-linux-gnu下确实是找不到【libhdf5_hl.so.10】和【libhdf5.so.10】这两个文件,如下图所示:
解决方案:根据相应的文件,创建所需的软连接,如下所示:
原因:初步断定是NVIDIA的显存不够,本文所使用的机器是GeForce GTX 960 2GB的显存。本人做了如下探究:
1)据同学介绍,他使用的机器显存有8GB,就不会出现这样的问题。
2)本人还尝试使用CPU( 物理内存8GB )运行sudo make runtest -j4,也不会出现这样的问题。
解决方案:
1)从机器层面入手,扩大硬件性能(主要是显存)
2)改用CPU跑程序,不过最后使用GPU的话还是需要使用好一点的设备(显卡、显卡)
参考网址:http://www.cnblogs.com/penguinliong/p/6351215.html
6、build_release/tools/caffe: error while loading shared libraries: libopenblas.so.0: cannot open shared object file: No such file or directory
描述:Makefile.configure配置好了,相应的引用位置也有 libopenblas.so.0 该文件,make runtest的时候仍然出错。
解决方案:将 openblas 的库所在位置添加到系统环境变量 LD_LIBRARY_PATH,export LD_LIBRARY_PATH=/opt/OpenBLAS/lib/ sudo ldconfig。打开终端,输入如下命令:
1)export LD_LIBRARY_PATH=/opt/OpenBLAS/lib/
2)sudo ldconfig
参考网址:
1)http://blog.csdn.net/lanxuecc/article/details/51997919
2)http://blog.csdn.net/lien0906/article/details/46816243
3)https://github.com/sermanet/OverFeat/issues/10
配置成功后的提示如下所示:
7、Check failed: fd != -1 (-1 vs. -1) File not found: examples/cifar10/cifar10_full_iter_60000.solverstate
描述:执行【sudo ./examples/cifar10/train_full.sh】报错。
解决方案:
相似问题:Check failed: fd != -1 (-1 vs. -1) File not found: deploy.prototxt
原因:因为没有把deploy.prototxt文件复制到demo下。
解决方案:把caffe/models/bvlc_reference_caffnnet/deploy.prototxt复制到demo下即可。
参考网址:http://blog.csdn.net/ahbbshenfeng/article/details/52077605
8、error while loading shared libraries: libhdf5_hl.so.100
9、Makefile:567: recipe for target '.build_release/examples/cifar10/convert_cifar_data.bin' failed
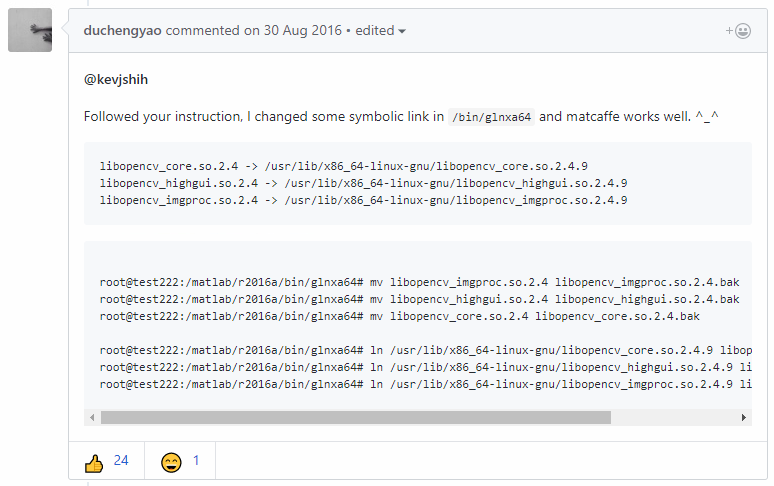
9、Ubuntu 16.04中使用Matlab R2016b编译Caffe接口出错的解决方法
MEX-file 'caffe/matlab/+caffe/private/caffe_.mexa64' 无效:
caffe/matlab/+caffe/private/caffe_.mexa64: undefined
symbol: _ZN2cv8imencodeERKNSt7__cxx1112basic_stringIcSt11char_traitsIcESaIcEEERKNS_11_InputArrayERSt6vectorIhSaIhEERKSB_IiSaIiEE。
出错 caffe.set_mode_cpu (line 5)
caffe_('set_mode_cpu');
出错 caffe.run_tests (line 6)
caffe.set_mode_cpu();
reference:https://github.com/BVLC/caffe/issues/3934
10、gcc 降级后的问题
/usr/lib/x86_64-linux-gnu/libopencv_highgui.so: undefined reference to `TIFFGetField@LIBTIFF_4.0'
/usr/lib/x86_64-linux-gnu/libopencv_highgui.so: undefined reference to `TIFFScanlineSize@LIBTIFF_4.0'
.build_release/lib/libcaffe.so: undefined reference to `google::protobuf::internal::NameOfEnum(google::protobuf::EnumDescriptor const*, int)'
.build_release/lib/libcaffe.so: undefined reference to `cv::imread(std::string const&, int)'
/usr/lib/x86_64-linux-gnu/libopencv_highgui.so: undefined reference to `TIFFReadEncodedTile@LIBTIFF_4.0'
/usr/lib/x86_64-linux-gnu/libopencv_highgui.so: undefined reference to `TIFFReadRGBATile@LIBTIFF_4.0'
/usr/lib/x86_64-linux-gnu/libopencv_highgui.so: undefined reference to `TIFFClose@LIBTIFF_4.0'
.build_release/lib/libcaffe.so: undefined reference to `google::protobuf::DescriptorPool::FindFileByName(std::string const&) const'
/usr/lib/x86_64-linux-gnu/libopencv_highgui.so: undefined reference to `TIFFRGBAImageOK@LIBTIFF_4.0'
.build_release/lib/libcaffe.so: undefined reference to `google::protobuf::internal::WireFormatLite::ReadBytes(google::protobuf::io::CodedInputStream*, std::string*)'
.build_release/lib/libcaffe.so: undefined reference to `google::protobuf::internal::StringTypeHandlerBase::Delete(std::string*)'
/usr/lib/x86_64-linux-gnu/libopencv_highgui.so: undefined reference to `TIFFOpen@LIBTIFF_4.0'
.build_release/lib/libcaffe.so: undefined reference to `google::protobuf::MessageFactory::InternalRegisterGeneratedFile(char const*, void (*)(std::string const&))'
.build_release/lib/libcaffe.so: undefined reference to `leveldb::DB::Open(leveldb::Options const&, std::string const&, leveldb::DB**)'
.build_release/lib/libcaffe.so: undefined reference to `cv::imencode(std::string const&, cv::_InputArray const&, std::vector<unsigned char, std::allocator<unsigned char> >&, std::vector<int, std::allocator<int> > const&)'
/usr/lib/x86_64-linux-gnu/libopencv_highgui.so: undefined reference to `TIFFReadEncodedStrip@LIBTIFF_4.0'
/usr/lib/x86_64-linux-gnu/libopencv_highgui.so: undefined reference to `TIFFSetField@LIBTIFF_4.0'
.build_release/lib/libcaffe.so: undefined reference to `google::protobuf::internal::StringTypeHandlerBase::New()'
.build_release/lib/libcaffe.so: undefined reference to `google::protobuf::internal::WireFormatLite::WriteBytesMaybeAliased(int, std::string const&, google::protobuf::io::CodedOutputStream*)'
/usr/lib/x86_64-linux-gnu/libopencv_highgui.so: undefined reference to `TIFFSetWarningHandler@LIBTIFF_4.0'
/usr/lib/x86_64-linux-gnu/libopencv_highgui.so: undefined reference to `TIFFSetErrorHandler@LIBTIFF_4.0'
.build_release/lib/libcaffe.so: undefined reference to `leveldb::Status::ToString() const'
.build_release/lib/libcaffe.so: undefined reference to `google::protobuf::internal::WireFormatLite::WriteString(int, std::string const&, google::protobuf::io::CodedOutputStream*)'
collect2: error: ld returned 1 exit status
Makefile:567: recipe for target '.build_release/examples/cifar10/convert_cifar_data.bin' failed
make: *** [.build_release/examples/cifar10/convert_cifar_data.bin] Error 1
reference:http://blog.csdn.net/u010734277/article/details/70195043
其他相关的参考网址:
1、解决/usr/lib/libstdc++.so.6: version `GLIBCXX_3.4.14' not found问题:http://blog.csdn.net/xiaolong2w/article/details/23915171
2、Caffe搭建:常见问题解决办法和ubuntu使用中遇到问题(持续更新):http://www.cnblogs.com/empty16/p/4828476.html
3、安装python caffe过程中遇到的一些问题以及对应的解决方案:http://www.cnblogs.com/TiBAi/p/6848307.html
4、安装caffe总结:http://blog.csdn.net/csoldiers/article/details/51685179
5、caffe+cuda7.0+opencv3.0.0+mkl ubuntu14.04配置:http://www.th7.cn/system/lin/201504/103304.shtml
6、Caffe
环境搭建中应注意的问题:http://blog.csdn.net/xiaxiazls/article/details/52039473
7、caffe
cpu版 Anaconda3 python 接口安装:http://blog.csdn.net/u012675539/article/details/51351553
【CPU版】Ubuntu + caffe + Anaconda2 + OpenCV3.x
2017.06.02:整理出第一个版本。
2018.01.05:整理libhdf5_hl.so.100和libopencv_highgui.so等两个问题。
2018.01.05:Ubuntu 16.04中使用Matlab R2016b编译Caffe接口出错的解决方法。
一、本文目的
本文基于上一篇博文《Ubuntu 常用软件安装:Matlab + XX-net + ... + TeamViewer + Tensorflow + Caffe》中的caffe环境的搭建部分进行完善,更详细的进行整理,主要贡献如下:
1、根据本人实践过程进行记录,更加完善记录整个“caffe环境搭建”的过程。
2、归纳总结问题集锦:caffe环境的搭建过程确实很多细节需要处理,本文尽可能收集一些相关的参考资料。
3、本文会尽可能详细的列出每个步骤,图文结合,并附上参考网址。
4、贴出【CPU版本】和【GPU版本】的Makefile.configure配置文件。
5、总结归纳测试案例。
参考网址:
1)caffe的配置过程:http://blog.csdn.net/brightming/article/details/51106629
2)【深度学习】 Ubuntu16.04 caffe Opencv2.4.13 GPU环境配置:http://blog.csdn.net/sinat_17196995/article/details/53466524
3)Ubuntu 常用软件安装:Matlab + XX-net + ... + TeamViewer + Tensorflow + Caffe
4)caffe安装:http://blog.csdn.net/lanxuecc/article/details/51997919
新增参考网址(20180105)
3D - caffe:https://github.com/faustomilletari/3D-Caffe.git
深度学习之常用软件(ubuntu):http://blog.csdn.net/houchaoqun_xmu/article/details/78869052
发表过CVPR-2017的作者的博客:http://zongweiz.leanote.com/post/Install-caffe-in-Ubuntu
cuda-8.0 + cudnn-5.1 的安装步骤请参考这里:http://blog.csdn.net/houchaoqun_xmu/article/details/78869052
OpenCV-3.3.0(Ubuntu-16.06)请参考这里:http://blog.csdn.net/houchaoqun_xmu/article/details/78565
二、G[b]PU版caffe配置过程[/b]
1、更新安装必要的软件包,去除不必要的包
sudo apt-get update
sudo apt-get upgrade
sudo apt-get install build-essential
sudo apt-get autoremove
2、查看系统GPU信息:lspci | grep -i nvidia
hcq@hcq-To-be-filled-by-O-E-M:~$ lspci | grep -i nvidia
01:00.0 VGA compatible controller: NVIDIA Corporation GM206 [GeForce GTX 960] (rev a1)
01:00.1 Audio device: NVIDIA Corporation Device 0fba (rev a1)
注:如果当前系统尚未安装NVIDIA驱动,需先进行安装,可参考这里。
3、安装并配置CUDA8.0
1)下载对应版本的CUDA安装包(.deb文件):https://developer.nvidia.com/cuda-downloads
2)cd到文件所在路径,并执行如下命令:
3)sudo dpkg -i cuda-repo-<distro>_<version>_<architecture>.deb
4)sudo apt-get update
5)sudo apt-get install cuda
=== 配置环境变量 ===
1)export PATH=“/usr/local/cuda-8.0/bin:$PATH”
2)export LD_LIBRARY_PATH=”/usr/local/cuda-8.0/lib64:$LD_LIBRARY_PATH“
3)配置环境变量和动态链接库,在命令行输入【sudo gedit /etc/profile】在文件末尾加入【export PATH = “/usr/local/cuda/bin:$PATH”】,保存后关闭文件。
4)保存之后,创建链接文件,输入【sudo gedit /etc/ld.so.conf.d/cuda.conf】在打开的文件中添加如下语句【/usr/local/cuda/lib64】执行【sudo ldconfig】。
5)查看显卡的驱动版本: cat /proc/driver/nvidia/version
6)查看nvcc编译器的版本: nvcc -V
=== 编译CUDA Sample(可选) ===
1)参考网址:http://blog.csdn.net/sinat_17196995/article/details/53466524
2)【cd /usr/local/cuda-8.0/samples/bin/x86_64/linux/release】,然后执行【sudo ./deviceQuery】,出现如下信息,表示成功:
sudo ./deviceQuery
[sudo] hcq 的密码:
./deviceQuery Starting...

CUDA Device Query (Runtime API) version (CUDART static linking)

Detected 1 CUDA Capable device(s)

Device 0: "GeForce GTX 960"
CUDA Driver Version / Runtime Version          8.0 / 8.0
CUDA Capability Major/Minor version number:    5.2
Total amount of global memory:                 1993 MBytes (2090270720 bytes)
( 8) Multiprocessors, (128) CUDA Cores/MP:     1024 CUDA Cores
GPU Max Clock rate:                            1178 MHz (1.18 GHz)
Memory Clock rate:                             3505 Mhz
Memory Bus Width:                              128-bit
L2 Cache Size:                                 1048576 bytes
Maximum Texture Dimension Size (x,y,z)         1D=(65536), 2D=(65536, 65536), 3D=(4096, 4096, 4096)
Maximum Layered 1D Texture Size, (num) layers  1D=(16384), 2048 layers
Maximum Layered 2D Texture Size, (num) layers  2D=(16384, 16384), 2048 layers
Total amount of constant memory:               65536 bytes
Total amount of shared memory per block:       49152 bytes
Total number of registers available per block: 65536
Warp size:                                     32
Maximum number of threads per multiprocessor:  2048
Maximum number of threads per block:           1024
Max dimension size of a thread block (x,y,z): (1024, 1024, 64)
Max dimension size of a grid size    (x,y,z): (2147483647, 65535, 65535)
Maximum memory pitch:                          2147483647 bytes
Texture alignment:                             512 bytes
Concurrent copy and kernel execution:          Yes with 2 copy engine(s)
Run time limit on kernels:                     Yes
Integrated GPU sharing Host Memory:            No
Support host page-locked memory mapping:       Yes
Alignment requirement for Surfaces:            Yes
Device has ECC support:                        Disabled
Device supports Unified Addressing (UVA):      Yes
Device PCI Domain ID / Bus ID / location ID:   0 / 1 / 0
Compute Mode:
< Default (multiple host threads can use ::cudaSetDevice() with device simultaneously) >

deviceQuery, CUDA Driver = CUDART, CUDA Driver Version = 8.0, CUDA Runtime Version = 8.0, NumDevs = 1, Device0 = GeForce GTX 960
Result = PASS
4、安装Anaconda2
1)到官网下载安装包(此处选择for Linux):https://www.continuum.io/downloads/
2)cd到安装包文件所在的目录下并执行:bash Anaconda2-4.3.1-Linux-x86_64.sh
3)配置环境变量:
== sudo gedit ~/.bashrc
== export PATH="/home/hcq/anaconda2/bin:$PATH"
== source ~/.bashrc
5、安装、编译OpenCV3.x
1)sudo git clone https://github.com/jayrambhia/Install-OpenCV
2)在Install-OpenCV/Ubuntu目录下:
== 先执行命令:sudo chmod +x *
== 然后执行sudo ./opencv_latest.sh(此过程需要一段时间,最后出现OpenCV 3.2.0 ready to be used表示成功)
3)cd /home/hcq/Install-OpenCV/Ubuntu/OpenCV/opencv-3.2.0
4)sudo mkdir release
5)cd release
6)sudo cmake -D CMAKE_BUILD_TYPE=RELEASE -D CMAKE_INSTALL_PREFIX=/usr/local ..
7)sudo make(编译过程需要一段时间,要到100%才算是是成功)
8)sudo make install
编译完,环境也自动加上了。
===== 配置文件 =====
1)sudo gedit /etc/ld.so.conf.d/opencv.conf #配置相关文件
2)复制如下代码加入到文件
PKG_CONFIG_PATH=$PKG_CONFIG_PATH:/usr/local/lib/pkgconfig
export PKG_CONFIG_PATH
3)source /etc/bash.bashrc
6、安装依赖项
1)安装google-glog:参考这里
== 下载地址:https://pan.baidu.com/s/1slpjjeH
== 将glog‐0.3.3.tar.gz这个文件拷贝到主文件夹下,即/home/yourname 文件夹下,点击鼠标右键,选择提取到此处(也就是解压该文件)解压后在终端输入如下命令:
cd /home/yourname/glog-0.3.3
./configure
make
sudo make install
2)安装其他依赖项:
sudo apt-get install libatlas-base-dev libprotobuf-dev libleveldb-dev libsnappy-dev libopencv-dev
sudo apt-get install libboost-all-dev libhdf5-serial-dev libgflags-dev libgoogle-glog-dev liblmdb-dev protobuf-compiler
3)安装OpenBLAS
git clone https://github.com/xianyi/OpenBLAS.git cd OpenBLAS
make -j $(($(nproc) + 1))
make install
参考网址:https://github.com/xianyi/OpenBLAS#set-the-number-of-threads-with-environment-variables
注:如果在sudo make runtest 的时候出现错误【libopenblas.so.0: cannot open shared object file: No such file or directory】,第四部分有介绍解决方案。
7、安装其他所需工具(可能导致错误的一些安装,建议读者先跳过本节的安装,遇到问题后再进行安装,印象会比较深刻)
1)conda install libgcc 参考网址:http://blog.csdn.net/u010734277/article/details/70195043
2)sudo apt install ffmpeg 参考网址:http://f.dataguru.cn/thread-738610-1-1.html
8、安装并配置CUDNN(一定要看好对应的版本!!否则后面一些链接库会出错):https://developer.nvidia.com/rdp/cudnn-download
====================== cudnn-5.1-8.0 ========================
1)切换到安装包所在的目录下:sudo tar xvf cudnn-8.0-linux-x64-v5.1.tgz
2)切换到 cuda/lib64 目录下:sudo cp lib* /usr/local/cuda-8.0/lib64/
3)切换到 cuda/include 目录下:sudo cp *.h /usr/local/cuda-8.0/include/
4)切换到 /usr/local/lib 目录下:sudo chmod +r libcudnn.so.5.1.10 && sudo ln -sf libcudnn.so.5.1.10 libcudnn.so.5 && sudo ln -sf libcudnn.so.5 libcudnn.so && sudo ldconfig
9、下载caffe源码、配置、编译:
=== 下载caffe源码 ===
1)cd到home/hcq/目录,下载caffe源码:sudo git clone https://github.com/BVLC/caffe.git
=== 配置相关文件 ===
1)cd到home/hcq/caffe,复制配置文件:sudo
cp Makefile.config.example Makefile.config
2)配置Makefile.config文件:sudo
gedit Makefile.config,去掉注释并修改的部分如下所示:
# cuDNN acceleration switch (uncomment to build with cuDNN).
USE_CUDNN := 1

# Uncomment if you're using OpenCV 3
OPENCV_VERSION := 3

# open for OpenBlas
BLAS := open
# (which should work)!
BLAS_INCLUDE := /opt/OpenBLAS/include
BLAS_LIB := /opt/OpenBLAS/lib

ANACONDA_HOME := /home/hcq/anaconda2
PYTHON_INCLUDE := $(ANACONDA_HOME)/include \
$(ANACONDA_HOME)/include/python2.7 \
$(ANACONDA_HOME)/lib/python2.7/site-packages/numpy/core/include

PYTHON_LIB := $(ANACONDA_HOME)/lib

# Whatever else you find you need goes here.
INCLUDE_DIRS := $(PYTHON_INCLUDE) /usr/local/include /usr/include/hdf5/serial
LIBRARY_DIRS := $(PYTHON_LIB) /usr/local/lib /usr/lib /usr/lib/x86_64-linux-gnu /usr/lib/x86_64-linux-gnu/hdf5/serial

# N.B. both build and distribute dirs are cleared on `make clean`
BUILD_DIR := build
DISTRIBUTE_DIR := distribute

# The ID of the GPU that 'make runtest' will use to run unit tests.
TEST_GPUID := 0

# enable pretty build (comment to see full commands)
Q ?= @
3)修改Makefile文件:sudo
gedit Makefile,进行如下修改:
NVCCFLAGS += -ccbin=$(CXX) -Xcompiler -fPIC $(COMMON_FLAGS)  # 这行去掉
NVCCFLAGS += -D_FORCE_INLINES -ccbin=$(CXX) -Xcompiler -fPIC $(COMMON_FLAGS) # 添加这行
4)进入/usr/lib/x86_64-linux-gnu目录下,执行如下命令(否则会提示:/usr/bin/ld:
找不到 -lhdf5_hl 和 /usr/bin/ld: 找不到 -lhdf5)
sudo ln libhdf5_serial.so.10.1.0 libhdf5.so
sudo ln libhdf5_serial_hl.so.10.0.2 libhdf5_hl.so
sudo ldconfig #使连接生效
5)caffe源码中,python的一些必要安装:
cd /home/hcq/caffe/python
for req in $(cat requirements.txt); do pip install $req; done
注:如果需要执行权限问题,就改变caffe文件的执行权限 sudo chown -R 'hcq' xxx
=== 编译caffe(期间遇到问题可以到第四部分查看是否有相关的解决方案)===
1)cd /home/hcq/caffe:进入caffe的根目录下
2)sudo make clean
3)sudo make all -j4 (-j4表示使用4核处理器执行当前指令)
4)sudo make test -j4(最好加上sudo防止有些文件的访问权限不够)
5)sudo make runtest -j4
6)sudo make pycaffe -j4(配置pycaffe)
=== 效果图展示 ===
1)sudo make all 成功后的效果图,如下所示:
2)sudo make runtest 成功后的效果图,如下所示:
[       OK ] ArgMaxLayerTest/1.TestCPUMaxVal (1 ms)
[ RUN      ] ArgMaxLayerTest/1.TestSetupMaxVal
[       OK ] ArgMaxLayerTest/1.TestSetupMaxVal (1 ms)
[ RUN      ] ArgMaxLayerTest/1.TestSetupAxis
[       OK ] ArgMaxLayerTest/1.TestSetupAxis (0 ms)
[ RUN      ] ArgMaxLayerTest/1.TestCPUTopK
[       OK ] ArgMaxLayerTest/1.TestCPUTopK (1 ms)
[----------] 12 tests from ArgMaxLayerTest/1 (48 ms total)

[----------] 4 tests from ContrastiveLossLayerTest/1, where TypeParam = caffe::CPUDevice<double>
[ RUN      ] ContrastiveLossLayerTest/1.TestGradientLegacy
[       OK ] ContrastiveLossLayerTest/1.TestGradientLegacy (125 ms)
[ RUN      ] ContrastiveLossLayerTest/1.TestForward
[       OK ] ContrastiveLossLayerTest/1.TestForward (0 ms)
[ RUN      ] ContrastiveLossLayerTest/1.TestGradient
[       OK ] ContrastiveLossLayerTest/1.TestGradient (136 ms)
[ RUN      ] ContrastiveLossLayerTest/1.TestForwardLegacy
[       OK ] ContrastiveLossLayerTest/1.TestForwardLegacy (0 ms)
[----------] 4 tests from ContrastiveLossLayerTest/1 (261 ms total)

[----------] Global test environment tear-down
[==========] 1106 tests from 150 test cases ran. (43894 ms total)
[  PASSED  ] 1106 tests.
hcq@hcq-To-be-filled-by-O-E-M:~/caffe$
10、caffe的[b]测试案例:[/b]
参考网址:http://caffe.berkeleyvision.org/gathered/examples/mnist.html
1)import caffe,输入如下命令:
== cd /home/hcq/caffe
== python
== import caffe
== 第一次成功后如下所示:
hcq@ubuntu:~/caffe/python$ python
Python 2.7.13 |Anaconda custom (64-bit)| (default, Dec 20 2016, 23:09:15)
[GCC 4.4.7 20120313 (Red Hat 4.4.7-1)] on linux2
Type "help", "copyright", "credits" or "license" for more information.
Anaconda is brought to you by Continuum Analytics.
Please check out: http://continuum.io/thanks and https://anaconda.org >>> import caffe
/home/hcq/anaconda2/lib/python2.7/site-packages/matplotlib/font_manager.py:280: UserWarning: Matplotlib is building the font cache using fc-list. This may take a moment.
'Matplotlib is building the font cache using fc-list. '
2)MNIST 模型
== cd /home/hcq/caffe(确保当前目录是caffe目录),执行如下命令:
== sudo ./data/mnist/get_mnist.sh
== sudo ./examples/mnist/create_mnist.sh
== sudo ./examples/mnist/train_lenet.sh
== 训练完成后如下所示:
I0601 13:09:21.129083 29215 solver.cpp:447] Snapshotting to binary proto file examples/mnist/lenet_iter_10000.caffemodel
I0601 13:09:21.134089 29215 sgd_solver.cpp:273] Snapshotting solver state to binary proto file examples/mnist/lenet_iter_10000.solverstate
I0601 13:09:21.163990 29215 solver.cpp:310] Iteration 10000, loss = 0.00275877
I0601 13:09:21.164013 29215 solver.cpp:330] Iteration 10000, Testing net (#0)
I0601 13:09:25.226337 29217 data_layer.cpp:73] Restarting data prefetching from start.
I0601 13:09:25.394167 29215 solver.cpp:397]     Test net output #0: accuracy = 0.991
I0601 13:09:25.394209 29215 solver.cpp:397]     Test net output #1: loss = 0.0280903 (* 1 = 0.0280903 loss)
I0601 13:09:25.394215 29215 solver.cpp:315] Optimization Done.
I0601 13:09:25.394234 29215 caffe.cpp:259] Optimization Done.
3)Cifar-10 模型
== cd /home/hcq/caffe #cd到caffe源码的根目录下
== sudo ./data/cifar10/get_cifar10.sh #该脚本会下载二进制的cifar,并解压,会在/data/cifar10中出现很多batch文件
== sudo ./examples/cifar10/create_cifar10.sh #运行后将会在examples中出现数据集./cifar10_xxx_lmdb和数据集图像均值./mean.binaryproto
注:CIFAR-10的卷积神经网络模型由卷积层,pooling层,ReLU,非线性变换层,局部对比归一化线性分类器组成。该模型定义在CAFFE_ROOT/examples/cifar10/cifar10_quick_train_test.prototxt中。
== sudo ./examples/cifar10/train_quick.sh #先以0.001的学习率迭代4000次,再以0.01的学习率接着再迭代1000次,共5000次
注:同理可以训练full模型,full模型比quick模型迭代次数多,一共迭代70000次,前60000次学习率是0.001,中间5000次学习率是0.0001,最后5000次学习率是0.00001。full模型的网络层数也比quick模型多,输入如下命令训练full模型
== sudo ./examples/cifar10/train_full.sh
参考网址:
== caffe示例实现之1在CIFAR-10数据集上训练与测试Caffe:http://blog.csdn.net/liumaolincycle/article/details/47258937
== caffe官网:http://caffe.berkeleyvision.org/
训练成功后,提示如下所示,以sudo ./examples/cifar10/train_quick.sh为例:
I0601 17:15:20.219635 32594 solver.cpp:237]     Train net output #0: loss = 0.550304 (* 1 = 0.550304 loss)
I0601 17:15:20.219642 32594 sgd_solver.cpp:105] Iteration 4700, lr = 0.0001
I0601 17:16:15.671823 32594 solver.cpp:218] Iteration 4800 (1.80336 iter/s, 55.452s/100 iters), loss = 0.403176
I0601 17:16:15.671891 32594 solver.cpp:237]     Train net output #0: loss = 0.403176 (* 1 = 0.403176 loss)
I0601 17:16:15.671898 32594 sgd_solver.cpp:105] Iteration 4800, lr = 0.0001
I0601 17:17:10.761785 32594 solver.cpp:218] Iteration 4900 (1.81524 iter/s, 55.089s/100 iters), loss = 0.466545
I0601 17:17:10.761903 32594 solver.cpp:237]     Train net output #0: loss = 0.466545 (* 1 = 0.466545 loss)
I0601 17:17:10.761907 32594 sgd_solver.cpp:105] Iteration 4900, lr = 0.0001
I0601 17:18:02.532764 32595 data_layer.cpp:73] Restarting data prefetching from start.
I0601 17:18:04.706779 32594 solver.cpp:457] Snapshotting to HDF5 file examples/cifar10/cifar10_quick_iter_5000.caffemodel.h5
I0601 17:18:04.708353 32594 sgd_solver.cpp:283] Snapshotting solver state to HDF5 file examples/cifar10/cifar10_quick_iter_5000.solverstate.h5
I0601 17:18:04.929492 32594 solver.cpp:310] Iteration 5000, loss = 0.451509
I0601 17:18:04.929522 32594 solver.cpp:330] Iteration 5000, Testing net (#0)
I0601 17:18:26.008786 32597 data_layer.cpp:73] Restarting data prefetching from start.
I0601 17:18:26.888097 32594 solver.cpp:397]     Test net output #0: accuracy = 0.7575
I0601 17:18:26.888123 32594 solver.cpp:397]     Test net output #1: loss = 0.737631 (* 1 = 0.737631 loss)
I0601 17:18:26.888141 32594 solver.cpp:315] Optimization Done.
I0601 17:18:26.888144 32594 caffe.cpp:259] Optimization Done.
4)使用训练的模型来分类新数据:
== 确保 sudo make pycaffe 已经编译成功。
== 打开终端,在caffe源码的根目录下,执行如下命令:
python python/classify.py examples/images/cat.jpg foo # 直接用一下别人的模型分类试一下:(默认用的ImageNet的模型)
hcq@hcq-To-be-filled-by-O-E-M:~/caffe$ python python/classify.py examples/images/cat.jpg foo
CPU mode
WARNING: Logging before InitGoogleLogging() is written to STDERR
W0602 11:25:53.561646  9707 _caffe.cpp:139] DEPRECATION WARNING - deprecated use of Python interface
W0602 11:25:53.561698  9707 _caffe.cpp:140] Use this instead (with the named "weights" parameter):
W0602 11:25:53.561709  9707 _caffe.cpp:142] Net('python/../models/bvlc_reference_caffenet/deploy.prototxt', 1, weights='python/../models/bvlc_reference_caffenet/bvlc_reference_caffenet.caffemodel')
Traceback (most recent call last):
  File "python/classify.py", line 138, in <module>
    main(sys.argv)
  File "python/classify.py", line 110, in main
    channel_swap=channel_swap)
  File "/home/hcq/caffe/python/caffe/classifier.py", line 26, in __init__
    caffe.Net.__init__(self, model_file, pretrained_file, caffe.TEST)
RuntimeError: Could not open file python/../models/bvlc_reference_caffenet/bvlc_reference_caffenet.caffemodel
上面这句话的意思是,使用cifar10_quick.prototxt网络 + cifar10_quick_iter_4000.caffemodel.h5模型,对examples/images/cat.jpg图片进行分类。错误原因:
解决方案:
1)cd /home/hcq/caffe/script
2)python download_model_binary.py /home/hcq/caffe/models/bvlc_reference_caffenet
参考网址:http://blog.csdn.net/u011636440/article/details/52441519
解决上述问题后,又出现新问题提示如下所示:
I0602 11:51:24.163389 10753 upgrade_proto.cpp:53] Attempting to upgrade input file specified using deprecated V1LayerParameter: python/../models/bvlc_reference_caffenet/bvlc_reference_caffenet.caffemodel
I0602 11:51:24.368646 10753 upgrade_proto.cpp:61] Successfully upgraded file specified using deprecated V1LayerParameter
I0602 11:51:24.436149 10753 net.cpp:744] Ignoring source layer loss
Traceback (most recent call last):
File "python/classify.py", line 138, in <module>
main(sys.argv)
File "python/classify.py", line 110, in main
channel_swap=channel_swap)
File "/home/hcq/caffe/python/caffe/classifier.py", line 34, in __init__
self.transformer.set_mean(in_, mean)
File "/home/hcq/caffe/python/caffe/io.py", line 259, in set_mean
raise ValueError('Mean shape incompatible with input shape.')
ValueError: Mean shape incompatible with input shape.错误原因:ValueError: Mean shape incompatible with input shape. 是因为‘mean’与‘input’的尺寸不同造成的。解决方案:修改了 ./python/caffe/io.py
文件,如下
将:
if ms != self.inputs[in_][1:]:
raise ValueError('Mean shape incompatible with input shape.')
修改为:
if ms != self.inputs[in_][1:]:
print(self.inputs[in_])
in_shape = self.inputs[in_][1:]
m_min, m_max = mean.min(), mean.max()
normal_mean = (mean - m_min) / (m_max - m_min)
mean = resize_image(normal_mean.transpose((1,2,0)),
in_shape[1:]).transpose((2,0,1)) * \
(m_max - m_min) + m_min
#raise ValueError('Mean shape incompatible with input shape.')参考网址:http://blog.csdn.net/gzljss/article/details/45849013
运行成功后,提示如下所示:
I0602 12:00:07.864248 10953 net.cpp:200] conv1 does not need backward computation.
I0602 12:00:07.864251 10953 net.cpp:200] data does not need backward computation.
I0602 12:00:07.864254 10953 net.cpp:242] This network produces output prob
I0602 12:00:07.864266 10953 net.cpp:255] Network initialization done.
I0602 12:00:07.987157 10953 upgrade_proto.cpp:44] Attempting to upgrade input file specified using deprecated transformation parameters: python/../models/bvlc_reference_caffenet/bvlc_reference_caffenet.caffemodel
I0602 12:00:07.987190 10953 upgrade_proto.cpp:47] Successfully upgraded file specified using deprecated data transformation parameters.
W0602 12:00:07.987195 10953 upgrade_proto.cpp:49] Note that future Caffe releases will only support transform_param messages for transformation fields.
I0602 12:00:07.987198 10953 upgrade_proto.cpp:53] Attempting to upgrade input file specified using deprecated V1LayerParameter: python/../models/bvlc_reference_caffenet/bvlc_reference_caffenet.caffemodel
I0602 12:00:08.217313 10953 upgrade_proto.cpp:61] Successfully upgraded file specified using deprecated V1LayerParameter
I0602 12:00:08.289186 10953 net.cpp:744] Ignoring source layer loss
(10, 3, 227, 227)
Loading file: examples/images/cat.jpg
Classifying 1 inputs.
Done in 0.43 s.
Saving results into foo
== 使用cifar10_quick_iter_4000.caffemodel.h5模型:
python python/classify.py --model_def examples/cifar10/cifar10_quick.prototxt --pretrained_model examples/cifar10/cifar10_quick_iter_4000.caffemodel.h5 --center_only examples/images/cat.jpg foo # 指定自己的模型进行分类
== 错误提示如下:
hcq@hcq-To-be-filled-by-O-E-M:~/caffe$ python python/classify.py --model_def examples/cifar10/cifar10_quick.prototxt --pretrained_model examples/cifar10/cifar10_quick_iter_4000.caffemodel.h5 --center_only  examples/images/cat.jpg foo
CPU mode
WARNING: Logging before InitGoogleLogging() is written to STDERR
W0602 11:27:22.857719  9729 _caffe.cpp:139] DEPRECATION WARNING - deprecated use of Python interface
W0602 11:27:22.857756  9729 _caffe.cpp:140] Use this instead (with the named "weights" parameter):
W0602 11:27:22.857759  9729 _caffe.cpp:142] Net('examples/cifar10/cifar10_quick.prototxt', 1, weights='examples/cifar10/cifar10_quick_iter_4000.caffemodel.h5')
Traceback (most recent call last):
File "python/classify.py", line 138, in <module>
main(sys.argv)
File "python/classify.py", line 110, in main
channel_swap=channel_swap)
File "/home/hcq/caffe/python/caffe/classifier.py", line 26, in __init__
caffe.Net.__init__(self, model_file, pretrained_file, caffe.TEST)
RuntimeError: Could not open file examples/cifar10/cifar10_quick_iter_4000.caffemodel.h5原因:在目录/home/hcq/caffe/examples/cifar10下,确实不存在cifar10_quick_iter_4000.caffemodel.h5这个模型,运行结果必然错误。解决方案:到目录/home/hcq/caffe/examples/cifar10下查看已有的模型,然后把指定的模型换成已有的模型,已有的模型如下所示(因人而异):
hcq@hcq-To-be-filled-by-O-E-M:~/caffe/examples/cifar10$ ls -lrt
总用量 6788
-rwxrwxr-x 1 hcq hcq     338 5月  27 11:55 train_quick.sh
-rwxrwxr-x 1 hcq hcq     139 5月  27 11:55 train_full_sigmoid.sh
-rwxrwxr-x 1 hcq hcq     142 5月  27 11:55 train_full_sigmoid_bn.sh
-rwxrwxr-x 1 hcq hcq     524 5月  27 11:55 train_full.sh
-rw-rw-r-- 1 hcq hcq    5243 5月  27 11:55 readme.md
-rwxrwxr-x 1 hcq hcq     467 5月  27 11:55 create_cifar10.sh
-rw-rw-r-- 1 hcq hcq    3677 5月  27 11:55 convert_cifar_data.cpp
-rw-rw-r-- 1 hcq hcq    1921 5月  27 11:55 cifar10_quick.prototxt
-rw-rw-r-- 1 hcq hcq    3122 5月  27 11:55 cifar10_full_train_test.prototxt
-rw-rw-r-- 1 hcq hcq    2879 5月  27 11:55 cifar10_full_sigmoid_train_test.prototxt
-rw-rw-r-- 1 hcq hcq    3192 5月  27 11:55 cifar10_full_sigmoid_train_test_bn.prototxt
-rw-rw-r-- 1 hcq hcq    2174 5月  27 11:55 cifar10_full.prototxt
drwxr--r-- 2 hcq root   4096 6月   1 15:38 cifar10_train_lmdb
drwxr--r-- 2 hcq root   4096 6月   1 15:38 cifar10_test_lmdb
-rw-r--r-- 1 hcq root  12299 6月   1 15:38 mean.binaryproto
-rw-rw-r-- 1 hcq hcq    3088 6月   1 15:39 cifar10_quick_train_test.prototxt
-rw-rw-r-- 1 hcq hcq     859 6月   1 16:25 cifar10_quick_solver.prototxt
-rw-rw-r-- 1 hcq hcq     944 6月   1 16:25 cifar10_full_solver_lr1.prototxt
-rw-rw-r-- 1 hcq hcq     882 6月   1 16:26 cifar10_quick_solver_lr1.prototxt
-rw-rw-r-- 1 hcq hcq     944 6月   1 16:26 cifar10_full_solver.prototxt
-rw-rw-r-- 1 hcq hcq     959 6月   1 16:26 cifar10_full_sigmoid_solver_bn.prototxt
-rw-rw-r-- 1 hcq hcq     953 6月   1 16:26 cifar10_full_sigmoid_solver.prototxt
-rw-rw-r-- 1 hcq hcq     945 6月   1 16:26 cifar10_full_solver_lr2.prototxt
-rw-r--r-- 1 hcq root 366048 6月   2 01:37 cifar10_full_iter_10000.solverstate.h5
-rw-r--r-- 1 hcq root 375752 6月   2 01:37 cifar10_full_iter_10000.caffemodel.h5
-rw-r--r-- 1 hcq root 366048 6月   2 02:34 cifar10_full_iter_20000.solverstate.h5
-rw-r--r-- 1 hcq root 375752 6月   2 02:34 cifar10_full_iter_20000.caffemodel.h5
-rw-r--r-- 1 hcq root 366048 6月   2 03:30 cifar10_full_iter_30000.solverstate.h5
-rw-r--r-- 1 hcq root 375752 6月   2 03:30 cifar10_full_iter_30000.caffemodel.h5
-rw-r--r-- 1 hcq root 366048 6月   2 04:27 cifar10_full_iter_40000.solverstate.h5
-rw-r--r-- 1 hcq root 375752 6月   2 04:27 cifar10_full_iter_40000.caffemodel.h5
-rw-r--r-- 1 hcq root 366048 6月   2 05:24 cifar10_full_iter_50000.solverstate.h5
-rw-r--r-- 1 hcq root 375752 6月   2 05:24 cifar10_full_iter_50000.caffemodel.h5
-rw-r--r-- 1 hcq root 366048 6月   2 06:21 cifar10_full_iter_60000.solverstate.h5
-rw-r--r-- 1 hcq root 375752 6月   2 06:21 cifar10_full_iter_60000.caffemodel.h5
-rw-r--r-- 1 hcq root 582496 6月   2 16:40 cifar10_quick_iter_4000.solverstate
-rw-r--r-- 1 hcq root 583301 6月   2 16:40 cifar10_quick_iter_4000.caffemodel
-rw-r--r-- 1 hcq root 590064 6月   2 16:44 cifar10_quick_iter_5000.solverstate.h5
-rw-r--r-- 1 hcq root 600032 6月   2 16:44 cifar10_quick_iter_5000.caffemodel.h5
== 选择【cifar10_quick_iter_5000.caffemodel.h5】作为指定模型,再次运行如下命令:
python python/classify.py --model_def examples/cifar10/cifar10_quick.prototxt --pretrained_model examples/cifar10/cifar10_quick_iter_5000.caffemodel.h5 --center_only examples/images/cat.jpg foo== 运行成功后,提示如下所示:
CPU mode
WARNING: Logging before InitGoogleLogging() is written to STDERR
W0602 16:48:24.261683 12766 _caffe.cpp:139] DEPRECATION WARNING - deprecated use of Python interface
W0602 16:48:24.261732 12766 _caffe.cpp:140] Use this instead (with the named "weights" parameter):
W0602 16:48:24.261735 12766 _caffe.cpp:142] Net('examples/cifar10/cifar10_quick.prototxt', 1, weights='examples/cifar10/cifar10_quick_iter_5000.caffemodel.h5')
I0602 16:48:24.262830 12766 net.cpp:51] Initializing net from parameters:
name: "CIFAR10_quick_test"
state {
phase: TEST
level: 0
}
layer {
...
...
I0602 16:48:24.263774 12766 net.cpp:242] This network produces output prob
I0602 16:48:24.263782 12766 net.cpp:255] Network initialization done.
I0602 16:48:24.264539 12766 net.cpp:798] Ignoring source layer cifar
I0602 16:48:24.264627 12766 hdf5.cpp:32] Datatype class: H5T_FLOAT
I0602 16:48:24.265048 12766 net.cpp:798] Ignoring source layer loss
(1, 3, 32, 32)
Loading file: examples/images/cat.jpg
Classifying 1 inputs.
Done in 0.03 s.
Saving results into foo注:默认的classify脚本不会直接输出结果,而是会把结果输入到foo文件里,不太直观,网上有一个修改版,添加了一些参数,可以输出概率最高的分类。
替换Python/classify.py,下载地址:
这个脚本添加了两个参数,可以指定labels_file,然后可以直接把分类结果输出出来:
python python/classify.py --print_results --model_def examples/cifar10/cifar10_quick.prototxt --pretrained_model examples/cifar10/cifar10_quick_iter_5000.caffemodel.h5 --labels_file data/cifar10/cifar10_words.txt --center_only examples/images/cat.jpg foo
Caffe学习资料:
1、Classification: Instant Recognition with Caffe:http://nbviewer.jupyter.org/github/BVLC/caffe/blob/master/examples/00-classification.ipynb
三、CPU版caffe环境配置过程
1、CPU和GPU版本的一些区别:
1)CPU版本的话,不需要NVIDIA驱动,不需要安装CUDA,不需要配置CUDNN
2)caffe目录下的Makefile.configure配置不一样
3)配置模型的时候,solver_mode: CPU,变成CPU(如果没改的话会报错),如下所示:
2、CPU版本的Makefile.configure配置,未注释掉的部分,如下所示:
# CPU-only switch (uncomment to build without GPU support).
CPU_ONLY := 1

# Uncomment if you're using OpenCV 3
OPENCV_VERSION := 3

# open for OpenBlas
BLAS := open
# (which should work)!
BLAS_INCLUDE := /opt/OpenBLAS/include
BLAS_LIB := /opt/OpenBLAS/lib

ANACONDA_HOME := /home/hcq/anaconda2
PYTHON_INCLUDE := $(ANACONDA_HOME)/include \
$(ANACONDA_HOME)/include/python2.7 \
$(ANACONDA_HOME)/lib/python2.7/site-packages/numpy/core/include

PYTHON_LIB := $(ANACONDA_HOME)/lib

# Whatever else you find you need goes here.
INCLUDE_DIRS := $(PYTHON_INCLUDE) /usr/local/include /usr/include/hdf5/serial
LIBRARY_DIRS := $(PYTHON_LIB) /usr/local/lib /usr/lib /usr/lib/x86_64-linux-gnu /usr/lib/x86_64-linux-gnu/hdf5/serial

# N.B. both build and distribute dirs are cleared on `make clean`
BUILD_DIR := build
DISTRIBUTE_DIR := distribute

# The ID of the GPU that 'make runtest' will use to run unit tests.
TEST_GPUID := 0

# enable pretty build (comment to see full commands)
Q ?= @
3、测试案例跟GPU的类似,只不过需要把solver_mode: CPU改为CPU。
四、问题集锦
1、sudo make all 编译过程遇到的错误,【conda install libgcc】安装libgcc即可,错误提示如下所示:
/usr/local/lib/libglog.so:对‘std::__cxx11::basic_ostringstream<char, std::char_traits<char>, std::allocator<char> >::~basic_ostringstream()@GLIBCXX_3.4.21’未定义的引用
/usr/lib/x86_64-linux-gnu/libgflags.so:对‘std::__cxx11::basic_string<char, std::char_traits<char>, std::allocator<char> >::find(char const*, unsigned long, unsigned long) const@GLIBCXX_3.4.21’未定义的引用
.build_release/lib/libcaffe.so:对‘std::out_of_range::out_of_range(std::__cxx11::basic_string<char, std::char_traits<char>, std::allocator<char> > const&)’未定义的引用
.build_release/lib/libcaffe.so:对‘std::__cxx11::basic_string<char, std::char_traits<char>, std::allocator<char> >::_M_replace_aux(unsigned long, unsigned long, unsigned long, char)’未定义的引用
/usr/local/lib/libopencv_core.so:对‘std::basic_istream<char, std::char_traits<char> >& std::getline<char, std::char_traits<char>, std::allocator<char> >(std::basic_istream<char, std::char_traits<char> >&, std::__cxx11::basic_string<char, std::char_traits<char>, std::allocator<char> >&, char)@GLIBCXX_3.4.21’未定义的引用
.build_release/lib/libcaffe.so:对‘std::__cxx11::basic_string<char, std::char_traits<char>, std::allocator<char> >::compare(unsigned long, unsigned long, char const*) const’未定义的引用
/usr/lib/x86_64-linux-gnu/libprotobuf.so:对‘std::__cxx11::basic_string<char, std::char_traits<char>, std::allocator<char> >::swap(std::__cxx11::basic_string<char, std::char_traits<char>, std::allocator<char> >&)@GLIBCXX_3.4.21’未定义的引用
/usr/local/lib/libglog.so:对‘vtable for std::__cxx11::basic_stringbuf<char, std::char_traits<char>, std::allocator<char> >@GLIBCXX_3.4.21’未定义的引用
/usr/local/lib/libopencv_core.so:对‘std::__cxx11::basic_stringbuf<char, std::char_traits<char>, std::allocator<char> >::str() const@GLIBCXX_3.4.21’未定义的引用
collect2: error: ld returned 1 exit status
Makefile:629: recipe for target '.build_release/tools/upgrade_solver_proto_text.bin' failed
make: *** [.build_release/tools/upgrade_solver_proto_text.bin] Error 1
或者如下所示:
AR -o .build_release/lib/libcaffe.a
LD -o .build_release/lib/libcaffe.so.1.0.0
CXX/LD -o .build_release/tools/upgrade_solver_proto_text.bin
CXX/LD -o .build_release/tools/test_net.bin
CXX/LD -o .build_release/tools/upgrade_net_proto_text.bin
CXX/LD -o .build_release/tools/finetune_net.bin
.build_release/tools/test_net.o: In function `boost::system::system_error::what() const':
test_net.cpp:(.text._ZNK5boost6system12system_error4whatEv[_ZNK5boost6system12system_error4whatEv]+0x74): undefined reference to `std::__cxx11::basic_string<char, std::char_traits<char>, std::allocator<char> >::_M_replace(unsigned long, unsigned long, char const*, unsigned long)'
test_net.cpp:(.text._ZNK5boost6system12system_error4whatEv[_ZNK5boost6system12system_error4whatEv]+0xa1): undefined reference to `std::__cxx11::basic_string<char, std::char_traits<char>, std::allocator<char> >::_M_append(char const*, unsigned long)'
test_net.cpp:(.text._ZNK5boost6system12system_error4whatEv[_ZNK5boost6system12system_error4whatEv]+0xe3): undefined reference to `std::__cxx11::basic_string<char, std::char_traits<char>, std::allocator<char> >::_M_append(char const*, unsigned long)'
/usr/local/lib/libglog.so: undefined reference to `std::__cxx11::basic_string<char, std::char_traits<char>, std::allocator<char> >::_M_create(unsigned long&, unsigned long)@GLIBCXX_3.4.21'
/usr/local/lib/libglog.so: undefined reference to `std::__cxx11::basic_string<char, std::char_traits<char>, std::allocator<char> >::_M_replace_aux(unsigned long, unsigned long, unsigned long, char)@GLIBCXX_3.4.21'
...
...
...
.build_release/lib/libcaffe.so: undefined reference to `std::out_of_range::out_of_range(std::__cxx11::basic_string<char, std::char_traits<char>, std::allocator<char> > const&)'
.build_release/lib/libcaffe.so: undefined reference to `std::__cxx11::basic_string<char, std::char_traits<char>, std::allocator<char> >::_M_replace_aux(unsigned long, unsigned long, unsigned long, char)'
/usr/local/lib/libopencv_core.so: undefined reference to `std::basic_istream<char, std::char_traits<char> >& std::getline<char, std::char_traits<char>, std::allocator<char> >(std::basic_istream<char, std::char_traits<char> >&, std::__cxx11::basic_string<char, std::char_traits<char>, std::allocator<char> >&, char)@GLIBCXX_3.4.21'
.build_release/lib/libcaffe.so: undefined reference to `std::__cxx11::basic_string<char, std::char_traits<char>, std::allocator<char> >::compare(unsigned long, unsigned long, char const*) const'
/usr/lib/gcc/x86_64-linux-gnu/5/../../../x86_64-linux-gnu/libprotobuf.so: undefined reference to `std::__cxx11::basic_string<char, std::char_traits<char>, std::allocator<char> >::swap(std::__cxx11::basic_string<char, std::char_traits<char>, std::allocator<char> >&)@GLIBCXX_3.4.21'
/usr/local/lib/libglog.so: undefined reference to `vtable for std::__cxx11::basic_stringbuf<char, std::char_traits<char>, std::allocator<char> >@GLIBCXX_3.4.21'
/usr/local/lib/libopencv_core.so: undefined reference to `std::__cxx11::basic_stringbuf<char, std::char_traits<char>, std::allocator<char> >::str() const@GLIBCXX_3.4.21'
collect2: error: ld returned 1 exit status
Makefile:629: recipe for target '.build_release/tools/upgrade_net_proto_text.bin' failed
make: *** [.build_release/tools/upgrade_net_proto_text.bin] Error 1
2、sudo make runtest 时遇到的错误,【sudo apt install ffmpeg】安装ffmpeg即可,错误提示如下所示:
hcq@ubuntu:~/caffe$ sudo make runtest
.build_release/tools/caffe
.build_release/tools/caffe: error while loading shared libraries: libopencv_core.so.3.2: cannot open shared object file: No such file or directory
Makefile:538: recipe for target 'runtest' failed
make: *** [runtest] Error 127
3、sudo make runtest 时遇到的错误,缺失一些相关的so链接:
hcq@hcq-To-be-filled-by-O-E-M:~/caffe$ sudo make runtest -j4
.build_release/tools/caffe
.build_release/tools/caffe: error while loading shared libraries: libhdf5_hl.so.10: cannot open shared object file: No such file or directory
Makefile:536: recipe for target 'runtest' failed
make: *** [runtest] Error 127
以及
hcq@hcq-To-be-filled-by-O-E-M:~/caffe$ sudo make runtest -j4
.build_release/tools/caffe
.build_release/tools/caffe: error while loading shared libraries: libhdf5.so.10: cannot open shared object file: No such file or directory
Makefile:536: recipe for target 'runtest' failed
make: *** [runtest] Error 127
原因:目录/usr/lib/x86_64-linux-gnu下确实是找不到【libhdf5_hl.so.10】和【libhdf5.so.10】这两个文件,如下图所示:
解决方案:根据相应的文件,创建所需的软连接,如下所示:
sudo ln libhdf5_serial_hl.so.10 libhdf5_hl.so.10
sudo ln libhdf5_serial.so.10 libhdf5.so.10
4、Makefile.configure配置中,关于nvcc warning的一些警告,注释掉相关的配置代码即可,提示如下所示:
NVCC src/caffe/layers/mvn_layer.cu
nvcc warning : The 'compute_20', 'sm_20', and 'sm_21' architectures are deprecated, and may be removed in a future release (Use -Wno-deprecated-gpu-targets to suppress warning).
nvcc warning : The 'compute_20', 'sm_20', and 'sm_21' architectures are deprecated, and may be removed in a future release (Use -Wno-deprecated-gpu-targets to suppress warning).
NVCC src/caffe/layers/filter_layer.cu
nvcc warning : The 'compute_20', 'sm_20', and 'sm_21' architectures are deprecated, and may be removed in a future release (Use -Wno-deprecated-gpu-targets to suppress warning).
nvcc warning : The 'compute_20', 'sm_20', and 'sm_21' architectures are deprecated, and may be removed in a future release (Use -Wno-deprecated-gpu-targets to suppress warning).
5、Check failed: status == CUDNN_STATUS_SUCCESS (3 vs. 0) CUDNN_STATUS_BAD_PARAM
F0601 10:03:16.683940 28607 cudnn.hpp:122] Check failed: status == CUDNN_STATUS_SUCCESS (3 vs. 0)  CUDNN_STATUS_BAD_PARAM
*** Check failure stack trace: ***
@     0x7f52e7de2e3d  google::LogMessage::Fail()
@     0x7f52e7de4bc0  google::LogMessage::SendToLog()
@     0x7f52e7de2a23  google::LogMessage::Flush()
@     0x7f52e7de558e  google::LogMessageFatal::~LogMessageFatal()
@     0x7f52e313c5f8  caffe::CuDNNConvolutionLayer<>::Reshape()
@     0x7f52e325ed37  caffe::Net<>::Init()
@     0x7f52e326146e  caffe::Net<>::Net()
@           0x888f2c  caffe::NetTest<>::InitNetFromProtoString()
@           0x88e1d1  caffe::NetTest_TestReshape_Test<>::TestBody()
@           0x91e4b3  testing::internal::HandleExceptionsInMethodIfSupported<>()
@           0x917aca  testing::Test::Run()
@           0x917c18  testing::TestInfo::Run()
@           0x917cf5  testing::TestCase::Run()
@           0x918fcf  testing::internal::UnitTestImpl::RunAllTests()
@           0x9192f3  testing::UnitTest::Run()
@           0x46d44d  main
@     0x7f52e2443830  (unknown)
@           0x474f69  _start
Makefile:536: recipe for target 'runtest' failed
make: *** [runtest] 已放弃 (core dumped)
原因:初步断定是NVIDIA的显存不够,本文所使用的机器是GeForce GTX 960 2GB的显存。本人做了如下探究:
1)据同学介绍,他使用的机器显存有8GB,就不会出现这样的问题。
2)本人还尝试使用CPU( 物理内存8GB )运行sudo make runtest -j4,也不会出现这样的问题。
解决方案:
1)从机器层面入手,扩大硬件性能(主要是显存)
2)改用CPU跑程序,不过最后使用GPU的话还是需要使用好一点的设备(显卡、显卡)
参考网址:http://www.cnblogs.com/penguinliong/p/6351215.html
6、build_release/tools/caffe: error while loading shared libraries: libopenblas.so.0: cannot open shared object file: No such file or directory
描述:Makefile.configure配置好了,相应的引用位置也有 libopenblas.so.0 该文件,make runtest的时候仍然出错。
解决方案:将 openblas 的库所在位置添加到系统环境变量 LD_LIBRARY_PATH,export LD_LIBRARY_PATH=/opt/OpenBLAS/lib/ sudo ldconfig。打开终端,输入如下命令:
1)export LD_LIBRARY_PATH=/opt/OpenBLAS/lib/
2)sudo ldconfig
参考网址:
1)http://blog.csdn.net/lanxuecc/article/details/51997919
2)http://blog.csdn.net/lien0906/article/details/46816243
3)https://github.com/sermanet/OverFeat/issues/10
配置成功后的提示如下所示:
[       OK ] ArgMaxLayerTest/1.TestCPUMaxVal (1 ms)
[ RUN      ] ArgMaxLayerTest/1.TestSetupMaxVal
[       OK ] ArgMaxLayerTest/1.TestSetupMaxVal (1 ms)
[ RUN      ] ArgMaxLayerTest/1.TestSetupAxis
[       OK ] ArgMaxLayerTest/1.TestSetupAxis (0 ms)
[ RUN      ] ArgMaxLayerTest/1.TestCPUTopK
[       OK ] ArgMaxLayerTest/1.TestCPUTopK (1 ms)
[----------] 12 tests from ArgMaxLayerTest/1 (48 ms total)

[----------] 4 tests from ContrastiveLossLayerTest/1, where TypeParam = caffe::CPUDevice<double>
[ RUN      ] ContrastiveLossLayerTest/1.TestGradientLegacy
[       OK ] ContrastiveLossLayerTest/1.TestGradientLegacy (125 ms)
[ RUN      ] ContrastiveLossLayerTest/1.TestForward
[       OK ] ContrastiveLossLayerTest/1.TestForward (0 ms)
[ RUN      ] ContrastiveLossLayerTest/1.TestGradient
[       OK ] ContrastiveLossLayerTest/1.TestGradient (136 ms)
[ RUN      ] ContrastiveLossLayerTest/1.TestForwardLegacy
[       OK ] ContrastiveLossLayerTest/1.TestForwardLegacy (0 ms)
[----------] 4 tests from ContrastiveLossLayerTest/1 (261 ms total)

[----------] Global test environment tear-down
[==========] 1106 tests from 150 test cases ran. (43894 ms total)
[  PASSED  ] 1106 tests.
hcq@hcq-To-be-filled-by-O-E-M:~/caffe$
7、Check failed: fd != -1 (-1 vs. -1) File not found: examples/cifar10/cifar10_full_iter_60000.solverstate
描述:执行【sudo ./examples/cifar10/train_full.sh】报错。
解决方案:
相似问题:Check failed: fd != -1 (-1 vs. -1) File not found: deploy.prototxt
原因:因为没有把deploy.prototxt文件复制到demo下。
解决方案:把caffe/models/bvlc_reference_caffnnet/deploy.prototxt复制到demo下即可。
参考网址:http://blog.csdn.net/ahbbshenfeng/article/details/52077605
8、error while loading shared libraries: libhdf5_hl.so.100
build_release/tools/caffe: error while loading shared libraries: libhdf5_hl.so.100: cannot open shared object file: No such file or directory Makefile:470: recipe for target 'runtest' failed参考网址:http://blog.csdn.net/a8039974/article/details/77179330
9、Makefile:567: recipe for target '.build_release/examples/cifar10/convert_cifar_data.bin' failed
Makefile:567: recipe for target '.build_release/examples/mnist/convert_mnist_data.bin' failed make: *** [.build_release/examples/mnist/convert_mnist_data.bin] Error 1 /usr/lib/x86_64-linux-gnu/libopencv_highgui.so: undefined reference to `TIFFReadRGBAStrip@LIBTIFF_4.0' /usr/lib/x86_64-linux-gnu/libopencv_highgui.so: undefined reference to `TIFFIsTiled@LIBTIFF_4.0' /usr/lib/x86_64-linux-gnu/libopencv_highgui.so: undefined reference to `TIFFWriteScanline@LIBTIFF_4.0' /usr/lib/x86_64-linux-gnu/libopencv_highgui.so: undefined reference to `TIFFGetField@LIBTIFF_4.0' /usr/lib/x86_64-linux-gnu/libopencv_highgui.so: undefined reference to `TIFFScanlineSize@LIBTIFF_4.0' /usr/lib/x86_64-linux-gnu/libopencv_highgui.so: undefined reference to `TIFFReadEncodedTile@LIBTIFF_4.0' /usr/lib/x86_64-linux-gnu/libopencv_highgui.so: undefined reference to `TIFFReadRGBATile@LIBTIFF_4.0' /usr/lib/x86_64-linux-gnu/libopencv_highgui.so: undefined reference to `TIFFClose@LIBTIFF_4.0' /usr/lib/x86_64-linux-gnu/libopencv_highgui.so: undefined reference to `TIFFRGBAImageOK@LIBTIFF_4.0' /usr/lib/x86_64-linux-gnu/libopencv_highgui.so: undefined reference to `TIFFOpen@LIBTIFF_4.0' /usr/lib/x86_64-linux-gnu/libopencv_highgui.so: undefined reference to `TIFFReadEncodedStrip@LIBTIFF_4.0' /usr/lib/x86_64-linux-gnu/libopencv_highgui.so: undefined reference to `TIFFSetField@LIBTIFF_4.0' /usr/lib/x86_64-linux-gnu/libopencv_highgui.so: undefined reference to `TIFFSetWarningHandler@LIBTIFF_4.0' /usr/lib/x86_64-linux-gnu/libopencv_highgui.so: undefined reference to `TIFFSetErrorHandler@LIBTIFF_4.0' collect2: error: ld returned 1 exit status Makefile:567: recipe for target '.build_release/examples/cifar10/convert_cifar_data.bin' failed make: *** [.build_release/examples/cifar10/convert_cifar_data.bin] Error 1reference:https://www.cnblogs.com/whu-zeng/p/6874307.html
9、Ubuntu 16.04中使用Matlab R2016b编译Caffe接口出错的解决方法
MEX-file 'caffe/matlab/+caffe/private/caffe_.mexa64' 无效:
caffe/matlab/+caffe/private/caffe_.mexa64: undefined
symbol: _ZN2cv8imencodeERKNSt7__cxx1112basic_stringIcSt11char_traitsIcESaIcEEERKNS_11_InputArrayERSt6vectorIhSaIhEERKSB_IiSaIiEE。
出错 caffe.set_mode_cpu (line 5)
caffe_('set_mode_cpu');
出错 caffe.run_tests (line 6)
caffe.set_mode_cpu();
reference:https://github.com/BVLC/caffe/issues/3934
10、gcc 降级后的问题
/usr/lib/x86_64-linux-gnu/libopencv_highgui.so: undefined reference to `TIFFGetField@LIBTIFF_4.0'
/usr/lib/x86_64-linux-gnu/libopencv_highgui.so: undefined reference to `TIFFScanlineSize@LIBTIFF_4.0'
.build_release/lib/libcaffe.so: undefined reference to `google::protobuf::internal::NameOfEnum(google::protobuf::EnumDescriptor const*, int)'
.build_release/lib/libcaffe.so: undefined reference to `cv::imread(std::string const&, int)'
/usr/lib/x86_64-linux-gnu/libopencv_highgui.so: undefined reference to `TIFFReadEncodedTile@LIBTIFF_4.0'
/usr/lib/x86_64-linux-gnu/libopencv_highgui.so: undefined reference to `TIFFReadRGBATile@LIBTIFF_4.0'
/usr/lib/x86_64-linux-gnu/libopencv_highgui.so: undefined reference to `TIFFClose@LIBTIFF_4.0'
.build_release/lib/libcaffe.so: undefined reference to `google::protobuf::DescriptorPool::FindFileByName(std::string const&) const'
/usr/lib/x86_64-linux-gnu/libopencv_highgui.so: undefined reference to `TIFFRGBAImageOK@LIBTIFF_4.0'
.build_release/lib/libcaffe.so: undefined reference to `google::protobuf::internal::WireFormatLite::ReadBytes(google::protobuf::io::CodedInputStream*, std::string*)'
.build_release/lib/libcaffe.so: undefined reference to `google::protobuf::internal::StringTypeHandlerBase::Delete(std::string*)'
/usr/lib/x86_64-linux-gnu/libopencv_highgui.so: undefined reference to `TIFFOpen@LIBTIFF_4.0'
.build_release/lib/libcaffe.so: undefined reference to `google::protobuf::MessageFactory::InternalRegisterGeneratedFile(char const*, void (*)(std::string const&))'
.build_release/lib/libcaffe.so: undefined reference to `leveldb::DB::Open(leveldb::Options const&, std::string const&, leveldb::DB**)'
.build_release/lib/libcaffe.so: undefined reference to `cv::imencode(std::string const&, cv::_InputArray const&, std::vector<unsigned char, std::allocator<unsigned char> >&, std::vector<int, std::allocator<int> > const&)'
/usr/lib/x86_64-linux-gnu/libopencv_highgui.so: undefined reference to `TIFFReadEncodedStrip@LIBTIFF_4.0'
/usr/lib/x86_64-linux-gnu/libopencv_highgui.so: undefined reference to `TIFFSetField@LIBTIFF_4.0'
.build_release/lib/libcaffe.so: undefined reference to `google::protobuf::internal::StringTypeHandlerBase::New()'
.build_release/lib/libcaffe.so: undefined reference to `google::protobuf::internal::WireFormatLite::WriteBytesMaybeAliased(int, std::string const&, google::protobuf::io::CodedOutputStream*)'
/usr/lib/x86_64-linux-gnu/libopencv_highgui.so: undefined reference to `TIFFSetWarningHandler@LIBTIFF_4.0'
/usr/lib/x86_64-linux-gnu/libopencv_highgui.so: undefined reference to `TIFFSetErrorHandler@LIBTIFF_4.0'
.build_release/lib/libcaffe.so: undefined reference to `leveldb::Status::ToString() const'
.build_release/lib/libcaffe.so: undefined reference to `google::protobuf::internal::WireFormatLite::WriteString(int, std::string const&, google::protobuf::io::CodedOutputStream*)'
collect2: error: ld returned 1 exit status
Makefile:567: recipe for target '.build_release/examples/cifar10/convert_cifar_data.bin' failed
make: *** [.build_release/examples/cifar10/convert_cifar_data.bin] Error 1
reference:http://blog.csdn.net/u010734277/article/details/70195043
其他相关的参考网址:
1、解决/usr/lib/libstdc++.so.6: version `GLIBCXX_3.4.14' not found问题:http://blog.csdn.net/xiaolong2w/article/details/23915171
2、Caffe搭建:常见问题解决办法和ubuntu使用中遇到问题(持续更新):http://www.cnblogs.com/empty16/p/4828476.html
3、安装python caffe过程中遇到的一些问题以及对应的解决方案:http://www.cnblogs.com/TiBAi/p/6848307.html
4、安装caffe总结:http://blog.csdn.net/csoldiers/article/details/51685179
5、caffe+cuda7.0+opencv3.0.0+mkl ubuntu14.04配置:http://www.th7.cn/system/lin/201504/103304.shtml
6、Caffe
环境搭建中应注意的问题:http://blog.csdn.net/xiaxiazls/article/details/52039473
7、caffe
cpu版 Anaconda3 python 接口安装:http://blog.csdn.net/u012675539/article/details/51351553

相关文章推荐
- 【CPU + GPU版】Ubuntu16.04 + caffe + Anaconda2 + OpenCV3.x(附:问题集锦+测试案例)
- 【CPU + GPU版】Ubuntu16.04 + caffe + Anaconda2 + OpenCV3.x(附:问题集锦+测试案例)
- 【CPU + GPU版】Ubuntu16.04 + caffe + Anaconda2 + OpenCV3.x(附:问题集锦+测试案例)
- 【CPU + GPU版】Ubuntu16.04 + caffe + Anaconda2 + OpenCV3.x(附:问题集锦+测试案例)
- 【CPU + GPU版】Ubuntu16.04 + caffe + Anaconda2 + OpenCV3.x(附:问题集锦+测试案例)
- 【CPU + GPU版】Ubuntu16.04 + caffe + Anaconda2 + OpenCV3.x(附:问题集锦+测试案例)
- 【CPU + GPU版】Ubuntu16.04 + caffe + Anaconda2 + OpenCV3.x(附:问题集锦+测试案例)
- 【CPU + GPU版】Ubuntu16.04 + caffe + Anaconda2 + OpenCV3.x(附:问题集锦+测试案例)
- 【CPU + GPU版】Ubuntu16.04 + caffe + Anaconda2 + OpenCV3.x(附:问题集锦+测试案例)
- 【CPU + GPU版】Ubuntu16.04 + caffe + Anaconda2 + OpenCV3.x(附:问题集锦+测试案例)
- ubuntu16.04 下安装加入opencv_contribute包的GPU版本的OpenCV3.2(CUDA支持)步骤与问题解决
- Ubuntu16.04 opencv3 python2.7 caffe(CPU_ONLY)
- Ubuntu16.04配置GPU caffe 加Qt下caffe和opencv环境配置
- ubuntu16.04安装N卡驱动,cuda toolkit7.5,opencv 2.4.13 with module gpu
- ubuntu16.04 安装 openCV3.1 问题
- Ubuntu16.04 +Caffe CPU/GPU 深度学习环境
- ubuntu16.04上配置与测试caffe(CPU)
- ubantu16.04+CPU+caffe+opencv3+python2.7+运行MNIST+问题汇总
- 【深度学习】 Ubuntu16.04 caffe Opencv2.4.13 GPU环境配置
- 在 Ubuntu 16.04 中安装支持 CPU 和 GPU 的 Google TensorFlow 神经网络软件