2 Apache Shiro 身份认证(登录)
2017-05-27 21:23
381 查看
2.1 概述
身份认证通常需要提供“用户”身份ID和一些标识信息,如用户名、密码。Shiro 中需要提供 principals(身份)和 credentials(凭证)用于验证用户身份。
principals
身份,即主体的标识属性,如用户名、邮箱、手机等,要求唯一。一个主体可以有多个 principals。
credentials
凭证(证明),即只有主体知道的安全数据,如密码、数字证书等。
最常见的 principals 和 credentials 组合就是用户名和密码。
2.2 项目依赖
使用 Maven 构建 Shiro 应用和管理依赖,POM.xml 基本配置如下:<dependencies> <dependency> <groupId>junit</groupId> <artifactId>junit</artifactId> <version>4.12</version> </dependency> <dependency> <groupId>commons-logging</groupId> <artifactId>commons-logging</artifactId> <version>1.2</version> </dependency> <dependency> <groupId>org.apache.shiro</groupId> <artifactId>shiro-core</artifactId> <version>1.3.2</version> </dependency> </dependencies>
2.3 基础的登录和退出功能
1 首先准备一些用户身份和凭证,以 ini 配置文件(shiro.ini)为例,通过
[users]指定了两个主体:
Steve/001和
Tony/002
[users]
Steve=001
Tony=002
2 测试用例
import static org.junit.Assert.*;

import org.apache.shiro.SecurityUtils;
import org.apache.shiro.authc.AuthenticationException;
import org.apache.shiro.authc.UsernamePasswordToken;
import org.apache.shiro.config.IniSecurityManagerFactory;
import org.apache.shiro.mgt.SecurityManager;
import org.apache.shiro.subject.Subject;
import org.apache.shiro.util.Factory;
import org.junit.Test;

public class ShiroTest {

@Test
public void testHelloShiro() {
// 1.获取SecurityManager工厂,使用ini配置文件初始化SecurityManager
Factory<SecurityManager> factory = new IniSecurityManagerFactory("classpath:shiro.ini");
// 2.获取SecurityManager实例
SecurityManager securityManager = factory.getInstance();
// 3.将SecurityManager实例绑定给SecurityUtils
SecurityUtils.setSecurityManager(securityManager);
// 4.通过SecurityUtils获取Subject
Subject subject = SecurityUtils.getSubject();
// 5.创建用户名、密码身份验证token
UsernamePasswordToken token = new UsernamePasswordToken("Tony", "002");
try {
// 6.使用用户名、密码身份验证token进行身份认证,即登录
subject.login(token);
} catch (AuthenticationException e) {
fail("身份认证失败");
}
// 7.判断用户处于“已登录”状态
assertTrue(subject.isAuthenticated());
// 8.退出登录
subject.logout();
}

}
测试用例说明:
(1) 首先通过
new IniSecurityManagerFactory创建一个
SecurityManager工厂,传入一个
ini配置文件参数;
(2) 其次通过
SecurityManager工厂获取一个
SecurityManager实例并绑定到
SecurityUtils,这是一个全局设置,只需设置一次;
(3) 通过
SecurityUtils得到一个
Subject主体,Shiro 会自动将此主体绑定到当前线程。如果处于 Web 环境中,则请求结束时需要解除绑定;
(4) 获取用于身份验证的 token,如用户名/密码;
(5) 调用
subject.login(token)方法进行登录认证,会自动委托给
SecurityManager.login方法进行登录认证;
(6) 如果身份认证失败请捕获
AuthenticationException或其子类,常见子类包括:
*
DisabledAccountException:禁用账号
*
LockedAccountException:锁定账号
*
UnknownA
4000
ccountException
:账号错误
*
ExcessiveAttemptsException:登录失败次数超出限制
*
IncorrectCredentialsException:凭证错误
*
ExpiredCredentialsException:凭证过期
对于页面的错误消息展示,最好使用如“用户名/密码错误”而不是“用户名错误/密码错误”,防止一些恶意用户非法扫描账号库;
(7) 最后调用
subject.logout()退出,会自动委托给
SecurityManager.logout方法退出。
从以上代码可以看出身份验证的步骤:
(1) 收集用户身份和凭证,如用户名和密码;
(2) 调用
subject.login(token)进行登录认证,如果失败会发生对应的
AuthenticationException异常,通过异常类型提示登录认证失败原因,若无异常则登录成功;
(3) 最后调用
subject.logout()执行退出登录操作。
以上测试代码的问题:
(1) 用户名和密码硬编码在
ini配置文件中,需要修改为数据库存储且密码需要加密;
(2) 用户身份 token 可能不仅仅是用户名和密码,可能还有其他信息,如登录时允许用户名/邮箱/手机号同时登录。
2.4 身份认证流程
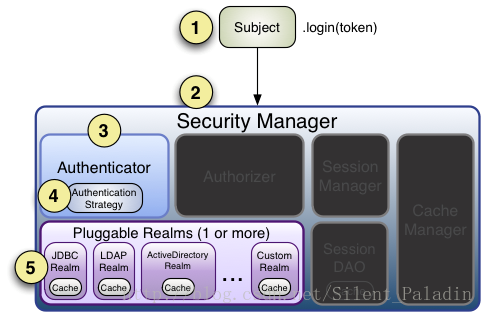
身份认证流程如下:
(1) 首先调用
subject.login(token)进行登录认证,自动委托给
SecurityManager,调用前必须获取
SecurityManager实例且要将此实例绑定给
SecurityUtils;
(2)
SecurityManager负责身份认证逻辑,会委托给
Authenticator进行身份认证;
(3)
Authenticator才是真正的身份认证负责人,是 Shiro API 中核心的身份认证入口点,可以自定义插入自己的身份认证实现逻辑;
(4)
Authenticator可能会委托给相应的
AuthenticationStrategy进行多
Realm身份认证,默认
ModularRealmAuthenticator会调用
AuthenticationStrategy进行多
Realm身份认证;
(5)
Authenticator会把相应的 token 传入
Realm,从
Realm获取身份认证信息,如果抛出异常表示身份认证失败。可以配置多个
Realm,将按照对应的顺序及策略进行访问。
2.5 Realm
Realm:域,
SecurityManager从
Realm获取安全数据(如用户名、密码)进行比较以确定用户身份是否合法,还可以从
Realm得到用户相应的角色和权限信息验证用户是否可以进行某种操作。可以将
Realm看成安全数据的数据源。如 ini 配置文件方式会使用
org.apache.shiro.realm.text.IniRealm。
org.apache.shiro.realm.Realm 接口定义如下:
package org.apache.shiro.realm;

import org.apache.shiro.authc.AuthenticationException;
import org.apache.shiro.authc.AuthenticationInfo;
import org.apache.shiro.authc.AuthenticationToken;

public interface Realm {

/**
* 返回一个唯一的Realm名字
*/
String getName();

/**
* 判断是否支持此token
*/
boolean supports(AuthenticationToken token);

/**
* 根据token获取认证信息
*/
AuthenticationInfo getAuthenticationInfo(AuthenticationToken token) throws AuthenticationException;

}
2.5.1 单
Realm配置
(1) 自定义
Realm实现
package shiro.realm;

import org.apache.shiro.authc.AuthenticationException;
import org.apache.shiro.authc.AuthenticationInfo;
import org.apache.shiro.authc.AuthenticationToken;
import org.apache.shiro.authc.IncorrectCredentialsException;
import org.apache.shiro.authc.SimpleAuthenticationInfo;
import org.apache.shiro.authc.UnknownAccountException;
import org.apache.shiro.authc.UsernamePasswordToken;
import org.apache.shiro.realm.Realm;

public class SingleRealm implements Realm {

@Override
public String getName() {
return "Single Realm";
}

@Override
public boolean supports(AuthenticationToken token) {
return token instanceof UsernamePasswordToken;
}

@Override
public AuthenticationInfo getAuthenticationInfo(AuthenticationToken token) throws AuthenticationException {
// 1.从token中获取用户名
String username = (String) token.getPrincipal();
// 2.从token中获取密码
String password = new String((char[]) token.getCredentials());
// 3.验证用户名,如果不匹配抛出UnknownAccountException异常
if (!"Hulk".equals(username)) {
throw new UnknownAccountException();
}
// 4.验证密码,如果不匹配抛出IncorrectCredentialsException异常
if (!"003".equals("003")) {
throw new IncorrectCredentialsException();
}
// 5.如果身份认证通过,返回一个AuthenticationInfo实现
return new SimpleAuthenticationInfo(username, password, getName());
}

}
(2) 在
ini配置文件(shiro-realm.ini)中指定自定义的 Realm 实现
#声明一个Realm
singleRealm=shiro.realm.SingleRealm
#指定securityManager的realms实现
securityManager.realms=$singleRealm
(3) 测试用例
import static org.junit.Assert.*;

import org.apache.shiro.SecurityUtils;
import org.apache.shiro.authc.AuthenticationException;
import org.apache.shiro.authc.UsernamePasswordToken;
import org.apache.shiro.config.IniSecurityManagerFactory;
import org.apache.shiro.mgt.SecurityManager;
import org.apache.shiro.subject.Subject;
import org.apache.shiro.util.Factory;
import org.junit.Test;

public class ShiroTest {

@Test
public void testCustomSingleRealm() {
// 1.获取SecurityManager工厂,使用ini配置文件初始化SecurityManager
Factory<SecurityManager> factory = new IniSecurityManagerFactory("classpath:shiro-realm.ini");
// 2.获取SecurityManager实例
SecurityManager securityManager = factory.getInstance();
// 3.将SecurityManager实例绑定给SecurityUtils
SecurityUtils.setSecurityManager(securityManager);
// 4.通过SecurityUtils获取Subject
Subject subject = SecurityUtils.getSubject();
// 5.创建用户名、密码身份验证token
UsernamePasswordToken token = new UsernamePasswordToken("Hulk", "003");
try {
// 6.使用用户名、密码身份验证token进行身份验证,即登录
subject.login(token);
} catch (AuthenticationException e) {
fail("身份认证失败");
}
// 7.判断用户处于“已登录”状态
assertTrue(subject.isAuthenticated());
}

}
2.5.2 多
Realm配置
(1) 自定义 Realm1
package shiro.realm;

import org.apache.shiro.authc.AuthenticationException;
import org.apache.shiro.authc.AuthenticationInfo;
import org.apache.shiro.authc.AuthenticationToken;
import org.apache.shiro.authc.IncorrectCredentialsException;
import org.apache.shiro.authc.SimpleAuthenticationInfo;
import org.apache.shiro.authc.UnknownAccountException;
import org.apache.shiro.authc.UsernamePasswordToken;
import org.apache.shiro.realm.Realm;

public class CustomRealm1 implements Realm {

@Override
public AuthenticationInfo getAuthenticationInfo(AuthenticationToken token)
throws AuthenticationException {
// 获取用户名
String username = (String) token.getPrincipal();
// 获取密码
String password = new String((char[]) token.getCredentials());
// 如果用户名错误
if (!"Barton".equals(username)) {
throw new UnknownAccountException();
}
// 如果密码错误
if (!"004".equals(password)) {
throw new IncorrectCredentialsException();
}
// 如果身份认证验证成功,返回一个AuthenticationInfo接口实现
return new SimpleAuthenticationInfo(username, password, getName());
}

@Override
public String getName() {
return "Custom Realm 1";
}

@Override
public boolean supports(AuthenticationToken token) {
return token instanceof UsernamePasswordToken;
}

}
(2) 自定义 Realm2
package shiro.realm;

import org.apache.shiro.authc.AuthenticationException;
import org.apache.shiro.authc.AuthenticationInfo;
import org.apache.shiro.authc.AuthenticationToken;
import org.apache.shiro.authc.IncorrectCredentialsException;
import org.apache.shiro.authc.SimpleAuthenticationInfo;
import org.apache.shiro.authc.UnknownAccountException;
import org.apache.shiro.authc.UsernamePasswordToken;
import org.apache.shiro.realm.Realm;

public class CustomRealm2 implements Realm {

@Override
public AuthenticationInfo getAuthenticationInfo(AuthenticationToken token)
throws AuthenticationException {
// 获取用户名
String username = (String) token.getPrincipal();
// 获取密码
String password = new String((char[]) token.getCredentials());
// 如果用户名错误
if (!"Thor".equals(username)) {
throw new UnknownAccountException();
}
// 如果密码错误
if (!"005".equals(password)) {
throw new IncorrectCredentialsException();
}
// 如果身份认证验证成功,返回一个AuthenticationInfo接口实现
return new SimpleAuthenticationInfo(username, password, getName());
}

@Override
public String getName() {
return "Custom Realm 2";
}

@Override
public boolean supports(AuthenticationToken token) {
return token instanceof UsernamePasswordToken;
}

}
(3) 在
ini配置文件(shiro-multi-realm.ini)中指定多个自定义的 Realm 实现
#声明多个Realm
customRealm1=shiro.realm.CustomRealm1
customRealm2=shiro.realm.CustomRealm2
#指定securityManager的realms实现
securityManager.realms=$customRealm1,$customRealm2
(4) 测试用例
import static org.junit.Assert.*;

import org.apache.shiro.SecurityUtils;
import org.apache.shiro.authc.AuthenticationException;
import org.apache.shiro.authc.UsernamePasswordToken;
import org.apache.shiro.config.IniSecurityManagerFactory;
import org.apache.shiro.mgt.SecurityManager;
import org.apache.shiro.subject.Subject;
import org.apache.shiro.util.Factory;
import org.junit.Test;

public class ShiroTest {

@Test
public void testCustomMultiRealm() {
Factory<SecurityManager> factory = new IniSecurityManagerFactory("classpath:shiro-multi-realm.ini");
SecurityManager securityManager = factory.getInstance();
SecurityUtils.setSecurityManager(securityManager);
Subject subject = SecurityUtils.getSubject();

UsernamePasswordToken token = new UsernamePasswordToken("Barton", "004");
try {
subject.login(token);
} catch (AuthenticationException e) {
fail("身份认证失败");
}
assertTrue(subject.isAuthenticated());
subject.logout();

token = new UsernamePasswordToken("Thor", "005");
try {
subject.login(token);
} catch (AuthenticationException e) {
fail("身份认证失败");
}
assertTrue(subject.isAuthenticated());
subject.logout();
}

}
2.5.3 Shiro 默认提供的
Realm
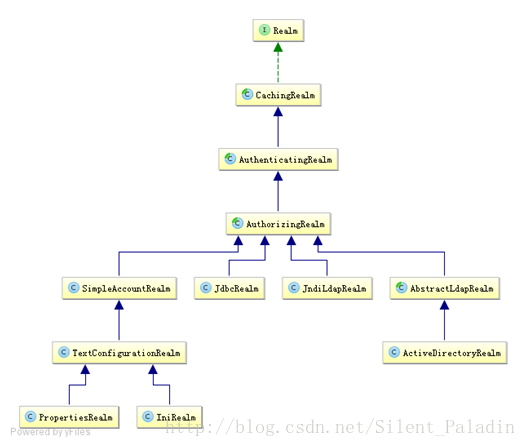
一般继承
AuthorizingRealm(授权)即可,
AuthorizingRealm继承了
AuthenticatingRealm(即身份认证),而且也间接继承了
CachingRealm(缓存实现)。
主要默认实现如下:
*
org.apache.shiro.realm.text.IniRealm:
ini配置文件中
[users]部分指定用户名、密码及角色;
[roles]部分指定角色权限信息;
*
org.apache.shiro.realm.text.PropertiesRealm:
user.username=password,role1,role2指定用户名、密码及角色;
role.role1=permission1,permission2指定角色权限信息;
*
org.apache.shiro.realm.jdbc.JdbcRealm:通过 SQL 查询相应的用户名、密码、角色、权限等信息。
2.5.4
JdbcRealm使用
(1) 使用 MySQL 数据库和阿里巴巴 druid 连接池,添加 Maven 依赖
<dependency>
<groupId>com.alibaba</groupId>
<artifactId>druid</artifactId>
<version>1.0.31</version>
</dependency>
<dependency>
<groupId>mysql</groupId>
<artifactId>mysql-connector-java</artifactId>
<version>5.1.42</version>
</dependency>
(2) 新建数据库
shiro,并在
shiro数据库中新建3张表:
*
users:存放用户名和密码
*
user_roles:存放用户和角色
*
roles_permissions:存放角色和权限
在 users 中添加一个用户记录,用户名
Fury,密码
000
drop database if exists shiro;
create database shiro;
use shiro;

create table users (
id bigint auto_increment,
username varchar(100),
password varchar(100),
password_salt varchar(100),
constraint pk_users primary key(id)
) charset=utf8 ENGINE=InnoDB;
create unique index idx_users_username on users(username);

create table user_roles(
id bigint auto_increment,
username varchar(100),
role_name varchar(100),
constraint pk_user_roles primary key(id)
) charset=utf8 ENGINE=InnoDB;
create unique index idx_user_roles on user_roles(username, role_name);

create table roles_permissions(
id bigint auto_increment,
role_name varchar(100),
permission varchar(100),
constraint pk_roles_permissions primary key(id)
) charset=utf8 ENGINE=InnoDB;
create unique index idx_roles_permissions on roles_permissions(role_name, permission);

insert into users(username,password)values('Fury','000');
(3) 创建
ini配置文件(shiro-jdbc-realm.ini)
jdbcRealm=org.apache.shiro.realm.jdbc.JdbcRealm
dataSource=com.alibaba.druid.pool.DruidDataSource
dataSource.driverClassName=com.mysql.jdbc.Driver
dataSource.url=jdbc:mysql://localhost:3306/shiro
dataSource.username=root
dataSource.password=123456
jdbcRealm.dataSource=$dataSource
securityManager.realms=$jdbcRealm
ini配置文件说明:
* 变量名=全限定类名:自动创建一个类实例
* 变量名.属性=值:自动调用相应的 setter 方法进行赋值
* $变量名:引用之前的一个对象实例
(4) 测试用例
import org.apache.shiro.SecurityUtils;
import org.apache.shiro.authc.AuthenticationException;
import org.apache.shiro.authc.UsernamePasswordToken;
import org.apache.shiro.config.IniSecurityManagerFactory;
import org.apache.shiro.mgt.SecurityManager;
import org.apache.shiro.subject.Subject;
import org.apache.shiro.util.Factory;
import org.junit.Test;

public class ShiroTest {

@Test
public void testJdbcRealm() {
Factory<SecurityManager> factory = new IniSecurityManagerFactory("classpath:shiro-jdbc-realm.ini");
SecurityManager securityManager = factory.getInstance();
SecurityUtils.setSecurityManager(securityManager);
Subject subject = SecurityUtils.getSubject();
UsernamePasswordToken token = new UsernamePasswordToken("Fury", "000");
try {
subject.login(token);
} catch (AuthenticationException e) {
e.printStackTrace();
fail("身份验证失败");
}
assertTrue(subject.isAuthenticated());
}

}
2.6 Authenticator 和 AuthenticationStrategy
authenticator的职责是验证用户账号,是 Shiro API 中身份认证核心的入口点:
public interface Authenticator {
public AuthenticationInfo authenticate(AuthenticationToken authenticationToken)
throws AuthenticationException;
}
如果验证通过,返回
AuthenticationInfo认证信息,其中包含了用户身份和凭证;如果验证失败会抛出相应的
AuthenticationException实现。
SecurityManager接口继承了
authenticator,另外还有一个
ModularRealmAuthenticator实现,委托给多个
Realm进行认证,认证规则通过
AuthenticationStrategy接口指定,默认提供的实现:
*
FirstSuccessfulStrategy:只要有一个
Realm验证成功即可,只返回第一个验证成功的
Realm的认证信息,其他的忽略;
*
AtLeastOneSuccessfulStrategy:只要有一个
Realm验证成功即可,和
FirstSuccessfulStrategy不同,返回所有验证成功的
Realm的认证信息;
*
AllSuccessfulStrategy:所有
Realm验证成功才算成功,如果有一个验证失败就算失败,验证成功返回所有成功的
Realm的认证信息。
ModularRealmAuthenticator默认使用
AtLeastOneSuccessfulStrategy策略。
假设有3个 Realm:
*
Realm1:用户名/密码为“Barton/004”时成功,返回身份/凭证为“Barton/004”
*
Realm2:用户名/密码为“Thor/005”时成功,返回身份/凭证为“Thor/005”
*
Realm3:用户名/密码为“Barton/004”时成功,和
Realm1不同之处在于返回的身份/凭证变为“Clint Barton/004”
Realm1和
Realm2代码在“2.5.2 多
Realm配置”章节中已经展示,
Realm3代码如下:
package shiro.realm;

import org.apache.shiro.authc.AuthenticationException;
import org.apache.shiro.authc.AuthenticationInfo;
import org.apache.shiro.authc.AuthenticationToken;
import org.apache.shiro.authc.IncorrectCredentialsException;
import org.apache.shiro.authc.SimpleAuthenticationInfo;
import org.apache.shiro.authc.UnknownAccountException;
import org.apache.shiro.authc.UsernamePasswordToken;
import org.apache.shiro.realm.Realm;

public class CustomRealm3 implements Realm {

@Override
public AuthenticationInfo getAuthenticationInfo(AuthenticationToken token)
throws AuthenticationException {
// 获取用户名
String username = (String) token.getPrincipal();
// 获取密码
String password = new String((char[]) token.getCredentials());
// 如果用户名错误
if (!"Barton".equals(username)) {
throw new UnknownAccountException();
}
// 如果密码错误
if (!"004".equals(password)) {
throw new IncorrectCredentialsException();
}
// 如果身份认证验证成功,返回一个AuthenticationInfo接口实现
return new SimpleAuthenticationInfo("Clint " + username, password, getName());
}

@Override
public String getName() {
return "Custom Realm 3";
}

@Override
public boolean supports(AuthenticationToken token) {
return token instanceof UsernamePasswordToken;
}

}
2.6.1 测试
FirstSuccessfulStrategy
(1) 创建
ini配置文件(shiro-authenticator-first-success.ini)
#指定securityManager的authenticator实现
authenticator=org.apache.shiro.authc.pam.ModularRealmAuthenticator
securityManager.authenticator=$authenticator

#指定securityManager.authenticator的authenticationStrategy
firstSuccessfulStrategy=org.apache.shiro.authc.pam.FirstSuccessfulStrategy
securityManager.authenticator.authenticationStrategy=$firstSuccessfulStrategy

customRealm1=shiro.realm.CustomRealm1
customRealm2=shiro.realm.CustomRealm2
customRealm3=shiro.realm.CustomRealm3
securityManager.realms=$customRealm3,$customRealm2,$customRealm1
(2) 测试用例
import static org.junit.Assert.*;

import org.apache.shiro.SecurityUtils;
import org.apache.shiro.authc.AuthenticationException;
import org.apache.shiro.authc.UsernamePasswordToken;
import org.apache.shiro.config.IniSecurityManagerFactory;
import org.apache.shiro.mgt.SecurityManager;
import org.apache.shiro.subject.PrincipalCollection;
import org.apache.shiro.subject.Subject;
import org.apache.shiro.util.Factory;
import org.junit.Test;

public class ShiroTest {

@Test
public void testFirstSuccessfulStrategyWithSuccess() {
Factory<SecurityManager> factory = new IniSecurityManagerFactory("classpath:shiro-authenticator-first-success.ini");
SecurityManager securityManager = factory.getInstance();
SecurityUtils.setSecurityManager(securityManager);
Subject subject = SecurityUtils.getSubject();
UsernamePasswordToken token = new UsernamePasswordToken("Barton", "004");
try {
subject.login(token);
} catch (AuthenticationException e) {
e.printStackTrace();
fail("身份验证失败");
}
assertTrue(subject.isAuthenticated());
// 获取身份集合,包含Realm验证成功的身份信息
PrincipalCollection principalCollection = subject.getPrincipals();
assertEquals(1, principalCollection.asList().size());
System.out.println(principalCollection.asList().get(0));
}

}
测试结果打印:
SLF4J: Failed to load class "org.slf4j.impl.StaticLoggerBinder".
SLF4J: Defaulting to no-operation (NOP) logger implementation
SLF4J: See http://www.slf4j.org/codes.html#StaticLoggerBinder for further details.
Clint Barton
2.6.2 测试
AtLeastOneSuccessfulStrategy
(1) 创建
ini配置文件(shiro-authenticator-atLeastOne-success.ini)
#指定securityManager的authenticator实现
authenticator=org.apache.shiro.authc.pam.ModularRealmAuthenticator
securityManager.authenticator=$authenticator

#指定securityManager.authenticator的authenticationStrategy
atLeastOneSuccessfulStrategy=org.apache.shiro.authc.pam.AtLeastOneSuccessfulStrategy
securityManager.authenticator.authenticationStrategy=$atLeastOneSuccessfulStrategy

customRealm1=shiro.realm.CustomRealm1
customRealm2=shiro.realm.CustomRealm2
customRealm3=shiro.realm.CustomRealm3
securityManager.realms=$customRealm1,$customRealm2,$customRealm3
(2) 测试用例
import static org.junit.Assert.*;

import org.apache.shiro.SecurityUtils;
import org.apache.shiro.authc.AuthenticationException;
import org.apache.shiro.authc.UsernamePasswordToken;
import org.apache.shiro.config.IniSecurityManagerFactory;
import org.apache.shiro.mgt.SecurityManager;
import org.apache.shiro.subject.PrincipalCollection;
import org.apache.shiro.subject.Subject;
import org.apache.shiro.util.Factory;
import org.junit.Test;

public class ShiroTest {

@Test
public void testAtLeastOneSuccessfulStrategyWithSuccess() {
Factory<SecurityManager> factory = new IniSecurityManagerFactory("classpath:shiro-authenticator-atLeastOne-success.ini");
SecurityManager securityManager = factory.getInstance();
SecurityUtils.setSecurityManager(securityManager);
Subject subject = SecurityUtils.getSubject();
UsernamePasswordToken token = new UsernamePasswordToken("Barton", "004");
try {
subject.login(token);
} catch (AuthenticationException e) {
e.printStackTrace();
fail("身份验证失败");
}
assertTrue(subject.isAuthenticated());
// 获取身份集合,包含Realm验证成功的身份信息
PrincipalCollection principalCollection = subject.getPrincipals();
assertEquals(2, principalCollection.asList().size());
for (Object principal : principalCollection.asList()) {
System.out.println(principal);
}
}

}
测试结果打印:
SLF4J: Failed to load class "org.slf4j.impl.StaticLoggerBinder".
SLF4J: Defaulting to no-operation (NOP) logger implementation
SLF4J: See http://www.slf4j.org/codes.html#StaticLoggerBinder for further details.
Barton
Clint Barton
2.6.3 测试
AllSuccessfulStrategy
(1) 创建
ini配置文件(shiro-authenticator-all-success.ini)
#指定securityManager的authenticator实现
authenticator=org.apache.shiro.authc.pam.ModularRealmAuthenticator
securityManager.authenticator=$authenticator

#指定securityManager.authenticator的authenticationStrategy
allSuccessfulStrategy=org.apache.shiro.authc.pam.AllSuccessfulStrategy
securityManager.authenticator.authenticationStrategy=$allSuccessfulStrategy

customRealm1=shiro.realm.CustomRealm1
customRealm2=shiro.realm.CustomRealm2
customRealm3=shiro.realm.CustomRealm3
securityManager.realms=$customRealm1,$customRealm3
(2) 测试用例
import static org.junit.Assert.*;

import org.apache.shiro.SecurityUtils;
import org.apache.shiro.authc.AuthenticationException;
import org.apache.shiro.authc.UsernamePasswordToken;
import org.apache.shiro.config.IniSecurityManagerFactory;
import org.apache.shiro.mgt.SecurityManager;
import org.apache.shiro.subject.PrincipalCollection;
import org.apache.shiro.subject.Subject;
import org.apache.shiro.util.Factory;
import org.junit.Test;

public class ShiroTest {

@Test
public void testAllSuccessfulStrategyWithSuccess() {
Factory<SecurityManager> factory = new IniSecurityManagerFactory("classpath:shiro-authenticator-all-success.ini");
SecurityManager securityManager = factory.getInstance();
SecurityUtils.setSecurityManager(securityManager);
Subject subject = SecurityUtils.getSubject();
UsernamePasswordToken token = new UsernamePasswordToken("Barton", "004");
try {
subject.login(token);
} catch (AuthenticationException e) {
e.printStackTrace();
fail("身份验证失败");
}
assertTrue(subject.isAuthenticated());
// 获取身份集合,包含Realm验证成功的身份信息
PrincipalCollection principalCollection = subject.getPrincipals();
assertEquals(2, principalCollection.asList().size());
for (Object principal : principalCollection.asList()) {
System.out.println(principal);
}
}

}
测试结果打印:
SLF4J: Failed to load class "org.slf4j.impl.StaticLoggerBinder".
SLF4J: Defaulting to no-operation (NOP) logger implementation
SLF4J: See http://www.slf4j.org/codes.html#StaticLoggerBinder for further details.
Barton
Clint Barton
以上是认证成功的测试用例,以下再给出一个认证失败的测试用例:
(1) 创建
ini配置文件(shiro-authenticator-all-fail.ini)
#指定securityManager的authenticator实现
authenticator=org.apache.shiro.authc.pam.ModularRealmAuthenticator
securityManager.authenticator=$authenticator

#指定securityManager.authenticator的authenticationStrategy
allSuccessfulStrategy=org.apache.shiro.authc.pam.AllSuccessfulStrategy
securityManager.authenticator.authenticationStrategy=$allSuccessfulStrategy

customRealm1=shiro.realm.CustomRealm1
customRealm2=shiro.realm.CustomRealm2
customRealm3=shiro.realm.CustomRealm3
securityManager.realms=$customRealm1,$customRealm2
(2) 测试用例
import org.apache.shiro.SecurityUtils;
import org.apache.shiro.authc.UnknownAccountException;
import org.apache.shiro.authc.UsernamePasswordToken;
import org.apache.shiro.config.IniSecurityManagerFactory;
import org.apache.shiro.mgt.SecurityManager;
import org.apache.shiro.subject.Subject;
import org.apache.shiro.util.Factory;
import org.junit.Test;

public class ShiroTest {

@Test(expected = UnknownAccountException.class)
public void testAllSuccessfulStrategyWithFail() {
Factory<SecurityManager> factory = new IniSecurityManagerFactory("classpath:shiro-authenticator-all-fail.ini");
SecurityManager securityManager = factory.getInstance();
SecurityUtils.setSecurityManager(securityManager);
Subject subject = SecurityUtils.getSubject();
UsernamePasswordToken token = new UsernamePasswordToken("Barton", "004");
subject.login(token);
}

}
2.6.3 自定义
AuthenticationStrategy
原文中
AuthenticationStrategy的实现原理还没有完全参透,等参透后再补充。

相关文章推荐
- 【Shiro】Apache Shiro架构之身份认证(Authentication)
- Apache shiro集群实现 (三)shiro身份认证(Shiro Authentication)
- 【Shiro】Apache Shiro架构之身份认证(Authentication)
- Apache shiro集群实现 (三)shiro身份认证(Shiro Authentication)
- Apache Shiro 身份认证例子
- Shiro学习总结(3)——Apache Shiro身份认证
- 使用Apache Shiro进行身份认证-多数据源认证
- 【Shiro】Apache Shiro架构之身份认证(Authentication)
- Shiro学习总结(3)——Apache Shiro身份认证
- 【Shiro】Apache Shiro架构之身份认证(Authentication)
- Apache shiro集群实现 (三)shiro身份认证(Shiro Authentication)
- 使用Apache Shiro进行身份认证-Active Directory认证
- Apache Shiro 身份认证例子
- Apache shiro 笔记整理之身份认证
- 使用Apache Shiro进行身份认证-LDAP认证
- 使用Apache Shiro进行身份认证-LDAP认证
- 【Shiro】Apache Shiro架构之身份认证(Authentication)
- Apache shiro集群实现 (三)shiro身份认证(Shiro Authentication)
- 使用Apache Shiro进行身份认证-密码加密
- 使用Apache Shiro进行身份认证-proxool配置