win7 xampp pthread多线程安装使用
2017-05-23 00:00
141 查看
安装测试
我的运行环境:系统:win7 ,64位
PHP:5.3.7 TS,VC9 ,64位
Apache: 2.0
我安装的是xampp集成环境
pthreads的windows扩展文件下载地址:http://windows.php.net/downloads/pecl/releases/pthreads/
我下载的是
php_pthreads-2.0.8-5.3-ts-vc9-x86.zip
这个版本
安装步骤:
1,将pthreadVC2.dll复制到 XX盘:\xampp\php\
2,将pthreadVC2.dll复制到 C:\Windows\SysWOW64
3,将php_pthreads.dll复制到 XX盘:\xampp\php\ext\
4,php.ini添加extension=php_pthreads.dll
5,重启apache
官方测试代码:
<?php
class AsyncOperation extends Thread {
public function __construct($arg){
$this->arg =$arg;
}

public function run(){
if($this->arg){
printf("Hello %s\n",$this->arg);
}
}
}
$thread =new AsyncOperation("World");
if($thread->start())
$thread->join();
?>
例子一
我们可以通过安装Pthread扩展来让PHP支持多线程。线程,有时称为轻量级进程,是程序执行的最小单元。线程是进程中的一个实体,是被系统独立调度和分派的基本单位,线程自己不拥有系统资源,它与同属一个进程的其它线程共享进程所拥有的全部资源。一个线程可以创建和撤消另一个线程,同一进程中的多个线程之间可以并发执行。每一个程序都至少有一个线程,那就是程序本身,通常称为主线程。线程是程序中一个单一的顺序控制流程。 在单个程序中同时运行多个线程完成不同的工作,称为多线程。
| 1 2 3 4 5 6 7 8 9 10 11 12 13 14 15 16 17 18 19 20 21 22 23 24 25 | <?php //实现多线程必须继承Thread类 class test extends Thread {public function __construct( $arg ){$this ->arg = $arg ; } //当调用start方法时,该对象的run方法中的代码将在独立线程中异步执行。 public function run(){if ( $this ->arg){printf( "Hello %s\n" , $this ->arg); } } } $thread = new test( "World" ); if ( $thread ->start()) {//join方法的作用是让当前主线程等待该线程执行完毕 //确认被join的线程执行结束,和线程执行顺序没关系。 //也就是当主线程需要子线程的处理结果,主线程需要等待子线程执行完毕 //拿到子线程的结果,然后处理后续代码。 $thread ->join(); } ?> |
| 1 2 3 4 5 6 7 8 9 10 11 12 13 14 15 16 17 18 19 | <?php class test extends Thread {public function __construct( $arg ){$this ->arg = $arg ; } public function run(){if ( $this ->arg){sleep(3); printf( "Hello %s\n" , $this ->arg); } } } $thread = new test( "World" ); $thread ->start(); echo "main thread\r\n" ; ?> |
例1如下:
| 1 2 3 4 5 6 7 8 9 10 11 12 13 14 15 16 17 18 19 20 21 22 23 24 25 26 27 28 29 30 31 32 33 34 35 | <?php class test extends Thread {private $name = '' ; private $res =null; public function __construct( $name , $res ){$this ->name = $name ; $this ->res = $res ; } public function run(){while (! feof ( $this ->res)) {if ( flock ( $this ->res,LOCK_EX)) {$data = fgets ( $this ->res); $data =trim( $data ); echo "Thread {$this->name} Read {$data} \r\n"; sleep(1); flock ( $this ->res,LOCK_UN); } } } } $fp = fopen ( './test.log' , 'rb' ); $threads [] = new test( 'a' , $fp ); $threads [] = new test( 'b' , $fp ); foreach ( $threads as $thread ) {$thread ->start(); } foreach ( $threads as $thread ) {$thread ->join(); } ?> |
test.log的内容如下:
| 1 2 3 4 5 6 | 111111 222222 333333 444444 555555 666666 |
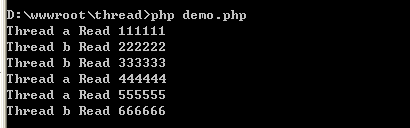
例2如下:
| 1 2 3 4 5 6 7 8 9 10 11 12 13 14 15 16 17 18 19 20 21 22 23 24 25 26 27 28 29 30 31 32 33 34 35 36 37 38 39 40 41 42 43 44 45 46 47 | <?php class Total extends Thread {public $name = '' ; private $total =0; private $startNum =0; private $endNum =0; public function __construct( $name , $startNum , $endNum ){$this ->name = $name ; $this ->startNum = $startNum ; $this ->endNum = $endNum ; } public function run(){for ( $ix = $this ->startNum; $ix < $this ->endNum; ++ $ix ) {$this ->total += $ix ; } echo "Thread {$this->name} total: {$this->total} \r\n"; } public function getTotal() {return $this ->total; } } $num =10000000; $threadNum =10; $setp = $num / $threadNum ; $startNum =0; $startTime =microtime(true); for ( $ix =0; $ix < $threadNum ; ++ $ix ) {$endNum = $startNum + $setp ; $thread = new Total( $ix , $startNum , $endNum ); $thread ->start(); $startNum = $endNum ; $threads [] = $thread ; } $total =0; foreach ( $threads as $thread ) {$thread ->join(); $total += $thread ->getTotal(); } $endTime =microtime(true); $time = $endTime - $startTime ; echo "total : {$total} time : {$time} \r\n"; |
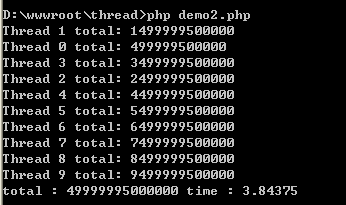
我们不使用多线程,来计算这累加和,代码如下:
| 1 2 3 4 5 6 7 8 9 10 11 12 13 | <?php $total =0; $startTime =microtime(true); for ( $ix =0; $ix <10000000; ++ $ix ) {$total += $ix ; } $endTime =microtime(true); $time = $endTime - $startTime ; echo "total : {$total} time : {$time} \r\n"; |

我们可以看到使用多线程和不使用,得到的结果是一样的,但是处理时间,多线程就慢很多。(*主要是线程的创建也是需要资源的,而且线程之间的相互切换也需要时间,这里的例子主要说明如何把一个问题分配给多个子线程去处理,然后主线程拿到子线程的结果并处理得到我们需要的结果。)
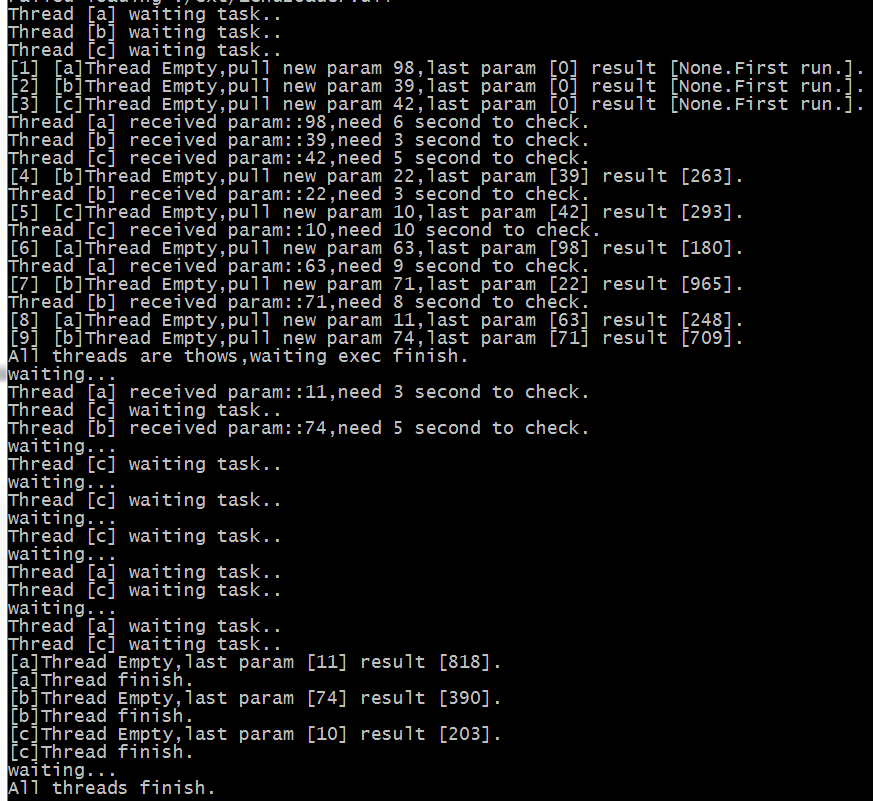
例子二
<?phpclass vote extends Thread {
public $res ='';
public $url =array();
public $name ='';
public $runing =false;
public $lc =false;
public function __construct($name) {
$this->res ='None.First run.';
$this->param =0;
$this->lurl =0;
$this->name =$name;
$this->runing =true;
$this->lc =false;
}
public function run() {
while ($this->runing) {
if ($this->param !=0) {
$nt =rand(1,10);
echo "Thread [{$this->name}] received param::{$this->param},need {$nt} second to check.\n";
$this->res =rand(100,999);
sleep($nt);
$this->lurl =$this->param;
$this->param ='';
} else {
echo "Thread [{$this->name}] waiting task..\n";
}
sleep(1);
}
}
}
//这里创建线程池.
$pool[] =new vote('a');
$pool[] =new vote('b');
$pool[] =new vote('c');
//启动所有线程,使其处于工作状态
foreach ($pool as $w) {
$w->start();
}
//派发任务给线程
for ($i =1; $i <10; $i++) {
$worker_content =rand(10,99);
while (true) {
foreach ($pool as $worker) {
//参数为空则说明线程空闲
if ($worker->param=='') {
$worker->param =$worker_content;
echo "[{$i}] [{$worker->name}]Thread Empty,pull new param {$worker_content},last param [{$worker->lurl}] result [{$worker->res}].\n";
break 2;
}
}
sleep(1);
}
}
echo "All threads are thows,waiting exec finish.\n";
//等待所有线程运行结束
while (count($pool)) {
//遍历检查线程组运行结束
foreach ($pool as $key => $threads) {
if ($worker->param=='') {
echo "[{$threads->name}]Thread Empty,last param [{$threads->lurl}] result [{$threads->res}].\n";
echo "[{$threads->name}]Thread finish.\n";
//设置结束标志
$threads->runing =false;
unset($pool[$key]);
}
}
echo "waiting...\n";
sleep(1);
}
echo "All threads finish.\n";
结果:
参考:
http://www.cnblogs.com/yuanfeiblog/p/5723699.html http://www.cnblogs.com/jkko123/p/6351604.html http://www.jb51.net/article/74849.htm

相关文章推荐
- 使用pthread库进行多线程编程2 - UNIX高级环境编程第12章读书笔记
- 使用pthread库进行多线程编程2 - UNIX高级环境编程第12章读书笔记
- 【整理】Win7下安装使用QuartusII和NiosII SBTE
- 转载《XAMPP安装和使用教程》(转)
- 笔记本在Win7下使用wubi安装Ubuntu10.04 双系统
- 第一个多线程程序——使用pthread
- 解决WIN7下无法安装卸载以及使用CAJViewer 7.0.2
- 使用VHD方式安装Win7不能启动的问题
- PLSQL Developer安装使用,win7也可以
- linux C++ 多线程 pthread_cond_t 使用的简单例子
- 使用pthread库进行多线程编程2 - UNIX高级环境编程第12章读书笔记
- Windows 7使用宝典安装技巧篇(7)——如何在Win7桌面上显示“我的电脑”
- Windows 7使用宝典安装技巧篇(6)——应用分享Win7的特色主题包
- XAMPP安装和使用教程
- 使用优盘安装Win7
- 使用pthread库进行多线程编程1 - UNIX环境高级编程第11章读书笔记
- Win7安装与使用
- Win7中IIS7和ASP的安装配置和使用
- XAMPP安装和使用教程(图文并茂)
- Win7新手系列教程:从安装到简单使用(新人必读)