漫画播放器一吐槽功能
2017-05-22 22:44
204 查看
前言
近来有些莫名的浮躁,浮躁的心态总让我静不下心来学习。新的一篇的文章到现在才跟大家见面,非常欣慰一直关注我的小伙伴,有你们的陪伴,一路不孤单。Google IO大会,谷歌宣布,将Kotlin语言作为安卓开发的一级编程语言。这里推荐两篇干货给大家,链接地址如下:
kotlin中文文档
几款开源的Kotlin的Android项目
漫画吐槽
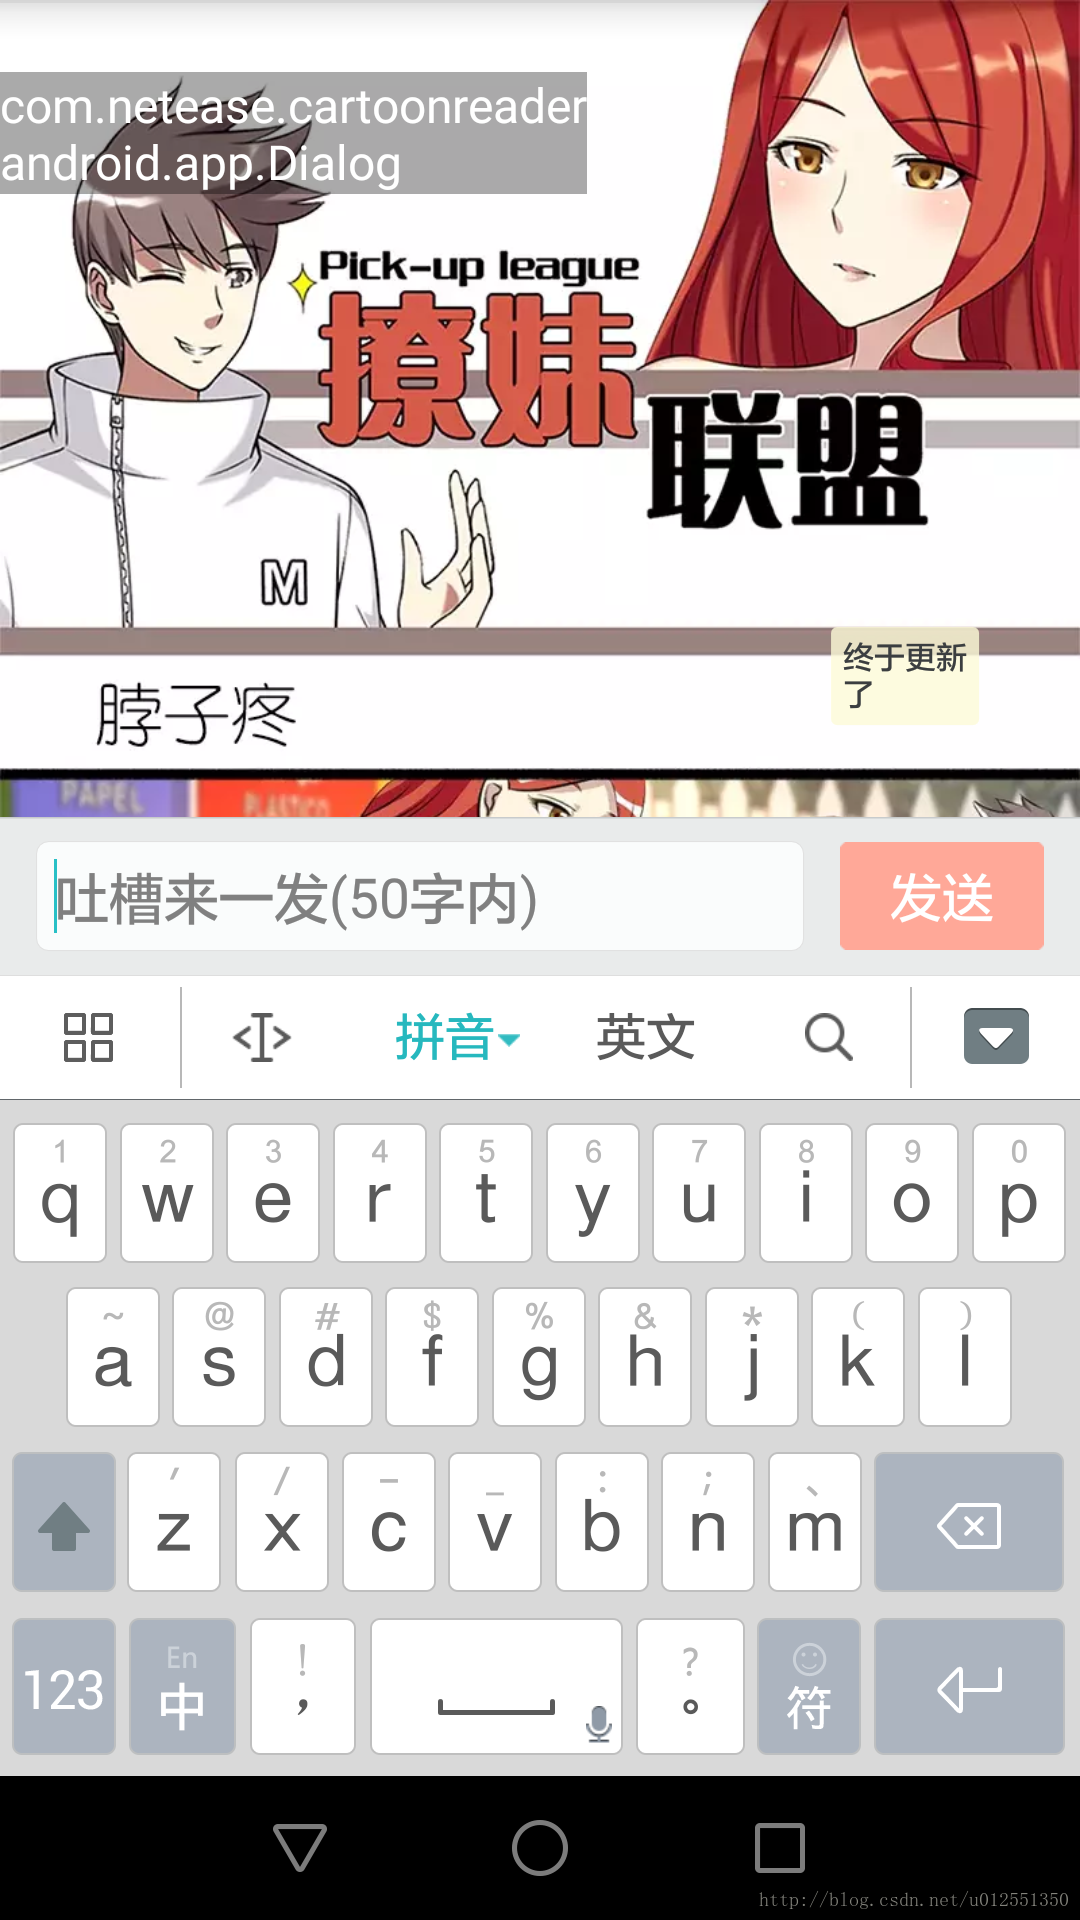
先来一张图,看看最终的实现效果:
由繁到简,拆分吐槽功能为以下几个自定义控件:
右下角的悬浮按钮
底部带输入框的 Dialog
吐槽控件(根据手指移动,并且可以在边缘挤压)
吐槽展示控件
接下来,我们逐一揪一揪各个控件的具体实现方式。
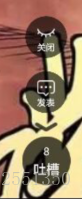
悬浮按钮(FloatButtonView)
实现功能一栏:展开与收起动画
关闭,开启状态
实时更新吐槽数量
发表按钮接口实现
实现流程如下:
(1)、构造函数
public FloatButtonView(Context context, @Nullable AttributeSet attrs, int defStyleAttr) {
super(context, attrs, defStyleAttr);
//添加视图
addLayoutView();
//初始化动画
initData();
//添加监听
setListener();
}
(2)、addLayoutView() 添加视图
private void addLayoutView() {
View view = LayoutInflater.from(getContext()).inflate(R.layout.view_float_btn, null, false);
//设置 MATCH_PARENT 不然 layout_marginBottom 无效
view.setLayoutParams(new ViewGroup.LayoutParams(ViewGroup.LayoutParams.MATCH_PARENT, ViewGroup.LayoutParams
.MATCH_PARENT));

mCloseImg = (ImageView) view.findViewById(R.id.img_close);
mCloseTv = (TextView) view.findViewById(R.id.tv_close);
mGossipNumTv = (TextView) view.findViewById(R.id.tv_num);

mCloseLayout = (RadiusLinearLayout) view.findViewById(R.id.layout_close);
mPublishLayout = (RadiusLinearLayout) view.findViewById(R.id.layout_publish);
mGossipLayout = (RadiusLinearLayout) view.findViewById(R.id.layout_gossip);

addView(view);
}
view_float_btn.xml 布局文件:
<?xml version="1.0" encoding="utf-8"?>
<RelativeLayout xmlns:android="http://schemas.android.com/apk/res/android"
xmlns:app="http://schemas.android.com/apk/res-auto"
android:layout_width="match_parent"
android:layout_height="match_parent">

<com.github.gossipdemo.radius.RadiusLinearLayout
android:id="@+id/layout_close"
android:layout_width="38dp"
android:layout_height="38dp"
android:layout_alignParentRight="true"
android:layout_marginBottom="12dp"
android:layout_above="@+id/layout_publish"
android:layout_marginRight="15dp"
android:gravity="center"
android:orientation="vertical"
app:rv_backgroundColor="#AF000000"
app:rv_radiusHalfHeightEnable="true">

<ImageView
android:id="@+id/img_close"
android:layout_width="wrap_content"
android:layout_height="wrap_content"
android:layout_marginTop="4dp"
android:src="@mipmap/ic_comp_close"/>

<TextView
android:id="@+id/tv_close"
android:layout_width="wrap_content"
android:layout_height="wrap_content"
android:text="关闭"
android:textColor="#FFF"
android:textSize="8sp"/>

</com.github.gossipdemo.radius.RadiusLinearLayout>

<com.github.gossipdemo.radius.RadiusLinearLayout
android:layout_width="38dp"
android:id="@+id/layout_publish"
android:layout_height="38dp"
android:layout_above="@+id/layout_gossip"
android:layout_alignParentRight="true"
android:layout_marginBottom="12dp"
android:layout_marginRight="15dp"
android:gravity="center"
android:orientation="vertical"
app:rv_backgroundColor="#AF000000"
app:rv_radiusHalfHeightEnable="true">

<ImageView
android:layout_width="wrap_content"
android:layout_height="wrap_content"
android:layout_marginTop="4dp"
android:src="@mipmap/ic_comp_publish"/>

<TextView
android:layout_width="wrap_content"
android:layout_height="wrap_content"
android:text="发表"
android:textColor="#FFF"
android:textSize="8sp"/>

</com.github.gossipdemo.radius.RadiusLinearLayout>

<com.github.gossipdemo.radius.RadiusLinearLayout
android:id="@+id/layout_gossip"
android:layout_width="44dp"
android:layout_height="44dp"
android:layout_alignParentBottom="true"
android:layout_alignParentRight="true"
android:layout_marginBottom="12dp"
android:layout_marginRight="12dp"
android:gravity="center"
android:orientation="vertical"
app:rv_backgroundColor="#AF000000"
app:rv_radiusHalfHeightEnable="true">

<TextView
android:id="@+id/tv_num"
android:layout_width="wrap_content"
android:layout_height="wrap_content"
android:text="0"
android:textColor="#FFF"
android:textSize="10sp"/>

<TextView
android:layout_width="wrap_content"
android:layout_height="wrap_content"
android:layout_marginTop="1dp"
android:text="吐槽"
android:textColor="#FFF"
android:textSize="12sp"/>

</com.github.gossipdemo.radius.RadiusLinearLayout>

</RelativeLayout>
注意:添加的子视图为
RelativeLayout相对布局,设置
android:layout_marginBottom会失效,针对该问题的解决方法是:给该子视图设置布局参数的高度为填充父窗体。
view.setLayoutParams(new ViewGroup.LayoutParams(ViewGroup.LayoutParams.MATCH_PARENT, ViewGroup.LayoutParams
.MATCH_PARENT));
(3)、initData() 初始化展开,缩放动画
private void initData() {
mOpenAnimator = openAnimator();
mCloseAnimator = closeAnimator();
}
展开与缩放动画:
/**
* 展开动画
*
* @return
*/
private ValueAnimator openAnimator() {
ValueAnimator animator = ValueAnimator.ofFloat(0f, 1.0f);
animator.setDuration(500);
animator.setInterpolator(new OvershootInterpolator());
animator.addUpdateListener(new ValueAnimator.AnimatorUpdateListener() {
@Override
public void onAnimationUpdate(ValueAnimator animation) {
setAnimatorParams(animation);
}
});
return animator;
}

public ValueAnimator closeAnimator() {
ValueAnimator animator = ValueAnimator.ofFloat(1.0f, 0f);
animator.setDuration(200);
animator.setInterpolator(new LinearInterpolator());
animator.addUpdateListener(new ValueAnimator.AnimatorUpdateListener() {
@Override
public void onAnimationUpdate(ValueAnimator animation) {
setAnimatorParams(animation);
}
});
return animator;
}

/**
* 设置动画参数
*
* @param animation
*/
private void setAnimatorParams(ValueAnimator animation) {
float value = (float) animation.getAnimatedValue();

mCloseLayout.setY(mGossipLayout.getY() - mCloseMove * value);
mPublishLayout.setY(mGossipLayout.getY() - mPublishMove * value);

mCloseLayout.setAlpha(value);
mPublishLayout.setAlpha(value);
}
实现过程比较简单,看看效果图:

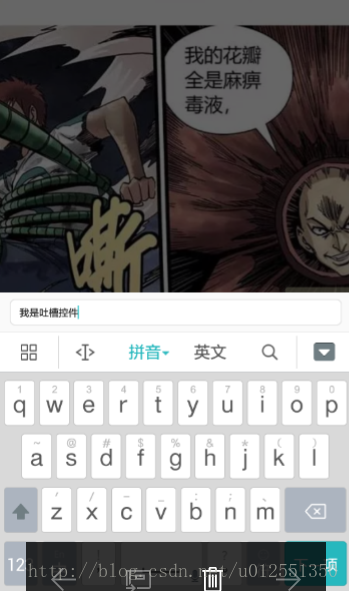
底部带输入框的 Dialog
看到这里你可能会有疑问了,为啥要使用 Dialog 呢,直接在漫画播放器底部添加输入框不就 ok 了吗?最开始我也是这么干的,可是结局太悲催了。整整浪费了我一整天的时间。神坑啊 …
神坑之一:
软键盘的弹起覆盖输入框?
这个还不简单,设置
android:windowSoftInputMode软键盘的输入模式,然后你会发现并没卵用。
之后就抓狂,喷血,尝试了各种百度,google,各大论坛搜索,各种方式尝试 . . .,我还不相信了小样,我还解决不了你 . . .
现实太残酷,我失败了。
神坑之二:
软键盘的弹出和收起会影响漫画播放器的视图滚动?
内心已经跑过一万匹草泥马 …
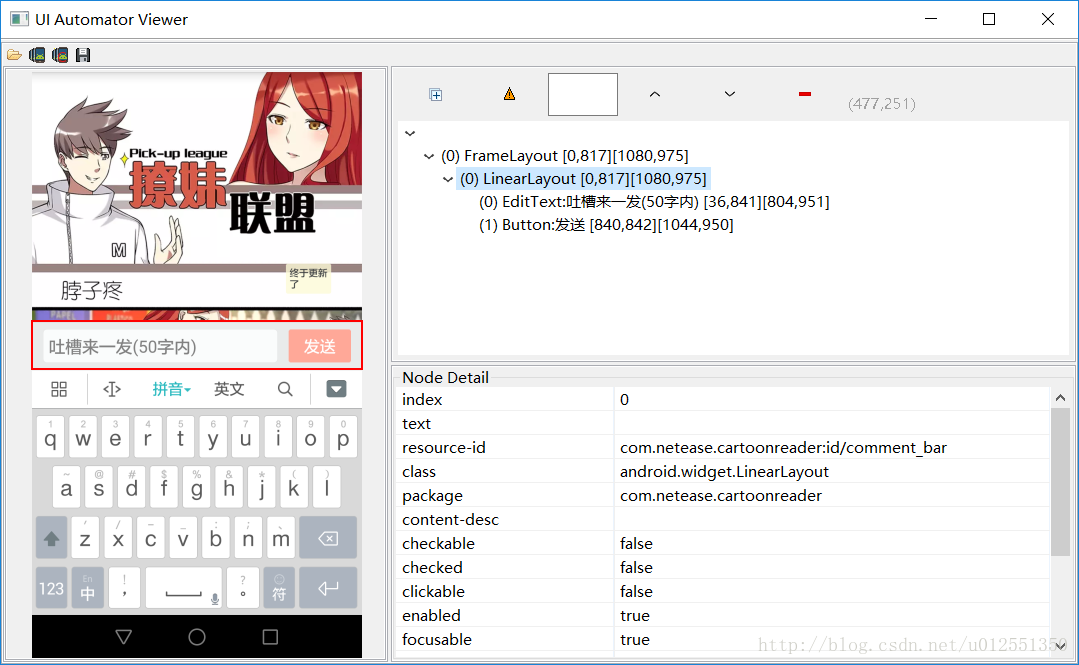
最后我通过查看【网易动漫】的 顶部 Activity,发现人家是采用 Dialog 的方式来实现的。这使我内心平复了一丢丢,原来网易也跟我踩过相同的坑啊。
强力推荐以下两款工具来查看和分析第三方
app视图层级:
1、查看顶部 Activity 路径
2、SDK 自带的 uiautomatorviewer.bat
下面我贴出 Dialog 的实现代码:
public class AppDialog extends Dialog {

private Context context;
private View contentView;
private EditText compEditText;
private OnPublishListener listener;
private String gossipText = "";

public AppDialog(@NonNull Context context, String text) {
super(context);
this.context = context;
this.gossipText = text;
addContentView();

setCanceledOnTouchOutside(true);
}

public AppDialog(@NonNull Context context) {
this(context, "");
}

private void addContentView() {
//布局的高度参数不要设置为 match_parent  不然 setCanceledOnTouchOutside 方法无效
View view = LayoutInflater.from(context).inflate(R.layout.view_app_dialog, null);
setContentView(view);
//设置dialog大小
this.contentView = view;
this.compEditText = (EditText) view.findViewById(R.id.player_edit_view);

compEditText.setOnEditorActionListener(new TextView.OnEditorActionListener() {
@Override
public boolean onEditorAction(TextView v, int actionId, KeyEvent event) {
if (listener != null) {
listener.publish(v);
}
return false;
}
});

if (gossipText != null) {
compEditText.setText(gossipText);
compEditText.setSelection(compEditText.getText().length());
}

Window dialogWindow = getWindow();
WindowManager manager = ((Activity) context).getWindowManager();
WindowManager.LayoutParams params = dialogWindow.getAttributes(); // 获取对话框当前的参数值
dialogWindow.setGravity(Gravity.BOTTOM);//对齐方式为底部对齐
Display d = manager.getDefaultDisplay(); // 获取屏幕宽、高度
params.width = (int) (d.getWidth() * 1.0f); // 宽度设置为屏幕宽度,根据实际情况调整

getWindow().setSoftInputMode(WindowManager.LayoutParams.SOFT_INPUT_ADJUST_RESIZE);//必须设置 不然输入框会被覆盖
getWindow().setBackgroundDrawable(new ColorDrawable(Color.TRANSPARENT));// android:windowBackground
getWindow().addFlags(WindowManager.LayoutParams.FLAG_DIM_BEHIND);// android:backgroundDimEnabled默认是true的

dialogWindow.setAttributes(params);
}
}
接下来是吐槽控件的实现,篇幅有点长,源码在文章的末尾给出。
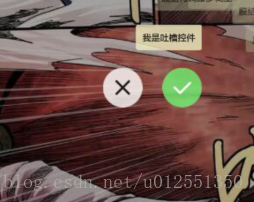
吐槽控件(GossipView)
先来看看吐槽控件的效果图,如下:
大概实现了以下几个效果:
跟随手指而移动
边缘挤压
多指挤压
(1)、跟随手指而移动
重写
onTouchEvent方法,返回 true 消费事件。
手指按下的同时记录触摸点的 X ,Y 坐标:
case MotionEvent.ACTION_DOWN:
simTouchX = event.getX();
simTouchY = event.getY();
手机移动时刻记录手指的偏移量:
case MotionEvent.ACTION_MOVE:
float dx = event.getX() - simTouchX;
float dy = event.getY() - simTouchY;
//contentLayout 表示随着手指移动的控件
contentLayout.setX(contentLayout.getX() + dx);
contentLayout.setY(contentLayout.getY() + dy);

simTouchX = event.getX();
simTouchY = event.getY();
注意手指移动的范围【屏幕范围内】,超过屏幕的显示需要边缘处理。
(2)边缘挤压
边缘挤压主要分为:
上边缘挤压(宽度不断增大,高度不断减少)
下边缘挤压(宽度不断增大,高度不断减少)
左边缘挤压(宽度不断减少,高度不断增大)
右边缘挤压(宽度不断减少,高度不断增大)
上边缘挤压,分析 Y 坐标的偏移量(dy 正数),动态改变控件的布局参数(宽度=控件宽度+dy;高度=自适应父窗体),实现挤压效果。
首先获取到控件的布局参数
FrameLayout.LayoutParams lp = (FrameLayout.LayoutParams) itemView.getLayoutParams();
动态改变控件宽度
lp.width = itemView.getWidth()+ dy; //dy表示两点Y坐标偏移量
计算控件宽度的最大值和最小值,如果控件的宽度小于等于最小值则最终的宽度为最小宽度,反之则为最大宽度:
//注意宽度的区间  取最大值和最小值
Rect rect = new Rect();
//itemView为文本控件
itemView.getPaint().getTextBounds(content, 0, itemView.getText().toString().length(), rect);
//最小值和最大值
int minWidth = rect.height() + itemView.getPaddingTop() + itemView.getPaddingBottom();
int maxWidth = rect.width() + itemView.getPaddingLeft() + itemView.getPaddingRight();
//越界处理
if (lp.width <= minWidth) {
lp.width = minWidth;
} else if (lp.width >= maxWidth) {
lp.width = maxWidth;
}
最后重置控件的宽度:
itemView.setLayoutParams(new FrameLayout.LayoutParams(lp.width, FrameLayout.LayoutParams.WRAP_CONTENT));
下,左,右边缘挤压与上边缘挤压类似。
(3)、多指挤压
第二根手指按下的同时计算与第一根手指之间的距离
case MotionEvent.ACTION_POINTER_DOWN:
//第二根手指X坐标
float multiTouchX = event.getX(1);
//第二根手指Y坐标
float multiTouchY = event.getY(1);
//两根手指的x距离
float dx = multiTouchX - simTouchX;
//两根手指的y距离
float dy = multiTouchY - simTouchY;
//两根手指的距离
fingersLength = (float) Math.sqrt(dx * dx + dy * dy);
然后计算手指移动的偏移量:
float moveDx= event.getX() - event.getX(1);
float moveDy= event.getY() - event.getY(1);
float moveLength= (float) Math.sqrt(moveDx* moveDx+ moveDy * moveDy);
//手指的偏移量
float fingersDistance= moveLength- fingersLength;
最后根据偏移量调用挤压方法。
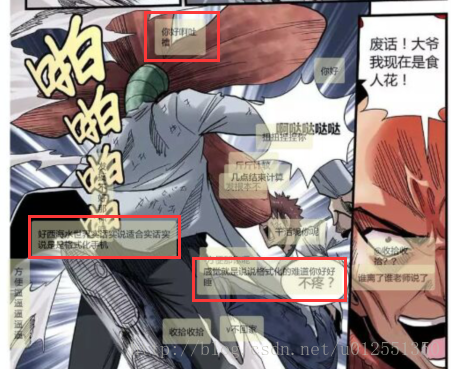
吐槽展示控件(动态添加)
效果一栏:
实现的代码如下:
View itemLayout = LayoutInflater.from(mGossipLayout.getContext()).inflate(R.layout
.view_gossip_item, null);
final RadiusTextView rtv = (RadiusTextView) itemLayout.findViewById(R.id.rvt_name);
rtv.setLayoutParams(new LinearLayout.LayoutParams((int) width, ViewGroup.LayoutParams
.WRAP_CONTENT));
rtv.setText(text);
rtv.setX(x);
rtv.setY(y);
mGossipLayout.addView(itemLayout);
吐槽控件细节处理的地方比较多,具体请参考 Demo
如果您有不懂的地方请给我留言。
技术交流欢迎您的加入


相关文章推荐
- 吐槽 qt4.8.1 vs2008 使用qt designer没有转到槽这个功能,真是要老命了,正好碰上初学的我,真是太坏了,
- android使用百度地图、定位SDK实现地图和定位功能!(最新、可用+吐槽)
- android使用百度地图、定位SDK实现地图和定位功能!(最新、可用+吐槽)
- Win10开始菜单遭用户吐槽:动态磁贴功能不像Win8.1那样
- android使用百度地图、定位SDK实现地图和定位功能!(最新、可用+吐槽)
- 记录Android微信分享功能的吐槽与思考
- 吐槽贴:百度地图 api 封装 的实用功能 [源码下载]
- 吐槽之Android Studio坑逼的提示功能
- WP手机升级到WP8.1之后一些功能的吐槽和没有Cortana,改变绿色图标的问题的解决方案以及怎样调戏Cortana
- 亲测生产环境一年多的真正免费的网管软件,功能强大无任何限制,公布个人电话欢迎吐槽
- android使用百度地图、定位SDK实现地图和定位功能!(最新、可用+吐槽)
- 吐槽:CSDN的博客文章编辑功能弱爆了
- [置顶] android应用中去android市场去评分的功能实现(吐槽一波个人应用上线...)
- 吐槽贴:百度地图 api 封装 的实用功能 [源码下载]
- 关于Unity 5.x 新功能 CommandBuff 的无力吐槽
- 吐槽:MySQL 5.6的NoSQL功能如“鸡肋”
- android应用中去android市场去评分的功能实现(吐槽一波个人应用上线...)
- 吐槽下linq to sql的分页功能
- Android 记录一次开发微信分享功能的吐槽与思考
- python实现curl功能