Android: DrawerLayout(抽屉导航)1
2017-05-09 19:11
267 查看
写一个侧滑页面的布局
比如这样的效果图:
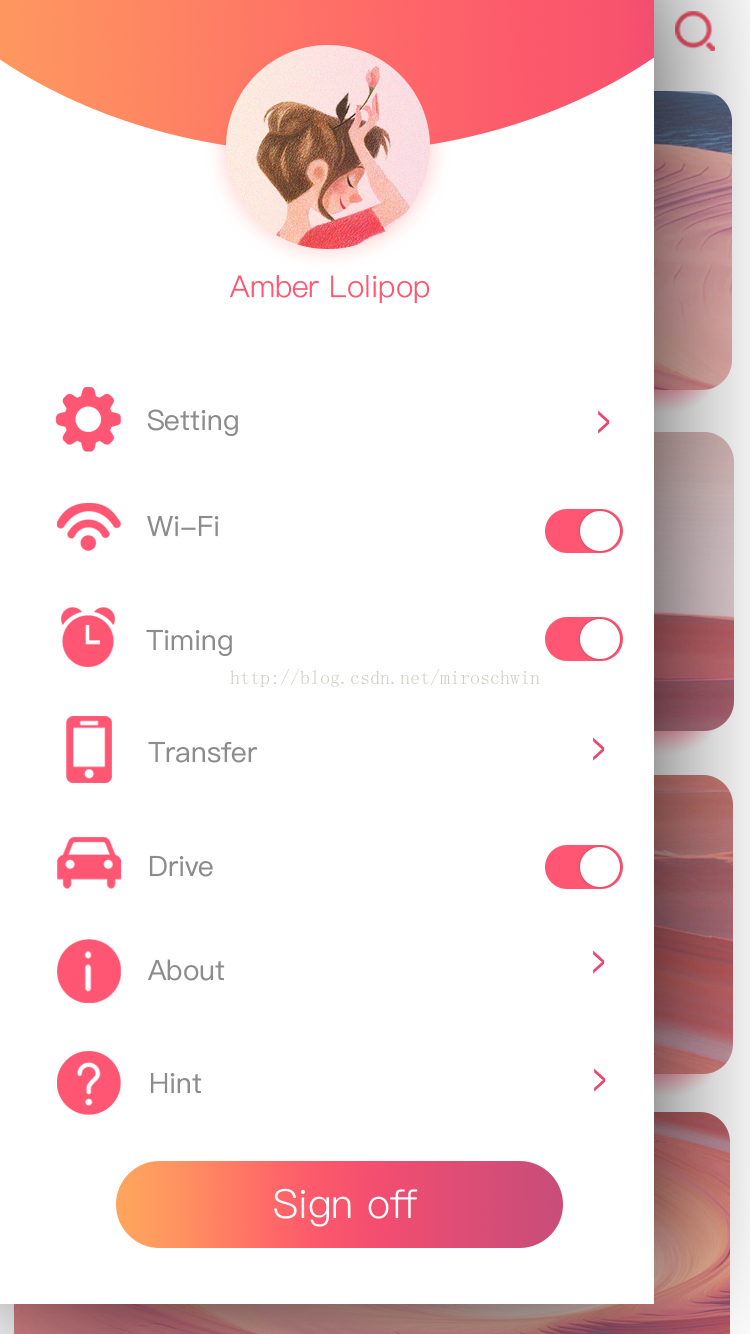
分析一下结构 整个用 LinearLaout布局结构
1、Drawer Layout 的v 4包
2、顶部的头像覆盖在渐变背景色上方, 所以使用FrameLayout,插入一个imageView覆盖在其上方,调整好marginTop距离
3、下方是这个音乐播放器侧滑界面的一些设置,此时使用对应结构的LinearLayout,再设置内边距和背景。只写几个其他一样的
4、最后添加一个按钮就完成了。

比如这样的效果图:
分析一下结构 整个用 LinearLaout布局结构
1、Drawer Layout 的v 4包
2、顶部的头像覆盖在渐变背景色上方, 所以使用FrameLayout,插入一个imageView覆盖在其上方,调整好marginTop距离
<FrameLayout
android:layout_width="match_parent"
android:layout_height="match_parent"
>
<ImageView
android:layout_width="match_parent"
android:layout_height="match_parent"
android:background="@drawable/circle_bg"/>
<ImageView
android:layout_width="30dp"
android:layout_height="30dp"
android:background="@drawable/head"/>

</FrameLayout>
3、下方是这个音乐播放器侧滑界面的一些设置,此时使用对应结构的LinearLayout,再设置内边距和背景。只写几个其他一样的
<LinearLayout
android:orientation="vertical"
android:layout_width="400dp"
android:layout_gravity="left"
android:layout_height="match_parent"
android:background="#ffffff">
<FrameLayout
android:layout_width="match_parent"
android:layout_height="150dp"
android:background="@drawable/circle_bg">

<ImageView
android:layout_marginTop="100dp"
android:layout_gravity="center"
android:layout_width="60dp"
android:layout_height="60dp"
android:background="@drawable/head"/>
</FrameLayout>

<LinearLayout
android:layout_marginTop="30dp"
android:padding="10dp"
android:orientation="horizontal"
android:layout_width="match_parent"
android:layout_height="wrap_content">
<ImageView
android:layout_width="40dp"
android:layout_height="40dp"
android:background="@drawable/setting"/>
<Button
android:id="@+id/btn_setting"
android:layout_width="wrap_content"
android:layout_height="wrap_content"
android:text="Setting"
android:background="#ffffff"/>

</LinearLayout>

<LinearLayout
android:layout_marginTop="30dp"
android:padding="10dp"
android:orientation="horizontal"
android:layout_width="match_parent"
android:layout_height="wrap_content">
<ImageView
android:layout_width="40dp"
android:layout_height="40dp"
android:background="@drawable/wifi"/>
<Button
android:id="@+id/btn_wifi"
android:layout_width="wrap_content"
android:layout_height="wrap_content"
android:text="Wi-Fi"
android:background="#ffffff"/>

</LinearLayout>

<LinearLayout
android:layout_marginTop="30dp"
android:padding="10dp"
android:orientation="horizontal"
android:layout_width="match_parent"
android:layout_height="wrap_content">
<ImageView
android:layout_width="40dp"
android:layout_height="40dp"
android:background="@drawable/timing"/>
<Button
android:id="@+id/btn_time"
android:layout_width="wrap_content"
android:layout_height="wrap_content"
android:text="Timing"
android:background="#ffffff"/>

</LinearLayout>

<LinearLayout
android:layout_marginTop="30dp"
android:padding="10dp"
android:orientation="horizontal"
android:layout_width="match_parent"
android:layout_height="wrap_content">
<ImageView
android:layout_width="40dp"
android:layout_height="40dp"
android:background="@drawable/transfer"/>
<Button
android:id="@+id/btn_transfer"
android:layout_width="wrap_content"
android:layout_height="wrap_content"
android:text="Transfer"
android:background="#ffffff"/>

</LinearLayout>
4、最后添加一个按钮就完成了。

相关文章推荐
- React Native控件之DrawerLayoutAndroid抽屉导航组件讲解
- (转)android组件之DrawerLayout(抽屉导航)-- 侧滑菜单效果
- 【React Native开发】React Native控件之DrawerLayoutAndroid抽屉导航切换组件解说(13)
- android组件之DrawerLayout(抽屉导航)-- 侧滑菜单效果
- 基于Android官方DrawerLayout实现抽屉导航菜单
- android组件--DrawerLayout(抽屉导航)
- 基于Android官方DrawerLayout实现抽屉导航菜单
- 【React Native开发】React Native控件之DrawerLayoutAndroid抽屉导航切换组件讲解(13)
- android开发游记:DrawerLayout 实现抽屉效果的导航菜单
- Android DrawerLayout抽屉效果的导航菜单实现
- android组件之DrawerLayout(抽屉导航)-- 侧滑菜单效果
- Android 抽屉导航 (DrawerLayout)
- Android5.0之NavigationView的使用 。android组件之DrawerLayout(抽屉导航)-- 侧滑菜单效果
- android组件之DrawerLayout(抽屉导航)-- 侧滑菜单效果
- android组件之DrawerLayout(抽屉导航)-- 侧滑菜单效果
- Android 使用DrawerLayout实现抽屉效果的导航菜单
- 基于Android官方DrawerLayout实现抽屉导航菜单
- Android 导航抽屉---Navigation Drawer (DrawerLayout)使用
- android 侧滑菜单效果----DrawerLayout(抽屉导航)
- android组件之DrawerLayout(抽屉导航)-- 侧滑菜单效果