Android Studio2.3更换默认的ConstraintLayout布局
2017-05-08 15:01
537 查看
最近Google更新了AS为2.3版本,由于现在大力推行ConstraintLayout布局,所以在新建工程的时候默认的布局也会变为ConstraintLayout,其实ConstraintLayout用起来还是蛮方便的,详见郭霖老师的文章http://blog.csdn.net/guolin_blog/article/details/53122387
。 但是,如果我们仅仅想写一个Demo用ConstraintLayout难免有点大材小用,操作起来也不如直接配置xml文件那么简单。那么Android
Studio能否修改新建工程的默认布局呢?非常遗憾在setting里面暂时是无法实现的,但是我们可以通过修改默认布局的文件来达到我们的目的。
以下以将ConstraintLayout修改为LinearLayout为例,介绍以下修改方法,其他的举一反三即可。
首先打开你的Android Sudio安装目录,我的为D:\Program Files\Android\Android Studio,进入到以下文件夹\plugins\android\lib\templates\activities\common\root\res\layout,如图所示:

然后使用文本编辑器打开simple.xml.ftl文件:如下图
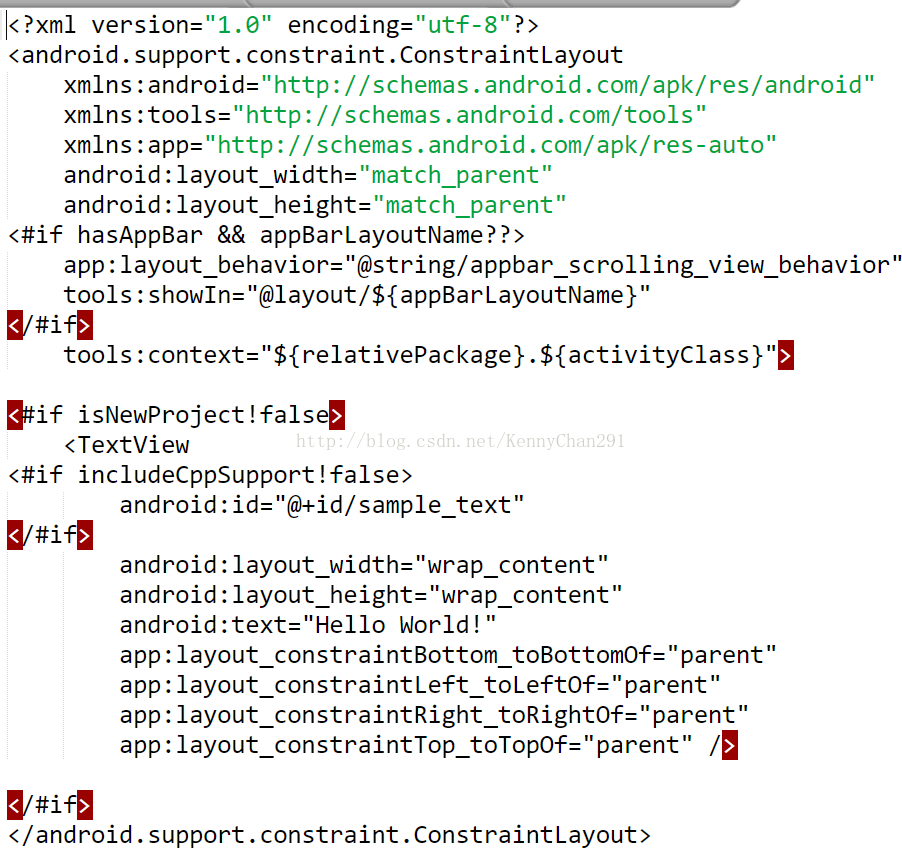
是不是很熟悉?没错这就是ConstraintLayout的布局文件,只不过有一些条件判定,我们无视它,直接改成LinearLayout的布局代码
[html]
view plain
copy
print?
<?xml version="1.0" encoding="utf-8"?>
<LinearLayout
xmlns:android="http://schemas.android.com/apk/res/android"
xmlns:app="http://schemas.android.com/apk/res-auto"
android:layout_width="match_parent"
android:layout_height="match_parent">

<TextView
android:layout_width="wrap_content"
android:layout_height="wrap_content"
android:text="Hello World!"
/>

</LinearLayout>

然后保存即可。注意:为了防止错误操作以及方便日后还原,最好在修改前备份一下simple.xml.ftl文件。
现在,再重新打开AS,新建一个工程,默认的布局就变成了LinearLayout了,是不是很简单呢?
。 但是,如果我们仅仅想写一个Demo用ConstraintLayout难免有点大材小用,操作起来也不如直接配置xml文件那么简单。那么Android
Studio能否修改新建工程的默认布局呢?非常遗憾在setting里面暂时是无法实现的,但是我们可以通过修改默认布局的文件来达到我们的目的。
以下以将ConstraintLayout修改为LinearLayout为例,介绍以下修改方法,其他的举一反三即可。
首先打开你的Android Sudio安装目录,我的为D:\Program Files\Android\Android Studio,进入到以下文件夹\plugins\android\lib\templates\activities\common\root\res\layout,如图所示:
然后使用文本编辑器打开simple.xml.ftl文件:如下图
是不是很熟悉?没错这就是ConstraintLayout的布局文件,只不过有一些条件判定,我们无视它,直接改成LinearLayout的布局代码
[html]
view plain
copy
print?
<?xml version="1.0" encoding="utf-8"?>
<LinearLayout
xmlns:android="http://schemas.android.com/apk/res/android"
xmlns:app="http://schemas.android.com/apk/res-auto"
android:layout_width="match_parent"
android:layout_height="match_parent">
<TextView
android:layout_width="wrap_content"
android:layout_height="wrap_content"
android:text="Hello World!"
/>
</LinearLayout>
<?xml version="1.0" encoding="utf-8"?> <LinearLayout xmlns:android="http://schemas.android.com/apk/res/android" xmlns:app="http://schemas.android.com/apk/res-auto" android:layout_width="match_parent" android:layout_height="match_parent"> <TextView android:layout_width="wrap_content" android:layout_height="wrap_content" android:text="Hello World!" /> </LinearLayout>
然后保存即可。注意:为了防止错误操作以及方便日后还原,最好在修改前备份一下simple.xml.ftl文件。
现在,再重新打开AS,新建一个工程,默认的布局就变成了LinearLayout了,是不是很简单呢?

相关文章推荐
- Android Studio2.3更换默认的ConstraintLayout布局
- Android Studio 2.3更换默认的ConstraintLayout布局
- Android Studio2.3更换默认的ConstraintLayout布局
- mac版本Android Studio2.3 修改默认ConstraintLayout为LinearLayout
- Android Studio 2.2新增布局——ConstraintLayout完全解析
- Android Studio如何把约束布局(ConstraintLayout)改为相对布局(RelativeLayout)
- androidStudio升级到2.3之后新建Activity布局变成了约束(ConstraintLayout)布局
- androidStudio升级到2.3之后新建Activity布局变成了约束(ConstraintLayout)布局
- 将Android Studio默认布局ConstraintLayout切换成LinearLayout
- [置顶] 最新的布局飞快的到来,让我们探索牛逼的布局。Android Studio中ConstraintLayout的使用
- Android studio约束布局 ConstraintLayout
- Android Studio 2.2新增布局——ConstraintLayout完全解析
- Android studio 中layout不能匹配到相应的布局文件的值
- 详解Android ConstraintLayout 约束布局的用法
- Android Studio 2.2 Preview - New UI Designer & Constraint Layout
- Android Studio App设置线性布局LinerLayout控件垂直/水平方向排列
- iOS 6 Auto Layout NSLayoutConstraint 界面布局
- iOS 6 Auto Layout NSLayoutConstraint 界面布局
- 那些年我们一起追过的自动布局Masonry(一)requiresConstraintBasedLayout
- Android Studio分类整理res/Layout中的布局文件 (笔记4)