串口通信原理
2017-05-02 22:37
232 查看
http://blog.csdn.net/qiwenmingshiwo/article/details/49557889
http://blog.csdn.net/qiwenmingshiwo/article/category/5920901
串口通信(Serial Communications)的概念非常简单,串口按位(bit)发送和接收字节。尽管比按字节(byte)的并行通信慢,但是串口可以在使用一根线发送数据的同时用另一根线接收数据。它很简单并且能够实现远距离通信。
波特率:这是一个衡量符号传输速率的参数。
主要介绍一下内容:
1.Android-serialport-api简单介绍
2.硬件地址和波特率的获取
3.发送和数据和接收数据
android-serialport-api下有两个主要的类
1.1 SerialPort的介绍
1.1.1调用的顺序如下:
SerialPort构造方法 –> jni open –>c open
需要一个操作串口的对象需要一个操作串口的对象创建SerialPort对象创建SerialPort对象JNI(使用c语言的open函数打开文件)JNI(使用c语言的open函数打开文件)操作的文件对象,波特率,文件操作权限。调用jni的open方法创建对象。返回文件的描述(FileDescriptor)返回需要的串口对象。
1.1.2 SerialPort的构造函数
public SerialPort(File device, int baudrate, int flags)
1.1.3 C语言中的open函数
c语言中open函数是用来打开一个文件的。具体可以看这里C语言open()函数:打开文件函数
int open(const char * pathname, int flags);
返回值:若所有欲核查的权限都通过了检查则返回0 值, 表示成功, 只要有一个权限被禁止则返回-1.
SerialPort类
2
3
4
5
6
7
8
9
10
11
12
13
14
15
16
17
18
19
20
21
22
23
24
25
26
27
28
29
30
31
32
33
34
35
36
37
38
39
40
41
42
43
44
45
46
47
48
49
50
51
52
53
54
55
56
57
58
59
60
61
62
63
64
65
66
67
68
69
70
71
72
73
74
75
76
77
78
79
80
81
82
83
84
85
86
87
88
89
90
1
2
3
4
5
6
7
8
9
10
11
12
13
14
15
16
17
18
19
20
21
22
23
24
25
26
27
28
29
30
31
32
33
34
35
36
37
38
39
40
41
42
43
44
45
46
47
48
49
50
51
52
53
54
55
56
57
58
59
60
61
62
63
64
65
66
67
68
69
70
71
72
73
74
75
76
77
78
79
80
81
82
83
84
85
86
87
88
89
90
SerialPort.c 中open函数
2
3
4
5
6
7
8
9
10
11
12
13
14
15
16
17
18
19
20
21
22
23
24
25
26
27
28
29
30
31
32
33
34
35
36
37
38
39
40
41
42
43
44
45
46
1
2
3
4
5
6
7
8
9
10
11
12
13
14
15
16
17
18
19
20
21
22
23
24
25
26
27
28
29
30
31
32
33
34
35
36
37
38
39
40
41
42
43
44
45
46
2.1数据的发送
2.1.1 数据的发送很简单,通过SerialPort对象的getOutputStream()方法获取到输出流,然后把数据写入到这个流中就行了。
2
3
4
5
6
7
8
9
10
11
1
2
3
4
5
6
7
8
9
10
11
2.2 数据的接收,通过SerialPort对象的getInputStream()方法获取到输入流,然后读流的就行了。不过一般会开一个线程去读数据
2
3
4
5
6
7
8
9
10
11
12
13
14
15
16
17
18
19
20
21
22
23
24
25
26
27
28
29
30
31
32
33
34
35
36
37
38
39
40
1
2
3
4
5
6
7
8
9
10
11
12
13
14
15
16
17
18
19
20
21
22
23
24
25
26
27
28
29
30
31
32
33
34
35
36
37
38
39
40
具体的话可以看项目中的SerialPortActivity这个类,但是这个只是一个例子而已,真正在使用中,我们要根据自己的要求来修改,后面的blog中会介绍。
我们都知道要操作一个串口设备,我们需要知道它的地址和波特率。其中波特率的话是一般根据硬件的说明来设定的,所以这个的话,我们只需要看说明就行了,当然在选择的波特率的时候,我们可以提供一些值来做选择。
3.1 波特率
我们可以创建一个集合来存储波特率,用到的时候来选择就行。
2
3
4
5
6
7
8
9
10
11
12
13
14
15
16
17
18
19
20
21
22
23
24
25
26
27
28
29
30
31
32
33
34
35
36
37
38
39
40
41
42
43
1
2
3
4
5
6
7
8
9
10
11
12
13
14
15
16
17
18
19
20
21
22
23
24
25
26
27
28
29
30
31
32
33
34
35
36
37
38
39
40
41
42
43
3.2 硬件地址的获取
其实硬件地址,也是一个集合来存储着,用得使用,指定硬件地址。我们说andorid-serialport-api中主要的Java文件有两个,其中SerialPort我们已经说了,剩下的SerialPortFinder就是获取硬件地址的类。
获取硬件地址的基本步骤:
读取/proc/tty/drivers文件读取/proc/tty/drivers文件串口设备的真实地址集合串口设备的真实地址集合获取到基本地址,然后读取/dev下的所有文件,文件的开始地址与基础地址匹配的就是串口设备,文件的绝对路径地址存入到集合中。
或者如下:
开始读取/proc/tty/drivers文件获取到基本地址,然后读取/dev下的所有文件, 文件的开始地址与基础地址匹配的就是串口设备, 文件的绝对路径地址存入到集合中串口设备的真实地址集合结束
3.2.1读取 /proc/tty/drivers 文件中的内容,判断哪些是串口设备的基础地址(通过serail这个关键字来判断)。我们可以看到drivers的文件内容如下(外设不同,文件内容不同)
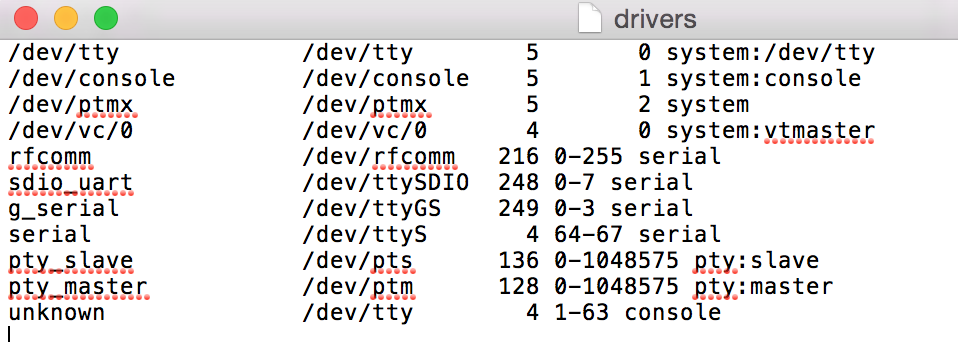
开始逐行读取/proc/tty/driver内容 窃取文件名filename。根据" +"分割这行数据, 得到字符数组 w(w.length >= 5)&&(w[w.length - 1].equals("serial"))?传递filename到3.2.2中, 执行3.2.2的操作,保存真实地址到集合中driver是否已经读取完?结束yesnoyesno
1.在读取文件的内容的时候,是一行一行的读取的。(如下面的那条数据)
2.读取到一行数据的时候,窃取第一串字符为文件名。(如下面的那条数据,文件名为:serial)
3.按照” +”(一个或者多个空格)分割一行数据。(如下面的数据分割后的结果是: w[0]=”serial”,w[1]=”/dev/ttyS”,w[2]=”4”,w[3]=”64-67”,w[4]=”serial”)
4.判断上面分割的字符数组的长度是否大于等于5,并且最后一个字符串是不是”serial”,满足条件传递filename到3.2.2中执行 3.2.2 。不满足读取下一行,直到读取完成。
3.2.2通过获取到基础地址,去查找真正的串口设备地址。把地址集合存起来。
开始获取/dev下所有文件files,循环files得到files[i]files[i].getAbsolutePath().startsWith(filename)?把files[i]存入到集合中files循环是否结束?结束yesnoyesno
下面是/dev 目录的切图(部分)
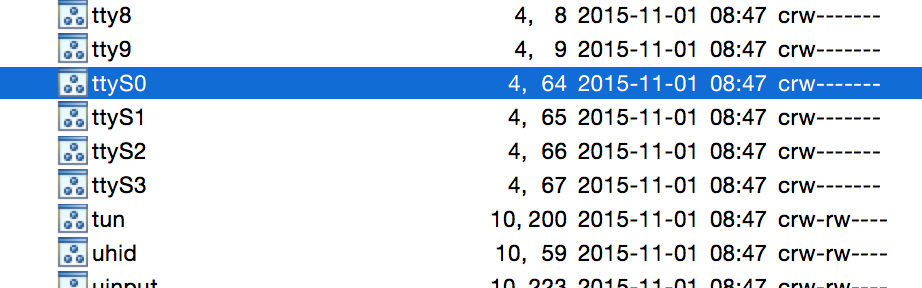
1.获取/dev下的所有文件,得到一个文件数组files。
2.循环files,等到files[i]。
3.获取files[i]的绝度路径,判断这个绝对路径是不是以3.2.1中传递过来的基础地址filename开头。(例如:我们传递过来的是基础地址是:/dev/ttyS,那么我们这里满足条件的就是:/dev/ttyS0,/dev/ttyS1,/dev/ttyS2,/dev/ttyS3,这四个设备就是串口设备)
4.满足3说明是串口设备,保存到集合中,不满足执行5。
5.判读是否已经循环结束。结束返回集合,没有结束执行2。
SerialPortFinder
http://blog.csdn.net/qiwenmingshiwo/article/category/5920901
一.串口通信原理
串口通信(Serial Communications)的概念非常简单,串口按位(bit)发送和接收字节。尽管比按字节(byte)的并行通信慢,但是串口可以在使用一根线发送数据的同时用另一根线接收数据。它很简单并且能够实现远距离通信。 波特率:这是一个衡量符号传输速率的参数。
二、android-serialport-api
主要介绍一下内容:1.Android-serialport-api简单介绍
2.硬件地址和波特率的获取
3.发送和数据和接收数据
1.android-serialport-api简单介绍
android-serialport-api下有两个主要的类| 参数 | 说明 |
|---|---|
| SerialPort | 获取串口的类(其实就是获取输入输出流) |
| SerialPortFinder | 获取硬件地址的类 |
1.1 SerialPort的介绍
1.1.1调用的顺序如下:
SerialPort构造方法 –> jni open –>c open
需要一个操作串口的对象需要一个操作串口的对象创建SerialPort对象创建SerialPort对象JNI(使用c语言的open函数打开文件)JNI(使用c语言的open函数打开文件)操作的文件对象,波特率,文件操作权限。调用jni的open方法创建对象。返回文件的描述(FileDescriptor)返回需要的串口对象。
1.1.2 SerialPort的构造函数
public SerialPort(File device, int baudrate, int flags)
| 参数 | 说明 |
|---|---|
| device | 要操作的文件对象 |
| baudrate | 波特率 |
| flags | 文件操作的标志 |
c语言中open函数是用来打开一个文件的。具体可以看这里C语言open()函数:打开文件函数
int open(const char * pathname, int flags);
| 参数 | 说明 |
|---|---|
| pathname | pathname 指向欲打开的文件路径字符串 |
| flags | 文件的打开打开方式: O_RDONLY 以只读方式打开文件O_WRONLY 以只写方式打开文件O_RDWR 以可读写方式打开文件 |
SerialPort类
package android_serialport_api;

import java.io.File;
import java.io.FileDescriptor;
import java.io.FileInputStream;
import java.io.FileOutputStream;
import java.io.IOException;
import java.io.InputStream;
import java.io.OutputStream;

import android.util.Log;
/**
1. 串口类
2. @author qiwenming
3.  */
public class SerialPort {

private static final String TAG = "SerialPort";

/*
* Do not remove or rename the field mFd: it is used by native method close();
*/
private FileDescriptor mFd;//文件描述
private FileInputStream mFileInputStream;
private FileOutputStream mFileOutputStream;

/**
*获得一个窗口
* @param device 设备
* @param baudrate 波特率
* @param flags 标志
* @throws SecurityException
* @throws IOException
*/
public SerialPort(File device, int baudrate, int flags) throws SecurityException, IOException {

/* Check access permission */ //检查权限
if (!device.canRead() || !device.canWrite()) {
try {
//如果丢失权限,就再获取权限
/* Missing read/write permission, trying to chmod the file */
Process su;
su = Runtime.getRuntime().exec("/system/bin/su");
String cmd = "chmod 666 " + device.getAbsolutePath() + "\n" + "exit\n";
//写命令
su.getOutputStream().write(cmd.getBytes());
if ((su.waitFor() != 0) || !device.canRead() || !device.canWrite()) {
throw new SecurityException();
}
} catch (Exception e) {
e.printStackTrace();
throw new SecurityException();
}
}
//打开设备,这里面调用jni 的open方法
mFd = open(device.getAbsolutePath(), baudrate, flags);
if (mFd == null) {
Log.e(TAG, "native open returns null");
throw new IOException();
}
mFileInputStream = new FileInputStream(mFd);
mFileOutputStream = new FileOutputStream(mFd);
}

// Getters and setters
public FileInputStream getInputStream() {
return mFileInputStream;
}

public FileOutputStream getOutputStream() {
return mFileOutputStream;
}

//============== JNI=========================================
/**
* 打开串口设备的方法
* @param path 设备的绝对路径
* @param baudrate 波特率
* @param flags 标志
* @return
*/
private native static FileDescriptor open(String path, int baudrate, int flags);
//关闭设备
public native void close();
//加载库文件
static {
System.loadLibrary("serial_port");
}
}12
3
4
5
6
7
8
9
10
11
12
13
14
15
16
17
18
19
20
21
22
23
24
25
26
27
28
29
30
31
32
33
34
35
36
37
38
39
40
41
42
43
44
45
46
47
48
49
50
51
52
53
54
55
56
57
58
59
60
61
62
63
64
65
66
67
68
69
70
71
72
73
74
75
76
77
78
79
80
81
82
83
84
85
86
87
88
89
90
1
2
3
4
5
6
7
8
9
10
11
12
13
14
15
16
17
18
19
20
21
22
23
24
25
26
27
28
29
30
31
32
33
34
35
36
37
38
39
40
41
42
43
44
45
46
47
48
49
50
51
52
53
54
55
56
57
58
59
60
61
62
63
64
65
66
67
68
69
70
71
72
73
74
75
76
77
78
79
80
81
82
83
84
85
86
87
88
89
90
SerialPort.c 中open函数
/*
* Class:     android_serialport_SerialPort
* Method:    open
* Signature: (Ljava/lang/String;II)Ljava/io/FileDescriptor;
*/
JNIEXPORT jobject JNICALL Java_android_1serialport_1api_SerialPort_open
(JNIEnv *env, jclass thiz, jstring path, jint baudrate, jint flags)
{
//变量定义,参数检查
......

/* Opening device */
//打开设备
{
jboolean iscopy;
const char *path_utf = (*env)->GetStringUTFChars(env, path, &iscopy);
LOGD("Opening serial port %s with flags 0x%x", path_utf, O_RDWR | flags);
//使用c语言的open函数打开文件
fd = open(path_utf
17554
, O_RDWR | flags);
LOGD("open() fd = %d", fd);
(*env)->ReleaseStringUTFChars(env, path, path_utf);
if (fd == -1)
{
/* Throw an exception */
LOGE("Cannot open port");
/* TODO: throw an exception */
return NULL;
}
}

//设备的一些设置
......

/* Create a corresponding file descriptor */
//创建我们需要的 file descriptor
{
jclass cFileDescriptor = (*env)->FindClass(env, "java/io/FileDescriptor");
jmethodID iFileDescriptor = (*env)->GetMethodID(env, cFileDescriptor, "<init>", "()V");
jfieldID descriptorID = (*env)->GetFieldID(env, cFileDescriptor, "descriptor", "I");
mFileDescriptor = (*env)->NewObject(env, cFileDescriptor, iFileDescriptor);
(*env)->SetIntField(env, mFileDescriptor, descriptorID, (jint)fd);
}

return mFileDescriptor;
}12
3
4
5
6
7
8
9
10
11
12
13
14
15
16
17
18
19
20
21
22
23
24
25
26
27
28
29
30
31
32
33
34
35
36
37
38
39
40
41
42
43
44
45
46
1
2
3
4
5
6
7
8
9
10
11
12
13
14
15
16
17
18
19
20
21
22
23
24
25
26
27
28
29
30
31
32
33
34
35
36
37
38
39
40
41
42
43
44
45
46
2.发送和数据和接收数据
2.1数据的发送 2.1.1 数据的发送很简单,通过SerialPort对象的getOutputStream()方法获取到输出流,然后把数据写入到这个流中就行了。
.....
mOutputStream = mSerialPort.getOutputStream();

// 把字符指令转为字节
byte[] text = StringUtils.hexStringToBytes(sendData.commandStr);
try {
mOutputStream.write(text);
mOutputStream.flush();
} catch (IOException e) {
e.printStackTrace();
}12
3
4
5
6
7
8
9
10
11
1
2
3
4
5
6
7
8
9
10
11
2.2 数据的接收,通过SerialPort对象的getInputStream()方法获取到输入流,然后读流的就行了。不过一般会开一个线程去读数据
......
try {
mSerialPort = mApplication.getSerialPort();
mOutputStream = mSerialPort.getOutputStream();
mInputStream = mSerialPort.getInputStream();

/* Create a receiving thread */
mReadThread = new ReadThread();
mReadThread.start();
} catch (SecurityException e) {
DisplayError(R.string.error_security);
} catch (IOException e) {
DisplayError(R.string.error_unknown);
} catch (InvalidParameterException e) {
DisplayError(R.string.error_configuration);
}
....
/**
*读取流中的数据
*/
private class ReadThread extends Thread {
@Override
public void run() {
super.run();
while(!isInterrupted()) {
int size;
try {
byte[] buffer = new byte[64];
if (mInputStream == null) return;
size = mInputStream.read(buffer);
if (size > 0) {
onDataReceived(buffer, size);
}
} catch (IOException e) {
e.printStackTrace();
return;
}
}
}
}12
3
4
5
6
7
8
9
10
11
12
13
14
15
16
17
18
19
20
21
22
23
24
25
26
27
28
29
30
31
32
33
34
35
36
37
38
39
40
1
2
3
4
5
6
7
8
9
10
11
12
13
14
15
16
17
18
19
20
21
22
23
24
25
26
27
28
29
30
31
32
33
34
35
36
37
38
39
40
具体的话可以看项目中的SerialPortActivity这个类,但是这个只是一个例子而已,真正在使用中,我们要根据自己的要求来修改,后面的blog中会介绍。
3.硬件地址和波特率的获取
我们都知道要操作一个串口设备,我们需要知道它的地址和波特率。其中波特率的话是一般根据硬件的说明来设定的,所以这个的话,我们只需要看说明就行了,当然在选择的波特率的时候,我们可以提供一些值来做选择。 3.1 波特率
我们可以创建一个集合来存储波特率,用到的时候来选择就行。
/**
* @author qiwenming
* @creation 2015-6-18 下午4:10:00
* @instruction 波特率的集合
*/
public class BaudRateListConstants {

private static List<Integer> list = new ArrayList<Integer>();
public static List<Integer> getBaudRateList(){
if(list.size()<=0){
list.add(50);
list.add(75);
list.add(110);
list.add(134);
list.add(150);
list.add(200);
list.add(300);
list.add(600);
list.add(1200);
list.add(1800);
list.add(2400);
list.add(4800);
list.add(9600);
list.add(38400);
list.add(57600);
list.add(115200);
list.add(230400);
list.add(460800);
list.add(500000);
list.add(576000);
list.add(921600);
list.add(1000000);
list.add(1152000);
list.add(1500000);
list.add(2000000);
list.add(2500000);
list.add(3000000);
list.add(3500000);
list.add(4000000);
}
return list;
}
}12
3
4
5
6
7
8
9
10
11
12
13
14
15
16
17
18
19
20
21
22
23
24
25
26
27
28
29
30
31
32
33
34
35
36
37
38
39
40
41
42
43
1
2
3
4
5
6
7
8
9
10
11
12
13
14
15
16
17
18
19
20
21
22
23
24
25
26
27
28
29
30
31
32
33
34
35
36
37
38
39
40
41
42
43
3.2 硬件地址的获取
其实硬件地址,也是一个集合来存储着,用得使用,指定硬件地址。我们说andorid-serialport-api中主要的Java文件有两个,其中SerialPort我们已经说了,剩下的SerialPortFinder就是获取硬件地址的类。
获取硬件地址的基本步骤:
读取/proc/tty/drivers文件读取/proc/tty/drivers文件串口设备的真实地址集合串口设备的真实地址集合获取到基本地址,然后读取/dev下的所有文件,文件的开始地址与基础地址匹配的就是串口设备,文件的绝对路径地址存入到集合中。
或者如下:
开始读取/proc/tty/drivers文件获取到基本地址,然后读取/dev下的所有文件, 文件的开始地址与基础地址匹配的就是串口设备, 文件的绝对路径地址存入到集合中串口设备的真实地址集合结束
3.2.1读取 /proc/tty/drivers 文件中的内容,判断哪些是串口设备的基础地址(通过serail这个关键字来判断)。我们可以看到drivers的文件内容如下(外设不同,文件内容不同)
开始逐行读取/proc/tty/driver内容 窃取文件名filename。根据" +"分割这行数据, 得到字符数组 w(w.length >= 5)&&(w[w.length - 1].equals("serial"))?传递filename到3.2.2中, 执行3.2.2的操作,保存真实地址到集合中driver是否已经读取完?结束yesnoyesno
1.在读取文件的内容的时候,是一行一行的读取的。(如下面的那条数据)
2.读取到一行数据的时候,窃取第一串字符为文件名。(如下面的那条数据,文件名为:serial)
3.按照” +”(一个或者多个空格)分割一行数据。(如下面的数据分割后的结果是: w[0]=”serial”,w[1]=”/dev/ttyS”,w[2]=”4”,w[3]=”64-67”,w[4]=”serial”)
4.判断上面分割的字符数组的长度是否大于等于5,并且最后一个字符串是不是”serial”,满足条件传递filename到3.2.2中执行 3.2.2 。不满足读取下一行,直到读取完成。
serial /dev/ttyS 4 64-67 serial
3.2.2通过获取到基础地址,去查找真正的串口设备地址。把地址集合存起来。
开始获取/dev下所有文件files,循环files得到files[i]files[i].getAbsolutePath().startsWith(filename)?把files[i]存入到集合中files循环是否结束?结束yesnoyesno
下面是/dev 目录的切图(部分)
1.获取/dev下的所有文件,得到一个文件数组files。
2.循环files,等到files[i]。
3.获取files[i]的绝度路径,判断这个绝对路径是不是以3.2.1中传递过来的基础地址filename开头。(例如:我们传递过来的是基础地址是:/dev/ttyS,那么我们这里满足条件的就是:/dev/ttyS0,/dev/ttyS1,/dev/ttyS2,/dev/ttyS3,这四个设备就是串口设备)
4.满足3说明是串口设备,保存到集合中,不满足执行5。
5.判读是否已经循环结束。结束返回集合,没有结束执行2。
SerialPortFinder
/*
* Copyright 2009 Cedric Priscal
*
* Licensed under the Apache License, Version 2.0 (the "License");
* you may not use this file except in compliance with the License.
* You may obtain a copy of the License at
*
* http://www.apache.org/licenses/LICENSE-2.0 *
* Unless required by applicable law or agreed to in writing, software
* distributed under the License is distributed on an "AS IS" BASIS,
* WITHOUT WARRANTIES OR CONDITIONS OF ANY KIND, either express or implied.
* See the License for the specific language governing permissions and
* limitations under the License.
*/

package android_serialport_api;

import java.io.File;
import java.io.FileReader;
import java.io.IOException;
import java.io.LineNumberReader;
import java.util.Iterator;
import java.util.Vector;

import android.util.Log;

/**
* 串口通讯的 寻检器
*
* @author qiwenming
*
*/
public class SerialPortFinder {

/**
* 设备类
*
* @author qiwenming
*/
public class Driver {
public Driver(String name, String root) {
mDriverName = name;
mDeviceRoot = root;
}

private String mDriverName;//设备名称
private String mDeviceRoot;//设备根节点
Vector<File> mDevices = null;//设备集合

/**
* 获取设备集合 这个是特定类型的设备 比如USB等
* @return
*/
public Vector<File> getDevices() {
//如果设备已经添加过,就不添加了,否则就必须添加
if (mDevices == null) {//如果
mDevices = new Vector<File>();
File dev = new File("/dev");
//获取 /dev 下的设备
File[] files = dev.listFiles();
int i;
for (i = 0; i < files.length; i++) {
//这里是拿文件的路径和我们 传递进来的路径进行对比,看看开头是不是我们传递捡来的  ,传递进来的函数是 外部类 getDrivers()
//比如 我们传递进来的文件路径是:  /dev/ttyUSB 那么我们获取道的文件的绝对路径 如:/dev/ttyUSB1 /dev/ttyUSB2
//就满足下面这个条件 ,就会加到集合中去
if (files[i].getAbsolutePath().startsWith(mDeviceRoot)) {
Log.d(TAG, "Found new device: " + files[i]);
mDevices.add(files[i]);
}
}
}
return mDevices;
}

public String getName() {
return mDriverName;
}
}

private static final String TAG = "SerialPort";

private Vector<Driver> mDrivers = null;

/**
* 获取设备
* @return
* @throws IOException
* 其实就是读取 /proc/tty/drivers 这个文件
* drivers中有设备的地址的总地址添加到一个集合中
*/
Vector<Driver> getDrivers() throws IOException {
if (mDrivers == null) {
mDrivers = new Vector<Driver>();
//读取行的流对象
LineNumberReader r = new LineNumberReader(new FileReader(
"/proc/tty/drivers"));
String l;
while ((l = r.readLine()) != null) {
// Issue 3:
// Since driver name may contain spaces, we do not extract
// driver name with split()
//看下面这个会发现 原来我们的 这个第一字符到第二个字符之间是21个,这也就是为什么这里面要用的 0x15 这个原因了
//dev/tty             /dev/tty        5       0 system:/dev/tty
String drivername = l.substring(0, 0x15).trim();//其实就是获取第一个非空格字符串
String[] w = l.split(" +");//这里是正则表达式:" +" 表示有一个或者多个空格
if ((w.length >= 5) && (w[w.length - 1].equals("serial"))) {
Log.d(TAG, "Found new driver " + drivername + " on "
+ w[w.length - 4]);
mDrivers.add(new Driver(drivername, w[w.length - 4]));
}
}
r.close();//关闭流
}
return mDrivers;
}

/**
* 得到所有的设备的名称
* @return
*/
public String[] getAllDevices() {
Vector<String> devices = new Vector<String>();
// Parse each driver
Iterator<Driver> itdriv;
try {
itdriv = getDrivers().iterator();//获取道设备的根地址
while (itdriv.hasNext()) {//迭代获取具体的根路径
Driver driver = itdriv.next();
Iterator<File> itdev = driver.getDevices().iterator();//获取道包含根地址的设备对象的集合
while (itdev.hasNext()) {//迭代获得具体的设备
String device = itdev.next().getName();
String value = String.format("%s (%s)", device,
driver.getName());
devices.add(value);
}
}
} catch (IOException e) {
e.printStackTrace();
}
return devices.toArray(new String[devices.size()]);
}

/**
* 获取道设备的路径
* @return
*/
public String[] getAllDevicesPath() {
Vector<String> devices = new Vector<String>();
// Parse each driver
Iterator<Driver> itdriv;
try {
itdriv = getDrivers().iterator();
while (itdriv.hasNext()) {
Driver driver = itdriv.next();
Iterator<File> itdev = driver.getDevices().iterator();
while (itdev.hasNext()) {
//获取
String device = itdev.next().getAbsolutePath();
devices.add(device);
}
}
} catch (IOException e) {
e.printStackTrace();
}
return devices.toArray(new String[devices.size()]);
}
}

相关文章推荐
- 串口通信原理
- 串口通信原理和简介
- 串口通信原理
- 单片机C51 - 串行通信原理及串口编程实验
- 单片机串口通信原理及原理图
- Win API串口通信原理及读写与操作
- ZigBee单播通信原理、串口配置 (对于理解收发数据的过程非常重要)
- STM32 基于串口RS485双机通信原理浅析
- C/C++串口通信原理及读写与操作
- 13.5 串口通信原理和控制程序
- 串口通信原理和简介
- 串口通信原理
- rs232串口通信原理
- 串口通信原理和简介
- C/C++串口通信原理及读写与操作
- [置顶] 单片机串口通信原理和控制程序
- 第六天:串口通信概念、原理
- 九.ARM裸机学习之串口通信详解1(串口通信接口及原理框图详解)
- 串口通信原理
- 串行通信的基本原理及用MFC实现串口通信编程通信编程实现原理基本串口//数据操作线程