spring入门到精通day01
2017-04-22 22:58
218 查看
前言:mvc框架在软件开发已经如日中天,不管是传统行业的ssh还是现今比较火热的ssm,spring都是不可或缺的“和事老”。由于本人也是spring学习的小白,本系列文档旨在记录spring学习的点点滴滴,如有错误,请各位大神多多斧正
环境:spring
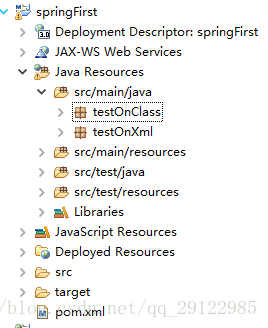
1创建maven项目,结构如下图:
在pom.xml文件中导入两个依赖,pom.xml代码如下:<project xmlns="http://maven.apache.org/POM/4.0.0" xmlns:xsi="http://www.w3.org/2001/XMLSchema-instance" xsi:schemaLocation="http://maven.apache.org/POM/4.0.0 http://maven.apache.org/xsd/maven-4.0.0.xsd"> <modelVersion>4.0.0</modelVersion> <groupId>com</groupId> <artifactId>spring</artifactId> <version>0.0.1-SNAPSHOT</version> <packaging>war</packaging> <dependencies> <dependency> <groupId>org.springframework</groupId> <artifactId>spring-context</artifactId> <version>4.3.8.RELEASE</version> </dependency> <!-- SpringJUnit4ClassRunner.class --> <dependency> <groupId>org.springframework</groupId> <artifactId>spring-test</artifactId> <version>4.3.8.RELEASE</version> </dependency> </dependencies> </project>
2通过java代码装配bean
在testOnClass包下创建4个文件:接口Student.java,
实现类SmallStudent.java,
配置类StudentConfig.java,
测试类StudentTest.java
代码分别如下:
Student.java
package testOnClass;

public interface Student {

void study();
}
SmallStudent.java
package testOnClass;

import org.springframework.stereotype.Component;

@Component //组件扫描
public class SmallStudent implements Student {

private String name = "王麻子";
private String subject = "该死的数学";
public void study() {
System.out.println(name + "学习" + subject);
}

}
StudentConfig.java
package testOnClass;

import org.springframework.context.annotation.ComponentScan;
import org.springframework.context.annotation.Configuration;

@Configuration //配置组件扫描类
@ComponentScan //组件扫描同一包下的注解,如:@Component等
public class StudentConfig {

}
StudentTest.java
package testOnClass;

import static org.junit.Assert.*;

import org.junit.Test;
import org.junit.runner.RunWith;
import org.springframework.beans.factory.annotation.Autowired;
import org.springframework.test.context.ContextConfiguration;
import org.springframework.test.context.junit4.SpringJUnit4ClassRunner;

@RunWith(SpringJUnit4ClassRunner.class) //需要导入spring-test
@ContextConfiguration(classes=StudentConfig.class) //导入组件扫描类
public class StudentTest {
@Autowired //自动装配含有@Component的类给student
private Student student;

@Test
public void componentScanTest() {
assertNotNull(student); //断言student对象是否存在
}

@Test
public void outTest() {
student.study(); //打印 王麻子学习该死的数学
}
}
3通过xml装配bean
由于spring默认读取根路径src下applicationContext.xml在src/main/resources(注意:为什么是在如下路径,请自行百度maven项目结构)

在applicationContext.xml中配置如下信息:
<?xml version="1.0" encoding="UTF-8"?>
<beans default-autowire="byName"
xmlns="http://www.springframework.org/schema/beans"
xmlns:xsi="http://www.w3.org/2001/XMLSchema-instance" xmlns:p="http://www.springframework.org/schema/p"
xsi:schemaLocation="http://www.springframework.org/schema/beans http://www.springframework.org/schema/beans/spring-beans.xsd http://www.springframework.org/schema/tx http://www.springframework.org/schema/tx/spring-tx.xsd http://www.springframework.org/schema/aop http://www.springframework.org/schema/aop/spring-aop.xsd http://www.springframework.org/schema/context http://www.springframework.org/schema/context/spring-context.xsd" xmlns:tx="http://www.springframework.org/schema/tx" xmlns:aop="http://www.springframework.org/schema/aop"
xmlns:context="http://www.springframework.org/schema/context">

<!-- 扫描testOnXml中默认含有@Component注解的类 -->
<context:component-scan base-package="testOnXml"></context:component-scan>

</beans>
然后在web.xml

中配置如下信息:
<?xml version="1.0" encoding="UTF-8"?>
<web-app xmlns:xsi="http://www.w3.org/2001/XMLSchema-instance" xmlns="http://java.sun.com/xml/ns/javaee" xsi:schemaLocation="http://java.sun.com/xml/ns/javaee http://java.sun.com/xml/ns/javaee/web-app_3_0.xsd" version="3.0">
<display-name>spring test</display-name>
<welcome-file-list>
<welcome-file>/index.jsp</welcome-file>
</welcome-file-list>
<context-param>
<param-name>contextConfigLocation</param-name>
<param-value>classpath:applicationContext.xml</param-value>
</context-param>
</web-app>
接着同样的方式配置
接口Student.java
package testOnXml;

public interface Student {

void study();
}
实现类SmallStudent.java
package testOnXml;

import org.springframework.stereotype.Component;

@Component //组件扫描
public class SmallStudent implements Student {

private String name = "王麻子";
private String subject = "该死的数学";
public void study() {
System.out.println(name + "学习" + subject);
}

}
测试类StudentTest.java
package testOnXml;

import static org.junit.Assert.*;

import org.junit.Test;
import org.junit.runner.RunWith;
import org.springframework.beans.factory.annotation.Autowired;
import org.springframework.test.context.ContextConfiguration;
import org.springframework.test.context.junit4.SpringJUnit4ClassRunner;

@RunWith(SpringJUnit4ClassRunner.class) //需要导入spring-test
@ContextConfiguration(locations={"classpath:applicationContext.xml"}) //导入组件扫描xml文件
public class StudentTest {
@Autowired //自动装配含有@Component的类给student
private Student student;

@Test
public void componentScanTest() {
assertNotNull(student); //断言student对象是否存在
}

@Test
public void outTest() {
student.study(); //打印 王麻子学习该死的数学
}
}
4结果


相关文章推荐
- Spring从入门到精通 3.1 反向控制/依赖注入
- Myeclipse——Spring 从入门到精通三 Spring3.0以后新特性之基于Annotation的注入
- 【Spring从入门到精通】(三)Spring的结构组成
- day01_12/11/2016_Spring入门PPT
- 【Spring源码从入门到精通】(八)解析及注册BeanDefinitions
- Spring.NET & NHibernate从入门到精通
- 【Spring从入门到精通】 (五)加载Bean
- Spring 入门实例 简易登录系统(精通Spring+4.x++企业应用开发实战 学习笔记一)
- 25、ASP.NET MVC入门到精通——Spring.net-业务层仓储
- JAVA WEB从入门到精通day01 HTML语言的学习
- mybatis 入门到精通 (六) mybatis 与spring3的结合
- Java入门到精通——调错篇之EasyUI+SpringMVC Form表单提交到Contorller中文字出现乱码
- Java入门到精通——调错篇之EasyUI+SpringMVC Form表单提交到Contorller中文字出现乱码
- 【无私分享:从入门到精通ASP.NET MVC】从0开始,一起搭框架、做项目(5.1) 登录功能的实现,开始接触Spring IOC、DI
- Java入门到精通——调错篇之Spring2.5利用aspect实现AOP时报错: error at ::0 can't find referenced pointcut XXX
- Myeclipse——Spring 从入门到精通二 依赖注入
- Java入门到精通——框架篇之Spring源码分析Spring两大核心类
- Java入门到精通——调错篇之Spring2.5使用AOP时报错only available on JDK 1.5 and higher
- 【Spring源码从入门到精通】(七)获取Document
- Spring入门到精通(二)