linux下基于S3C2440的PWM蜂鸣器移植以及驱动程序分析
2017-04-20 22:37
609 查看
==========================================================================
主机操作系统:Centos 6.7
交叉编译器环境:arm-linux-gcc-4.5.4 (可通过命令/opt/buildroot-2012.08/arm920t/usr/bin/arm-linux-gcc -v查询)
开发板平台: fl2440
Linux内核版本: linux-3.0 .54
==========================================================================一、关于PWM:
PWM(Pulse Width Modulation)——脉宽调制,它是利用微控制器的数字输出来对模拟电路进行控制的一种非常有效的技术,广泛应用于测量、通信、功率控制与变换等许多领域。

通过S3C2440底板原理图可知蜂鸣器接2440的GPB0/TOUT0.即我们的蜂鸣器是通过GPB0 IO口使用PWM信号驱动工作的,而且GPB0口是一个复用的IO口,要使用它得把他设置成TOUT0 PWM输出模式。
蜂鸣器可以发声,靠的不仅仅是蜂鸣器硬件的驱动,还有Linux下的PWM(脉冲宽度调制)这种变频技术,靠改变脉冲宽度来控制输出电压,通过改变周期来控制其输出频率。通过改变频率可以使蜂鸣器发出不同的声音。
二、修改mach-smdk2440.c
[yangni@yangni linux-3.0.54]$ vim
./arch/arm/mach-s3c2440/mach-smdk2440.c
--- match.c	2017-04-19 12:33:47.962939139 -0800
+++ mach-smdk2440.c	2017-04-19 12:32:12.287934361 -0800
@@ -23,6 +23,7 @@
#include <linux/platform_device.h>
#include <linux/io.h>

+#include <linux/gpio.h>   //add beeper inlude file

#include <asm/mach/arch.h>
#include <asm/mach/map.h>
@@ -218,11 +219,24 @@
.id = -1,
};

+/**************************************************************/
+
+/*add the struct of beeper*/
+static struct platform_device smdk2440_beeper_device= {
+    .name= "pwm-beeper",
+    .dev= {
+        .parent = &s3c_device_timer[0].dev,//采用具有PWM脉冲宽度调制功能的定时器0;
+        .platform_data = 0,
+    },
+    .id= 0,
+};
+
+/* ******************* */

static struct platform_device *smdk2440_devices[]  __initdata = {
@@ -236,6 +250,9 @@
&uda1340_codec,
&s3c24xx_uda134x,
&samsung_asoc_dma,
+    //add for beeper
+    &s3c_device_timer,
+    &smdk2440_beeper_device,
};

static void __init smdk2440_map_io(void)
@@ -250,6 +267,11 @@
{
s3c24xx_fb_set_platdata(&smdk2440_fb_info);
s3c_i2c0_set_platdata(NULL);
+    //add for beeper
+    gpio_request(S3C2410_GPB(0),"beeper");
+    s3c_gpio_setpull(S3C2410_GPB(0), S3C_GPIO_PULL_NONE);
+    s3c_gpio_cfgpin(S3C2410_GPB(0), S3C2410_GPB0_TOUT0);

platform_add_devices(smdk2440_devices, ARRAY_SIZE(smdk2440_devices));
smdk_machine_init(); 根据补丁文件修改mach-smdk2440.c后,但为了把PWM蜂鸣器的通用驱动程序——Pwm-beeper.c添加到内核中,还需要修改/drivers/input/misc目录下的Kconfig文件。三、修改Kconfig文件:
将“ depends on HAVE_PWM ”
这句注释掉(在前面加#号)
[yangni@yangni linux-3.0.54]$ vim
drivers/input/misc/Kconfig

四、修改配置文件:
[b][yangni@yangni linux-3.0.54]$make
menuconfig
[/b]
SystemType --->
[ * ] PWM device support
DeviceDrivers --->
Input device support --->
[* ] Miscellaneous devices --->
< * > PWM beeper support
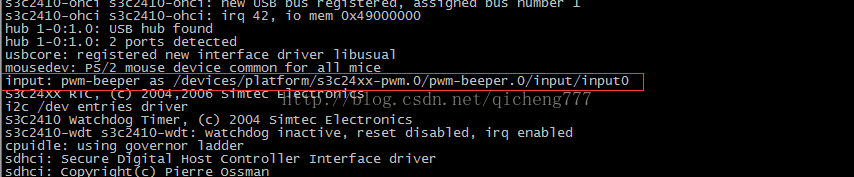
配置完成以后就可以make了,然后将重新编译好的内核下载到开发板上,开发板启动的时候会听到“滴”的一声响。并且,在开发板会打印出如下相关的信息:
五、测试程序:
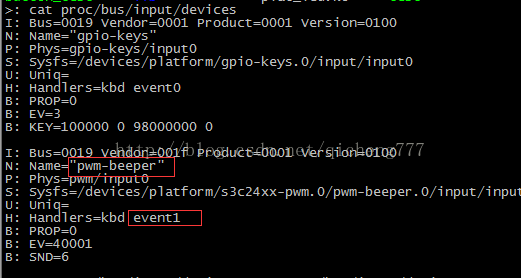
首先得查找出事件编号。因为后来移植过按键驱动,所以按键驱动被分配为input0了,导致后来再运行打开不了,所以测试程序写的时候,open的时候要open对。
cat proc/bus/input/devices
/*********************************************************************************
*      Copyright:  (C) 2017 qicheng
*                  All rights reserved.
*
*       Filename:  beer_test.c
*    Description:  This file
*
*        Version:  1.0.0(04/19/2017)
*         Author:  yangni <497049229@qq.com>
*      ChangeLog:  1, Release initial version on "04/19/2017 11:44:58 AM"
*
********************************************************************************/

#include<stdint.h>

#include<string.h>

#include<fcntl.h>

#include<unistd.h>

#include<stdio.h>

#include<linux/input.h>

#include<unistd.h>

int main(int argc, char *argv[])

{

int fd, version, ret;
int i;
struct input_event event;

if ((fd = open("/dev/event1", O_RDWR)) < 0) {

perror("beep test");

return 1;

}

event.type = EV_SND;
event.code = SND_TONE;

if(!strcmp (argv[1],"1"))
{
for(i=0;i<=7;i++)
{
event.value = 2000;   //打开蜂鸣器
ret = write(fd, &event, sizeof(struct input_event));
sleep(0.5);
event.value = 0;      //关闭蜂鸣器
ret = write(fd, &event, sizeof(struct input_event));
}
}

else if(!strcmp (argv[1],"0"))
{

event.value = 0;
ret = write(fd, &event, sizeof(struct input_event));
}

close(fd);

return 0;

} 从应用程序中得到的input_event.code只能为SND_BELL或SND_TONE,否则退出。如果为SND_BELL,不管input_event.value为多少,最终的value只能为1000或0,即不能改变蜂鸣器的频率。1000表示蜂鸣器打开,0表示蜂鸣器关闭。
如果为SND_TONE,则可以通过改变input_event.value的值来调整蜂鸣器的频率,从而发出各种不同的音调。
六、驱动程序分析:
该驱动程序位于:drivers/input/misc/pwm-beeper.c
[yangni@yangni linux-3.0.54]$ vim drivers/input/misc/pwm-beeper.c
/*
*  Copyright (C) 2010, Lars-Peter Clausen <lars@metafoo.de>
*  PWM beeper driver
*
*  This program is free software; you can redistribute it and/or modify it
*  under  the terms of the GNU General  Public License as published by the
*  Free Software Foundation;  either version 2 of the License, or (at your
*  option) any later version.
*
*  You should have received a copy of the GNU General Public License along
*  with this program; if not, write to the Free Software Foundation, Inc.,
*  675 Mass Ave, Cambridge, MA 02139, USA.
*
*/

#include <linux/input.h>
#include <linux/module.h>
#include <linux/kernel.h>
#include <linux/platform_device.h>
#include <linux/pwm.h>
#include <linux/slab.h>

struct pwm_beeper {
struct input_dev *input;
struct pwm_device *pwm;
unsigned long period;
};

#define HZ_TO_NANOSECONDS(x) (1000000000UL/(x))

//事件处理函数
static int pwm_beeper_event(struct input_dev *input,
unsigned int type, unsigned int code, int value)
{
int ret = 0;
struct pwm_beeper *beeper = input_get_drvdata(input);
unsigned long period;

if (type != EV_SND || value < 0)
return -EINVAL;         //若input_event.type不是EV_SND或input_event.value小于0,则退出

switch (code) {
case SND_BELL:
value = value ? 1000 : 0;
break;
case SND_TONE:
break;
default:
return -EINVAL;
}

if (value == 0) {
pwm_config(beeper->pwm, 0, 0);       //配置PWM函数
pwm_disable(beeper->pwm);            //关闭PWM函数
} else {
period = HZ_TO_NANOSECONDS(value);
ret = pwm_config(beeper->pwm, period / 2, period);
if (ret)
return ret;
ret = pwm_enable(beeper->pwm);
if (ret)
return ret;
beeper->period = period;
}

return 0;
}

static int __devinit pwm_beeper_probe(struct platform_device *pdev)
{
unsigned long pwm_id = (unsigned long)pdev->dev.platform_data;
struct pwm_beeper *beeper;
int error;

//为蜂鸣器设备开辟一段内存空间,并清零
beeper = kzalloc(sizeof(*beeper), GFP_KERNEL);
if (!beeper)
return -ENOMEM;

beeper->pwm = pwm_request(pwm_id, "pwm beeper");  //申请一个PWM设备

if (IS_ERR(beeper->pwm)) {
error = PTR_ERR(beeper->pwm);
dev_err(&pdev->dev, "Failed to request pwm device: %d\n", error);
goto err_free;
}

beeper->input = input_allocate_device();    //为输入设备结构体分配一个空间,并对其主要的成员进行了初始化.
if (!beeper->input) {
dev_err(&pdev->dev, "Failed to allocate input device\n");
error = -ENOMEM;
goto err_pwm_free;
}
beeper->input->dev.parent = &pdev->dev;       //将输入信息赋值到输入子系统

beeper->input->name = "pwm-beeper";
beeper->input->phys = "pwm/input0";
beeper->input->id.bustype = BUS_HOST;
beeper->input->id.vendor = 0x001f;
beeper->input->id.product = 0x0001;
beeper->input->id.version = 0x0100;
beeper->input->evbit[0] = BIT(EV_SND);
beeper->input->sndbit[0] = BIT(SND_TONE) | BIT(SND_BELL);
beeper->input->event = pwm_beeper_event; //给出 事件处理函数
input_set_drvdata(beeper->input, beeper);
error = input_register_device(beeper->input);
if (error) {
dev_err(&pdev->dev, "Failed to register input device: %d\n", error);
goto err_input_free;
}
platform_set_drvdata(pdev, beeper);
return 0;
err_input_free:
input_free_device(beeper->input);
err_pwm_free:
pwm_free(beeper->pwm);
err_free:
kfree(beeper);
return error;
}
//移除pwm设备
static int __devexit pwm_beeper_remove(struct platform_device *pdev)
{
struct pwm_beeper *beeper = platform_get_drvdata(pdev);
platform_set_drvdata(pdev, NULL);
input_unregister_device(beeper->input); //卸载输入子系统
pwm_disable(beeper->pwm);
pwm_free(beeper->pwm);
kfree(beeper);
return 0;
}
#ifdef CONFIG_PM
static int pwm_beeper_suspend(struct device *dev)
{
struct pwm_beeper *beeper = dev_get_drvdata(dev);
if (beeper->period)
pwm_disable(beeper->pwm);
return 0;
}
static int pwm_beeper_resume(struct device *dev)
{
struct pwm_beeper *beeper = dev_get_drvdata(dev);
if (beeper->period) {
pwm_config(beeper->pwm, beeper->period / 2, beeper->period);
pwm_enable(beeper->pwm);
}
return 0;
}
static SIMPLE_DEV_PM_OPS(pwm_beeper_pm_ops,
pwm_beeper_suspend, pwm_beeper_resume);
#define PWM_BEEPER_PM_OPS (&pwm_beeper_pm_ops)
#else
#define PWM_BEEPER_PM_OPS NULL
#endif
//创建平台驱动,此处name与上面我们在mach-smdk2440.c添加的名字相同,用于匹配
static struct platform_driver pwm_beeper_driver = {
.probe = pwm_beeper_probe,
.remove = __devexit_p(pwm_beeper_remove),
.driver = {
.name = "pwm-beeper",
.owner = THIS_MODULE,
.pm = PWM_BEEPER_PM_OPS,
},
};
//驱动入口
static int __init pwm_beeper_init(void)
{
return platform_driver_register(&pwm_beeper_driver); //注册平台驱动
}
module_init(pwm_beeper_init);
static void __exit pwm_beeper_exit(void)
{
platform_driver_unregister(&pwm_beeper_driver);
}
module_exit(pwm_beeper_exit);
MODULE_AUTHOR("Lars-Peter Clausen <lars@metafoo.de>");
MODULE_DESCRIPTION("PWM beeper driver");
MODULE_LICENSE("GPL");
MODULE_ALIAS("platform:pwm-beeper");
内核使能的是驱动,而设备是我们自己添加的。该驱动程序工作流程与之前的类似:
1、创建平台驱动 static struct platform_driver pwm_beeper_driver()
[b] [/b]平台驱动的成员
name要与上面我们在mach-smdk2440.c添加的设备机构体成员name名字相同,方便用于匹配。
2、注册平台驱动
pwm_beeper_init(void)中的函数platform_driver_register()函数用于驱动注册。
3、调用pwm_beeper_probe()函数
设备与驱动匹配后,会调用pwm_beeper_probe()函数。该驱动中probe函数主要是用于申请pwm设备以及给输入子系统赋值(指定事件处理函数)。
beeper->input->evbit[0] = BIT(EV_SND); beeper->input->sndbit[0] = BIT(SND_TONE) | BIT(SND_BELL);PWM蜂鸣器的事件类型为EV_SND,声音的类型为SND_TONE或SND_BELL
这两项内容就是我们在应用程序中要用到的input_event中的type和code
4、事件处理函数:
static int pwm_beeper_event(struct input_dev *input,
unsigned int type, unsigned int code, int value)
{
int ret = 0;
struct pwm_beeper *beeper = input_get_drvdata(input);
unsigned long period;

if (type != EV_SND || value < 0)
return -EINVAL;

switch (code) {
case SND_BELL:
value = value ? 1000 : 0;
break;
case SND_TONE:
break;
default:
return -EINVAL;
cda3
}

if (value == 0) {
pwm_config(beeper->pwm, 0, 0);       //配置PWM函数
pwm_disable(beeper->pwm);            //关闭PWM函数
} else {
period = HZ_TO_NANOSECONDS(value);
ret = pwm_config(beeper->pwm, period / 2, period);
if (ret)
return ret;
ret = pwm_enable(beeper->pwm);
if (ret)
return ret;
beeper->period = period;
}

return 0;
} 这里是应用程序调用的关键。首先通过判断事件类型event是不是EV_SND,不是则退出。如果是event是EV_SND类型,则接着判断声音类型code的值:
如果code为SND_BELL,不管input_event.value为多少,最终的value只能为1000或0,即不能改变蜂鸣器的频率。0表示关闭。
如果code为SND_TONE,则可以通过改变input_event.value的值来调整蜂鸣器的频率,从而发出各种不同的音调。
5、卸载平台驱动
pwm_beeper_exit(void)中的函数platform_driver_unregister函数用于驱动退出。
6、输入子系统简介:
Linux输入子系统包括三个层次:事件处理层(Event Handler)、核心层(Input
Core)和驱动层(Input Driver)。
1.事件处理层负责与用户程序打交道,将核心层传来的事件报告给用户程序。
2.核心层是链接其他两个层之间的纽带与桥梁,向下提供驱动层的接口,向上提供事件处理层的接口。
3.驱动层负责操作具体的硬件设备,这层的代码是针对具体的驱动程序的,键盘、鼠标、触摸屏等字符设备驱动功能的实现工作主要就在这层。
输入子系统有三个核心结构体:input_dev,input_handle和input_handler。input_dev表示一个输入设备,包含输入设备的一些相关信息;input_handler表示对输入事件的具体处理,它为输入设备的功能实现了一个接口;input_handle是用来连接输入设备和输入事件。输入子系统主要的任务就是把这三个结构体连接在一起。
总结:
该驱动新的知识点主要涉及申请pwm设备以及对事件处理函数的理解,还有就是输入子系统的使用,输入子系统详细使用可参考博客:
http://blog.csdn.net/lbmygf/article/details/7360084
[b] [/b]
本文参考博客:http://blog.csdn.net/zhaocj/article/details/8843892
http://blog.csdn.net/lyx_win/article/details/52248006

相关文章推荐
- 基于S3C2440的Linux-3.6.6移植 PWM蜂鸣器驱动
- 基于S3C2440的Linux-3.6.6移植——PWM蜂鸣器驱动
- s3c2440 linux3.0下PWM使用之蜂鸣器驱动移植
- linux-2.6.32在mini2440开发板上移植(10)之触摸屏工作原理以及驱动程序详细分析
- linux-2.6.32在mini2440开发板上移植(10)之触摸屏工作原理以及驱动程序详细分析
- linux-2.6.32在mini2440开发板上移植---触摸屏工作原理以及驱动程序详细分析
- 基于Linux2.6.22.6内核的S3C2440的触摸屏驱动程序分析
- linux-2.6.32在mini2440开发板上移植(10)之触摸屏工作原理以及驱动程序详细分析
- 基于S3C2440的Linux内核移植和yaffs2文件系统制作--内核移植
- Linux-2.6.32.2内核在mini2440上的移植(十七)---移植PWM控制蜂鸣器驱动
- 基于S3C2440的linux-3.6.6移植——LED驱动
- 基于S3C2440的Linux内核移植和yaffs2文件系统制作--Bootloader的功能
- 基于S3C2440的Linux内核移植和yaffs2文件系统制作--修改Linux源码参数
- Linux-2.6.32.2内核在mini2440上的移植(十七)---移植PWM控制蜂鸣器驱动
- 基于S3C2440的Linux内核移植和yaffs2文件系统制作--制作根文件系统
- Linux芯片级移植与底层驱动(基于3.7.4内核) --SMP多核启动以及CPU热插拔驱动 推荐
- 基于S3C2440的Linux内核移植和yaffs2文件系统制作--Linux内核移植
- 基于linux下的dm9000网卡移植全分析
- 基于S3C2440的Linux内核移植和yaffs2文件系统制作-- 配置Linux内核
- Linux下IIS音频驱动程序分析(基于S3C2410+ UDA1341)