android组件ListView之SimpleAdapter简单使用
2017-04-20 20:31
471 查看
SimpleAdapter
java.lang.Object↳ android.widget.BaseAdapter
↳ android.widget.SimpleAdapter
ArrayAdapter只能适配简单的数据,而SimpleAdapter相对来说可以丰富列表项的内容,比如我们常见的QQ,微信,新闻列表。
SimpleAdapter 只有一个构造函数
SimpleAdapter(Context context, List<? extends Map<String, ?>> data, int resource, String[] from, int[] to)
从构造函数的参数可以初步理解下参数的意思,data数据、resource列表项的文件、from展示的数据、to数据展示的地方。下面代码中详细说明各个参数的作用。
Activity类
public class MainActivity extends Activity {
private ListView listView;
private List<Map<String, Object>> list;

@Override
protected void onCreate(Bundle savedInstanceState) {
super.onCreate(savedInstanceState);
setContentView(R.layout.activity_main);
listView = (ListView) findViewById(R.id.lv);
initDataList();
// key值数组,适配器通过key值取value,与列表项组件一一对应
String[] from = { "img", "title", "content", "date" };
// 列表项组件Id 数组
int[] to = { R.id.item_img, R.id.item_title, R.id.item_content,
R.id.item_date };
/**
* SimpleAdapter(Context context, List<? extends Map<String, ?>> data, int resource, String[] from, int[] to)
* context:activity界面类
* data 数组内容是map的集合数据
* resource 列表项文件
* from map key值数组
* to 列表项组件id数组      from与to一一对应,适配器绑定数据
*/
final SimpleAdapter adapter = new SimpleAdapter(this, list,
R.layout.listview_item, from, to);

listView.setAdapter(adapter);
/**
* 单击
*/
listView.setOnItemClickListener(new OnItemClickListener() {
@Override
public void onItemClick(AdapterView<?> arg0, View arg1, int arg2,
long arg3) {
Map<String, Object> map = list.get(arg2);
String str = "";
str += map.get("title") + "---" + map.get("content") + "\n"
+ "长按删除!";
Toast.makeText(MainActivity.this, str, Toast.LENGTH_SHORT)
.show();

}
});
/**
* 长按
*/
listView.setOnItemLongClickListener(new OnItemLongClickListener() {

@Override
public boolean onItemLongClick(AdapterView<?> arg0, View arg1,
int arg2, long arg3) {
list.remove(arg2);
adapter.notifyDataSetChanged();// 更新列表数据
Toast.makeText(MainActivity.this, "删除成功!", Toast.LENGTH_SHORT)
.show();
return false;
}
});

}

/**
* 初始化适配器需要的数据格式
*/
private void initDataList() {
//图片资源
int img[] = { R.drawable.i1, R.drawable.i2, R.drawable.i3,
R.drawable.i4, R.drawable.i5, R.drawable.i6, R.drawable.i7,
R.drawable.i8, R.drawable.i9, R.drawable.i10 };
list = new ArrayList<Map<String, Object>>();
for (int i = 0; i < 10; i++) {
Map<String, Object> map = new HashMap<String, Object>();
map.put("img", img[i]);
map.put("title", "android" + i);
map.put("content", "SimpleAdapter" + i);
map.put("date",
new SimpleDateFormat("yyyy-MM-dd").format(new Date()));
list.add(map);
}

}

}
主界面activity_main.xml
<LinearLayout xmlns:android="http://schemas.android.com/apk/res/android"
xmlns:tools="http://schemas.android.com/tools"
android:id="@+id/container"
android:layout_width="match_parent"
android:layout_height="match_parent"
tools:context="com.example.l6.MainActivity"
android:orientation="vertical">
<ListView
android:id="@+id/lv"
android:layout_width="wrap_content"
android:layout_height="wrap_content"
>

</ListView>

</LinearLayout>
列表项文件listview_item.xml
<RelativeLayout xmlns:android="http://schemas.android.com/apk/res/android"
xmlns:tools="http://schemas.android.com/tools"
android:layout_width="match_parent"
android:layout_height="match_parent" >

<LinearLayout
android:layout_width="wrap_content"
android:layout_height="wrap_content"
android:orientation="horizontal" >

<ImageView
android:id="@+id/item_img"
android:layout_width="48dp"
android:layout_height="48dp"
android:src="@drawable/ic_launcher" />

<LinearLayout
android:layout_width="wrap_content"
android:layout_height="wrap_content"
android:orientation="vertical" >

<TextView
android:id="@+id/item_title"
android:layout_width="wrap_content"
android:layout_height="wrap_content"
android:text="标题"
android:textColor="#F00"
android:textSize="20sp" />

<TextView
android:id="@+id/item_content"
android:layout_width="wrap_content"
android:layout_height="wrap_content"
android:text="内容"
android:textColor="#000"
android:textSize="16sp" />
</LinearLayout>
</LinearLayout>

<TextView
android:id="@+id/item_date"
android:layout_width="wrap_content"
android:layout_height="wrap_content"
android:layout_alignParentBottom="true"
android:layout_alignParentRight="true"
android:text="时间"
android:textColor="#0FF"
android:textSize="16sp" />

</RelativeLayout>
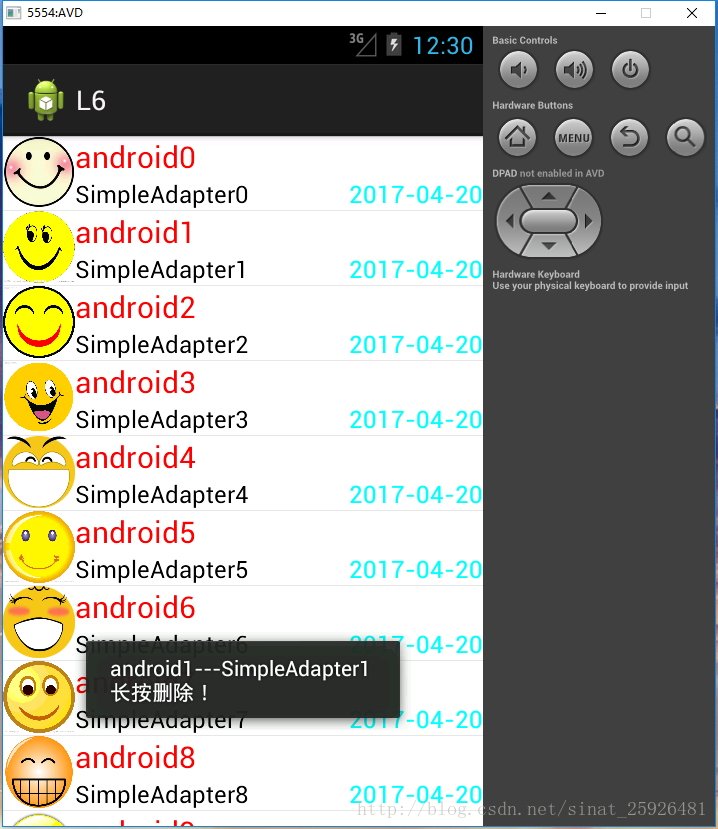
效果

相关文章推荐
- android组件ListView之BaseAdapter简单使用
- android组件ListView之ArrayAdapter简单使用
- android——ListView(使用simpleCursorAdapter)
- Android Common Layout 和 Adapter Layout 简单介绍(及ListView的简单使用)(一)
- marsAndroid学习——常见控件ExpandableListActivityh和SimpleExpandableListAdapter的简单使用
- Android SimpleAdapter应用介绍,代码+解释 ListView使用+滚动监听用scoll
- Android之ListView使用方法-ArrayAdapter-SimpleAdapter-BaseAdapter
- Android杂谈--ListView之SimpleAdapter的使用
- android Adapter综合使用(ArrayAdapter、SimpleAdapter、BaseAdapter在ListView和GridView中的使用)
- 一看就会Android之列表视图组件ListView结合Adapter的使用及监听
- 【Android基础】listview控件的使用(3)------Map与SimpleAdapter组成的多显示条目的Listview
- Android杂谈--ListView之SimpleAdapter的使用
- android 使用SimpleCursorAdapter将SQLite数据显示到ListView
- Android杂谈--ListView之SimpleAdapter的使用
- Android 之 ListView使用SimpleAdapter展示列表
- Android实例demo11之listview的简单使用(arrayadapter、simpleadapter)
- Android 中 ListAactivity 和Activity 使用ListView 以及ArrayAdapter和SimpleAdapter参数详解
- android中,用SimpleAdapter创建有自己布局的listView,以及listView的修改更新notifyDataSetChanged()的使用。
- android ListView使用的三种方法汇总(通过继承BaseAdapter,使用SimpleAdapter和SimpleCursorAdapter)
- Android之ListView使用方法-SimpleAdapter-SimpleCursorAdapter