Spring Boot 整合MyBatis
2017-04-17 00:00
736 查看
Spring Boot官方提供了Spring Data的支持,但是却没有提供MyBatis的支持。
因为,Spring Data是Spring旗下的子产品,而MyBatis却不是。
本文通过一个小例子来实现Spring Boot 与MyBatis的整合。
加入maven依赖
Spring Boot官方提供的starter是这样的:spring-boot-starter-*
而其他第三方提供的starter是这样的:*-spring-boot-starter
编写实体类
编写持久层
Spring Boot的启动程序
@MapperScan指定要扫描的XxxMapper.java文件
在src/main/resources/下创建包 org.yun.mapper(与EmpMapper.java的包同名)
然后,建立EmpMapper.xml文件
编写application.properties
创建数据表schema.sql
初始化数据data.sql
将schema.sql、data.sql(名字固定)文件放置在src/main/resources下目录,Spring Boot启动的时候会自动执行。
最后编写单元测试
参考资料:
https://github.com/mybatis/spring-boot-starter/wiki/Quick-Start
http://www.mybatis.org/spring-boot-starter/mybatis-spring-boot-autoconfigure/index.html
补充:
在实际项目中一般都会使用Mybatis Generator来实现实体类、映射文件的生成。
那具体怎么操作呢?以MySQL数据库为例。
取消h2内存数据库驱动的依赖,加入MySQL数据库驱动的依赖。
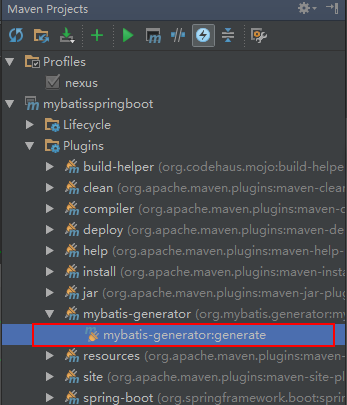
同时添加以一个Mybatis Generator插件
编写mybatis的文件生成配置文件:generatorConfig.xml
使用IDA右键执行,即可实现代码生成。
会生成如下代码
因为,Spring Data是Spring旗下的子产品,而MyBatis却不是。
本文通过一个小例子来实现Spring Boot 与MyBatis的整合。
加入maven依赖
<!-- mybatis整合spring boot的starter -->
<dependency>
<groupId>org.mybatis.spring.boot</groupId>
<artifactId>mybatis-spring-boot-starter</artifactId>
<version>1.3.0</version>
</dependency>

<dependency>
<groupId>com.h2database</groupId>
<artifactId>h2</artifactId>
<scope>runtime</scope>
</dependency>

<dependency>
<groupId>org.springframework.boot</groupId>
<artifactId>spring-boot-starter-test</artifactId>
<scope>test</scope>
</dependency>
Spring Boot官方提供的starter是这样的:spring-boot-starter-*
而其他第三方提供的starter是这样的:*-spring-boot-starter
编写实体类
public class Emp {

private Long id;
private String name;
private Date birthday;
private Double salary;

public Emp() {
}

public Emp(String name, Date birthday, Double salary) {
this.name = name;
this.birthday = birthday;
this.salary = salary;
}

//getter and setter
}
编写持久层
public interface EmpMapper {

List<Emp> findAll();

Emp findById(Long id);

void save(Emp emp);

void update(Emp emp);

void delete(Long id);
}
Spring Boot的启动程序
@MapperScan("org.yun.mapper")
@SpringBootApplication
public class Application {

public static void main(String[] args) {
SpringApplication.run(Application.class, args);
}
}
@MapperScan指定要扫描的XxxMapper.java文件
在src/main/resources/下创建包 org.yun.mapper(与EmpMapper.java的包同名)
然后,建立EmpMapper.xml文件
<?xml version="1.0" encoding="UTF-8" ?>
<!DOCTYPE mapper PUBLIC "-//mybatis.org//DTD Mapper 3.0//EN" "http://mybatis.org/dtd/mybatis-3-mapper.dtd" >
<mapper namespace="org.yun.mapper.EmpMapper">

<sql id="baseSql">
id,name,birthday,salary
</sql>

<select id="findAll" resultType="org.yun.domain.Emp">
select
<include refid="baseSql"/>
from emp
</select>

<select id="findById" parameterType="long" resultType="org.yun.domain.Emp">
select
<include refid="baseSql"/>
from emp
where id = #{id}
</select>

<insert id="save" parameterType="org.yun.domain.Emp" keyProperty="id" useGeneratedKeys="true">
insert into emp(name,birthday,salary)values(#{name},#{birthday},#{salary})
</insert>

<update id="update" parameterType="org.yun.domain.Emp">
update emp set name = #{name},birthday = #{birthday},salary = #{salary}
where id = #{id}
</update>

<delete id="delete" parameterType="long">
delete from emp where id = #{id}
</delete>

</mapper>
编写application.properties
#指定实体类的名别包
mybatis.type-aliases-package=org.yun.domain

#指定XxxMapper.xml的位置
#mybatis.mapper-locations=classpath:org/yun/mapper/*Mapper.xml
创建数据表schema.sql
CREATE TABLE emp (
id       BIGINT PRIMARY KEY AUTO_INCREMENT,
name     VARCHAR(30),
birthday DATE,
salary   DOUBLE
);
初始化数据data.sql
insert into emp(name,birthday,salary)values('admin','1999-09-09',9000);将schema.sql、data.sql(名字固定)文件放置在src/main/resources下目录,Spring Boot启动的时候会自动执行。
最后编写单元测试
import static org.junit.Assert.assertNotNull;
import static org.junit.Assert.assertTrue;

@RunWith(SpringRunner.class)
@SpringBootTest
public class ApplicationTests {

@Autowired
private EmpMapper empMapper;

@Test
public void contextLoads() {
assertNotNull(empMapper);

Emp emp1 = new Emp("tom", new Date(), 5000D);
Emp emp2 = new Emp("bill", new Date(), 6000D);
empMapper.save(emp1);
empMapper.save(emp2);

assertTrue(empMapper.findAll().size() == 3);

Emp emp = empMapper.findById(2L);
emp.setSalary(8000D);
empMapper.update(emp);
assertTrue(emp.getSalary() == 8000D);

empMapper.delete(2L);
assertTrue(empMapper.findAll().size() == 2);
}
}
参考资料:
https://github.com/mybatis/spring-boot-starter/wiki/Quick-Start
http://www.mybatis.org/spring-boot-starter/mybatis-spring-boot-autoconfigure/index.html
补充:
在实际项目中一般都会使用Mybatis Generator来实现实体类、映射文件的生成。
那具体怎么操作呢?以MySQL数据库为例。
<!--<dependency>
<groupId>com.h2database</groupId>
<artifactId>h2</artifactId>
<scope>runtime</scope>
</dependency>-->

<dependency>
<groupId>mysql</groupId>
<artifactId>mysql-connector-java</artifactId>
<version>5.1.41</version>
<scope>runtime</scope>
</dependency>
取消h2内存数据库驱动的依赖,加入MySQL数据库驱动的依赖。
同时添加以一个Mybatis Generator插件
<plugin>
<groupId>org.mybatis.generator</groupId>
<artifactId>mybatis-generator-maven-plugin</artifactId>
<version>1.3.2</version>
<dependencies>
<dependency>
<groupId>mysql</groupId>
<artifactId>mysql-connector-java</artifactId>
<version>5.1.41</version>
</dependency>
</dependencies>
</plugin>
编写mybatis的文件生成配置文件:generatorConfig.xml
<?xml version="1.0" encoding="UTF-8"?>
<!DOCTYPE generatorConfiguration
PUBLIC "-//mybatis.org//DTD MyBatis Generator Configuration 1.0//EN"
"http://mybatis.org/dtd/mybatis-generator-config_1_0.dtd">
<generatorConfiguration>
<!--加载jdbc属性文件-->
<properties resource="application.properties"/>
<context id="DB2Tables" targetRuntime="MyBatis3" defaultModelType="flat">
<!--缓存 暂时不加-->
<!--<plugin type="org.mybatis.generator.plugins.CachePlugin"/>-->
<!--重写equals()和hashCode()-->
<plugin type="org.mybatis.generator.plugins.EqualsHashCodePlugin"/>
<!-- 分页 -->
<plugin type="org.mybatis.generator.plugins.RowBoundsPlugin"/>
<!--序列化-->
<plugin type="org.mybatis.generator.plugins.SerializablePlugin"/>
<!--重写toString()-->
<plugin type="org.mybatis.generator.plugins.ToStringPlugin"/>
<!-- 注释 -->
<commentGenerator>
<!-- 是否取消注释 -->
<property name="suppressAllComments" value="true"/>
<!-- 是否生成注释代时间戳-->
<property name="suppressDate" value="true"/>
</commentGenerator>
<!--数据库链接URL,用户名、密码 -->
<jdbcConnection driverClass="${spring.datasource.driver-class-name}"
connectionURL="${spring.datasource.url}"
userId="${spring.datasource.username}"
password="${spring.datasource.password}"/>
<!-- 类型解析器 -->
<!-- 默认false:把JDBC DECIMAL 和 NUMERIC 类型解析为java.lang.Integer
true:把JDBC DECIMAL 和 NUMERIC 类型解析为java.math.BigDecimal
-->
<javaTypeResolver>
<property name="forceBigDecimals" value="false"/>
</javaTypeResolver>
<!-- 生成model的包名和位置 -->
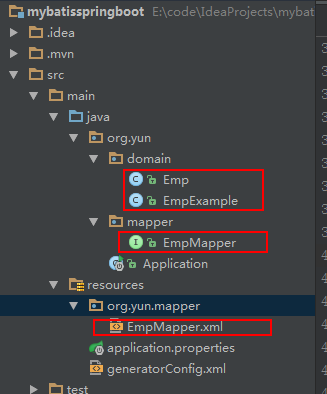
<javaModelGenerator targetPackage="org.yun.domain"
targetProject="src\main\java">
<!-- 是否让schema作为包的后缀 -->
<property name="enableSubPackages" value="true"/>
<!-- 从数据库返回的值被清理前后的空格 -->
<property name="trimStrings" value="true"/>
</javaModelGenerator>
<!-- 生成 xxxMapper.xml文件的包名和位置 -->
<sqlMapGenerator targetPackage="org.yun.mapper"
targetProject="src\main\resources"> <!-- 这里一定是src/main/resources目录 -->
<property name="enableSubPackages" value="true"/>
</sqlMapGenerator>
<!-- 生成xxxMapper的包名和位置 -->
<javaClientGenerator type="XMLMAPPER"
targetPackage="org.yun.mapper"
targetProject="src\main\java">
<property name="enableSubPackages" value="true"/>
</javaClientGenerator>
<!-- 要生成哪些表 -->
<table tableName="emp" domainObjectName="Emp"/>
</context>
</generatorConfiguration>使用IDA右键执行,即可实现代码生成。
会生成如下代码

相关文章推荐
- Spring boot +freemarker+mybatis整合
- Spring Boot 整合Mybatis(步骤讲解) 附源码
- springBoot整合mybatis
- springboot学习笔记-2 一些常用的配置以及整合mybatis
- springboot与mybatis整合实例详解(完美融合)
- springboot 整合mybatis
- Spring Boot学习第三篇:Spring Boot整合Mybatis、和其他
- springBoot与MyBatis整合示例
- spring-boot整合mybatis打包war包
- spring boot 学习笔记(2) 整合mybatis
- Spring boot 整合mybatis
- spring-boot与mybatis整合优化介绍
- springboot与mybatis整合实例详解(完美融合)
- SpringBoot入门之整合mybatis
- spring boot和mybatis整合
- Spring Boot学习记录(三)--整合Mybatis
- Spring Boot整合MyBatis
- SpringBoot整合Mybatis示例
- springboot整合mybatis中的坑
- Spring Boot整合MyBatis