android自动化测试CTS源码分析之三
2017-04-16 09:29
405 查看
4 测试项解析
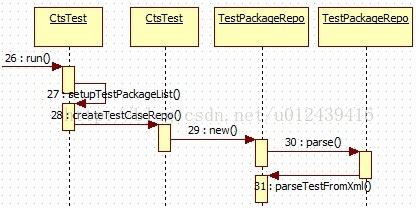
CtsTest的setupTestPackageList方法首先调用createTestCaseRepo方法收集CTS的所有测试项,然后根据CTS命令进行过滤,最后生成测试项。流程图如下,
4.1 所有测试项
CtsTest的createTestCaseRepo方法如下,ITestPackageRepo createTestCaseRepo() {
return new TestPackageRepo(mCtsBuild.getTestCasesDir(), mIncludeKnownFailures);
}传入所有测试项的路径---android-cts/repository/testcases
在linux环境下,路径为: android-cts/repository/plans
在该路径下,一个xml文件就是一个plan。其中Android.xml文件如下,
<TestPlan version="1.0">
<Entry name="android.JobScheduler"/>
<Entry name="android.aadb"/>
<Entry name="android.acceleration"/>
<Entry name="android.accessibility"/>
<Entry name="android.accessibilityservice"/>
<Entry name="android.accounts"/>
<Entry name="android.admin"/>
<Entry name="android.adminhostside"/>
<Entry name="android.animation"/>
<Entry name="android.app"/>
<Entry name="android.app.usage"/>
<Entry name="android.appwidget"/>
<Entry name="android.bionic"/>
<Entry name="android.bluetooth"/>
••••
其中一个Entry对应一个测试文件,
<Entry name="android.bluetooth"/>
对应哪个文件呢? 需要在android-cts/repository/testcases路径下查找。
"android.bluetooth"并不是说对应的xml文件名称为android.bluetooth,而是xml文件对应的appPackageName的值是"android.bluetooth"
CtsBluetoothTestCases.xml文件如下,
<?xml version="1.0" encoding="UTF-8"?>
<TestPackage appNameSpace="com.android.cts.bluetooth" appPackageName="android.bluetooth" name="CtsBluetoothTestCases" runner="android.support.test.runner.AndroidJUnitRunner" version="1.0">
<TestSuite name="android">
<TestSuite name="bluetooth">
<TestSuite name="cts">
<TestCase name="BasicAdapterTest">
<Test name="testAndroidTestCaseSetupProperly" abis="armeabi-v7a, arm64-v8a" />
<Test name="test_checkBluetoothAddress" abis="armeabi-v7a, arm64-v8a" />
<Test name="test_enableDisable" abis="armeabi-v7a, arm64-v8a" />
<Test name="test_getAddress" abis="armeabi-v7a, arm64-v8a" />
<Test name="test_getBondedDevices" abis="armeabi-v7a, arm64-v8a" />
<Test name="test_getDefaultAdapter" abis="armeabi-v7a, arm64-v8a" />
<Test name="test_getName" abis="armeabi-v7a, arm64-v8a" />
<Test name="test_getRemoteDevice" abis="armeabi-v7a, arm64-v8a" />
<Test name="test_listenUsingRfcommWithServiceRecord" abis="armeabi-v7a, arm64-v8a" />
</TestCase>
</TestSuite>
</TestSuite>
</TestSuite>
</TestPackage>
说明, Entry name="android.bluetooth"对应的xml文件为CtsBluetoothTestCases.xml,
并且还可以看到, CtsBluetoothTestCases.xml文件中一共有9个测试项。
在完整的CTS测试中,一个测试项需要测试2次,一次是32位,一次是64位的。
回到源码中, TestPackageRepo的构造方法如下,
public TestPackageRepo(File testCaseDir, boolean includeKnownFailures) {
mTestMap = new HashMap<>();
mIncludeKnownFailures = includeKnownFailures;
parse(testCaseDir); // 根据路径开始解析
}
parse方法如下,
private void parse(File dir) {
File[] xmlFiles = dir.listFiles(new XmlFilter());//获取所有xml文件
for (File xmlFile : xmlFiles) {
parseTestFromXml(xmlFile);// 逐个解析
}
}
parseTestFromXml方法如下,
private void parseTestFromXml(File xmlFile)  {
TestPackageXmlParser parser = new TestPackageXmlParser(mIncludeKnownFailures);
try {
parser.parse(createStreamFromFile(xmlFile));
Set<TestPackageDef> defs = parser.getTestPackageDefs();
if (defs.isEmpty()) {
Log.w(LOG_TAG, String.format("Could not find test package info in xml file %s",
xmlFile.getAbsolutePath()));
}
for (TestPackageDef def : defs) {
String name = def.getAppPackageName();
String abi = def.getAbi().getName();
if (!mTestMap.containsKey(abi)) {
mTestMap.put(abi, new HashMap<String, TestPackageDef>());
}
mTestMap.get(abi).put(name, def);
}
} catch (FileNotFoundException e) {
Log.e(LOG_TAG, String.format("Could not find test case xml file %s",
xmlFile.getAbsolutePath()));
Log.e(LOG_TAG, e);
} catch (ParseException e) {
Log.e(LOG_TAG, String.format("Failed to parse test case xml file %s",
xmlFile.getAbsolutePath()));
Log.e(LOG_TAG, e);
}
}
利用TestPackageXmlParser将xml文件解析保存到TestPackageXmlParser的变量
mPackageDefs中,该变量是一个HashMap。
private Map<String, TestPackageDef> mPackageDefs = new HashMap<String, TestPackageDef>();
一般一个xml文件对应一个TestPackageDef类,将xml文件的所有信息都保存在TestPackageDef中。
最后所有xml文件解析完成之后保存在TestPackageRepo的变量mTestMap中。
private final Map<String, Map<String, TestPackageDef>> mTestMap;
4.2 抽出plan测试项
CtsTest的setupTestPackageList方法如下,private void setupTestPackageList(Set<String> abis) throws DeviceNotAvailableException {
if (!mTestPackageList.isEmpty()) {
Log.logAndDisplay(LogLevel.INFO, LOG_TAG, "Resume tests using existing package list");
return;
}
try {
// Collect ALL tests
ITestPackageRepo testRepo = createTestCaseRepo(); // 解析所有测试项
List<ITestPackageDef> testPkgDefs = new ArrayList<>(getAvailableTestPackages(testRepo));
testPkgDefs = filterByAbi(testPkgDefs, abis);
// Note: run() relies on the fact that the list is reliably sorted for sharding purposes
Collections.sort(testPkgDefs);
// Create test package list.
List<TestPackage> testPackageList = new ArrayList<>();
for (ITestPackageDef testPackageDef : testPkgDefs) {
// Note: createTest filters the test list inside of testPackageDef by exclusion list
IRemoteTest testForPackage = testPackageDef.createTest(mCtsBuild.getTestCasesDir());
if (testPackageDef.getTests().size() > 0) {
testPackageList.add(new TestPackage(testPackageDef, testForPackage));
}
}
// Filter by shard
int numTestPackages = testPackageList.size();
int totalShards = Math.min(mTotalShards, numTestPackages);
List<TestPackage> shardTestPackageList = new ArrayList<>();
for (int i = mShardAssignment; i < numTestPackages; i += totalShards) {
shardTestPackageList.add(testPackageList.get(i));
}
mTestPackageList.addAll(shardTestPackageList);
} catch (FileNotFoundException e) {
throw new IllegalArgumentException("failed to find test plan file", e);
} catch (ParseException e) {
throw new IllegalArgumentException("failed to parse test plan file", e);
} catch (ConfigurationException e) {
throw new IllegalArgumentException("failed to process arguments", e);
}
}首先调用getAvailableTestPackages方法解析plan的测试方法,然后从所有测试方法中抽出有效的plan方法。
最后存放在CtsTest的变量mTestPackageList中。
private List<TestPackage> mTestPackageList = new ArrayList<>();
并且,一个测试项对应一个TestPackage对象。

相关文章推荐
- android自动化测试CTS源码分析之一
- android自动化测试CTS源码分析之五
- Android call setting 源码分析 从顶层到底层(下)
- Android IPC 通讯机制源码分析
- Android IPC 通讯机制源码分析
- Android App 源码分析(贪吃蛇游戏)
- Android 2.1 源码结构分析
- Android 源码分析-打电话和发短信
- Android framework源码之JNI实现过程分析
- Android IPC 通讯机制源码分析 (二)
- Android IPC 通讯机制源码分析2(转)
- Android IPC 通讯机制源码分析 (二)
- Android 源码分析-打电话和发短信
- Android 2.1 源码结构分析
- Android 2.1 源码结构分析 转载
- Android IPC 通讯机制源码分析(1)
- Android IPC 通讯机制源码分析 二
- Android IPC 通讯机制源码分析
- Android 2.1 源码结构分析 转载