Nginx学习笔记(1)
2017-04-13 17:28
141 查看
Nginx配置文件详解:
配置文件参考:http://blog.csdn.net/tjcyjd/article/details/50695922
Nginx虚拟主机(三种方式):
一个server标签就是一个虚拟主机
1、基于域名的虚拟主机。通过域名来区分虚拟主机
===》应用:外部网站(重要)
小例子:
去掉注释和空白符:
nginx配置文件:
创建目录以及赋予权限:
检测配置文件:
修改host文件:
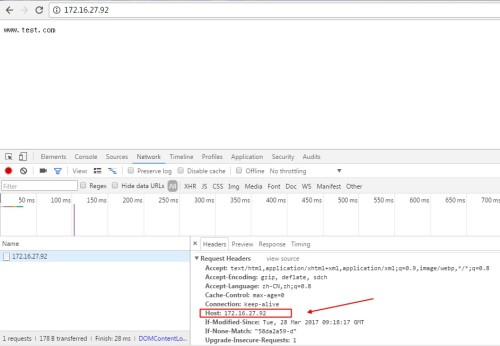
基于域名的虚拟主机访问原理: 是通过请求头的host来辨别
简单测试方法:
步骤一:在win7 host文件中修改为:
(1)、当访问172.16.27.XX时,得到的是www.test.com,主机是基于域名的虚拟主机,所以访问ip之后,请求后host传参是172.16.27.xx,默认读取第一个虚拟主机
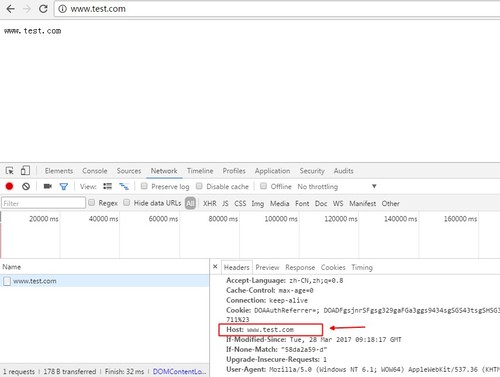
(2)、访问www.test.com
(3)访问bbs.baidu.com

2、基于端口的虚拟主机。通过端口区分虚拟主机
===》应用:公司内部网站(重要)
nginx.conf配置文件
访问网址:
3、基于IP的虚拟主机。几乎不用。不支持ifconfig别名,需要用ip命令,配置文件可以。
创建虚拟主机配置文件
检测配置文件与虚拟主机访问测试
Nginx别名作用及配置当你访问baidu.com的时候能跳转到www.baidu.com 类似这样的实例,一般有两种方式:1、捕捉301代码实现跳转 2、Nginx别名的配置与DNS中A记录添加域名
nginx.conf
测试修改host文件,添加test.com
Nginx状态信息配置及信息详解说明:
http_stub_status模块能够获取Nginx的并发连接,请求等。
因 此模块非核心模块,所以需要在编译的时候需手动添加编译参数–with-http_stub_status_module
编译:
nginx.conf
extra目录下的status.conf文件
检查:(测试前修改host文件或DNS的A记录)
分析:
nginx日志配置指令详解
日志对于统计排错来说非常有利的。本文总结了nginx日志相关的配置如access_log、log_format、open_log_file_cache、log_not_found、log_subrequest、rewrite_log、error_log。nginx有一个非常灵活的日志记录模式。每个级别的配置可以有各自独立的访问日志。日志格式通过log_format命令来定义。ngx_http_log_module是用来定义请求日志格式的。
1. log_format指令
注意:日志格式可参考nginx.conf.defualt文件
语法: log_format name string …;
默认值: log_format combined “…”;
配置段: httpname表示格式名称,string表示等义的格式。log_format有一个默认的无需设置的combined日志格式,相当于apache的combined日志格式,如下所示:nginx.conf
如果nginx位于负载均衡器,squid,nginx反向代理之后,web服务器无法直接获取到客户端真实的IP地址了。 $remote_addr获取反向代理的IP地址。反向代理服务器在转发请求的http头信息中,可以增加信息$http_x_forwarded_for,用来记录 客户端IP地址和客户端请求的服务器地址
日志格式允许包含的变量注释如下:
2. access_log指令语法: access_log path [format [buffer=size [flush=time]]];
access_log path format gzip[=level] [buffer=size] [flush=time];
access_log syslog:server=address[,parameter=value] [format];
access_log off;
默认值: access_log logs/access.log main;
配置段: http, server, location, if in location, limit_except
gzip压缩等级。
buffer设置内存缓存区大小。
flush保存在缓存区中的最长时间。
不记录日志:access_log off;
使用默认main格式记录日志:access_log logs/access.log 或 access_log logs/access.log main;注意:根据如上include extra/www.conf
* ~ 为区分大小写匹配
* ~* 为不区分大小写匹配
* !~和!~*分别为区分大小写不匹配及不区分大小写不匹配
二.文件及目录匹配,其中:
* -f和!-f用来判断是否存在文件
* -d和!-d用来判断是否存在目录
* -e和!-e用来判断是否存在文件或目录
* -x和!-x用来判断文件是否可执行
三.rewrite指令的最后一项参数为flag标记,flag标记有:
1.last 相当于apache里面的[L]标记,表示rewrite。
2.break本条规则匹配完成后,终止匹配,不再匹配后面的规则。
3.redirect 返回302临时重定向,浏览器地址会显示跳转后的URL地址。
4.permanent 返回301永久重定向,浏览器地址会显示跳转后的URL地址。
实例:nginx 301跳转到带www域名方法rewrite
www.conf
配置文件参考:http://blog.csdn.net/tjcyjd/article/details/50695922
Nginx虚拟主机(三种方式):
一个server标签就是一个虚拟主机
1、基于域名的虚拟主机。通过域名来区分虚拟主机
===》应用:外部网站(重要)
小例子:
去掉注释和空白符:
egrep -v "#|^$" nginx.conf.default > nginx.conf
nginx配置文件:
worker_processes  1;

events {
worker_connections  1024;
}
http {
include       mime.types;
default_type  application/octet-stream;
sendfile        on;
keepalive_timeout  65;

server {
listen       80;
server_name  www.test.com;
location / {
root    html/test/www;
index  index.html index.htm;
}
error_page   500 502 503 504  /50x.html;
location = /50x.html {
root   html;
}
}

server {
listen       80;
server_name  bbs.test.com;
location / {
root   html/test/bbs;
index  index.html index.htm;
}
error_page   500 502 503 504  /50x.html;
location = /50x.html {
root   html;
}
}

}
创建目录以及赋予权限:
[root@localhost nginx]# mkdir /usr/local/nginx/html/test/{bbs,www}

[root@localhost nginx]# echo "www.test.com" > /usr/local/nginx/html/test/www/index.html

[root@localhost nginx]# echo "bbs.test.com" > /usr/local/nginx/html/test/bbs/index.html

[root@localhost nginx]# chmod +x -R /usr/local/nginx/html/test/
检测配置文件:
[root@localhost conf]# /usr/local/nginx/sbin/nginx  -t
nginx: the configuration file /usr/local/nginx/conf/nginx.conf syntax is ok
nginx: configuration file /usr/local/nginx/conf/nginx.conf test is successful
重新加载配置文件:
[root@localhost conf]# /usr/local/nginx/sbin/nginx -s reload
修改host文件:
172.16.27.92 www.test.com bbs.test.com测试:
[root@localhost conf]# curl www.test.com
www.test.com
[root@localhost conf]# curl bbs.test.com
bbs.test.com
基于域名的虚拟主机访问原理: 是通过请求头的host来辨别
简单测试方法:
步骤一:在win7 host文件中修改为:
172.16.27.XX www.test.com bbs.test.com浏览器访问 www.test.com bbs.test.com 172.16.27.XX
(1)、当访问172.16.27.XX时,得到的是www.test.com,主机是基于域名的虚拟主机,所以访问ip之后,请求后host传参是172.16.27.xx,默认读取第一个虚拟主机
(2)、访问www.test.com
(3)访问bbs.baidu.com
2、基于端口的虚拟主机。通过端口区分虚拟主机
===》应用:公司内部网站(重要)
nginx.conf配置文件
worker_processes  1;

events {
worker_connections  1024;
}
http {
include       mime.types;
default_type  application/octet-stream;
sendfile        on;
keepalive_timeout  65;

server {
listen       8001;
server_name  www.test.com;
location / {
root   html/test/www;
index  index.html index.htm;
}
error_page   500 502 503 504  /50x.html;
location = /50x.html {
root   html;
}
}

server {
listen       8002;
server_name  www.test.com;
location / {
root   html/test/bbs;
index  index.html index.htm;
}
error_page   500 502 503 504  /50x.html;
location = /50x.html {
root   html;
}
}

}
[root@localhost conf]# /usr/local/nginx/sbin/nginx -t nginx: the configuration file /usr/local/nginx/conf/nginx.conf syntax is ok nginx: configuration file /usr/local/nginx/conf/nginx.conf test is successful [root@localhost conf]# /usr/local/nginx/sbin/nginx -s reload
访问网址:
[root@localhost conf]# curl www.test.com:8001
www.test.com
[root@localhost conf]# curl www.test.com:8002
bbs.test.com
3、基于IP的虚拟主机。几乎不用。不支持ifconfig别名,需要用ip命令,配置文件可以。
用include指令实现nginx多虚拟主机配置
编辑nginx.confcd /usr/local/nginx/conf vim nginx.confnginx.conf 如下
worker_processes  1;

events {
worker_connections  1024;
}
http {
include       mime.types;
default_type  application/octet-stream;
sendfile        on;
keepalive_timeout  65;

include extra/
include extra/bbs.conf;

}
#也可以使用 include extra/*.conf 来代替的,表示所有文件,这里支持通配符.创建虚拟主机配置文件
mkdir extra
cat -n nginx.conf.basename.bak
sed -n '12,23p' nginx.conf.basename.bak     #查看该文件12至23行
sed -n '12,23p' nginx.conf.basename.bak  > extra/www.conf
sed -n '25,36p' nginx.conf.basename.bak  > extra/bbs.conf
检测配置文件与虚拟主机访问测试
cat extra/www.conf
cat extra/bbs.conf
../sbin/nginx -t
../sbin/nginx -s reload
curl www.test.com
netstat -lanp|grep nginx
curl www.test.com:8001
curl www.test.com:8002
Nginx别名作用及配置当你访问baidu.com的时候能跳转到www.baidu.com 类似这样的实例,一般有两种方式:1、捕捉301代码实现跳转 2、Nginx别名的配置与DNS中A记录添加域名
nginx.conf
server {
listen       8001;
server_name  www.test.com  test.com;
location / {
root   html/test/www;
index  index.html index.htm;
}
error_page   500 502 503 504  /50x.html;
location = /50x.html {
root   html;
}
}
测试修改host文件,添加test.com
vim /etc/hosts  #如果是DNS则要添加A记录
172.16.27.XX  www.test.com  bbs.test.com  test.com

/usr/local/nginx/sbin/nginx -t   #检查nginx.conf文件
/usr/local/nginx/sbin/nginx -s reload  #重载配置文件

curl :8001
curl test.com:8001
Nginx状态信息配置及信息详解说明:
http_stub_status模块能够获取Nginx的并发连接,请求等。
因 此模块非核心模块,所以需要在编译的时候需手动添加编译参数–with-http_stub_status_module
编译:
# ./configure \
--prefix=/usr/local/nginx \
--pid-path=/var/run/nginx/nginx.pid \
--lock-path=/var/lock/nginx.lock \
--error-log-path=/var/log/nginx/error.log \
--http-log-path=/var/log/nginx/access.log \
--with-http_gzip_static_module \
--http-client-body-temp-path=/var/tmp/nginx/client \
--http-proxy-temp-path=/var/tmp/nginx/proxy \
--http-fastcgi-temp-path=/var/tmp/nginx/fastcgi \
--http-uwsgi-temp-path=/var/tmp/nginx/uwsgi \
--http-scgi-temp-path=/var/tmp/nginx/scgi
--with-http_stub_status_module

make  && make install
nginx.conf
worker_processes  1;

events {
worker_connections  1024;
}
http {
include       mime.types;
default_type  application/octet-stream;
sendfile        on;
keepalive_timeout  65;

include extra/www.conf;
include extra/bbs.conf;
include extra/status.conf;

}
extra目录下的status.conf文件
server {
listen       8001;
server_name  status.test.com;
location / {
stub_status on;
access_log off;
}
}
检查:(测试前修改host文件或DNS的A记录)
/usr/local/nginx/sbin/nginx -t  //测试配置是否正确
/usr/local/nginx/sbin/nginx -s reload

[root@localhost extra]# curl status.test.com:8001
Active connections: 1
server accepts handled requests
12 12 12
Reading: 0 Writing: 1 Waiting: 0
分析:
Active connections: 291
server accepts handled requests
: 16630948 16630948 31070465
Reading: 6 Writing: 179 Waiting: 106

active connections — 对后端发起的活动连接数
server accepts handled requests — nginx 总共处理了 16630948 个连接, 成功创建 16630948 次握手 (证明中间没有失败的), 总共处理了 31070465 个请求 (平均每次握手处理了 1.8个数据请求)
reading — nginx 读取到客户端的Header信息数
writing — nginx 返回给客户端的Header信息数
waiting — 开启 keep-alive 的情况下,这个值等于 active – (reading + writing),意思就是Nginx说已经处理完正在等候下一次请求指令的驻留连接
nginx日志配置指令详解
日志对于统计排错来说非常有利的。本文总结了nginx日志相关的配置如access_log、log_format、open_log_file_cache、log_not_found、log_subrequest、rewrite_log、error_log。nginx有一个非常灵活的日志记录模式。每个级别的配置可以有各自独立的访问日志。日志格式通过log_format命令来定义。ngx_http_log_module是用来定义请求日志格式的。
1. log_format指令
注意:日志格式可参考nginx.conf.defualt文件
语法: log_format name string …;
默认值: log_format combined “…”;
配置段: httpname表示格式名称,string表示等义的格式。log_format有一个默认的无需设置的combined日志格式,相当于apache的combined日志格式,如下所示:nginx.conf
worker_processes  1;

events {
worker_connections  1024;
}
http {
include       mime.types;
default_type  application/octet-stream;
log_format  main  '$remote_addr - $remote_user [$time_local] "$request" '
'$status $body_bytes_sent "$http_referer" '
'"$http_user_agent" "$http_x_forwarded_for"';
sendfile        on;
keepalive_timeout  65;

include extra/www.conf;
include extra/bbs.conf;
include extra/status.conf;

}如上格式的访问日志:172.16.14.151 - - [01/Apr/2017:10:13:18 +0800] "GET / HTTP/1.1" 304 0 "-" "Mozilla/5.0 (Windows NT 6.1; WOW64) AppleWebKit/537.36 (KHTML, like Gecko) Chrome/55.0.2883.87 Safari/537.36" "-"
如果nginx位于负载均衡器,squid,nginx反向代理之后,web服务器无法直接获取到客户端真实的IP地址了。 $remote_addr获取反向代理的IP地址。反向代理服务器在转发请求的http头信息中,可以增加信息$http_x_forwarded_for,用来记录 客户端IP地址和客户端请求的服务器地址
日志格式允许包含的变量注释如下:
$remote_addr, $http_x_forwarded_for 记录客户端IP地址
$remote_user 记录客户端用户名称
$request 记录请求的URL和HTTP协议
$status 记录请求状态
$body_bytes_sent 发送给客户端的字节数,不包括响应头的大小; 该变量与Apache模块mod_log_config里的“%B”参数兼容。
$bytes_sent 发送给客户端的总字节数。
$connection 连接的序列号。
$connection_requests 当前通过一个连接获得的请求数量。
$msec 日志写入时间。单位为秒,精度是毫秒。
$pipe 如果请求是通过HTTP流水线(pipelined)发送,pipe值为“p”,否则为“.”。
$http_referer 记录从哪个页面链接访问过来的
$http_user_agent 记录客户端浏览器相关信息
$request_length 请求的长度(包括请求行,请求头和请求正文)。
$request_time 请求处理时间,单位为秒,精度毫秒; 从读入客户端的第一个字节开始,直到把最后一个字符发送给客户端后进行日志写入为止。
$time_iso8601 ISO8601标准格式下的本地时间。
$time_local 通用日志格式下的本地时间。
2. access_log指令语法: access_log path [format [buffer=size [flush=time]]];
access_log path format gzip[=level] [buffer=size] [flush=time];
access_log syslog:server=address[,parameter=value] [format];
access_log off;
默认值: access_log logs/access.log main;
配置段: http, server, location, if in location, limit_except
gzip压缩等级。
buffer设置内存缓存区大小。
flush保存在缓存区中的最长时间。
不记录日志:access_log off;
使用默认main格式记录日志:access_log logs/access.log 或 access_log logs/access.log main;注意:根据如上include extra/www.conf
server {
listen       8001;
access_log  /var/log/nginx/access_log/www/access_www.log  main;
server_name  www.test.com  test.com;
location / {
root   html/test/www;
index  index.html index.htm;
}
error_page   500 502 503 504  /50x.html;
location = /50x.html {
root   html;
}
}
Nginx下的rewrite规则
一.正则表达式匹配,其中:* ~ 为区分大小写匹配
* ~* 为不区分大小写匹配
* !~和!~*分别为区分大小写不匹配及不区分大小写不匹配
二.文件及目录匹配,其中:
* -f和!-f用来判断是否存在文件
* -d和!-d用来判断是否存在目录
* -e和!-e用来判断是否存在文件或目录
* -x和!-x用来判断文件是否可执行
三.rewrite指令的最后一项参数为flag标记,flag标记有:
1.last 相当于apache里面的[L]标记,表示rewrite。
2.break本条规则匹配完成后,终止匹配,不再匹配后面的规则。
3.redirect 返回302临时重定向,浏览器地址会显示跳转后的URL地址。
4.permanent 返回301永久重定向,浏览器地址会显示跳转后的URL地址。
实例:nginx 301跳转到带www域名方法rewrite
www.conf
server {
listen       8001;
access_log  /var/log/nginx/access_log/www/access_www.log  main;
server_name  www.test.com  test.com;
location / {
root   html/test/www;
index  index.html index.htm;
}
error_page   500 502 503 504  /50x.html;
location = /50x.html {
root   html;
}
}

server {
listen       80;
access_log  /var/log/nginx/access_log/www/access_www.log  main;
server_name  test.com;
location / {
root   html/test/www;
index  index.html index.htm;
}
rewrite ^/(.*)$ http://www.test.com:8001/$1 permanent;
error_page   500 502 503 504  /50x.html;
location = /50x.html {
root   html;
}
}

相关文章推荐
- Nginx学习笔记(零):ubuntu下安装pcre、zlib、openssl
- Nginx学习笔记1-Nginx功能模块以及进程管理
- Nginx学习笔记
- Nginx学习笔记(一)
- Nginx学习笔记
- nginx学习笔记(7)Nginx如何处理一个请求---转载
- nginx学习笔记(1):nginx平台架构
- nginx学习笔记(1)---nginx的基本架构
- nginx学习笔记
- nginx学习笔记
- Nginx学习笔记(一):Configure命令详解
- nginx学习笔记(2):nginx基础概念之connection
- nginx学习笔记(2)---nginx配置文件中优化相关的参数
- [置顶] Nginx学习笔记
- Nginx学习笔记
- Nginx学习笔记
- Nginx学习笔记(二):配置文件
- Nginx学习笔记3--Nginx和PHP(fastCGI)的配置和优化
- Nginx学习笔记1-编译Nignx,搭建开发环境