Linux with Buildroot
2017-04-12 01:02
441 查看
In today's blog post I will explain how to build your own custom
Linux system for the Raspberry Pi.
The ideal tool for such an endeavour would be an automated build system which took a set of requirements - the list of packages to include, kernel configuration, etc. - and created a self-contained root filesystem for the Pi, together with a freshly built kernel
(
(
and config files (
ready to be placed onto the
of the SD card.
As it turns out, there is a system like that out there - it's called Buildroot - and with a little bit of customization we
can shape it exactly into the build system we want.
Buildroot grew out from the µClibc (microcontroller libc) project, a reimplementation of the standard Unix C library specially targeted for
embedded Linux systems. The µClibc people needed a tool which would automate the creation of such systems and this need led them to the development of Buildroot.
Test drive
As the best way to learn something is by doing it, first I'll show you how to build a basic root filesystem.
Download and extract the latest stable Buildroot to a local directory:
The archive will be unpacked into a directory called
Enter this directory (referred to as
now on):
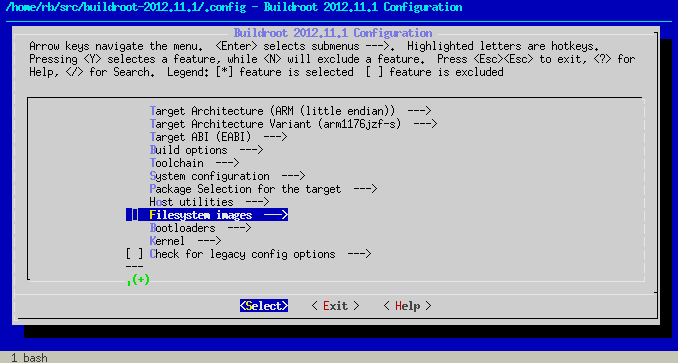
and invoke the following make target to configure the system:
The configuration tool uses
so you'll find it quite familiar if you have ever configured a Linux kernel.
Here are the settings you should change (everything else can be left at defaults):
Top level configuration
These correspond to what we have on the Raspberry Pi.
Build options
where Buildroot will download the sources of all packages we have selected for the build. In the default setup, this is a directory under
but I preferred an external location to enable reuse and prevent accidental removal.
Buildroot can use ccache for compilation of C/C++ source code; this means that object files built with a given command line (compiler
configuration) are saved in a cache and are reused when the same object file is to be built again. This saves a lot of time with repeated builds (typical when tinkering) so I turned it on.
Toolchain
We'll use the latest
branch from the foundation's git repository, so here we select matching kernel headers. The additional GCC options are required
for hardfp.
You may want to add others - I prefer to keep these pruned to the absolute minimum.
We need these for
stuff.
These seemed like a good idea (and without them, certain packages cannot be selected). RPC is needed only if you want to mount NFS filesystems to the Pi.
System configuration
The system hostname and the banner can be anything you wish.
Buildroot will mount the kernel-provided
to
automatically populated when Linux detects new hardware
we'll be able to write hotplug scripts to handle device attach/disconnect events, which sounds nice
The getty baudrate is 38400 because that's what I've seen in my
Package selection for target
This is the section where you specify which packages get in and which will be left out.
Busybox - which is enabled by default - gives us a fairly complete userland, so the only extra you should enable here is dropbear,
a small SSH server under
Also, if you want to mount NFS filesystems, you should enable
You may select other packages too, as you see fit.
Filesystem images
Here we ask Buildroot to generate a
Kernel
With these settings, Buildroot will clone the foundation's
configure it using
in the source) and build a
we can then shove into
(Note that post-processing with the
is not needed anymore as the latest firmware can load
without a hitch.)
Now exit the configuration program - save the new configuration as you leave! - and initiate a full build of the system by executing:
Buildroot will
Go through the following steps:
Build a compiler toolchain (gcc, binutils, libtool, autoconf, automake, m4, cmake, pkg-config, etc.) for the host machine running Buildroot
=>
Build a
can cross-compile to the ARM architecture, together with an ARM µClibc
=>
Unpack, configure and build all selected packages using the compiler (and µClibc) built in step 2
=>
(build dependencies are also installed to
Install packages
=>
Create a root file system image
=>
and install the kernel
=>
Post-build fixup
There are some minor issues which we'll have to deal with before we can use our freshly baked root fs on the Pi.
As root, unpack
its destined place (most likely
your NFS root - we'll call this place
now on) and go through the following steps:
Set a root password
In the default fs, root has no password:
This would be fine if we logged in via the console (or over telnet), but dropbear requires a password to be set if we want to SSH to the box.
A crypt-based password is fine, so let's create a crypted version of the word
set it as the root password in
Mount /boot
We want to mount
the Pi, so we create a mount point and write the necessary entry to
Copy firmware files and kernel to /boot
Mount the SD card's first partition to - let's say -
then:
We also need a command line for our kernel, so put the following line into
This comes from Raspbian, you may vary it as you wish - here is my latest NFS root cmdline for example:
(For the syntax and semantics of the
see the relevant kernel docs.)
Now the system is ready: put the SD card into your Pi and hope for the best. :-) (But seriously, it should work.)
In the first part of this article, we built a minimal Linux system with Buildroot. In today's
session, we'll automate the post-build fixups and extend Buildroot with two RPi-specific packages.
Automating post-build actions
This is easy: just create a script somewhere which contains the commands to execute after a successful build, then let Buildroot know about it by setting the
variable (which can be found under
The location of this script can be specified relative to
so it makes sense to store it somewhere in the Buildroot tree. My solution was to create a
for this purpose and symlink it to the actual content which is stored in a
Git repository:
This way I can easily add all my personal customizations to a freshly unpacked Buildroot tree.
The script (
could look like this:
(don't forget to chmod the script file to 755)
As you see, Buildroot runs the script from
passes the location of the target file system as the first argument.
A small change compared to the previous article is the hard-coding of the crypted password, this was done to avoid the dependency on Perl.
The
are copied from a Buildroot-provided skeleton filesystem and then updated with our stuff. If we left out the copy and ran
contain several entries for
Extending Buildroot with new packages
Buildroot stores its packages (or rather package definitions) in the
For instance, the busybox package may be found under
Packages may have sub-packages, sub-packages may have sub-sub-packages and so on, these are stored in an analogous directory structure under
an example).
Each package has a
which specifies what options the package has and defines how kconfig should display these in the configuration menu.
When kconfig starts, it parses
which pulls in the
of the
These recursively include their child
and this way a configuration tree is built. Kconfig presents this tree to the user who makes her selections. Upon exiting, all config settings are merged together into a
which is then saved to
As an example, here is the
from the
Each
configuration variable. The first line of the stanza defines the type and label of the config entry. The
tells kconfig that selecting
automatically enable the
as well, while
that
selected only if
been already selected (in practice this means that this entry won't be visible until
been selected).
All lines below the config stanzas must be indented with a single tab. Help lines must have an extra prefix of two extra spaces (after the tab).
Upon executing
goes over the selected packages and for each one executes a package-specific makefile located at
Let's see how
(
Every makefile in Buildroot works in the same way: first it sets up a set of make variables to configure the build (their names are prefixed with the uppercase name of the package, hyphens converted to underscores), then invokes one or several macros (in this
case,
carry out the actual build process.
The system provides three major mechanisms/macros for building packages:
autotools-based ones (
the rest
A package gets built in several stages: first it's downloaded, then unpacked, patched, configured, built and finally installed (it can be also cleaned and uninstalled - if the package supports this).
Download
To download a package called
Buildroot tries to fetch it from
can also clone it from a version control system - SVN, Bazaar, Git, Mercurial are all supported -,
from somewhere or simply copy it from a directory on the local system). If we define a variable named
then Buildroot will use that instead of
The downloaded file will be stored in the download directory (
our case).
Unpack
The downloaded package gets unpacked into
Patch
If there are any files called
the
then these are all applied to the unpacked source in alphabetical order.
Configure
In the case of autotools-based packages, this step invokes the
with parameters given by
an environment extended with the variables in
In the case of generic packages, we must define a variable called
Buildroot will invoke that:
Build
In case of autotools-based packages, this step executes
For generic packages, we must define the build steps in
Install
Buildroot knows about four types of installation:
Install to the host directory (
Install to the staging directory (
Install to the images directory (
Install to the target directory (
The
packages which must be built for the host machine (host gcc, m4, autotools, cmake, etc.)
The
to install dependencies of other packages. For instance,
on
so these must be built and installed (as ARM binaries) to
get built.
The
for the Linux kernel and the final root fs. Not many packages use this kind of install.
The
a base for the final root fs: each package which wants to have files in the root fs must install something here.
For generic packages, the corresponding make variables prescribing the install steps are
respectively.
Creating a package for RPi firmware
In the previous article, we copied the firmware files (
the Linux kernel and
the
card by hand.
It would be nice to modify Buildroot in such a way that when the build process is over, we get a
under
can extract to the
We'll create a new package under
take care of this.
The new package's
looks like this (watch out for tab characters if you copy/paste):
The corresponding makefile:
of the package (
this case).
We take advantage of the fact that a given commit on GitHub can be downloaded in .tar.gz format from the
that this package wants to install something to
the build process will execute the commands in
The reason for assembling the boot directory under
that we don't want these files to be present on
we need an empty directory which will serve as a mount point).
To activate this package, we need to pull in its
one of the main
As we'll most likely create several RPi-specific packages, I created the following
the
and sourced it at the end of
the last
The result: a new menu entry -
The corresponding makefile (
This just pulls in all the package-specific makefiles it finds under the
The last thing we must do is to package up the contents of the staging
to
Let's do this with an images install:
First we copy the kernel zImage to
staging (
by the top-level Makefile), then we create the tar.gz.
As we need the kernel image before we can pack up
we have to declare a dependency on the
That's all.
Creating a package for RPi userland
The RPi userland consists of the following libraries:
libbcm_host.so
libEGL.so
libGLESv2.so
libmmal.so
libmmal_vc_client.so
libopenmaxil.so
libOpenVG.so
libvchiq_arm.so
libvcos.so
libWFC.so
These will become important when we want to experiment with the facilities provided by the Broadcom VideoCore GPU from our programs.
Fortunately, the complete source code of these libraries is available on GitHub and the package uses
its build system which means it's a snap to integrate it into Buildroot.
Here are all the files required for our new package
Linux system for the Raspberry Pi.
The ideal tool for such an endeavour would be an automated build system which took a set of requirements - the list of packages to include, kernel configuration, etc. - and created a self-contained root filesystem for the Pi, together with a freshly built kernel
(
kernel.img), boot loader, firmware
(
bootcode.bin,
start.elf)
and config files (
config.txt,
cmdline.txt)
ready to be placed onto the
/bootpartition
of the SD card.
As it turns out, there is a system like that out there - it's called Buildroot - and with a little bit of customization we
can shape it exactly into the build system we want.
Buildroot grew out from the µClibc (microcontroller libc) project, a reimplementation of the standard Unix C library specially targeted for
embedded Linux systems. The µClibc people needed a tool which would automate the creation of such systems and this need led them to the development of Buildroot.
Test drive
As the best way to learn something is by doing it, first I'll show you how to build a basic root filesystem.
Download and extract the latest stable Buildroot to a local directory:
mkdir -p $HOME/buildroot
cd $HOME/buildroot
wget http://buildroot.uclibc.org/downloads/buildroot-2012.11.1.tar.gz tar xvzf buildroot-2012.11.1.tar.gz
The archive will be unpacked into a directory called
buildroot-2012.11.1.
Enter this directory (referred to as
$TOPDIRfrom
now on):
cd buildroot-2012.11.1
and invoke the following make target to configure the system:
make menuconfig
The configuration tool uses
kconfig,
so you'll find it quite familiar if you have ever configured a Linux kernel.
Here are the settings you should change (everything else can be left at defaults):
Top level configuration
| Target Architecture | ARM (little endian) |
|---|---|
| Target Architecture Variant | arm1176jzf-s |
| Target ABI | EABI |
Build options
| Download dir | $(HOME)/buildroot/dl |
|---|---|
| Enable compiler cache | YES |
| Compiler cache location | $(HOME)/buildroot/ccache |
Download dirspecifies the directory
where Buildroot will download the sources of all packages we have selected for the build. In the default setup, this is a directory under
$TOPDIR,
but I preferred an external location to enable reuse and prevent accidental removal.
Buildroot can use ccache for compilation of C/C++ source code; this means that object files built with a given command line (compiler
configuration) are saved in a cache and are reused when the same object file is to be built again. This saves a lot of time with repeated builds (typical when tinkering) so I turned it on.
Toolchain
| Kernel Headers | Linux 3.6.x kernel headers |
|---|---|
| GCC compiler Version | GCC 4.7.x |
| Additional gcc options | --with-float=hard --with-fpu=vfp |
rpi-3.6.ykernel
branch from the foundation's git repository, so here we select matching kernel headers. The additional GCC options are required
for hardfp.
| Purge unwanted locales | YES |
|---|---|
| Locales to keep | C en_US |
| Generate locale data | en_US |
| Use software floating point by default | NO |
|---|---|
| Target Optimizations | -pipe -mfloat-abi=hard -mfpu=vfp |
| Use ARM Vector Floating Point unit | YES |
hardfp. Essential
stuff.
| Enable large file (files > 2 GB) support | YES |
|---|---|
| Enable IPv6 support | YES |
| Enable RPC support | YES |
| Enable WCHAR support | YES |
| Enable C++ support | YES |
System configuration
| System hostname | rpi |
|---|---|
| System banner | Welcome to Raspberry Pi! |
| /dev management | Dynamic using mdev |
| Port to run a getty (login prompt) on | tty1 |
| Baudrate to use | 38400 |
Dynamic using mdevmeans that:
Buildroot will mount the kernel-provided
devtmpfsfilesystem
to
/dev- this pseudo fs is
automatically populated when Linux detects new hardware
we'll be able to write hotplug scripts to handle device attach/disconnect events, which sounds nice
The getty baudrate is 38400 because that's what I've seen in my
/etc/inittab.
Package selection for target
This is the section where you specify which packages get in and which will be left out.
Busybox - which is enabled by default - gives us a fairly complete userland, so the only extra you should enable here is dropbear,
a small SSH server under
Networking
applications
which will let us log in remotely.
Also, if you want to mount NFS filesystems, you should enable
Networking
applications
/
Portmap.
You may select other packages too, as you see fit.
Filesystem images
| Compression method | gzip |
|---|
rootfs.tar.gz(besides
rootfs.tar).
Kernel
| Linux Kernel | YES |
|---|---|
| Kernel version | Custom Git tree |
| URL of custom Git repository | https://github.com/raspberrypi/linux |
| Custom Git version | rpi-3.6.y |
| Kernel configuration | Using a defconfig |
| Defconfig name | bcmrpi |
| Kernel binary format | zImage |
rpi-3.6.ybranch,
configure it using
arch/arm/configs/bcmrpi_defconfig(included
in the source) and build a
zImagewhich
we can then shove into
/boot.
(Note that post-processing with the
imagetool-uncompressed.pyscript
is not needed anymore as the latest firmware can load
zImagekernels
without a hitch.)
Now exit the configuration program - save the new configuration as you leave! - and initiate a full build of the system by executing:
make all
Buildroot will
Go through the following steps:
Build a compiler toolchain (gcc, binutils, libtool, autoconf, automake, m4, cmake, pkg-config, etc.) for the host machine running Buildroot
=>
$TOPDIR/output/host
Build a
gccwhich
can cross-compile to the ARM architecture, together with an ARM µClibc
=>
$TOPDIR/output/toolchain
Unpack, configure and build all selected packages using the compiler (and µClibc) built in step 2
=>
$TOPDIR/output/build/<package>-<version>
(build dependencies are also installed to
$TOPDIR/output/staging)
Install packages
=>
$TOPDIR/output/target
Create a root file system image
=>
$TOPDIR/output/images/rootfs.tar.gz
and install the kernel
=>
$TOPDIR/output/images/zImage
Post-build fixup
There are some minor issues which we'll have to deal with before we can use our freshly baked root fs on the Pi.
As root, unpack
output/images/rootfs.tar.gzto
its destined place (most likely
/dev/mmcblk0p2or
your NFS root - we'll call this place
$ROOTDIRfrom
now on) and go through the following steps:
Set a root password
In the default fs, root has no password:
# cat /etc/shadow
root::10933:0:99999:7:::
bin:*:10933:0:99999:7:::
daemon:*:10933:0:99999:7:::
adm:*:10933:0:99999:7:::
lp:*:10933:0:99999:7:::
sync:*:10933:0:99999:7:::
shutdown:*:10933:0:99999:7:::
halt:*:10933:0:99999:7:::
uucp:*:10933:0:99999:7:::
operator:*:10933:0:99999:7:::
ftp:*:10933:0:99999:7:::
nobody:*:10933:0:99999:7:::
default::10933:0:99999:7:::
This would be fine if we logged in via the console (or over telnet), but dropbear requires a password to be set if we want to SSH to the box.
A crypt-based password is fine, so let's create a crypted version of the word
passpassand
set it as the root password in
/etc/shadow:
CRYPTEDPASS=$(perl -e 'print crypt("passpass","salt")')
sed -i -e "s#^root:[^:]*:#root:$CRYPTEDPASS:#" $ROOTDIR/etc/shadow
Mount /boot
We want to mount
/dev/mmcblk0p1to
/booton
the Pi, so we create a mount point and write the necessary entry to
/etc/fstab:
install -d -m 0755 $ROOTDIR/boot
echo '/dev/mmcblk0p1 /boot vfat defaults 0 0' >> $ROOTDIR/etc/fstab
Copy firmware files and kernel to /boot
Mount the SD card's first partition to - let's say -
/mnt/rpi/boot(
$BOOTDIR),
then:
cp $TOPDIR/output/images/zImage $BOOTDIR/kernel.img
git clone https://github.com/raspberrypi/firmware cp firmware/boot/bootcode.bin $BOOTDIR
cp firmware/boot/start.elf $BOOTDIR
cp firmware/boot/fixup.dat $BOOTDIR
We also need a command line for our kernel, so put the following line into
$BOOTDIR/cmdline.txt:
dwc_otg.lpm_enable=0 console=ttyAMA0,115200 kgdboc=ttyAMA0,115200 console=tty1 elevator=deadline rootwait root=/dev/mmcblk0p2 rootfstype=ext4
This comes from Raspbian, you may vary it as you wish - here is my latest NFS root cmdline for example:
dwc_otg.lpm_enable=0 console=ttyAMA0,115200 kgdboc=ttyAMA0,115200 console=tty1 elevator=deadline rootwait ip=::::rpi::dhcp root=/dev/nfs nfsroot=192.168.1.1:/mnt/shares/rpifs/nfsroot,tcp,rsize=32768,wsize=32768
(For the syntax and semantics of the
ipparameter
see the relevant kernel docs.)
Now the system is ready: put the SD card into your Pi and hope for the best. :-) (But seriously, it should work.)
In the first part of this article, we built a minimal Linux system with Buildroot. In today's
session, we'll automate the post-build fixups and extend Buildroot with two RPi-specific packages.
Automating post-build actions
This is easy: just create a script somewhere which contains the commands to execute after a successful build, then let Buildroot know about it by setting the
BR2_ROOTFS_POST_BUILD_SCRIPTconfig
variable (which can be found under
System
configuration
/
Custom script
to run before creating filesystem images
in kconfig).
The location of this script can be specified relative to
$TOPDIR,
so it makes sense to store it somewhere in the Buildroot tree. My solution was to create a
board/rpidirectory
for this purpose and symlink it to the actual content which is stored in a
Git repository:
cd $HOME/repos
git clone https://github.com/cellux/rpi-buildroot.git cd $HOME/buildroot
tar xvzf buildroot-2012.11.1.tar.gz
cd buildroot-2012.11.1
ln -s $HOME/repos/rpi-buildroot/board/rpi board/rpi
This way I can easily add all my personal customizations to a freshly unpacked Buildroot tree.
The script (
board/rpi/post-build.sh)
could look like this:
TARGETDIR=$1
BR_ROOT=$PWD

# set root password to `passpass'
install -T -m 0600 $BR_ROOT/system/skeleton/etc/shadow $TARGETDIR/etc/shadow
sed -i -e 's#^root:[^:]*:#root:saWv8UefZU43.:#' $TARGETDIR/etc/shadow

# create an empty /boot directory in target
install -d -m 0755 $TARGETDIR/boot

# setup mount for /boot
install -T -m 0644 $BR_ROOT/system/skeleton/etc/fstab $TARGETDIR/etc/fstab
echo '/dev/mmcblk0p1 /boot vfat defaults 0 0' >> $TARGETDIR/etc/fstab
(don't forget to chmod the script file to 755)
As you see, Buildroot runs the script from
$TOPDIRand
passes the location of the target file system as the first argument.
A small change compared to the previous article is the hard-coding of the crypted password, this was done to avoid the dependency on Perl.
The
/etc/shadowand
/etc/fstabfiles
are copied from a Buildroot-provided skeleton filesystem and then updated with our stuff. If we left out the copy and ran
makerepeatedly,
$TARGETDIR/etc/fstabwould
contain several entries for
/boot.
Extending Buildroot with new packages
Buildroot stores its packages (or rather package definitions) in the
$TOPDIR/packagedirectory.
For instance, the busybox package may be found under
$TOPDIR/package/busybox.
Packages may have sub-packages, sub-packages may have sub-sub-packages and so on, these are stored in an analogous directory structure under
package/<main-package>(see
x11r7for
an example).
Each package has a
Config.infile
which specifies what options the package has and defines how kconfig should display these in the configuration menu.
When kconfig starts, it parses
$TOPDIR/Config.in,
which pulls in the
Config.infiles
of the
toolchain,
system,
package,
fs,
bootand
linuxdirectories.
These recursively include their child
Config.infiles
and this way a configuration tree is built. Kconfig presents this tree to the user who makes her selections. Upon exiting, all config settings are merged together into a
.configfile
which is then saved to
$TOPDIR.
As an example, here is the
Config.infile
from the
tcpdumppackage:
config BR2_PACKAGE_TCPDUMP
bool "tcpdump"
select BR2_PACKAGE_LIBPCAP
help
A tool for network monitoring and data acquisition.
 http://www.tcpdump.org/
config BR2_PACKAGE_TCPDUMP_SMB
bool "smb dump support"
depends on BR2_PACKAGE_TCPDUMP
help
enable possibly-buggy SMB printer
Each
configstanza defines one
configuration variable. The first line of the stanza defines the type and label of the config entry. The
selectentry
tells kconfig that selecting
tcpdumpwould
automatically enable the
libpcappackage
as well, while
dependsdeclares
that
smb dump supportcan be
selected only if
tcpdumphas
been already selected (in practice this means that this entry won't be visible until
tcpdumphas
been selected).
All lines below the config stanzas must be indented with a single tab. Help lines must have an extra prefix of two extra spaces (after the tab).
Upon executing
make, Buildroot
goes over the selected packages and for each one executes a package-specific makefile located at
package/<package-name>/<package-name>.mk.
Let's see how
tcpdumpgets built
(
package/tcpdump/tcpdump.mk):
#############################################################
#
# tcpdump
#
#############################################################
# Copyright (C) 2001-2003 by Erik Andersen <andersen@codepoet.org>
# Copyright (C) 2002 by Tim Riker <Tim@Rikers.org>

TCPDUMP_VERSION = 4.3.0
TCPDUMP_SITE = http://www.tcpdump.org/release TCPDUMP_LICENSE = BSD-3c
TCPDUMP_LICENSE_FILES = LICENSE

TCPDUMP_CONF_ENV = ac_cv_linux_vers=2 td_cv_buggygetaddrinfo=no
TCPDUMP_CONF_OPT = --without-crypto \
$(if $(BR2_PACKAGE_TCPDUMP_SMB),--enable-smb,--disable-smb)
TCPDUMP_DEPENDENCIES = zlib libpcap

# make install installs an unneeded extra copy of the tcpdump binary
define TCPDUMP_REMOVE_DUPLICATED_BINARY
rm -f $(TARGET_DIR)/usr/sbin/tcpdump.$(TCPDUMP_VERSION)
endef

TCPDUMP_POST_INSTALL_TARGET_HOOKS += TCPDUMP_REMOVE_DUPLICATED_BINARY

$(eval $(autotools-package))
Every makefile in Buildroot works in the same way: first it sets up a set of make variables to configure the build (their names are prefixed with the uppercase name of the package, hyphens converted to underscores), then invokes one or several macros (in this
case,
autotools-package) which
carry out the actual build process.
The system provides three major mechanisms/macros for building packages:
autotools-packagefor
autotools-based ones (
./configure &&
make && make install
)
cmake-packagefor
cmakeprojects
generic-packagefor
the rest
A package gets built in several stages: first it's downloaded, then unpacked, patched, configured, built and finally installed (it can be also cleaned and uninstalled - if the package supports this).
Download
To download a package called
pkg,
Buildroot tries to fetch it from
$(PKG_SITE)/$(PKG)-$(PKG_VERSION).tar.gz(it
can also clone it from a version control system - SVN, Bazaar, Git, Mercurial are all supported -,
scpit
from somewhere or simply copy it from a directory on the local system). If we define a variable named
PKG_SOURCE,
then Buildroot will use that instead of
$(PKG)-$(PKG_VERSION).tar.gz.
The downloaded file will be stored in the download directory (
$(HOME)/buildroot/dlin
our case).
Unpack
The downloaded package gets unpacked into
output/build/$(PKG)-$(PKG_VERSION).
Patch
If there are any files called
$(PKG)-*.patchin
the
package/$(PKG)directory,
then these are all applied to the unpacked source in alphabetical order.
Configure
In the case of autotools-based packages, this step invokes the
./configurescript
with parameters given by
$(PKG)_CONF_OPTand
an environment extended with the variables in
$(PKG)_CONF_ENV.
In the case of generic packages, we must define a variable called
$(PKG)_CONFIGURE_CMDSand
Buildroot will invoke that:
define PKG_CONFIGURE_CMDS
# do what is required here to configure package `pkg'
endef
Build
In case of autotools-based packages, this step executes
make.
For generic packages, we must define the build steps in
$(PKG)_BUILD_CMDS.
Install
Buildroot knows about four types of installation:
Install to the host directory (
output/host)
Install to the staging directory (
output/staging)
Install to the images directory (
output/images)
Install to the target directory (
output/target)
The
hostdirectory is used for
packages which must be built for the host machine (host gcc, m4, autotools, cmake, etc.)
The
stagingdirectory is used
to install dependencies of other packages. For instance,
tcpdumpdepends
on
zliband
libpcap,
so these must be built and installed (as ARM binaries) to
output/stagingbefore
tcpdumpcan
get built.
The
imagesdirectory is the target
for the Linux kernel and the final root fs. Not many packages use this kind of install.
The
targetdirectory serves as
a base for the final root fs: each package which wants to have files in the root fs must install something here.
For generic packages, the corresponding make variables prescribing the install steps are
$(PKG)_INSTALL_CMDS,
$(PKG)_INSTALL_STAGING_CMDS,
$(PKG)_INSTALL_IMAGES_CMDSand
$(PKG)_INSTALL_TARGET_CMDS,
respectively.
Creating a package for RPi firmware
In the previous article, we copied the firmware files (
bootcode.bin,
start.elfand
fixup.dat),
the Linux kernel and
cmdline.txtto
the
/bootpartition of the SD
card by hand.
It would be nice to modify Buildroot in such a way that when the build process is over, we get a
bootfs.tar.gzfile
under
output/imageswhich we
can extract to the
/bootpartition.
We'll create a new package under
package/rpi/rpi-firmwareto
take care of this.
The new package's
Config.infile
looks like this (watch out for tab characters if you copy/paste):
config BR2_PACKAGE_RPI_FIRMWARE
bool "Raspberry Pi GPU firmware + boot files"
help
If you select this, you'll get a bootfs.tar.gz in output/images
with a filesystem ready to be written to the first partition
of the Raspberry Pi SD card.
 https://github.com/raspberrypi/firmware
config BR2_PACKAGE_RPI_FIRMWARE_CMDLINE
string "Linux kernel command line"
default "dwc_otg.lpm_enable=0 console=tty1 elevator=deadline rootwait ip=dhcp root=/dev/mmcblk0p2 rootfstype=ext4"
help
String to be written to /boot/cmdline.txt
The corresponding makefile:
#############################################################
#
# rpi-firmware
#
#############################################################
RPI_FIRMWARE_VERSION = ffbb918fd46f1b0b687a474857b370f24f71989d
RPI_FIRMWARE_SITE = https://github.com/raspberrypi/firmware/archive RPI_FIRMWARE_SOURCE = $(RPI_FIRMWARE_VERSION).tar.gz
RPI_FIRMWARE_INSTALL_STAGING = YES

define RPI_FIRMWARE_INSTALL_STAGING_CMDS
$(INSTALL) -d -m 0755 $(STAGING_DIR)/boot || /bin/true
$(INSTALL) -m 0644 $(@D)/boot/bootcode.bin $(STAGING_DIR)/boot
$(INSTALL) -m 0644 $(@D)/boot/fixup.dat $(STAGING_DIR)/boot
$(INSTALL) -m 0644 $(@D)/boot/start.elf $(STAGING_DIR)/boot
echo "$(call qstrip,$(BR2_PACKAGE_RPI_FIRMWARE_CMDLINE))" > $(STAGING_DIR)/boot/cmdline.txt
endef

$(eval $(generic-package))
$(@D)is the build directory
of the package (
output/build/rpi-firmware-ffbb918fd46f1b0b687a474857b370f24f71989din
this case).
We take advantage of the fact that a given commit on GitHub can be downloaded in .tar.gz format from the
https://github.com/<user>/<repo>/archive/<sha1>.tar.gzURL.
RPI_FIRMWARE_INSTALL_STAGING = YESdeclares
that this package wants to install something to
output/stagingso
the build process will execute the commands in
RPI_FIRMWARE_INSTALL_STAGING_CMDS.
The reason for assembling the boot directory under
stagingis
that we don't want these files to be present on
target(there
we need an empty directory which will serve as a mount point).
To activate this package, we need to pull in its
Config.infrom
one of the main
Config.infiles.
As we'll most likely create several RPi-specific packages, I created the following
Config.inin
the
package/rpidirectory:
menu "Raspberry Pi"
source "package/rpi/rpi-firmware/Config.in"
endmenu
and sourced it at the end of
package/Config.in(before
the last
endmenu):
source "package/rpi/Config.in"
The result: a new menu entry -
Raspberry
Pi
- shows up under
Package
Selection for the target
, and when we enter it, we see the options defined by
package/rpi/rpi-firmware/Config.in.
The corresponding makefile (
package/rpi/rpi.mk):
include package/rpi/*/*.mk
This just pulls in all the package-specific makefiles it finds under the
package/rpi/*directories.
The last thing we must do is to package up the contents of the staging
/bootfolder
to
output/images/bootfs.tar.gz.
Let's do this with an images install:
RPI_FIRMWARE_INSTALL_IMAGES = YES

define RPI_FIRMWARE_INSTALL_IMAGES_CMDS
$(INSTALL) -m 0644 $(BINARIES_DIR)/zImage $(STAGING_DIR)/boot/kernel.img
tar -C $(STAGING_DIR)/boot -cvzf $(BINARIES_DIR)/bootfs.tar.gz .
endef
First we copy the kernel zImage to
/booton
staging (
BINARIES_DIRis specified
by the top-level Makefile), then we create the tar.gz.
As we need the kernel image before we can pack up
bootfs.tar.gz,
we have to declare a dependency on the
linuxpackage:
RPI_FIRMWARE_DEPENDENCIES = linux
That's all.
Creating a package for RPi userland
The RPi userland consists of the following libraries:
libbcm_host.so
libEGL.so
libGLESv2.so
libmmal.so
libmmal_vc_client.so
libopenmaxil.so
libOpenVG.so
libvchiq_arm.so
libvcos.so
libWFC.so
These will become important when we want to experiment with the facilities provided by the Broadcom VideoCore GPU from our programs.
Fortunately, the complete source code of these libraries is available on GitHub and the package uses
cmakeas
its build system which means it's a snap to integrate it into Buildroot.
Here are all the files required for our new package
rpi-userland:
package/rpi/rpi-userland/Config.in:
config BR2_PACKAGE_RPI_USERLAND bool "Raspberry Pi userland" help Raspberry Pi Userland https://github.com/raspberrypi/userland/[/code]
(Don't forget to reference it frompackage/rpi/Config.in.)package/rpi/rpi-userland/rpi-userland.mk:############################################################# # # rpi-userland # ############################################################# RPI_USERLAND_VERSION = 9852ce28826889e50c4d6786b942f51bccccac54 RPI_USERLAND_SITE = https://github.com/raspberrypi/userland/archive RPI_USERLAND_SOURCE = 9852ce28826889e50c4d6786b942f51bccccac54.tar.gz RPI_USERLAND_INSTALL_TARGET = YES define RPI_USERLAND_INSTALL_TARGET_CMDS $(INSTALL) -m 0644 $(@D)/build/lib/*.so $(TARGET_DIR)/usr/lib $(INSTALL) -m 0755 $(@D)/build/bin/* $(TARGET_DIR)/usr/bin endef $(eval $(cmake-package))
First I usedmasteras the value
ofRPI_USERLAND_VERSION, but
this led to name clashes between packages in the download directory (several packages wanted to download their archive tomaster.tar.gz),
so I switched to SHA-1 hashes instead.
One last thing before we can build this: theinterface/vcos/glibc/vcos_backtrace.cfile
must be patched because it refers to a C function (backtrace)
which is not available in µClibc:package/rpi/rpi-userland/rpi-userland-disable-backtrace.patch:--- userland.old/interface/vcos/glibc/vcos_backtrace.c 2013-01-06 21:19:45.642055469 +0100 +++ userland.new/interface/vcos/glibc/vcos_backtrace.c 2013-01-06 21:17:55.592626490 +0100 @@ -26,16 +26,19 @@ */ #include <interface/vcos/vcos.h> -#ifdef __linux__ +#ifdef __GLIBC__ +#ifndef __UCLIBC__ #include <execinfo.h> #endif +#endif #include <stdio.h> #include <stdlib.h> #include <sys/types.h> void vcos_backtrace_self(void) { -#ifdef __linux__ +#ifdef __GLIBC__ +#ifndef __UCLIBC__ void *stack[64]; int depth = backtrace(stack, sizeof(stack)/sizeof(stack[0])); char **names = backtrace_symbols(stack, depth); @@ -49,5 +52,6 @@ free(names); } #endif +#endif }
(Note: a fix for this has been merged to upstream on Jan 22 2013 which made this patch unnecessary.)
If you don't want to fiddle with copy/pasting these files, just fetch them from my Git repository at https://github.com/cellux/rpi-buildroot
Now executemake menuconfig,
enable the new package(s),makethe
whole thing and unpack the resultingbootfs.tar.gzandrootfs.tar.gz(as
root) to the correct places.

相关文章推荐
- DIY Linux with Buildroot
- DIY Linux with Buildroot [1/2]
- buildroot linux filesystem 初探
- x4412开发板&ibox卡片电脑项目实战10-使用buildroot搭建linux文件系统
- Extending A Linux Disk With LVM–Extending Root Par
- 嵌入式 内核编译总是遇到make: ***/root/build_kernel/linux-2.6.14.1/arch/arm 是目录
- [C++] Build Shared libraries with GCC on Linux ---gcc is actually for compile C
- imlib2 compile env build with debian linux
- opt/buildroot-gcc342/bin/mipsel-linux-gcc: Command not found解决办法
- Assertion failure in -[UIApplication _runWithMainScene:transitionContext:completion:], /BuildRoot/Li
- [转载] 在Linux下用buildroot搭建mips/arm的交叉编译平台
- opt/buildroot-gcc342/bin/mipsel-linux-gcc: Command not found解决办法
- 用buildroot打造自己的Linux Toolchain
- opt/buildroot-gcc342/bin/mipsel-linux-gcc: Command not found解决办法
- opt/buildroot-gcc342/bin/mipsel-linux-gcc: Command not found解决办法
- Opencv + Qt (linux, build with qt)
- linux autologin with root
- Firefox 4 build with Qt (Linux Version)
- BeagleBoard Rev C5 Simple System with Buildroot
- ./build/linux/install-arm-sysroot.py