linux命令:samb文件共享
2017-04-10 16:10
309 查看
为了实现Windows主机与Linux服务器之间的资源共享, 利用linux samba服务,将Linux系统和Windows系统之间能够实现互相通信,提供了极大方便。本文將简要介绍搭建Samba服务器。
1、服务查询默认情况下,Linux系统在默认安装中已经安装了Samba服务包的一部分 ,为了对整个过程有一个完整的了解,可先将这部分卸载掉。[root@localhost ~]# rpm -qa |grep samba*
samba-client-3.0.33-3.14.el5
samba-common-3.0.33-3.14.el5
samba-3.0.33-3.14.el5
samba-swat-3.0.33-3.14.el5
system-config-samba-1.2.41-5.el5
2、卸载Samba因与其它rpm包之间存在依赖关系,参数-f是指强制,--nodeps是指不检查依赖关系:[root@localhost ~]# rpm -e samba-common --nodeps
[root@localhost ~]# rpm -e samba-client --nodeps
[root@localhost ~]# rpm -e samba --nodep 3、安装Samba3.6[root@localhost ~]# yum list all |grep samba3*samba3x.i386 3.6.23-6.el5 Aliyun
samba3x-client.i386 3.6.23-6.el5 Aliyun
samba3x-common.i386 3.6.23-6.el5 Aliyun
samba3x-swat.i386 3.6.23-6.el5 Aliyun
samba3x-winbind.i386 3.6.23-6.el5 Aliyun
samba3x-winbind-devel.i386 3.6.23-6.el5 Aliyun安装完成后,使用命令rpm -qa | grep samba进行查询,发现搭建samba服务器所依赖的所有服务器都已经安装好了即可。 4、配置smb.conf文件Samba的配置文件一般就放在/etc/samba目录中,主配置文件名为smb.conf,文件中记录着大量的规则和共享信息,所以是samba服务非常重要的核心配置文件,完成samba服务器搭建的大部分主要配置都在该文件中进行。Samba服务器的工作原理是:客户端向Samba服务器发起请求,请求访问共享目录,Samba服务器接收请求,查询smb.conf文件,查看共享目录是否存在,以及来访者的访问权限,如果来访者具有相应的权限,则允许客户端访问,最后将访问过程中系统的信息以及采集的用户访问行为信息存放在日志文件中。
实例操作:如何通过samba共享linux文件目录:第一步:修改配置文件 首先备份一下samba的配置文件cd /etc/sambacp smb.conf smb.confbak然后重新创建一个smb.conf文件vim smb.conf然后我们把这段写入smb.conf中 [global] #全局设置 workgroup = WORKGROUP
netbios name = MYSERVER
server string = Samba Server TestServer
security = share
[shared_name] #共享名称 comment = #注释信息
path = #共享目录的路径 browseable = #是否可以浏览(yes|no) read only = #是否只读(yes|no) writable = #是否可写(yes|no) write list = user1,user2,@group,+group #定义可写列表,可以是用户或者组 valid users = #定义白名单 invalid users = #定义黑名单
注解:
[global]这段是全局配置,是必段写的。其中有如下的几行;workgroup 就是Windows中显示的工作组;在这里我设置的是LINUXSIR (用大写);
netbios name 就是在Windows中显示出来的计算机名;
server string 就是Samba服务器说明,可以自己来定义;这个不是什么重要的;
security 这是验证和登录方式,这里我们用了share ;验证方式有好多种,这是其中一种;另外一种常用的是user的验证方式;如果用share呢,就是不用设置用户和密码了;[shared_name] 这个在Windows中显示出来是共享的目录;
path = 可以设置要共享的目录放在哪里;
writeable = 是否可写,这里我设置为可写;
browseable = 是否可以浏览,可以;可以浏览意味着,我们在工作组下能看到共享文件夹。如果您不想显示出来,那就设置为 browseable = noguest ok = 匿名用户是否允许以guest身份是登录;
第二步:建立目录并设置好权限 [root@xuelinux samba]# mkdir /share/test -pv #递归建立目录
mkdir: 已创建目录 “/share”
mkdir: 已创建目录 “/share/test”
修改samba配置文件,在最后面增加以下几行: [root@xuelinux samba]# vim smb.conf [tools]
comment = Share Testing
path = /share/test
public = yes
writable = yes
[root@xuelinux samba]# testparm #查看测试配置文档是否有问题
Load smb config files from /etc/samba/smb.conf
Processing section "[homes]"
Processing section "[printers]"
Processing section "[tools]"
Loaded services file OK.
Server role: ROLE_STANDALONE
Press enter to see a dump of your service definitions
[global]
server string = Samba Server Version %v
passdb backend = tdbsam
log file = /var/log/samba/%m.log
max log size = 50
cups options = raw
[homes]
comment = Home Directories
read only = No
browseable = No
[printers]
comment = All Printers
path = /var/spool/samba
printable = Yes
browseable = No
[tools]
comment = Share Testing
path = /share/test
read only = No
guest ok = Yes
第三步:启动smbd和nmbd服务器;
[root@xuelinux samba]# service smb start #启动samba服务
启动 SMB 服务: [确定]
启动 NMB 服务: [确定]
[root@xuelinux samba]# service nmb start #启动nmbd服务 #linux6.0后需要啟動此項
启动 NMB 服务: [确定]
第四步:把相关需要访问共享的用户设置为samba服务用户[root@xuelinux samba]# smbpasswd -a hadoop
#把系统已存在的用户hadoop设置为samba服务的用户
New SMB password: #设置访问共享的密码,此密码最好跟系统用户的登录密码不同
Retype new SMB password:
Added user hadoop. #添加成功
[root@xuelinux samba]# ll总计 52
-rw-r--r-- 1 root root 20 2009-05-29 lmhosts
-rw------- 1 root root 4096 03-22 10:14 passdb.tdb #已经生成了密码数据库文件
-rw------- 1 root root 8192 03-22 10:14 secrets.tdb #已经生成了安全密钥数据库文件
-rw-r--r-- 1 root root 9733 03-22 09:10 smb.back
-rw-r--r-- 1 root root 9839 03-22 10:09 smb.conf
-rw-r--r-- 1 root root 97 2009-05-29 smbusers
通过windows客户端访问测试结果如下,成功访问共享目录:

由于tools目录暂时没有给hadoop用户写权限,所以暂时无法再该目录下新建文件,需先修改tools目录的访问权限:
[root@johntest samba]# setfacl -m u:hadoop:rwx /share/test/ #给用户hadoop设置facl权限,使得对test目录具有读写执行权限。
扩展:linux系统如何访问windows共享文件
smbclient #访问windows共享命令 -L NetBIOS_Name #接主机名或IP地址
-U username #接访问共享的用户名[root@localhost test]# smbclient -L 10.109.134.200 -U administrator
Password:
Domain=[FOX-0] OS=[Windows Server 2003 3790 Service Pack 2] Server=[Windows Server 2003 5.2]
Sharename Type Comment
--------- ---- -------
C$ Disk
K$ Disk Symantec Backup Exec Disk
F$ Disk
IPC$ IPC
ADMIN$ Disk
D$ Disk
E$ Disk Software134.200 Disk
IFT_STN Disk
session request to 10.109.134.200 failed (Called name not present)
session request to 10 failed (Called name not present)
Domain=[FOX-0] OS=[Windows Server 2003 3790 Service Pack 2] Server=[Windows Server 2003 5.2][root@localhost test]# smbclient //10.109.134.200/e$ -U administrator
Password:
Domain=[FOX-0] OS=[Windows Server 2003 3790 Service Pack 2] Server=[Windows Server 2003 5.2]
smb: \> ls
b4fe0b43839fc2f8b297b365f3 D 0 Mon Nov 30 17:23:29 2015
FTP D 0 Tue Oct 11 09:57:57 2016
LinuxFTP D 0 Tue Mar 14 11:02:43 2017
RECYCLER DHS 0 Wed Jun 24 16:57:30 2015
System Volume Information DHS 0 Thu Sep 22 09:14:41 2016
35000 blocks of size 4194304. 30829 blocks available
smb: \>
[root@localhost test]# rpm -qa |grep samba #查看web界面控制samb服务器
samba-client-3.0.33-3.14.el5
samba-common-3.0.33-3.14.el5
samba-3.0.33-3.14.el5
samba-swat-3.0.33-3.14.el5
system-config-samba-1.2.41-5.el5
[root@xuelinux ~]# service xinetd start
正在启动 xinetd: [确定]
[root@xuelinux ~]# chkconfig swat on
[root@xuelinux ~]# chkconfig --list
........
xinetd 0:关闭1:关闭2:关闭3:启用4:启用5:启用6:关闭
基于 xinetd 的服务:
...
rsync: 关闭
swat: 启用
tcpmux-server: 关闭
[root@xuelinux ~]# service xinetd restart停止 xinetd: [确定]正在启动 xinetd: [确定]
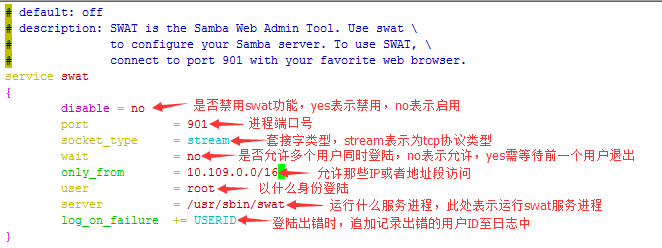
配置文件路径为:/etc/xinetd.d/swat
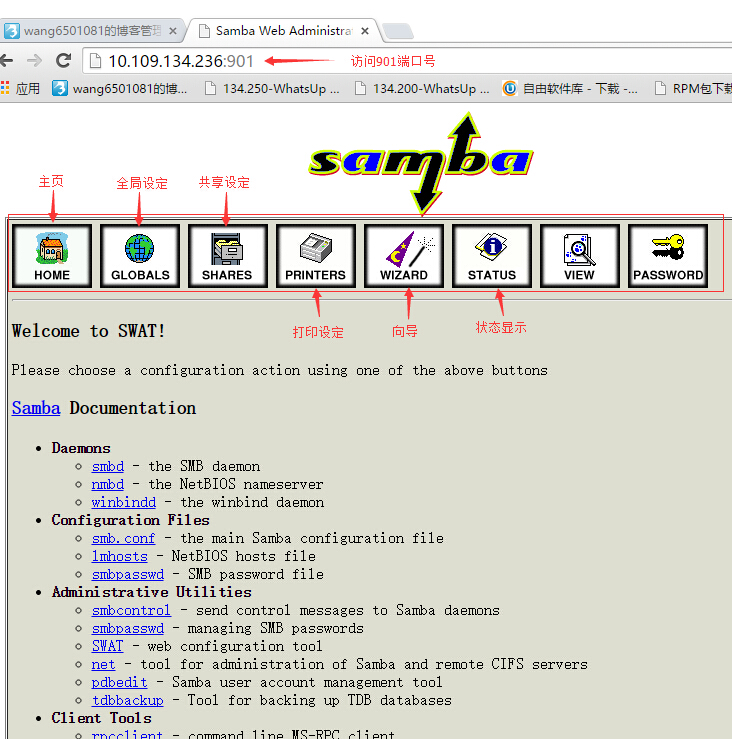
通过客户端访问web界面的samba服务:
---end---
1、服务查询默认情况下,Linux系统在默认安装中已经安装了Samba服务包的一部分 ,为了对整个过程有一个完整的了解,可先将这部分卸载掉。[root@localhost ~]# rpm -qa |grep samba*
samba-client-3.0.33-3.14.el5
samba-common-3.0.33-3.14.el5
samba-3.0.33-3.14.el5
samba-swat-3.0.33-3.14.el5
system-config-samba-1.2.41-5.el5
2、卸载Samba因与其它rpm包之间存在依赖关系,参数-f是指强制,--nodeps是指不检查依赖关系:[root@localhost ~]# rpm -e samba-common --nodeps
[root@localhost ~]# rpm -e samba-client --nodeps
[root@localhost ~]# rpm -e samba --nodep 3、安装Samba3.6[root@localhost ~]# yum list all |grep samba3*samba3x.i386 3.6.23-6.el5 Aliyun
samba3x-client.i386 3.6.23-6.el5 Aliyun
samba3x-common.i386 3.6.23-6.el5 Aliyun
samba3x-swat.i386 3.6.23-6.el5 Aliyun
samba3x-winbind.i386 3.6.23-6.el5 Aliyun
samba3x-winbind-devel.i386 3.6.23-6.el5 Aliyun安装完成后,使用命令rpm -qa | grep samba进行查询,发现搭建samba服务器所依赖的所有服务器都已经安装好了即可。 4、配置smb.conf文件Samba的配置文件一般就放在/etc/samba目录中,主配置文件名为smb.conf,文件中记录着大量的规则和共享信息,所以是samba服务非常重要的核心配置文件,完成samba服务器搭建的大部分主要配置都在该文件中进行。Samba服务器的工作原理是:客户端向Samba服务器发起请求,请求访问共享目录,Samba服务器接收请求,查询smb.conf文件,查看共享目录是否存在,以及来访者的访问权限,如果来访者具有相应的权限,则允许客户端访问,最后将访问过程中系统的信息以及采集的用户访问行为信息存放在日志文件中。
实例操作:如何通过samba共享linux文件目录:第一步:修改配置文件 首先备份一下samba的配置文件cd /etc/sambacp smb.conf smb.confbak然后重新创建一个smb.conf文件vim smb.conf然后我们把这段写入smb.conf中 [global] #全局设置 workgroup = WORKGROUP
netbios name = MYSERVER
server string = Samba Server TestServer
security = share
[shared_name] #共享名称 comment = #注释信息
path = #共享目录的路径 browseable = #是否可以浏览(yes|no) read only = #是否只读(yes|no) writable = #是否可写(yes|no) write list = user1,user2,@group,+group #定义可写列表,可以是用户或者组 valid users = #定义白名单 invalid users = #定义黑名单
注解:
[global]这段是全局配置,是必段写的。其中有如下的几行;workgroup 就是Windows中显示的工作组;在这里我设置的是LINUXSIR (用大写);
netbios name 就是在Windows中显示出来的计算机名;
server string 就是Samba服务器说明,可以自己来定义;这个不是什么重要的;
security 这是验证和登录方式,这里我们用了share ;验证方式有好多种,这是其中一种;另外一种常用的是user的验证方式;如果用share呢,就是不用设置用户和密码了;[shared_name] 这个在Windows中显示出来是共享的目录;
path = 可以设置要共享的目录放在哪里;
writeable = 是否可写,这里我设置为可写;
browseable = 是否可以浏览,可以;可以浏览意味着,我们在工作组下能看到共享文件夹。如果您不想显示出来,那就设置为 browseable = noguest ok = 匿名用户是否允许以guest身份是登录;
第二步:建立目录并设置好权限 [root@xuelinux samba]# mkdir /share/test -pv #递归建立目录
mkdir: 已创建目录 “/share”
mkdir: 已创建目录 “/share/test”
修改samba配置文件,在最后面增加以下几行: [root@xuelinux samba]# vim smb.conf [tools]
comment = Share Testing
path = /share/test
public = yes
writable = yes
[root@xuelinux samba]# testparm #查看测试配置文档是否有问题
Load smb config files from /etc/samba/smb.conf
Processing section "[homes]"
Processing section "[printers]"
Processing section "[tools]"
Loaded services file OK.
Server role: ROLE_STANDALONE
Press enter to see a dump of your service definitions
[global]
server string = Samba Server Version %v
passdb backend = tdbsam
log file = /var/log/samba/%m.log
max log size = 50
cups options = raw
[homes]
comment = Home Directories
read only = No
browseable = No
[printers]
comment = All Printers
path = /var/spool/samba
printable = Yes
browseable = No
[tools]
comment = Share Testing
path = /share/test
read only = No
guest ok = Yes
第三步:启动smbd和nmbd服务器;
[root@xuelinux samba]# service smb start #启动samba服务
启动 SMB 服务: [确定]
启动 NMB 服务: [确定]
[root@xuelinux samba]# service nmb start #启动nmbd服务 #linux6.0后需要啟動此項
启动 NMB 服务: [确定]
第四步:把相关需要访问共享的用户设置为samba服务用户[root@xuelinux samba]# smbpasswd -a hadoop
#把系统已存在的用户hadoop设置为samba服务的用户
New SMB password: #设置访问共享的密码,此密码最好跟系统用户的登录密码不同
Retype new SMB password:
Added user hadoop. #添加成功
[root@xuelinux samba]# ll总计 52
-rw-r--r-- 1 root root 20 2009-05-29 lmhosts
-rw------- 1 root root 4096 03-22 10:14 passdb.tdb #已经生成了密码数据库文件
-rw------- 1 root root 8192 03-22 10:14 secrets.tdb #已经生成了安全密钥数据库文件
-rw-r--r-- 1 root root 9733 03-22 09:10 smb.back
-rw-r--r-- 1 root root 9839 03-22 10:09 smb.conf
-rw-r--r-- 1 root root 97 2009-05-29 smbusers
通过windows客户端访问测试结果如下,成功访问共享目录:
由于tools目录暂时没有给hadoop用户写权限,所以暂时无法再该目录下新建文件,需先修改tools目录的访问权限:
[root@johntest samba]# setfacl -m u:hadoop:rwx /share/test/ #给用户hadoop设置facl权限,使得对test目录具有读写执行权限。
扩展:linux系统如何访问windows共享文件
smbclient #访问windows共享命令 -L NetBIOS_Name #接主机名或IP地址
-U username #接访问共享的用户名[root@localhost test]# smbclient -L 10.109.134.200 -U administrator
Password:
Domain=[FOX-0] OS=[Windows Server 2003 3790 Service Pack 2] Server=[Windows Server 2003 5.2]
Sharename Type Comment
--------- ---- -------
C$ Disk
K$ Disk Symantec Backup Exec Disk
F$ Disk
IPC$ IPC
ADMIN$ Disk
D$ Disk
E$ Disk Software134.200 Disk
IFT_STN Disk
session request to 10.109.134.200 failed (Called name not present)
session request to 10 failed (Called name not present)
Domain=[FOX-0] OS=[Windows Server 2003 3790 Service Pack 2] Server=[Windows Server 2003 5.2][root@localhost test]# smbclient //10.109.134.200/e$ -U administrator
Password:
Domain=[FOX-0] OS=[Windows Server 2003 3790 Service Pack 2] Server=[Windows Server 2003 5.2]
smb: \> ls
b4fe0b43839fc2f8b297b365f3 D 0 Mon Nov 30 17:23:29 2015
FTP D 0 Tue Oct 11 09:57:57 2016
LinuxFTP D 0 Tue Mar 14 11:02:43 2017
RECYCLER DHS 0 Wed Jun 24 16:57:30 2015
System Volume Information DHS 0 Thu Sep 22 09:14:41 2016
35000 blocks of size 4194304. 30829 blocks available
smb: \>
[root@localhost test]# rpm -qa |grep samba #查看web界面控制samb服务器
samba-client-3.0.33-3.14.el5
samba-common-3.0.33-3.14.el5
samba-3.0.33-3.14.el5
samba-swat-3.0.33-3.14.el5
system-config-samba-1.2.41-5.el5
[root@xuelinux ~]# service xinetd start
正在启动 xinetd: [确定]
[root@xuelinux ~]# chkconfig swat on
[root@xuelinux ~]# chkconfig --list
........
xinetd 0:关闭1:关闭2:关闭3:启用4:启用5:启用6:关闭
基于 xinetd 的服务:
...
rsync: 关闭
swat: 启用
tcpmux-server: 关闭
[root@xuelinux ~]# service xinetd restart停止 xinetd: [确定]正在启动 xinetd: [确定]
配置文件路径为:/etc/xinetd.d/swat
通过客户端访问web界面的samba服务:
---end---

相关文章推荐
- Linux命令_ zcat 命令详解 -》不解压文件直接查看文件内容
- linux命令(三)
- Linux命令(40):watch命令
- linux命令随笔(4)
- linux命令中的参数前的一横(-)和两横(--)的区别
- linux命令
- Linux命令系列(2):cd命令
- Linux命令行下编译Android NDK的示例代码
- Linux命令基础9-mv命令
- linux命令记录
- Linux命令收集
- 用python执行Linux命令
- Linux命令:MySQL系列之十四--MySQL备份与还原(LVM逻辑卷快照备份重要章节)
- 工作常用Linux命令
- linux screen 命令详解(后台执行linux命令)
- 面试时常问的linux命令
- linux命令(进程结束):killall命令
- linux命令
- Linux命令-cut
- linux命令清空垃圾箱