Unity3D优化技巧系列三
2017-03-30 16:49
253 查看
笔者介绍:姜雪伟,IT公司技术合伙人,IT高级讲师,CSDN社区专家,特邀编辑,畅销书作者,国家专利发明人;已出版书籍:《手把手教你架构3D游戏引擎》电子工业出版社和《Unity3D实战核心技术详解》电子工业出版社等。CSDN视频网址:http://edu.csdn.net/lecturer/144 继续优化的技术分享,本篇博客主要是介绍关于美术资源的制作要求,以及如何压缩资源优化包体。我们知道Unity引擎本身也是可以压缩的,在这里就给读者介绍了,下 面主要是关于资源的外部处理。一、美术UI规范 在制作美术资源时,首先要设计好美术风格,接下来要设计好背景图片的大小,通常的做法是1024 * 1024作为最大的,换句话说就是制作的背景图片要小于等于它的尺寸。接下来就是关卡图片以及ICON图片,这些图片就要设置的小一些。通常设置成2的n次方,大小为256*256,128*128,64*64,32*32这种形式,当然如果实在不能是2的n次方那就要根据图片的大小进行设置了,当然在Unity引擎中也要进行设置,效果如下所示:
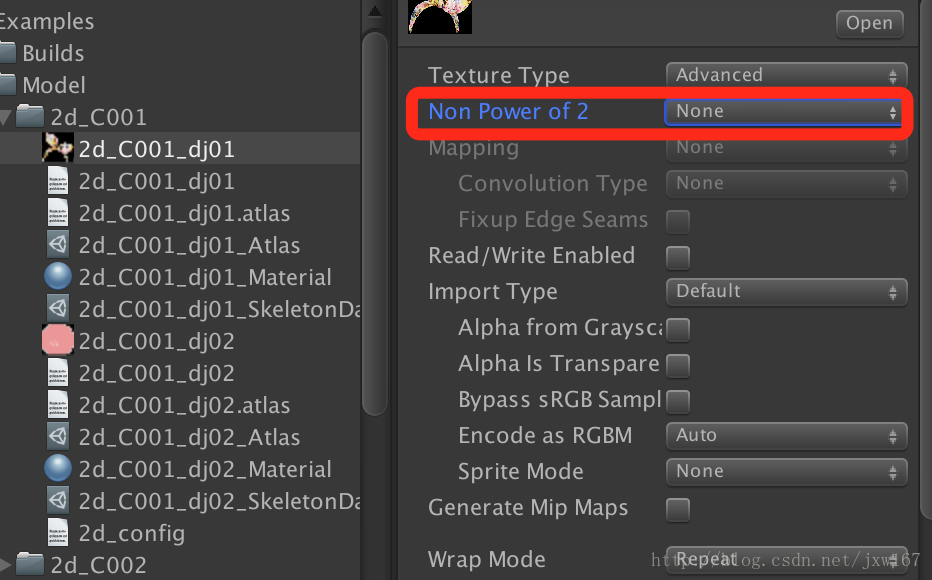
将图片设置成不是2的n次方,这么做的好处是优化内存加载,如果一张图片不是2的n次方,你在Unity将其设置成2的n次方,不够的部分,Unity会为你填充默认颜色,这样当图片加载到内存后,它是按照2的n次方进行处理的,浪费内存。 在制作图片时要本着一个原则,带有Alpha通道的图片采用的格式是png,不带有alpha通道的图片采用的格式是jpg。此二者的图片相对来说比较小。二、图片压缩 美术把UI制作好了后,打包成程序时,包体会受到影响,这就要求我们还要继续压缩图片,作为无损压缩最好的工具,个人推荐使用www.tinypng.com一个在线压缩的网站,对于png和jpg图片特别好用。可以通过在线传递图片在线压缩,然后再将其下载下来,可以单张处理也可以批量处理,网站效果图如下所示:

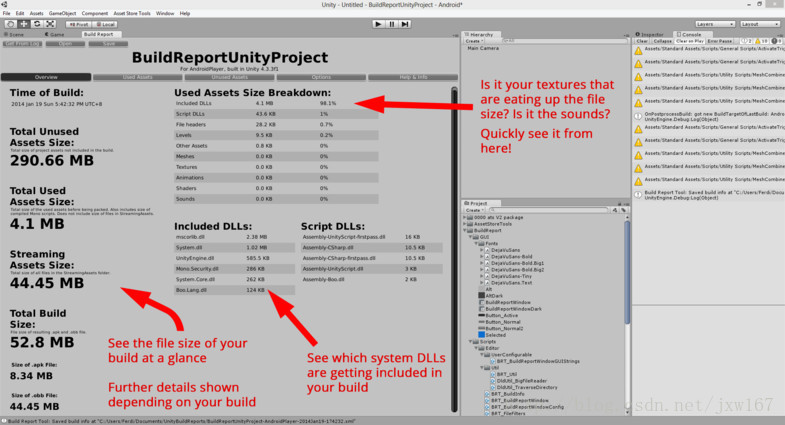
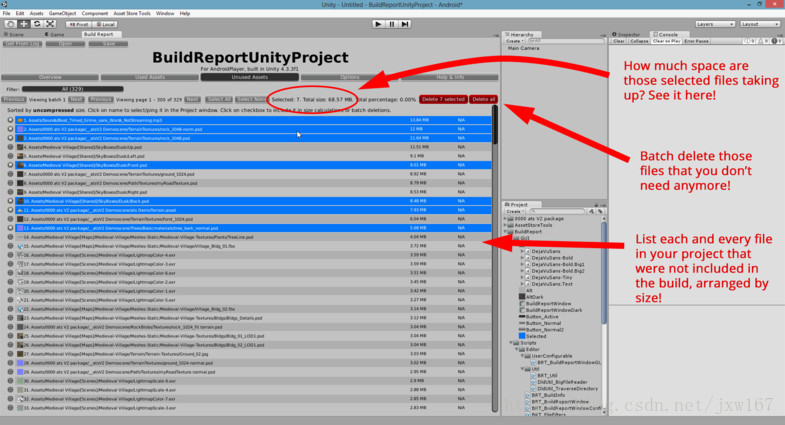
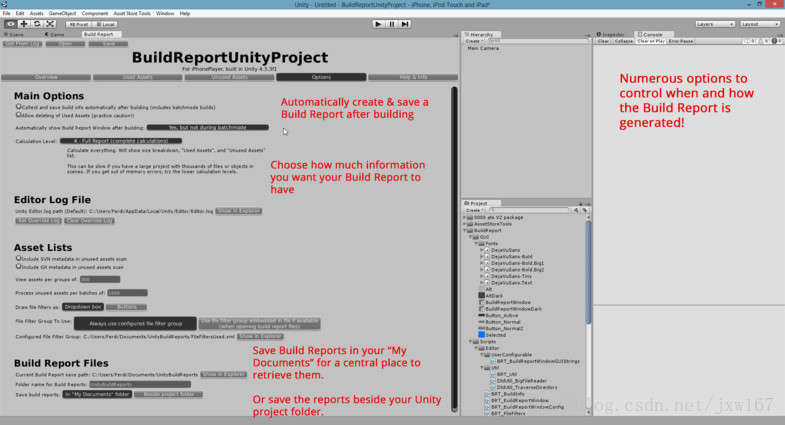
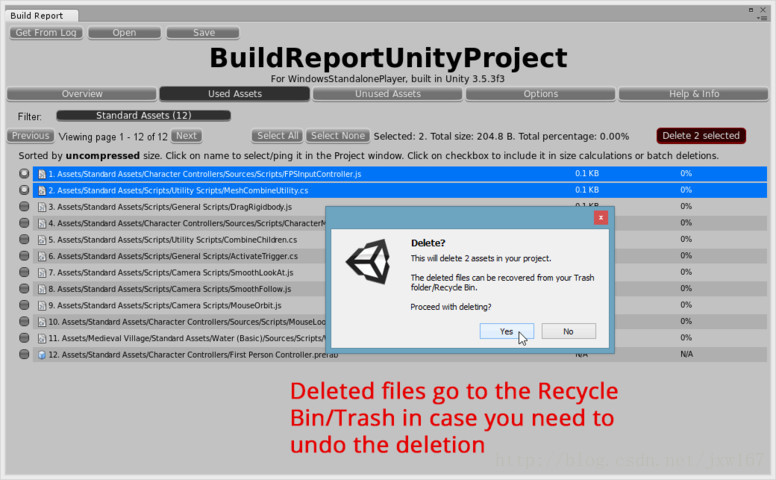
压缩的图片品质几乎没什么损失,但是压缩率高达80%,非常值得推荐。另外开发还可以通过Build Report Tool这个工具查找美术资源占用大小。下面通过图示的方式告诉你如何使用?如下图所示:

三、图集打包 找到图片优化的方法后,后面就要考虑图片加载到内存后的问题了,为了优化内存的加载频率,我们通常的做法是把UI图片打成图集,这样可以有效减少内存加载频率,如果不打成图集,内存加载图片时要不停的加入,释放,这样会严重影响效率。 如果使用Unity自身的打图集方法,因为Unity自身的图集大小是一定的,比如你设置成1024*1024,不管你的图集是否填满,它在内存中都会占用这么大的内存,这对程序来说就是一种浪费,所以在这里推荐大家使用工具TexturePacker进行打包,这样可以有效减少不必要的空间,TexturePacker可以根据你打包的图片大小进行处理。 在使用Unity 打包时可以进行设置分类,比如UI的可以分成几类,游戏场景中的UI分成几类,这么做的好处是避免没用使用到的图片还占据内存。 运行图片如下所示:
四、游戏场景图集 前面介绍的都是关于UI图片的制作,这个也符合大部分人的思维方式,大家想过没有,其实游戏场景也是需要图集的,我们通常的做法就是建模,然后将模型放置到场景中,对于静态的物体,我们也可以考虑使用图集的方式,这个可以根据自己编写算法实现,当然场景图集是要分类的,一般都是使用相同的材质Shader进行处理的,这样也便于代码的编写,打包成图集的方法是采用二叉树算法,手工打包成图集,效果如下所示:
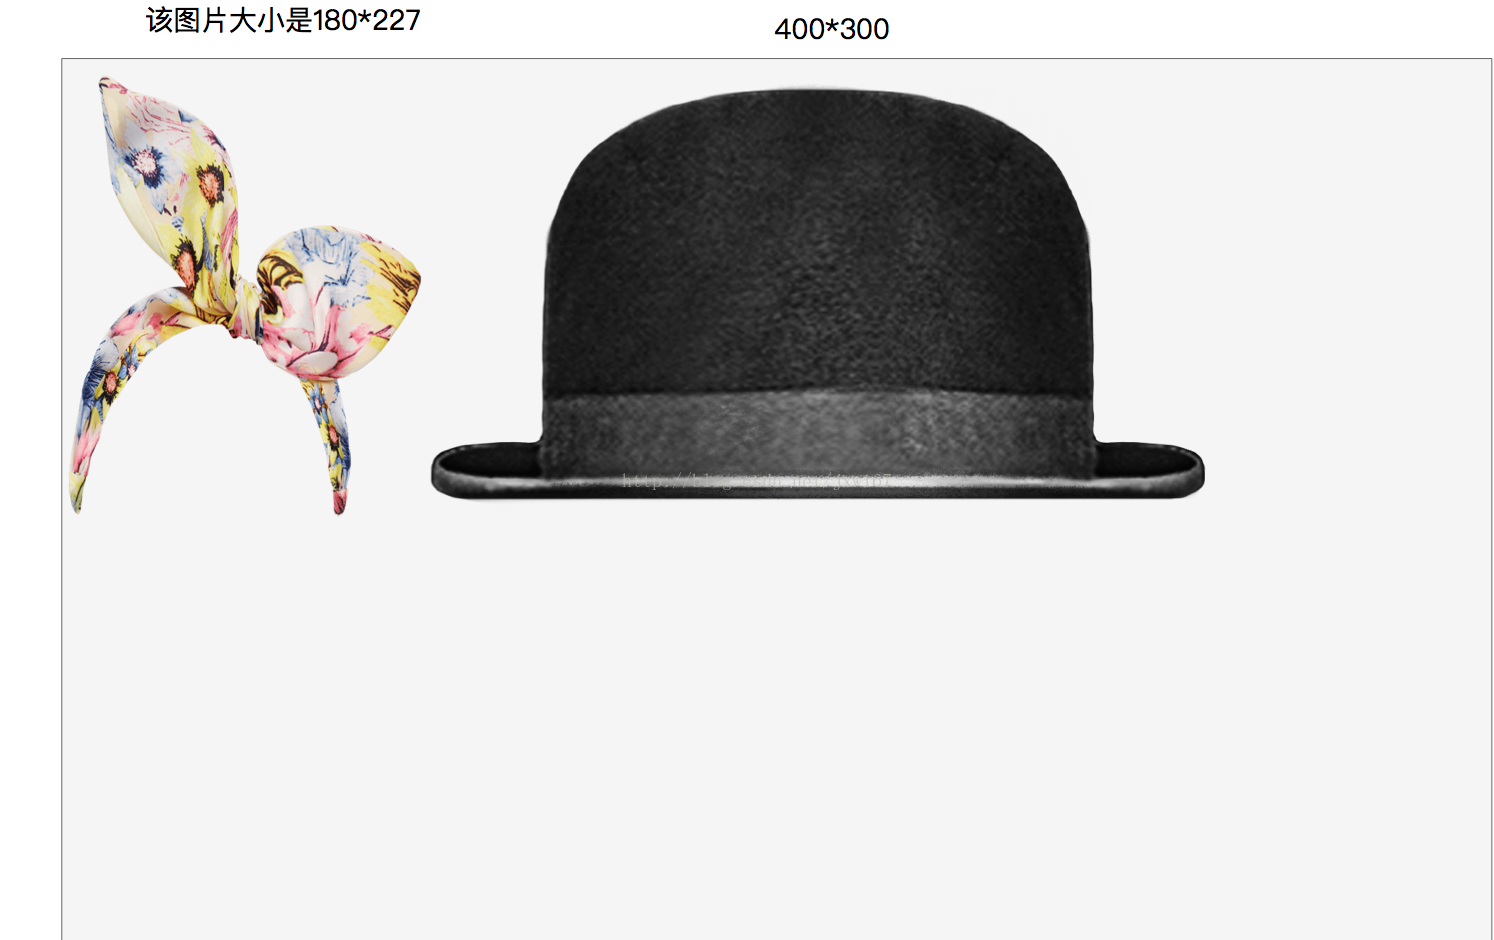
给读者展示一下如何使用,打包成图集后,根据每张图片的大小,以上图为例,第一张图片大小是180*233,那他的横坐标就是180,纵坐标是233。当给模型添加材质时可以根据它的UV(180,233)坐标取到当前的贴图手动赋值给模型,同理,帽子的图片UV坐标就是180+400=580,(580,300)即它的横向坐标是580,纵向坐标是300,那可以根据它的UV坐标取的对应的贴图给模型赋值。这就要求模型的材质是同样的Shader处理,这种方式也是可以优化效率的。一般是在场景完成后,也就是产品进入优化阶段后进行的操作。 接下来我们用代码实现,我们的实现原理是通过二叉树原理实现,首先我们需要定义AslatsNode节点,这个节点满足我们插入节点,建立二叉树,首先我们需要定义图集的大小,鉴于移动端硬件的限制,我们初步定义为1024,插入节点核心代码如下:
将图片设置成不是2的n次方,这么做的好处是优化内存加载,如果一张图片不是2的n次方,你在Unity将其设置成2的n次方,不够的部分,Unity会为你填充默认颜色,这样当图片加载到内存后,它是按照2的n次方进行处理的,浪费内存。 在制作图片时要本着一个原则,带有Alpha通道的图片采用的格式是png,不带有alpha通道的图片采用的格式是jpg。此二者的图片相对来说比较小。二、图片压缩 美术把UI制作好了后,打包成程序时,包体会受到影响,这就要求我们还要继续压缩图片,作为无损压缩最好的工具,个人推荐使用www.tinypng.com一个在线压缩的网站,对于png和jpg图片特别好用。可以通过在线传递图片在线压缩,然后再将其下载下来,可以单张处理也可以批量处理,网站效果图如下所示:
压缩的图片品质几乎没什么损失,但是压缩率高达80%,非常值得推荐。另外开发还可以通过Build Report Tool这个工具查找美术资源占用大小。下面通过图示的方式告诉你如何使用?如下图所示:
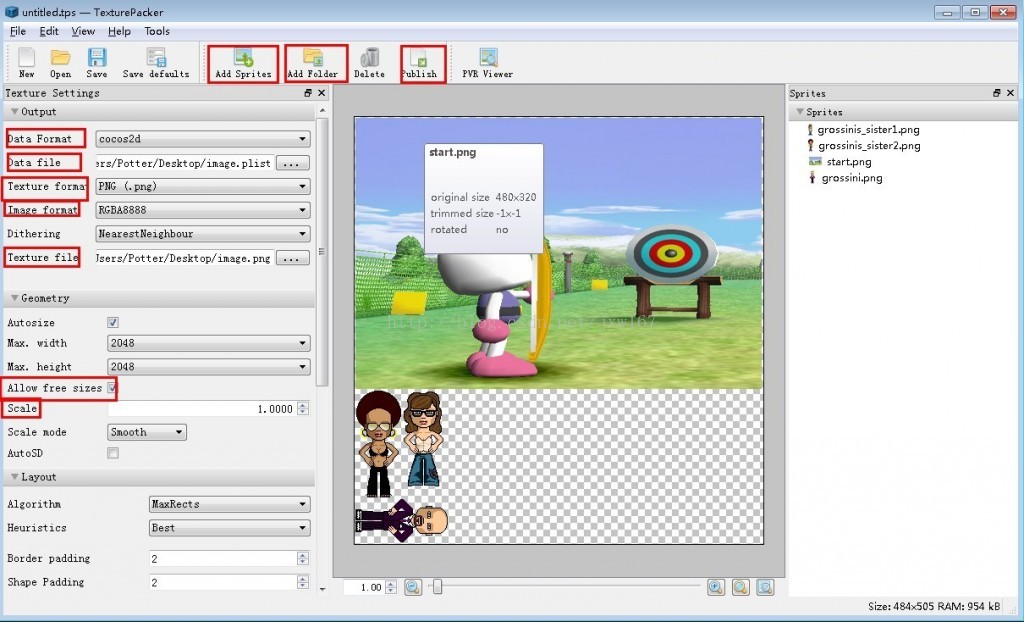
三、图集打包 找到图片优化的方法后,后面就要考虑图片加载到内存后的问题了,为了优化内存的加载频率,我们通常的做法是把UI图片打成图集,这样可以有效减少内存加载频率,如果不打成图集,内存加载图片时要不停的加入,释放,这样会严重影响效率。 如果使用Unity自身的打图集方法,因为Unity自身的图集大小是一定的,比如你设置成1024*1024,不管你的图集是否填满,它在内存中都会占用这么大的内存,这对程序来说就是一种浪费,所以在这里推荐大家使用工具TexturePacker进行打包,这样可以有效减少不必要的空间,TexturePacker可以根据你打包的图片大小进行处理。 在使用Unity 打包时可以进行设置分类,比如UI的可以分成几类,游戏场景中的UI分成几类,这么做的好处是避免没用使用到的图片还占据内存。 运行图片如下所示:
四、游戏场景图集 前面介绍的都是关于UI图片的制作,这个也符合大部分人的思维方式,大家想过没有,其实游戏场景也是需要图集的,我们通常的做法就是建模,然后将模型放置到场景中,对于静态的物体,我们也可以考虑使用图集的方式,这个可以根据自己编写算法实现,当然场景图集是要分类的,一般都是使用相同的材质Shader进行处理的,这样也便于代码的编写,打包成图集的方法是采用二叉树算法,手工打包成图集,效果如下所示:
给读者展示一下如何使用,打包成图集后,根据每张图片的大小,以上图为例,第一张图片大小是180*233,那他的横坐标就是180,纵坐标是233。当给模型添加材质时可以根据它的UV(180,233)坐标取到当前的贴图手动赋值给模型,同理,帽子的图片UV坐标就是180+400=580,(580,300)即它的横向坐标是580,纵向坐标是300,那可以根据它的UV坐标取的对应的贴图给模型赋值。这就要求模型的材质是同样的Shader处理,这种方式也是可以优化效率的。一般是在场景完成后,也就是产品进入优化阶段后进行的操作。 接下来我们用代码实现,我们的实现原理是通过二叉树原理实现,首先我们需要定义AslatsNode节点,这个节点满足我们插入节点,建立二叉树,首先我们需要定义图集的大小,鉴于移动端硬件的限制,我们初步定义为1024,插入节点核心代码如下:
 public AtlasNode Insert(Texture2D image, int index) {

   if (image == null)
    return null;

    if (child != null)

    AtlasNode newNode = child[0].Insert(image, index);

    if (newNode != null)

     return newNode;

    return child[1].Insert(image, index);

   }

   else {

    if (hasImage)

     return null;

    if (!ImageFits(image, rc))

     return null;

    if (PerfectFit(image, rc)) {

     hasImage = true;

     imageRef = image;

     name = imageRef.name;

     sortIndex = index;

     return this;

    }

    child = new AtlasNode[2];

    child[0] = new AtlasNode();

    child[1] = new AtlasNode();

    float deltaW = rc.width - image.width;

    float deltaH = rc.height - image.height;


    if (deltaW > deltaH) {

     child[0].rc = new Rect(rc.xMin, rc.yMin, image.width, rc.height);

     child[1].rc = new Rect(rc.xMin + image.width + TEXTURE_PADDING, rc.yMin, rc.width - (image.width + TEXTURE_PADDING), rc.height);

    }

    else {

     child[0].rc = new Rect(rc.xMin, rc.yMin, rc.width, image.height);

     child[1].rc = new Rect(rc.xMin, rc.yMin + image.height + TEXTURE_PADDING, rc.width, rc.height - (image.height + TEXTURE_PADDING));

    }
    return child[0].Insert(image, index);

   }

}以上代码实现了图片在二叉树进行图片的插入,接下来我们需要建立二叉树代码如下:public void Build(Texture2D target) {
if (child != null) {
if (child[0] != null) {
child[0].Build(target);
}
if (child[1] != null) {
child[1].Build(target);
}
}
if (imageRef != null) {
Color[] data = imageRef.GetPixels(0);
for (int x = 0; x < imageRef.width; ++x) {
for (int y = 0; y < imageRef.height; ++y) {
target.SetPixel(x + (int)rc.x, y + (int)rc.y, data[x + y * imageRef.width]);
}
}
if (TEXTURE_PADDING > 0 && BLEED) {
for (int y = 0; y < imageRef.height; ++y) {
int x = imageRef.width - 1;
target.SetPixel(x + (int)rc.x + TEXTURE_PADDING, y + (int)rc.y, data[x + y * imageRef.width]);
}
for (int x = 0; x < imageRef.width; ++x) {
int y = imageRef.height - 1;
target.SetPixel(x + (int)rc.x, y + (int)rc.y + TEXTURE_PADDING, data[x + y * imageRef.width]);
}
}
}
}
}第三步是创建图集代码如下:public static Atlas[] CreateAtlas(string name, Texture2D[] textures, Atlas startWith = null) {
List<Texture2D> toProcess = new List<Texture2D>();
toProcess.AddRange(textures);
int index = toProcess.Count - 1;
toProcess.Reverse(); // Because we index backwards
List<Atlas> result = new List<Atlas>();
int insertIndex = 0;
if (startWith != null) {
insertIndex = startWith.root.sortIndex;
}
while(index >= 0) {
Atlas _atlas = startWith;
if (_atlas == null) {
_atlas = new Atlas();
_atlas.texture = new Texture2D(AtlasSize, AtlasSize, TextureFormat.RGBA32, false);
_atlas.root = new AtlasNode();
_atlas.root.rc = new Rect(0, 0, AtlasSize, AtlasSize);
}
startWith = null;
while (index >= 0 && (_atlas.root.Contains(toProcess[index].name) || _atlas.root.Insert(toProcess[index], insertIndex++) != null)) {
index -= 1;
}
result.Add(_atlas);
_atlas.root.sortIndex = insertIndex;
insertIndex = 0;
_atlas = null;
}
foreach(Atlas atlas in result) {
atlas.root.Build(atlas.texture);
List<AtlasNode> nodes = new List<AtlasNode>();
atlas.root.GetBounds(ref nodes);
nodes.Sort(delegate (AtlasNode x, AtlasNode y) {
if (x.sortIndex == y.sortIndex) return 0;
if (y.sortIndex > x.sortIndex) return -1;
return 1;
});
List<Rect> rects = new List<Rect>();
foreach(AtlasNode node in nodes) {
Rect normalized = new Rect(node.rc.xMin / atlas.root.rc.width, node.rc.yMin / atlas.root.rc.height, node.rc.width / atlas.root.rc.width, node.rc.height / atlas.root.rc.height);
normalized.x += 0.5f / atlas.root.rc.width;
normalized.width -= 1.0f / atlas.root.rc.width;
normalized.y += 0.5f / atlas.root.rc.height;
normalized.height -= 1.0f / atlas.root.rc.height;
rects.Add(normalized);
}
atlas.uvRects = new AtlasDescriptor[rects.Count];
for (int i = 0; i < rects.Count; i++) {
atlas.uvRects[i] = new AtlasDescriptor();
atlas.uvRects[i].width = (int)nodes[i].rc.width;
atlas.uvRects[i].height = (int)nodes[i].rc.height;
atlas.uvRects[i].name = nodes[i].name;
atlas.uvRects[i].uvRect = rects[i];
}
atlas.root.Clear();
atlas.texture.Apply(false, false);
SaveAtlas(atlas, name);
atlas.texture.Apply(false, false);
}
return result.ToArray();
} 最后一步实现就是把我们生成的图集保存一下: public static void SaveAtlas(Atlas atlas, string name) {
if (atlas == null || atlas.texture == null)
return;
var bytes = atlas.texture.EncodeToPNG();
if (!System.IO.Directory.Exists(Application.dataPath + "/Debug/"))
System.IO.Directory.CreateDirectory(Application.dataPath + "/Debug/");
string file = Application.dataPath + "/Debug/" + name + ".png";
System.IO.File.WriteAllBytes(file, bytes);
}希望对大家有所帮助!

相关文章推荐
- Unity3D优化技巧系列二
- Unity3D优化技巧系列七
- Unity3D优化技巧系列五
- Unity3D优化技巧系列一
- Unity3D优化技巧系列六
- Unity3D优化技巧系列四
- Unity3D优化技巧系列七
- Unity3D优化技巧系列八
- Unity3D静态对象优化系列一
- linq to sql 系列之 linq to sql性能优化技巧
- Unity3D模型优化技巧
- Unity3D中使用Profiler精确定位性能热点的优化技巧
- Unity3D静态对象优化系列一
- Unity3D中使用Profiler精确定位性能热点的优化技巧
- MySQL 优化系列 --2.常见SQL技巧
- Unity3D中使用Profiler精确定位性能热点的优化技巧
- Unity3D中使用Profiler精确定位性能热点的优化技巧
- Unity3D静态对象优化系列
- Unity3D静态对象优化系列二
- unity3d 手游端一些优化技巧