windows短信猫二次开发
2017-03-28 18:34
393 查看
原文出处:http://blog.csdn.net/mishifangxiangdefeng/article/details/52763461#t7
目录(?)[-]
短信猫
一搭环境
物理层开源项目Rxtx
指令层开源项目Smslib
二编程
检测可用的端口
连接猫池
发短信
收短信
断开连接
三踩过的坑
No device response
flush
write
短信猫与PC通过GSM无线网络交互。
交互过程可以分为三个层次:
1.物理层,即无线网络通信。
2.指令层,短信猫支持M35AT指令。
3.应用层,APP需要与短信猫交互的内容。
在做二次开发过程中,真正需要关心的只是应用层的内容。为了避免重复开始,关于物理层和指令层,可以直接使用现有的开源项目。而二次开发的代码只需要调用指令层的API即可。
开源项目Rxtx和Win32Com都能完成这样的功能。其中Win32Com只支持32位Windows,而Rxtx可以支持32位和64位的Windows和Linux,因此本文选择了Rxtx。
步骤:
下载rxtxSerial.dll并复制到JAVA_HOME\bin目录下
下载RXTXcomm.jar,并导入到项目中
步骤:
从smslib官网下载SMSLib (Java - jar file) v3.5.4
解压,把jar包导入到项目中
2
3
4
5
6
7
8
9
10
11
12
13
14
15
16
17
18
19
20
21
22
23
24
25
26
27
28
29
30
31
32
33
34
35
36
37
38
39
40
41
42
43
44
45
46
47
48
49
50
51
52
53
54
55
56
57
58
59
60
61
62
63
64
65
66
67
1
2
3
4
5
6
7
8
9
10
11
12
13
14
15
16
17
18
19
20
21
22
23
24
25
26
27
28
29
30
31
32
33
34
35
36
37
38
39
40
41
42
43
44
45
46
47
48
49
50
51
52
53
54
55
56
57
58
59
60
61
62
63
64
65
66
67
2
3
4
5
6
7
8
9
10
11
12
13
14
15
16
17
18
19
20
21
22
23
24
25
26
27
28
29
30
31
32
33
34
35
36
37
38
39
40
41
42
43
44
45
46
47
48
49
50
51
52
53
54
55
56
57
1
2
3
4
5
6
7
8
9
10
11
12
13
14
15
16
17
18
19
20
21
22
23
24
25
26
27
28
29
30
31
32
33
34
35
36
37
38
39
40
41
42
43
44
45
46
47
48
49
50
51
52
53
54
55
56
57
这段代码可以直接拿来用,只有一个地方要改,且很容易出现错误。
1
参数1:”modem.com1”
这是这次串口连接的名字,用于与其它的串口连接区分,没有格式要求,但是要唯一。
参数2:portname
串口的名字,可以从设备管理器中查出来,也可以通过上面的“检测可用的端口”程序检测出来。在windows上一般是“COMxx”。
参数3:波特率
9600, 19200, 57600, 115200。一般是115200。从设备管理器上查出来的似乎不准,可以用“检测可用的端口”程序检测出来。
参数4:制造商
smslib支持的制造商可以从org.smslib.modem.athandler查到。

最常见的是”Huawei”和”Wavecom”
参数5:型号
smslib支持的型号可以从org.smslib.modem.athandler查到。
也可以填”“。
2
3
4
5
6
1
2
3
4
5
6
2
3
4
5
6
7
8
9
10
11
12
13
14
15
16
17
18
19
1
2
3
4
5
6
7
8
9
10
11
12
13
14
15
16
17
18
19
1
制造商填错了
开始按照设备管理器里查出来的波特率填的,一直报这个错误。改成另一个值就好了。可见设备管理器里查出来的不准。
1.设备没连好
2.信号不好,表现为灯常亮,正常应该灯闪
3.不知道原因,重启一下就好了
4.串口被占
目录(?)[-]
短信猫
一搭环境
物理层开源项目Rxtx
指令层开源项目Smslib
二编程
检测可用的端口
连接猫池
发短信
收短信
断开连接
三踩过的坑
No device response
flush
write
短信猫
短信猫用于批量收/发短信或其它SIM卡服务。短信猫与PC通过GSM无线网络交互。
交互过程可以分为三个层次:
1.物理层,即无线网络通信。
2.指令层,短信猫支持M35AT指令。
3.应用层,APP需要与短信猫交互的内容。
在做二次开发过程中,真正需要关心的只是应用层的内容。为了避免重复开始,关于物理层和指令层,可以直接使用现有的开源项目。而二次开发的代码只需要调用指令层的API即可。
一、搭环境
1、物理层开源项目Rxtx
这一层的主要工作是实现Java的串口通信。开源项目Rxtx和Win32Com都能完成这样的功能。其中Win32Com只支持32位Windows,而Rxtx可以支持32位和64位的Windows和Linux,因此本文选择了Rxtx。
步骤:
下载rxtxSerial.dll并复制到JAVA_HOME\bin目录下
下载RXTXcomm.jar,并导入到项目中
2、指令层开源项目Smslib
这一层的主要工作是把用户可能会用到的操作(例如连接猫池、发短信、收短信等)封装成猫所支持的AT指令,通过rxtx发出去。步骤:
从smslib官网下载SMSLib (Java - jar file) v3.5.4
解压,把jar包导入到项目中
二、编程
满满的都是套路。0.检测可用的端口
public void findComm()
{
static int bauds[] = { 9600, 19200, 57600, 115200 };
Enumeration<CommPortIdentifier> portList = CommPortIdentifier
. getPortIdentifiers();
System. out.println( "短信设备端口连接测试..." );
//connect("COM13", 115200);
while (portList.hasMoreElements()) {

CommPortIdentifier portId = (CommPortIdentifier) portList
.nextElement();

if (portId.getPortType() == CommPortIdentifier.PORT_SERIAL ) {
System. out.println( "找到串口:" + portId.getName());

for ( int i = 0; i < bauds. length; i++) {
System. out.print( "  Trying at " + bauds [i] + "..." );
SerialPort serialPort = null;
try {
InputStream inStream;
OutputStream outStream;
int c;
String response;
serialPort = (SerialPort) portId.open(
"SMSLibCommTester" , 1000);
serialPort
.setFlowControlMode(SerialPort.FLOWCONTROL_RTSCTS_IN );
serialPort.setSerialPortParams(bauds [i],
SerialPort. DATABITS_8 , SerialPort.STOPBITS_1 ,
SerialPort. PARITY_NONE );
inStream = serialPort.getInputStream();
outStream = serialPort.getOutputStream();
serialPort.enableReceiveTimeout(1000);
c = inStream.read();
while (c != -1)
c = inStream.read();
outStream.write( 'A');
outStream.write( 'T');
outStream.write( '\r');
try {
Thread. sleep(1000);
} catch (Exception e) {
}
response = "";
c = inStream.read();
while (c != -1) {
response += ( char) c;
c = inStream.read();
}
if (response.indexOf( "OK" ) >= 0)
{
portname = portId.getName();
baud = bauds [i];
System. out.println( "找到设备:" + portname + baud);
break;
} else
System. out.println( "  没有发现设备!" );
} catch (Exception e) {
System. out.println( "  没有发现设备!" );
}
finally{
serialPort.close();
}
}
}
}
}12
3
4
5
6
7
8
9
10
11
12
13
14
15
16
17
18
19
20
21
22
23
24
25
26
27
28
29
30
31
32
33
34
35
36
37
38
39
40
41
42
43
44
45
46
47
48
49
50
51
52
53
54
55
56
57
58
59
60
61
62
63
64
65
66
67
1
2
3
4
5
6
7
8
9
10
11
12
13
14
15
16
17
18
19
20
21
22
23
24
25
26
27
28
29
30
31
32
33
34
35
36
37
38
39
40
41
42
43
44
45
46
47
48
49
50
51
52
53
54
55
56
57
58
59
60
61
62
63
64
65
66
67
1、连接猫池
public void connect()
{
// Create the notification callback method for inbound & status report
// messages.
//InboundNotification inboundNotification = new InboundNotification();
// Create the notification callback method for inbound voice calls.
CallNotification callNotification = new CallNotification();
//Create the notification callback method for gateway statuses.
GatewayStatusNotification statusNotification = new GatewayStatusNotification();
OrphanedMessageNotification orphanedMessageNotification = new OrphanedMessageNotification();
try
{
System.out.println(Library.getLibraryDescription());
System.out.println("Version: " + Library.getLibraryVersion());
// Create the Gateway representing the serial GSM modem.
SerialModemGateway gateway = new SerialModemGateway("modem.com1", portname, baud, "Wavecom", "");
// Set the modem protocol to PDU (alternative is TEXT). PDU is the default, anyway...
gateway.setProtocol(Protocols.PDU);
// Do we want the Gateway to be used for Inbound messages?
gateway.setInbound(true);
// Do we want the Gateway to be used for Outbound messages?
gateway.setOutbound(true);
// Let SMSLib know which is the SIM PIN.
gateway.setSimPin("1234");
// Set up the notification methods.
//Service.getInstance().setInboundMessageNotification(inboundNotification);
Service.getInstance().setCallNotification(callNotification);
Service.getInstance().setGatewayStatusNotification(statusNotification);
Service.getInstance().setOrphanedMessageNotification(orphanedMessageNotification);
Service.getInstance().S.SERIAL_POLLING = true;  //hyn 启用轮循模式
// Add the Gateway to the Service object.
Service.getInstance().addGateway(gateway);
// Similarly, you may define as many Gateway objects, representing
// various GSM modems, add them in the Service object and control all of them.
// Start! (i.e. connect to all defined Gateways)
Service.getInstance().startService();
// Printout some general information about the modem.
System.out.println();
System.out.println("Modem Information:");
System.out.println("  Manufacturer: " + gateway.getManufacturer());
System.out.println("  Model: " + gateway.getModel());
System.out.println("  Serial No: " + gateway.getSerialNo());
System.out.println("  SIM IMSI: " + gateway.getImsi());
System.out.println("  Signal Level: " + gateway.getSignalLevel() + " dBm");
System.out.println("  Battery Level: " + gateway.getBatteryLevel() + "%");
System.out.println();
// In case you work with encrypted messages, its a good time to declare your keys.
// Create a new AES Key with a known key value.
// Register it in KeyManager in order to keep it active. SMSLib will then automatically
// encrypt / decrypt all messages send to / received from this number.
Service.getInstance().getKeyManager().registerKey("+306948494037", new AESKey(new SecretKeySpec("0011223344556677".getBytes(), "AES")));
}
catch (Exception e)
{
e.printStackTrace();
}
}12
3
4
5
6
7
8
9
10
11
12
13
14
15
16
17
18
19
20
21
22
23
24
25
26
27
28
29
30
31
32
33
34
35
36
37
38
39
40
41
42
43
44
45
46
47
48
49
50
51
52
53
54
55
56
57
1
2
3
4
5
6
7
8
9
10
11
12
13
14
15
16
17
18
19
20
21
22
23
24
25
26
27
28
29
30
31
32
33
34
35
36
37
38
39
40
41
42
43
44
45
46
47
48
49
50
51
52
53
54
55
56
57
这段代码可以直接拿来用,只有一个地方要改,且很容易出现错误。
SerialModemGateway gateway = new SerialModemGateway("modem.com1", portname, baud, "Wavecom", "");11
参数1:”modem.com1”
这是这次串口连接的名字,用于与其它的串口连接区分,没有格式要求,但是要唯一。
参数2:portname
串口的名字,可以从设备管理器中查出来,也可以通过上面的“检测可用的端口”程序检测出来。在windows上一般是“COMxx”。
参数3:波特率
9600, 19200, 57600, 115200。一般是115200。从设备管理器上查出来的似乎不准,可以用“检测可用的端口”程序检测出来。
参数4:制造商
smslib支持的制造商可以从org.smslib.modem.athandler查到。
最常见的是”Huawei”和”Wavecom”
参数5:型号
smslib支持的型号可以从org.smslib.modem.athandler查到。
也可以填”“。
2.发短信
public void sendMessage(String target, String content) throws Exception
{
OutboundMessage msg = new OutboundMessage(target, content);
Service.getInstance().sendMessage(msg);
System.out.println(msg);
}12
3
4
5
6
1
2
3
4
5
6
3.收短信
public void readMessage(){
try
{
// Define a list which will hold the read messages.
List<InboundMessage> msgList;
System.out.println("Example: Read messages from a serial gsm modem.");
// Read Messages. The reading is done via the Service object and
// affects all Gateway objects defined. This can also be more directed to a specific
// Gateway - look the JavaDocs for information on the Service method calls.
msgList = new ArrayList<InboundMessage>();
Service.getInstance().readMessages(msgList, MessageClasses.ALL);
for (InboundMessage msg : msgList)
System.out.println(msg);
}
catch (Exception e)
{
e.printStackTrace();
}
}12
3
4
5
6
7
8
9
10
11
12
13
14
15
16
17
18
19
1
2
3
4
5
6
7
8
9
10
11
12
13
14
15
16
17
18
19
4.断开连接
Service.getInstance().stopService();1
1
三、踩过的坑
1.No device response.
制造商填错了2.flush
波特率填错了。开始按照设备管理器里查出来的波特率填的,一直报这个错误。改成另一个值就好了。可见设备管理器里查出来的不准。
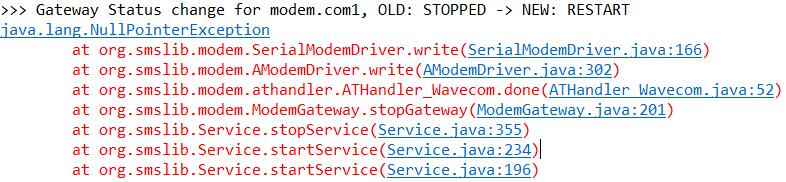
3.write
1.设备没连好
2.信号不好,表现为灯常亮,正常应该灯闪
3.不知道原因,重启一下就好了
4.串口被占

相关文章推荐
- windows短信猫二次开发
- 短信猫的二次开发
- 电信CDMA MODEM 二次开发API接口说明(适用windows/linux)
- 简易短信猫接口程序,可快速实现短信猫二次开发
- 配送短信猫二次开发接口软件,提供多种开发语言示例
- 多口短信猫池做二次开发应用实现过程与原理
- SVN二次开发——让SVN、TSVN(TortoiseSVN)支持windows的访问控制模型、NTFS ADS (可选数据流、NTFS的安全属性)
- 一些有关Windows Desktop Search二次开发的有用资源
- eHotGIS For Windows phone 8 (WP8) SDK 二次开发入门
- 短信猫 短信通 的二次开发程序
- SVN二次开发——让SVN、TSVN(TortoiseSVN)支持windows的访问控制模型、NTFS ADS(可选数据流、NTFS的安全属性)
- 请各位大侠帮帮小弟的忙,谁有windows(MAS)dll二次开发例子
- 短信猫JAVA二次开发包SMSLib,org.smslib.TimeoutException: No response from device解决方案
- CDMA短信猫AT命令全集,CDMA短信猫二次开发所能使用的AT命令
- 联通spApi.jar短信接口二次开发
- 利用短信猫进行二次开发
- RTX短信二次开发(RTX短信插件)
- 短信猫delphi版的短信猫二次开发
- 电信短信网关ISAG-SMS二次开发
- GSM短信猫常用二次开发包使用实例