Quartz存储与持久化-基于Spring的配置
2017-03-18 14:44
302 查看
在上文【Quartz】Quartz存储与持久化-基于quartz.properties的配置 ,是通过配置quartz.properties文件的方式来实现持久化的。本文将通过spring配置的方式来实现存储与持久化。
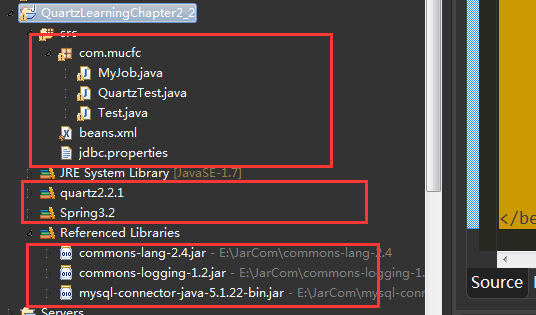
1、同上文一样,要先创建相关的数据表,并新建一个Java工程,并导入相关的包,整个工程目录 如下:
2、创建Job类
[java] view
plain copy


package com.mucfc;
import java.text.SimpleDateFormat;
import java.util.Date;
import org.apache.log4j.Logger;
import org.quartz.Job;
import org.quartz.JobExecutionContext;
import org.quartz.JobExecutionException;
public class MyJob implements Job{
private static final Logger logger = Logger.getLogger(MyJob.class);
@Override
public void execute(JobExecutionContext context)
throws JobExecutionException {
System.out.println("Hello quzrtz "+
new SimpleDateFormat("yyyy-MM-dd HH:mm:ss ").format(new Date()));
}
}
3、创建一个调度类
[java] view
plain copy
package com.mucfc;
import java.text.ParseException;
import java.util.List;
import org.apache.commons.lang.StringUtils;
import org.quartz.CronScheduleBuilder;
import org.quartz.Job;
import org.quartz.JobBuilder;
import org.quartz.JobDetail;
import org.quartz.JobKey;
import org.quartz.Scheduler;
import org.quartz.SchedulerException;
import org.quartz.SchedulerFactory;
import org.quartz.SimpleScheduleBuilder;
import org.quartz.SimpleTrigger;
import org.quartz.Trigger;
import org.quartz.TriggerBuilder;
import org.quartz.TriggerKey;
import org.quartz.impl.StdSchedulerFactory;
import org.springframework.beans.factory.annotation.Autowired;
import org.springframework.context.ApplicationContext;
import org.springframework.context.support.ClassPathXmlApplicationContext;
import org.springframework.stereotype.Component;
@Component
public class QuartzTest {
@Autowired
private Scheduler scheduler;
private static String JOB_GROUP_NAME = "ddlib";
private static String TRIGGER_GROUP_NAME = "ddlibTrigger";
/**
* 开始一个simpleSchedule()调度
*/
public void startSchedule() {
try {
// 1、创建一个JobDetail实例,指定Quartz
JobDetail jobDetail = JobBuilder.newJob(MyJob.class)
// 任务执行类
.withIdentity("job1_1", "jGroup1")
// 任务名,任务组
.build();
// 2、创建Trigger
SimpleScheduleBuilder builder = SimpleScheduleBuilder
.simpleSchedule()
// 设置执行次数
.repeatSecondlyForTotalCount(10);
Trigger trigger = TriggerBuilder.newTrigger()
.withIdentity("trigger1_1", "tGroup1").startNow()
.withSchedule(builder).build();
// 3、创建Scheduler
scheduler.start();
// 4、调度执行
scheduler.scheduleJob(jobDetail, trigger);
try {
Thread.sleep(60000);
} catch (InterruptedException e) {
e.printStackTrace();
}
scheduler.shutdown();
} catch (SchedulerException e) {
e.printStackTrace();
}
}
/**
* 从数据库中找到已经存在的job,并重新开户调度
*/
public void resumeJob() {
try {
// ①获取调度器中所有的触发器组
List<String> triggerGroups = scheduler.getTriggerGroupNames();
// ②重新恢复在tgroup1组中,名为trigger1_1触发器的运行
for (int i = 0; i < triggerGroups.size(); i++) {
List<String> triggers = scheduler.getTriggerGroupNames();
for (int j = 0; j < triggers.size(); j++) {
Trigger tg = scheduler.getTrigger(new TriggerKey(triggers
.get(j), triggerGroups.get(i)));
// ②-1:根据名称判断
if (tg instanceof SimpleTrigger
&& tg.getDescription().equals("tgroup1.trigger1_1")) {
// ②-1:恢复运行
scheduler.resumeJob(new JobKey(triggers.get(j),
triggerGroups.get(i)));
}
}
}
scheduler.start();
} catch (Exception e) {
e.printStackTrace();
}
}
}
4、beans.xml文件配置
[html] view
plain copy
<?xml version="1.0" encoding="UTF-8"?>
<beans xmlns="http://www.springframework.org/schema/beans"
xmlns:xsi="http://www.w3.org/2001/XMLSchema-instance" xmlns:context="http://www.springframework.org/schema/context"
xmlns:p="http://www.springframework.org/schema/p" xmlns:task="http://www.springframework.org/schema/task"
xsi:schemaLocation="http://www.springframework.org/schema/beans
http://www.springframework.org/schema/beans/spring-beans-3.0.xsd
http://www.springframework.org/schema/context
http://www.springframework.org/schema/context/spring-context-3.0.xsd
http://www.springframework.org/schema/task
http://www.springframework.org/schema/task/spring-task-3.0.xsd">
<!-- 自动扫描注解的bean -->
<context:component-scan base-package="com.mucfc"/>
<context:property-placeholder location="classpath:jdbc.properties" />
<bean id="quartzDataSource" class="org.springframework.jdbc.datasource.DriverManagerDataSource" >
<!-- <property name="driverClass" value="${quartz.driverClassName}"/>
<property name="jdbcUrl" value="${quartz.url}"/>
<property name="user" value="${quartz.username}"/>
<property name="password" " value="${quartz.password}"/>
<property name="minPoolSize" value="${quartz.minPoolSize}"/>
<property name="initialPoolSize" value="${quartz.initialPoolSize}"/> -->
<property name="driverClassName" value="${quartz.driverClassName}"/>
<property name="url" value="${quartz.url}"/>
<property name="username" value="${quartz.username}"/>
<property name="password" value="${quartz.password}"/>
</bean>
<!-- quartz持久化存储 -->
<bean name="quartzScheduler"
class="org.springframework.scheduling.quartz.SchedulerFactoryBean">
<property name="dataSource">
<ref bean="quartzDataSource" />
</property>
<property name="applicationContextSchedulerContextKey" value="applicationContext" />
<property name="quartzProperties">
<props>
<prop key="org.quartz.scheduler.instanceName">CRMscheduler</prop>
<prop key="org.quartz.scheduler.instanceId">AUTO</prop>
<!-- 线程池配置 -->
<prop key="org.quartz.threadPool.class">org.quartz.simpl.SimpleThreadPool</prop>
<prop key="org.quartz.threadPool.threadCount">20</prop>
<prop key="org.quartz.threadPool.threadPriority">5</prop>
<prop key="org.quartz.jobStore.misfireThreshold">120000</prop>
<!-- JobStore 配置 -->
<prop key="org.quartz.jobStore.class">org.quartz.impl.jdbcjobstore.JobStoreTX</prop>
<!-- 集群配置 -->
<prop key="org.quartz.jobStore.isClustered">true</prop>
<prop key="org.quartz.jobStore.clusterCheckinInterval">15000</prop>
<prop key="org.quartz.jobStore.maxMisfiresToHandleAtATime">1</prop>
<!-- 数据表设置 -->
<prop key="org.quartz.jobStore.tablePrefix">qrtz_</prop>
<prop key="org.quartz.jobStore.dataSource">qzDS</prop>
</props>
</property>
</bean>
</beans>
其中数据源jdbc.properties:
[html] view
plain copy
############quartz db########################
quartz.driverClassName=com.mysql.jdbc.Driver
quartz.url=jdbc:mysql://127.0.0.1:3306/quartz?useUnicode=true
quartz.username=root
quartz.password=christmas258@
quartz.minPoolSize=7
quartz.initialPoolSize=12
5、测试类
[java] view
plain copy
package com.mucfc;
import org.springframework.context.ApplicationContext;
import org.springframework.context.support.ClassPathXmlApplicationContext;
public class Test {
public static void main(String[] args) {
ApplicationContext context=new ClassPathXmlApplicationContext("beans.xml");
QuartzTest quartzTest=context.getBean("quartzTest",QuartzTest.class);
quartzTest.startSchedule();
//quartzTest.resumeJob();
}
}
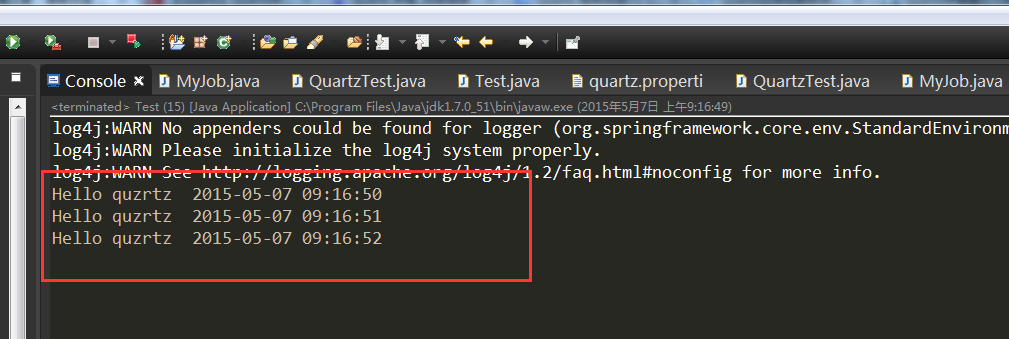
输出结果:
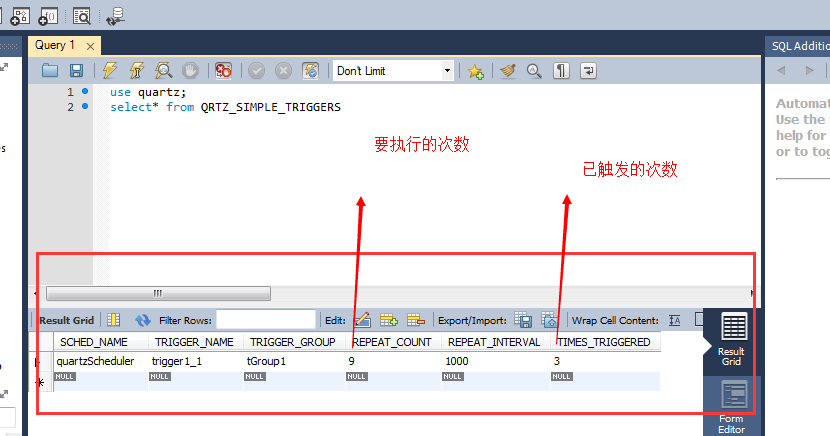
查看数据表
停止程序,语句改成:
[java] view
plain copy
//quartzTest.startSchedule();
uartzTest.resumeJob();
然后就可以发现任务接着运行了,运行完成完之后自动从数据表中删除:

项下载地址
1、同上文一样,要先创建相关的数据表,并新建一个Java工程,并导入相关的包,整个工程目录 如下:
2、创建Job类
[java] view
plain copy
package com.mucfc;
import java.text.SimpleDateFormat;
import java.util.Date;
import org.apache.log4j.Logger;
import org.quartz.Job;
import org.quartz.JobExecutionContext;
import org.quartz.JobExecutionException;
public class MyJob implements Job{
private static final Logger logger = Logger.getLogger(MyJob.class);
@Override
public void execute(JobExecutionContext context)
throws JobExecutionException {
System.out.println("Hello quzrtz "+
new SimpleDateFormat("yyyy-MM-dd HH:mm:ss ").format(new Date()));
}
}
3、创建一个调度类
[java] view
plain copy
package com.mucfc;
import java.text.ParseException;
import java.util.List;
import org.apache.commons.lang.StringUtils;
import org.quartz.CronScheduleBuilder;
import org.quartz.Job;
import org.quartz.JobBuilder;
import org.quartz.JobDetail;
import org.quartz.JobKey;
import org.quartz.Scheduler;
import org.quartz.SchedulerException;
import org.quartz.SchedulerFactory;
import org.quartz.SimpleScheduleBuilder;
import org.quartz.SimpleTrigger;
import org.quartz.Trigger;
import org.quartz.TriggerBuilder;
import org.quartz.TriggerKey;
import org.quartz.impl.StdSchedulerFactory;
import org.springframework.beans.factory.annotation.Autowired;
import org.springframework.context.ApplicationContext;
import org.springframework.context.support.ClassPathXmlApplicationContext;
import org.springframework.stereotype.Component;
@Component
public class QuartzTest {
@Autowired
private Scheduler scheduler;
private static String JOB_GROUP_NAME = "ddlib";
private static String TRIGGER_GROUP_NAME = "ddlibTrigger";
/**
* 开始一个simpleSchedule()调度
*/
public void startSchedule() {
try {
// 1、创建一个JobDetail实例,指定Quartz
JobDetail jobDetail = JobBuilder.newJob(MyJob.class)
// 任务执行类
.withIdentity("job1_1", "jGroup1")
// 任务名,任务组
.build();
// 2、创建Trigger
SimpleScheduleBuilder builder = SimpleScheduleBuilder
.simpleSchedule()
// 设置执行次数
.repeatSecondlyForTotalCount(10);
Trigger trigger = TriggerBuilder.newTrigger()
.withIdentity("trigger1_1", "tGroup1").startNow()
.withSchedule(builder).build();
// 3、创建Scheduler
scheduler.start();
// 4、调度执行
scheduler.scheduleJob(jobDetail, trigger);
try {
Thread.sleep(60000);
} catch (InterruptedException e) {
e.printStackTrace();
}
scheduler.shutdown();
} catch (SchedulerException e) {
e.printStackTrace();
}
}
/**
* 从数据库中找到已经存在的job,并重新开户调度
*/
public void resumeJob() {
try {
// ①获取调度器中所有的触发器组
List<String> triggerGroups = scheduler.getTriggerGroupNames();
// ②重新恢复在tgroup1组中,名为trigger1_1触发器的运行
for (int i = 0; i < triggerGroups.size(); i++) {
List<String> triggers = scheduler.getTriggerGroupNames();
for (int j = 0; j < triggers.size(); j++) {
Trigger tg = scheduler.getTrigger(new TriggerKey(triggers
.get(j), triggerGroups.get(i)));
// ②-1:根据名称判断
if (tg instanceof SimpleTrigger
&& tg.getDescription().equals("tgroup1.trigger1_1")) {
// ②-1:恢复运行
scheduler.resumeJob(new JobKey(triggers.get(j),
triggerGroups.get(i)));
}
}
}
scheduler.start();
} catch (Exception e) {
e.printStackTrace();
}
}
}
4、beans.xml文件配置
[html] view
plain copy
<?xml version="1.0" encoding="UTF-8"?>
<beans xmlns="http://www.springframework.org/schema/beans"
xmlns:xsi="http://www.w3.org/2001/XMLSchema-instance" xmlns:context="http://www.springframework.org/schema/context"
xmlns:p="http://www.springframework.org/schema/p" xmlns:task="http://www.springframework.org/schema/task"
xsi:schemaLocation="http://www.springframework.org/schema/beans
http://www.springframework.org/schema/beans/spring-beans-3.0.xsd
http://www.springframework.org/schema/context
http://www.springframework.org/schema/context/spring-context-3.0.xsd
http://www.springframework.org/schema/task
http://www.springframework.org/schema/task/spring-task-3.0.xsd">
<!-- 自动扫描注解的bean -->
<context:component-scan base-package="com.mucfc"/>
<context:property-placeholder location="classpath:jdbc.properties" />
<bean id="quartzDataSource" class="org.springframework.jdbc.datasource.DriverManagerDataSource" >
<!-- <property name="driverClass" value="${quartz.driverClassName}"/>
<property name="jdbcUrl" value="${quartz.url}"/>
<property name="user" value="${quartz.username}"/>
<property name="password" " value="${quartz.password}"/>
<property name="minPoolSize" value="${quartz.minPoolSize}"/>
<property name="initialPoolSize" value="${quartz.initialPoolSize}"/> -->
<property name="driverClassName" value="${quartz.driverClassName}"/>
<property name="url" value="${quartz.url}"/>
<property name="username" value="${quartz.username}"/>
<property name="password" value="${quartz.password}"/>
</bean>
<!-- quartz持久化存储 -->
<bean name="quartzScheduler"
class="org.springframework.scheduling.quartz.SchedulerFactoryBean">
<property name="dataSource">
<ref bean="quartzDataSource" />
</property>
<property name="applicationContextSchedulerContextKey" value="applicationContext" />
<property name="quartzProperties">
<props>
<prop key="org.quartz.scheduler.instanceName">CRMscheduler</prop>
<prop key="org.quartz.scheduler.instanceId">AUTO</prop>
<!-- 线程池配置 -->
<prop key="org.quartz.threadPool.class">org.quartz.simpl.SimpleThreadPool</prop>
<prop key="org.quartz.threadPool.threadCount">20</prop>
<prop key="org.quartz.threadPool.threadPriority">5</prop>
<prop key="org.quartz.jobStore.misfireThreshold">120000</prop>
<!-- JobStore 配置 -->
<prop key="org.quartz.jobStore.class">org.quartz.impl.jdbcjobstore.JobStoreTX</prop>
<!-- 集群配置 -->
<prop key="org.quartz.jobStore.isClustered">true</prop>
<prop key="org.quartz.jobStore.clusterCheckinInterval">15000</prop>
<prop key="org.quartz.jobStore.maxMisfiresToHandleAtATime">1</prop>
<!-- 数据表设置 -->
<prop key="org.quartz.jobStore.tablePrefix">qrtz_</prop>
<prop key="org.quartz.jobStore.dataSource">qzDS</prop>
</props>
</property>
</bean>
</beans>
其中数据源jdbc.properties:
[html] view
plain copy
############quartz db########################
quartz.driverClassName=com.mysql.jdbc.Driver
quartz.url=jdbc:mysql://127.0.0.1:3306/quartz?useUnicode=true
quartz.username=root
quartz.password=christmas258@
quartz.minPoolSize=7
quartz.initialPoolSize=12
5、测试类
[java] view
plain copy
package com.mucfc;
import org.springframework.context.ApplicationContext;
import org.springframework.context.support.ClassPathXmlApplicationContext;
public class Test {
public static void main(String[] args) {
ApplicationContext context=new ClassPathXmlApplicationContext("beans.xml");
QuartzTest quartzTest=context.getBean("quartzTest",QuartzTest.class);
quartzTest.startSchedule();
//quartzTest.resumeJob();
}
}
输出结果:
查看数据表
停止程序,语句改成:
[java] view
plain copy
//quartzTest.startSchedule();
uartzTest.resumeJob();
然后就可以发现任务接着运行了,运行完成完之后自动从数据表中删除:
项下载地址

相关文章推荐
- Quartz存储与持久化-基于Spring的配置
- Quartz存储与持久化-基于Spring的配置
- Quartz存储与持久化-基于Spring的配置
- Quartz存储与持久化-基于Spring的配置
- 【Quartz】Quartz存储与持久化-基于Spring的配置
- Quartz存储与持久化-基于Spring的配置
- Quartz存储与持久化-基于Spring的配置
- Quartz存储与持久化-基于Spring的配置
- 【Quartz】Quartz存储与持久化-基于Spring的配置
- 【Quartz】Quartz存储与持久化-基于Spring的配置
- Quartz存储与持久化-基于Spring的配置
- Quartz存储与持久化-基于Spring的配置
- Quartz存储与持久化-基于Spring的配置
- Quartz存储与持久化-基于Spring的配置
- 【Quartz】Quartz存储与持久化-基于quartz.properties的配置
- 【Quartz】Quartz存储与持久化-基于quartz.properties的配置
- Quartz存储与持久化-基于quartz.properties的配置
- Quartz存储与持久化-基于quartz.properties的配置
- Quartz存储与持久化-基于quartz.properties的配置
- Quartz存储与持久化-基于quartz.properties的配置