在eclipse上使用maven创建ejb-helloworld项目
2017-03-17 14:11
417 查看
前提条件:已安装eclipse,并完成maven配置
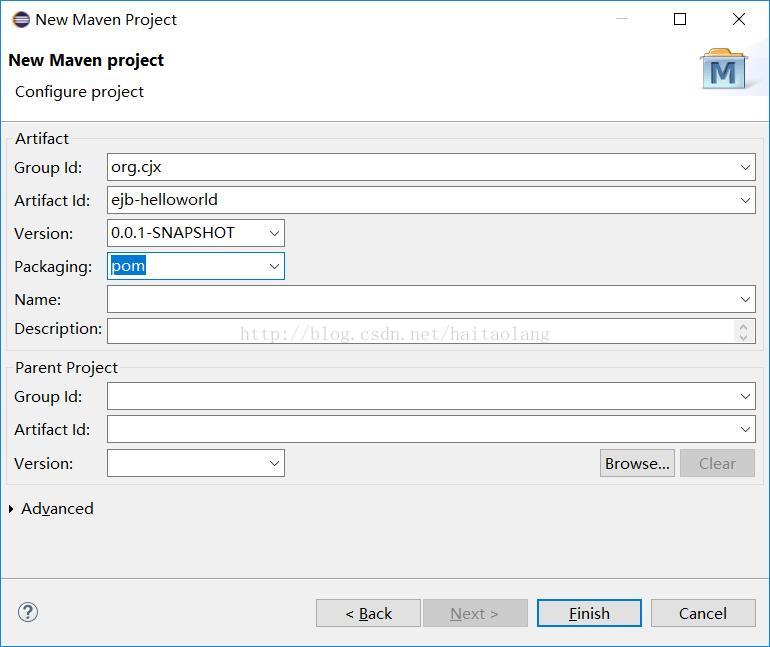
1. 新建maven project,填好Artifact上的Group Id和Artifact Id,Packaging中选择pom
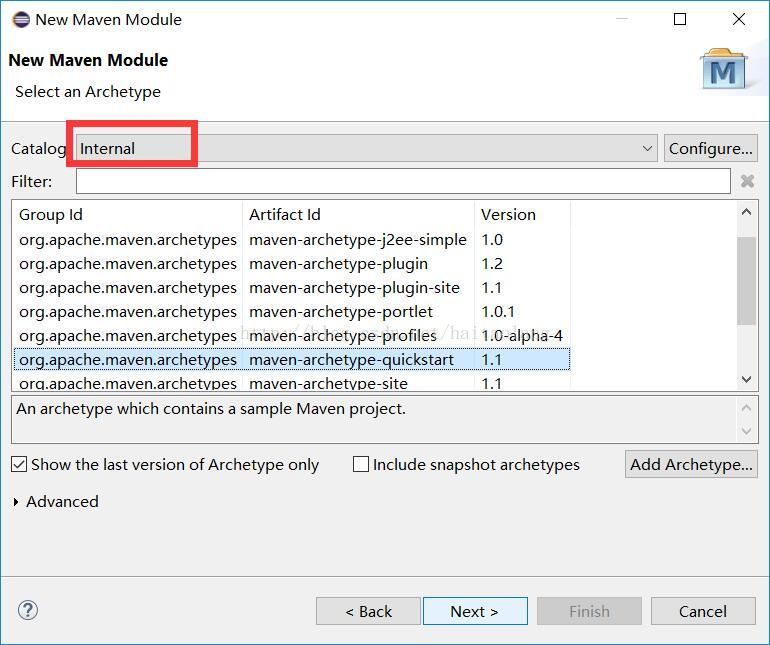
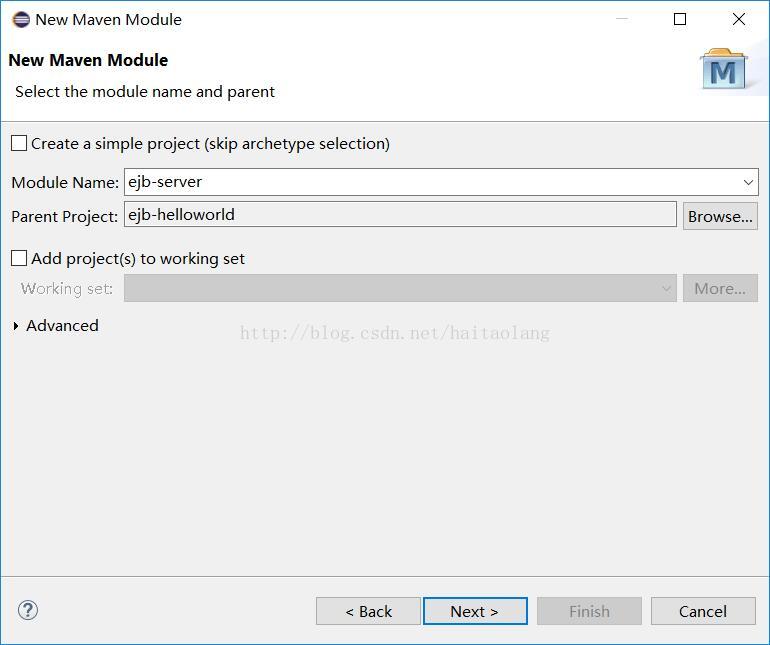
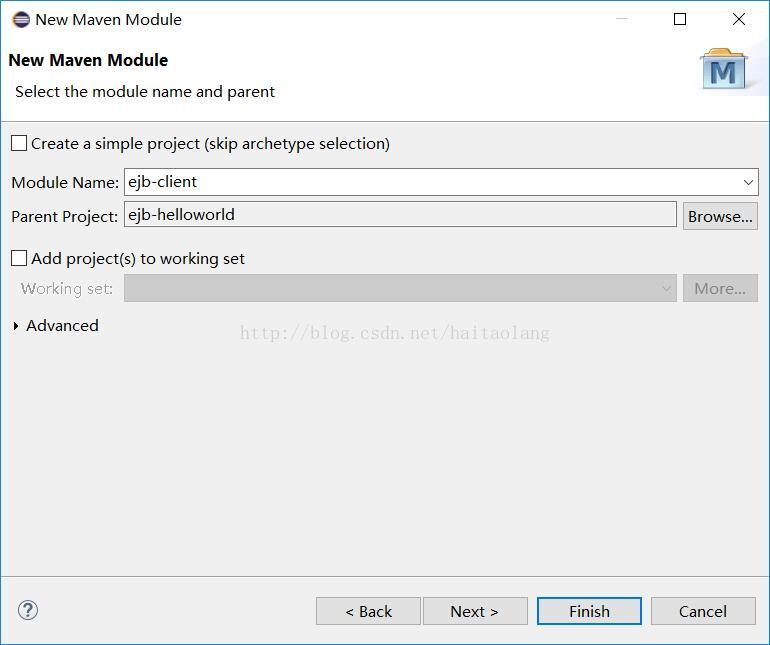
2. 新建两个maven module,分别是server和client
3. server中新建RemoteHelloWorld接口和HelloWorldBean类
4. client中新建HelloWorldClient类
5. 在client的根目录右键,新建文件夹src/main/resources, 并在该文件夹下添加文件jboss-ejb-client.properties
6. 按下列格式修改server的pom.xml
7. 按下列格式修改client的pom.xml
8. 右键server或client的根目录,maven->update projects,更新server和client
9. 右键server的根目录,run as -> run on server
10. 运行client的HelloWorldClient.java,run as -> java application,出现结果说明已经成功了!
11. 这个过程中可能会遇到各种各样的问题,让人找不着北,下面几种办法可能有用。
右键模块名,maven -> update project
删除wildfly安装根目录\standalone\deployments下的所有文件
重启Eclipse/计算机
1. 新建maven project,填好Artifact上的Group Id和Artifact Id,Packaging中选择pom
2. 新建两个maven module,分别是server和client
3. server中新建RemoteHelloWorld接口和HelloWorldBean类
//RemoteHelloWorld.java
package org.ejb.server;

/**
* @author chenjx
*
*/
public interface RemoteHelloWorld {
String sayHello(String name);
}
//HelloWorldBean.java
package org.ejb.server;
import javax.ejb.Remote;
import javax.ejb.Stateless;
/**
* @author chenjx
*
*/
@Stateless//无状态连接
@Remote(RemoteHelloWorld.class)//格式:接口.class
public class HelloWorldBean implements RemoteHelloWorld{
public String sayHello(String name) {
// TODO Auto-generated method stub
String str = "Hello " + name;
System.out.println(str);//这个在服务端输出
return str;//这个返回给调用该服务方法的客户端
}
}4. client中新建HelloWorldClient类
//HelloWorldClient.java
package org.ejb.client;

import java.util.Hashtable;

import javax.naming.Context;
import javax.naming.InitialContext;
import javax.naming.NamingException;

import org.ejb.server.RemoteHelloWorld;

/**
* @author chenjx
*
*/
public class HelloWorldClient {

private static String name;

public static void main(String[] args) throws NamingException {
// TODO Auto-generated method stub
testSayHello();
}

private static void testSayHello() throws NamingException {
final RemoteHelloWorld hw = lookupRemoteHelloWorld();
name = "Chenjx";
String str = hw.sayHello(name);//调用服务端的方法并得到返回值
System.out.println(str);//在客户端输出返回值
}

private static RemoteHelloWorld lookupRemoteHelloWorld() throws NamingException{
final Hashtable<String, String> jndiProperties = new Hashtable<String, String>();
jndiProperties.put(Context.URL_PKG_PREFIXES, "org.jboss.ejb.client.naming");
final Context context = new InitialContext(jndiProperties);
return (RemoteHelloWorld) context.lookup("ejb:/ejb-server/HelloWorldBean!"+ RemoteHelloWorld.class.getName());
//格式:ejb:/服务端名/实现类名! + 接口名.class.getName()
}
}
5. 在client的根目录右键,新建文件夹src/main/resources, 并在该文件夹下添加文件jboss-ejb-client.properties
remote.connectionprovider.create.options.org.xnio.Options.SSL_ENABLED=false

remote.connections=default

remote.connection.default.host=localhost
remote.connection.default.port = 8080
remote.connection.default.connect.options.org.xnio.Options.SASL_POLICY_NOANONYMOUS=false
6. 按下列格式修改server的pom.xml
<?xml version="1.0" encoding="UTF-8" standalone="no"?>
<project xmlns="http://maven.apache.org/POM/4.0.0" xmlns:xsi="http://www.w3.org/2001/XMLSchema-instance" xsi:schemaLocation="http://maven.apache.org/POM/4.0.0 http://maven.apache.org/maven-v4_0_0.xsd">     <modelVersion>4.0.0</modelVersion>
    <groupId>org.cjx</groupId><!-- 创建maven 项目时的填的groupId -->
    <artifactId>ejb-server</artifactId><!-- 服务端名 -->
    <version>0.0.1-SNAPSHOT</version><!-- 版本号,在项目的pom.xml中可以看 -->
    <packaging>ejb</packaging>
    <name>WildFly Quickstart: ejb-server</name>
    <url>http://maven.apache.org</url>

    <licenses>
        <license>
            <name>Apache License, Version 2.0</name>
            <distribution>repo</distribution>
            <url>http://www.apache.org/licenses/LICENSE-2.0.html</url>
        </license>
    </licenses>

    <properties>
        <!-- Explicitly declaring the source encoding eliminates the following message: -->
        <!-- [WARNING] Using platform encoding (UTF-8 actually) to copy filtered
            resources, i.e. build is platform dependent! -->
        <project.build.sourceEncoding>UTF-8</project.build.sourceEncoding>

        <!-- JBoss dependency versions -->

        <version.wildfly.maven.plugin>1.0.2.Final</version.wildfly.maven.plugin>

        <version.jboss.spec.javaee.7.0>1.0.3.Final</version.jboss.spec.javaee.7.0>

        <!-- other plug-in versions -->
        <version.ejb.plugin>2.3</version.ejb.plugin>

        <!-- maven-compiler-plugin -->
        <maven.compiler.target>1.8</maven.compiler.target>
        <maven.compiler.source>1.8</maven.compiler.source>
    </properties>

    <dependencyManagement>
        <dependencies>
            <!-- Define the version of the JBoss Java EE APIs we want to use -->
            <!-- JBoss distributes a complete set of Java EE APIs including
                a Bill of Materials (BOM). A BOM specifies the versions of a "stack" (or
                a collection) of artifacts. We use this here so that we always get the correct
                versions of artifacts. Here we use the jboss-javaee-7.0 stack (you can
                read this as the JBoss stack of the Java EE APIs). You can actually
                use this stack with any version of WildFly that implements Java EE. -->
            <dependency>
                <groupId>org.jboss.spec</groupId>
                <artifactId>jboss-javaee-7.0</artifactId>
                <version>${version.jboss.spec.javaee.7.0}</version>
                <type>pom</type>
                <scope>import</scope>
            </dependency>
        </dependencies>
    </dependencyManagement>

    <dependencies>

        <!-- Import the Common Annotations API (JSR-250), we use provided scope
            as the API is included in WildFly -->
        <dependency>
            <groupId>org.jboss.spec.javax.annotation</groupId>
            <artifactId>jboss-annotations-api_1.2_spec</artifactId>
            <scope>provided</scope>
        </dependency>

        <!-- Import the EJB API, we use provided scope as the API is included in WildFly -->
        <dependency>
            <groupId>org.jboss.spec.javax.ejb</groupId>
            <artifactId>jboss-ejb-api_3.2_spec</artifactId>
            <scope>provided</scope>
        </dependency>

    </dependencies>

    <build>
        <!-- Set the name of the deployment -->
        <finalName>${project.artifactId}</finalName>
        <plugins>
            <!-- WildFly plug-in to deploy the application -->
            <plugin>
                <groupId>org.wildfly.plugins</groupId>
                <artifactId>wildfly-maven-plugin</artifactId>
                <version>${version.wildfly.maven.plugin}</version>
                <configuration>
                    <filename>${project.build.finalName}.jar</filename>
                </configuration>
            </plugin>
            <plugin>
                <groupId>org.apache.maven.plugins</groupId>
                <artifactId>maven-ejb-plugin</artifactId>
                <version>${version.ejb.plugin}</version>
                <configuration>
                    <ejbVersion>3.1</ejbVersion>
                    <!-- this is false by default -->
                    <generateClient>true</generateClient>
                </configuration>
            </plugin>
        </plugins>
    </build>

</project>
7. 按下列格式修改client的pom.xml
<?xml version="1.0" encoding="UTF-8" standalone="no"?>
<project xmlns="http://maven.apache.org/POM/4.0.0" xmlns:xsi="http://www.w3.org/2001/XMLSchema-instance" xsi:schemaLocation="http://maven.apache.org/POM/4.0.0 http://maven.apache.org/maven-v4_0_0.xsd">     <modelVersion>4.0.0</modelVersion>

    <parent>
    	<groupId>org.cjx</groupId><!-- 创建maven项目时填的groupId -->
        <artifactId>ejb-helloworld</artifactId><!-- maven项目名 -->
    <version>0.0.1-SNAPSHOT</version><!-- 版本号,在项目的pom.xml中可以看 -->
    </parent>
    <artifactId>ejb-client</artifactId><!-- 客户端名 -->
    <packaging>jar</packaging>
    <name>WildFly Quickstart: ejb-client</name>
    <description>WildFly Quickstarts: Java client for remote EJB</description>
    <url>http://maven.apache.org</url>

    <licenses>
        <license>
            <name>Apache License, Version 2.0</name>
            <distribution>repo</distribution>
            <url>http://www.apache.org/licenses/LICENSE-2.0.html</url>
        </license>
    </licenses>

    <properties>
        <!-- Explicitly declaring the source encoding eliminates the following
            message: -->
        <!-- [WARNING] Using platform encoding (UTF-8 actually) to copy filtered
            resources, i.e. build is platform dependent! -->
        <project.build.sourceEncoding>UTF-8</project.build.sourceEncoding>

        <version.wildfly>10.0.0.CR4</version.wildfly>
        <version.jboss.spec.javaee.7.0>1.0.3.Final</version.jboss.spec.javaee.7.0>

        <!-- WildFly Maven plug-in to deploy your WAR to a local WildFly container -->
        <version.wildfly.maven.plugin>1.0.2.Final</version.wildfly.maven.plugin>

        <!-- other plug-in versions -->
        <version.exec.plugin>1.2.1</version.exec.plugin>
        <version.war.plugin>2.1.1</version.war.plugin>

        <!-- maven-compiler-plugin -->
        <maven.compiler.target>1.8</maven.compiler.target>
        <maven.compiler.source>1.8</maven.compiler.source>
    </properties>

    <dependencyManagement>
      <dependencies>
         <!-- Define the version of JBoss' Java EE 7 APIs we want to use -->
         <!-- JBoss distributes a complete set of Java EE 7 APIs including
            a Bill of Materials (BOM). A BOM specifies the versions of a "stack" (or
            a collection) of artifacts. We use this here so that we always get the correct
            versions of artifacts. Here we use the jboss-javaee-7.0 stack (you can
            read this as the JBoss stack of the Java EE 7 APIs). You can actually
            use this stack with any version of WildFly that implements Java EE 7, not
            just WildFly 10! -->
         <dependency>
            <groupId>org.jboss.spec</groupId>
            <artifactId>jboss-javaee-7.0</artifactId>
            <version>${version.jboss.spec.javaee.7.0}</version>
            <type>pom</type>
            <scope>import</scope>
         </dependency>

         <dependency>
             <groupId>org.wildfly</groupId>
             <artifactId>wildfly-ejb-client-bom</artifactId>
             <version>${version.wildfly}</version>
             <type>pom</type>
             <scope>import</scope>
         </dependency>
      </dependencies>

    </dependencyManagement>

    <dependencies>

        <!-- Import the transaction spec API, we use runtime scope because
            we aren't using any direct reference to the spec API in our client code -->
        <dependency>
            <groupId>org.jboss.spec.javax.transaction</groupId>
            <artifactId>jboss-transaction-api_1.2_spec</artifactId>
            <scope>runtime</scope>
        </dependency>

        <!-- Import the EJB API, we use runtime scope because we aren't using
            any direct reference to EJB spec API in our client code -->
        <dependency>
            <groupId>org.jboss.spec.javax.ejb</groupId>
            <artifactId>jboss-ejb-api_3.2_spec</artifactId>
            <scope>runtime</scope>
        </dependency>

       <!-- We depend on the EJB remote business interfaces  of this application -->
       <dependency>
          <groupId>org.cjx</groupId>
          <artifactId>ejb-server</artifactId>
          <type>ejb-client</type>
         <version>${project.version}</version>
       </dependency>

        <!-- Include the ejb client jars -->
        <dependency>
            <groupId>org.wildfly</groupId>
            <artifactId>wildfly-ejb-client-bom</artifactId>
            <type>pom</type>
            <scope>runtime</scope>
        </dependency>

    </dependencies>

    <build>
        <finalName>${project.artifactId}</finalName>
        <plugins>

            <!-- Add the maven exec plug-in to allow us to run a java program
                via maven -->
            <plugin>
                <groupId>org.codehaus.mojo</groupId>
                <artifactId>exec-maven-plugin</artifactId>
                <version>${version.exec.plugin}</version>
                <executions>
                    <execution>
                        <goals>
                            <goal>exec</goal>
                        </goals>
                    </execution>
                </executions>
                <configuration>
                    <executable>java</executable>
                    <workingDirectory>${project.build.directory}/exec-working-directory</workingDirectory>
                    <arguments>
                        <!-- automatically creates the classpath using all
                            project dependencies, also adding the project build directory -->
                        <argument>-classpath</argument>
                        <classpath>
                        </classpath>
                        <argument>org.ejb.client.HelloWorldClient</argument><!-- 客户端中包名+实现类名 -->
                    </arguments>
                </configuration>
            </plugin>
            <!-- build standalone exe jar -->
            <plugin>
                <artifactId>maven-assembly-plugin</artifactId>
                <configuration>
                    <descriptorRefs>
                        <descriptorRef>jar-with-dependencies</descriptorRef>
                    </descriptorRefs>
                    <archive>
                        <manifest>
                            <mainClass>org.ejb.client.HelloWorldClient</mainClass><!-- 客户端中包名+实现类名 -->
                        </manifest>
                    </archive>
                </configuration>
            </plugin>

            <!-- The WildFly plug-in deploys your apps to a local WildFly
                container -->
            <!-- Disabling it here means that we don't try to deploy this
                POM! -->
            <plugin>
                <groupId>org.wildfly.plugins</groupId>
                <artifactId>wildfly-maven-plugin</artifactId>
                <version>${version.wildfly.maven.plugin}</version>
                <inherited>true</inherited>
                <configuration>
                    <skip>true</skip>
                </configuration>
            </plugin>
        </plugins>

    </build>

</project>
8. 右键server或client的根目录,maven->update projects,更新server和client
9. 右键server的根目录,run as -> run on server
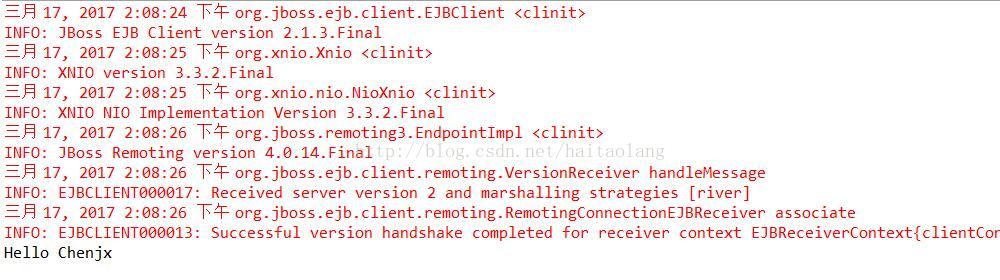
10. 运行client的HelloWorldClient.java,run as -> java application,出现结果说明已经成功了!
11. 这个过程中可能会遇到各种各样的问题,让人找不着北,下面几种办法可能有用。
右键模块名,maven -> update project
删除wildfly安装根目录\standalone\deployments下的所有文件
重启Eclipse/计算机

相关文章推荐
- 在eclipse中使用Maven创建ejb-Helloworld项目
- Maven创建EJB项目HelloWorld使用IDE为eclipse
- eclipse maven3 创建 maven 项目 之 HelloWorld 入门
- [使用心得]maven2之m2eclipse使用手册之六使用Maven2插件创建一个简单的SSH2项目之tomcat篇
- EJB学习(二)——使用Eclipse+JBOSS创建第一个EJB项目
- Eclipse中使用Maven创建Servlet3.0 Web 项目
- 使用eclipse创建Maven项目
- Eclipse使用Maven创建项目是报错:Could not resolve archetype org.apache.maven.archetypes:maven-archetype-quick
- Maven学习总结(七)——eclipse中使用Maven创建Web项目
- Eclipse中使用Maven创建项目 (转)
- Eclipse中使用Maven创建Servlet3.0 Web 项目
- JBoss7.1与eclipse(indigo)集成,创建EJB3.x项目(HelloWorld)非常详细的图解步骤
- [使用心得]maven2之m2eclipse使用手册之六使用Maven2插件创建一个简单的SSH2项目之glassfish篇(一)
- 使用Maven在Eclipse中创建Web项目[转]
- Maven学习总结(七)——eclipse中使用Maven创建Web项目
- 使用Eclipse创建Maven项目
- eclipse 使用 maven-archetype-quickstart 创建项目报错
- [使用心得]maven2之m2eclipse使用手册之六使用Maven2插件创建一个简单的SSH2项目之jetty篇(二)
- [使用心得]maven2之m2eclipse使用手册之六使用Maven2插件创建一个简单的SSH2项目之jetty篇(三)
- Eclipse下使用maven创建多模块项目