matlab+opencv混编处理高光谱数据
2017-03-15 20:45
423 查看
之前介绍了如何在c++里调用matlab库函数读取.mat文件,这里介绍如何将完整的c++文件模块化为matlab可以调用的函数。
这个的好处是可以利用matlab方便的数据读写功能以及后续的绘图功能,同时主体部分调用opencv 高效的c++代码。
我用的是matlab2016+visual stdio 2010 + opencv 2.4.9。因为opencv 2.4.9之后的版本不支持visual stdio 2010,请下载vs2015。
F:\1\opencv\build\x64\vc10\bin;
其中vc10与vs2010相对应,其它版本请选择相应版本。
这个的好处是可以利用matlab方便的数据读写功能以及后续的绘图功能,同时主体部分调用opencv 高效的c++代码。
我用的是matlab2016+visual stdio 2010 + opencv 2.4.9。因为opencv 2.4.9之后的版本不支持visual stdio 2010,请下载vs2015。
1.把opencv库增加到## 标题 ##环境变量
把opencv2.4.9解压到F:\1(自己设置)文件夹,在环境变量里加入如下语句F:\1\opencv\build\x64\vc10\bin;
其中vc10与vs2010相对应,其它版本请选择相应版本。
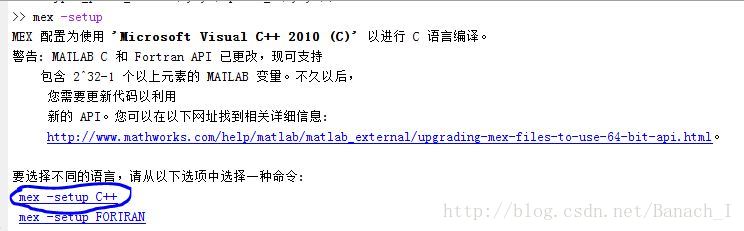
2.mex - setup
在matlab里输入mex - setup然后点击选择
mex -setup C++把vs2010设置为编译器。
3.编译.mexw64文件
.mexw64文件就相当于matlab函数,输入和输出都是matlab数据类型,但是运行的代码是自己写的c++代码,效率更高。clear all;
is_64bit = strcmp(computer,'MACI64') || strcmp(computer,'GLNXA64') || strcmp(computer,'PCWIN64');
out_dir='./';
IE:\Matopencv\build\include -IE:\Matopencv\build\include\opencv -IE:\Matopencv\build\include\opencv2';
CPPFLAGS = ' -O -DNDEBUG -I.\ -IF:\1\opencv\build\include -IF:\1\opencv\build\include\opencv -IF:\1\opencv\build\include\opencv2'; % your OpenCV "include" path
LDFLAGS = ' -LF:\1\opencv\build\x64\vc10\lib';
LIBS = ' -lopencv_core249 -lopencv_highgui249 -lopencv_video249 -lopencv_imgproc249';
if is_64bit
CPPFLAGS = [CPPFLAGS ' -largeArrayDims'];
end
compile_files = {
'hyper_lsc_demo.cpp'
};
for k = 1 : length(compile_files)
str = compile_files{k};
fprintf('compilation of: %s\n', str);
str = [str ' -outdir ' out_dir CPPFLAGS LDFLAGS LIBS];
args = regexp(str, '\s+', 'split');
mex(args{:});
end
fprintf('Congratulations, compilation successful!!!\n');4.接口函数
#include "mex.h"
#include "cv.h"
#include <opencv2/opencv.hpp>
#include <iostream>
#include <fstream>
#include <vector>
#include "lsc.h"
using namespace cv;
using namespace std;

void mexFunction( int nlhs, mxArray *plhs[], int nrhs, const mxArray *prhs[] )
{
const size_t *size;
size = mxGetDimensions(prhs[0]);
int m_height = *size;
int m_width = *(size+1);
int m_channels = *(size+2);
int numberOfElements = mxGetNumberOfElements(prhs[0]);
int m_imgSize = m_height*m_width;
mexPrintf( " %d %d %d /n",m_height,m_width,m_channels);
double *pMatl = (double *) mxGetPr(prhs[0]);

Mat Im(m_imgSize, m_channels, CV_64F);
for( int x = 0; x < m_width; x++ )
{
for( int y = 0; y < m_height; y++ )
{
int i = y*m_width+x;
double *p = Im.ptr<double>(i);
for( int j = 0; j < m_channels; j++ )
{
p[j] = pMatl[ j*m_imgSize+m_height*x+y ];
}
}
}

mexPrintf( " asdasd /n");
size_t dims[3]={m_height,m_width,m_channels};
plhs[0] = mxCreateNumericArray(3,dims,mxDOUBLE_CLASS,mxREAL);
mexPrintf( " asdasd1 /n");
double *pOutMatl = mxGetPr(plhs[0]);
for( int x = 0; x < m_width; x++ )
{
for( int y = 0; y < m_height; y++ )
{
int i = y*m_width+x;
double *p = Im.ptr<double>(i);
for( int j = 0; j < m_channels; j++ )
{
pOutMatl[ j*m_imgSize+m_height*x+y ] = p[j];
}
}
}
mexPrintf( " asdasd2 /n");

}

相关文章推荐
- matlab数据文件的处理
- Matlab生物信息学工具箱新增功能——处理GEO系列数据
- OpenCV 处理内存中的图像数据
- matlab的数据类型 对比 OpenCV
- matlab 处理excel中数据
- 多线程VC++和Matlab混编在信号采集和处理中的应用
- 使用C++将OpenCV中Mat的数据写入二进制文件,用Matlab读出
- matlab处理各种数据、文件
- Stata和Matlab联合处理金融数据
- Matlab处理blob类型数据
- 利用TESLA GPU和MATLAB实现大规模型数据并行处理
- Zedboardwebcam设计问题篇(六)opencv处理帧数据之算法改进
- Zedboardwebcam设计问题篇(五)opencv处理帧数据,函数代码实现
- 如何将opencv的处理结果保存由matlab分析
- MATLAB中如何在绘制条形图(bar graph)时,处理只有一组数据的颜色设置问题
- 用MatlAB处理实验数据程序
- 如何将opencv的处理结果保存由matlab分析
- 图像数据类型的转换 matlab opencv
- mark一下matlab的数据处理
- MATLAB处理txt文本文件---数据格式要有规律性,否则要用编写特定方式进行读取