Android UI 中如何利用表格进行布局
2017-03-12 10:38
501 查看
对于控件布局中的表格布局,我感觉没有线性布局灵活。在表格布局中只能通过 TableRow 属性来控制它的行而列的话里面有几个控件就是几列(一般情况)。我下面就用表格布局操作完成下面图例。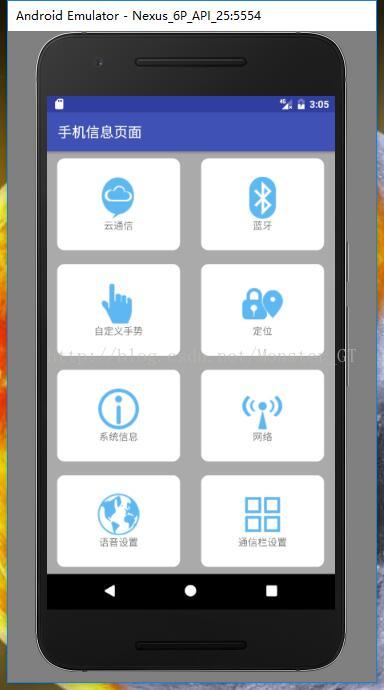
 一、首先要先要先创建一个表格布局的文件。创建成功后进入程序页面,然后点击下图中所示位置文件,对内容进行编写。
 对于表格布局,在编写开始之前要先分析如何进行布局才能使页面更加美观整洁,表格布局的一个好处就是对于空间的利用可以更加对称,更容易控制。 在分析好如何布局后,我们开始进行布局。首先,这个案例的背景是一个灰色的,整个页面充斥着屏幕空间,一共是四行两列,分析完这些后,我们就可以作出一个大体的布局。
 导入所需要的图片后,我们还需要定义一下风格类型,因为整个案例的背景是灰色,但是每一个空间显示出来的却是白色,所以我们需要做一些定义,通过定义我们也可以让控件更加美观。首先,我们需要在 drawable 下面建立一个 .xml 文件具体代码如下:
一、首先要先要先创建一个表格布局的文件。创建成功后进入程序页面,然后点击下图中所示位置文件,对内容进行编写。 对于表格布局,在编写开始之前要先分析如何进行布局才能使页面更加美观整洁,表格布局的一个好处就是对于空间的利用可以更加对称,更容易控制。 在分析好如何布局后,我们开始进行布局。首先,这个案例的背景是一个灰色的,整个页面充斥着屏幕空间,一共是四行两列,分析完这些后,我们就可以作出一个大体的布局。<TableLayout xmlns:android="http://schemas.android.com/apk/res/android" xmlns:app="http://schemas.android.com/apk/res-auto" xmlns:tools="http://schemas.android.com/tools" android:layout_width="match_parent" android:layout_height="match_parent" android:background="@android:color/darker_gray" /**背景颜色为灰色 android:orientation="vertical" /**使表格垂直排列 android:stretchColumns="*" tools:context=".MainActivity">
<TableRow
android:layout_width="match_parent"
android:layout_height="match_parent"
android:orientation="horizontal"                  /**使每一行中的控件水平排列
android:layout_weight="1"></TableRow>
<TableRow
android:layout_width="match_parent"
android:layout_height="match_parent"
android:orientation="horizontal"
android:layout_weight="1"></TableRow>
<TableRow
android:layout_width="match_parent"
android:layout_height="match_parent"
android:orientation="horizontal"
android:layout_weight="1"></TableRow>
<TableRow
android:layout_width="match_parent"
android:layout_height="match_parent"
android:orientation="horizontal"
android:layout_weight="1"></TableRow>
以下是对上面一些代码的解释:
android:layout_weight="1" //这一句是对每一行所占空间的大小进行设定,每个所占的比重都是“1”,所以平均分布。
android:stretchColumns="*" //这句话是为了让 table 铺满纵向屏幕。android:stretchColumns字段是为了 让 table 自动铺满屏幕android:s二、 通过上面的布局,整体框架已经具有雏形。下面就是对每一行进行布局。对于每一行里的控件布局我们可以使用线性布局,让表格布局对线性布局进行嵌套。然后我们需要在每一行的表格里添加图片和文字,而且图片和文字是垂直排列。我们分析完后,可以将图片先从外面导入到 res 下面的 drawable 中。
导入所需要的图片后,我们还需要定义一下风格类型,因为整个案例的背景是灰色,但是每一个空间显示出来的却是白色,所以我们需要做一些定义,通过定义我们也可以让控件更加美观。首先,我们需要在 drawable 下面建立一个 .xml 文件具体代码如下:<shape xmlns:android="http://schemas.android.com/apk/res/android" android:shape="rectangle">/**这里是设置形状<corners android:radius="10dp"></corners> /**对控件的边缘设置圆角<solid android:color="#ffffff"></solid> /**设置控件的背景颜色,由于案例是白色,所以这里设为白色</shape>然后在定义的线性布局中进行调用。在每一行的表格中,有两个图标,所以每一行的 TableRow 中我们需要定义两个线性布局,每个线性布局中各有一个 ImageView 控件和 TextView 控件,设置为垂直排列,将图片设置好后,对每一个LinearLayout 设置距离属性。将 TextView 控件中文字设为居中。图片和文字宽和高都设为包裹“wrap- content”。完整的代码如下:
<TableLayoutxmlns:android="http://schemas.android.com/apk/res/android"xmlns:app="http://schemas.android.com/apk/res-auto"xmlns:tools="http://schemas.android.com/tools"android:layout_width="match_parent"android:layout_height="match_parent"android:background="@android:color/darker_gray"android:orientation="vertical"android:stretchColumns="*"tools:context=".MainActivity"><TableRowandroid:layout_width="match_parent"android:layout_height="match_parent"android:orientation="horizontal"android:layout_weight="1"><LinearLayoutandroid:background="@drawable/loground" /**对上文中风格创建的调用,下面相同android:layout_marginLeft="15dp"android:layout_marginRight="15dp"android:layout_marginBottom="10dp"android:layout_marginTop="10dp"android:layout_height="match_parent"android:orientation="vertical"android:gravity="center"> //垂直布局<ImageViewandroid:id="@+id/imageView"android:layout_width="wrap_content"android:layout_height="wrap_content"app:srcCompat="@drawable/clound" /><TextViewandroid:layout_width="wrap_content"android:layout_height="wrap_content"android:layout_gravity="center"android:text="@string/_cloud" /**调用语言。下面相同。具体设置下文讲解/></LinearLayout><LinearLayoutandroid:background="@drawable/loground"android:layout_marginLeft="15dp"android:layout_marginRight="15dp"android:layout_marginBottom="10dp"android:layout_marginTop="10dp"android:layout_height="match_parent"android:orientation="vertical"android:gravity="center"> //垂直布局<ImageViewandroid:id="@+id/imageView2"android:layout_width="wrap_content"android:layout_height="wrap_content"app:srcCompat="@drawable/bluetooth" /><TextViewandroid:layout_width="wrap_content"android:layout_height="wrap_content"android:layout_gravity="center"android:text="@string/_bluetooth"/></LinearLayout></TableRow><TableRowandroid:layout_width="match_parent"android:layout_height="match_parent"android:orientation="horizontal"android:layout_weight="1"><LinearLayoutandroid:layout_marginLeft="15dp"android:layout_marginRight="15dp"android:layout_marginBottom="10dp"android:layout_marginTop="10dp"android:background="@drawable/loground"android:layout_height="match_parent"android:orientation="vertical"android:gravity="center"> //垂直布局<ImageViewandroid:id="@+id/imageView3"android:layout_width="wrap_content"android:layout_height="wrap_content"app:srcCompat="@drawable/gesture" /><TextViewandroid:layout_width="wrap_content"android:layout_height="wrap_content"android:layout_gravity="center"android:text="@string/_gesture"/></LinearLayout><LinearLayoutandroid:layout_marginLeft="15dp"android:layout_marginRight="15dp"android:layout_marginBottom="10dp"android:layout_marginTop="10dp"android:background="@drawable/loground"android:layout_height="match_parent"android:orientation="vertical"android:gravity="center"> //垂直布局<ImageViewandroid:id="@+id/imageView4"android:layout_width="wrap_content"android:layout_height="wrap_content"app:srcCompat="@drawable/gps" /><TextViewandroid:layout_width="wrap_content"android:layout_height="wrap_content"android:layout_gravity="center"android:text="@string/_gps"/></LinearLayout></TableRow><TableRowandroid:layout_width="match_parent"android:layout_height="match_parent"android:orientation="horizontal"android:layout_weight="1"><LinearLayoutandroid:background="@drawable/loground"android:layout_marginLeft="15dp"android:layout_marginRight="15dp"android:layout_marginBottom="10dp"android:layout_marginTop="10dp"android:layout_height="match_parent"android:orientation="vertical"android:gravity="center"> //垂直布局<ImageViewandroid:id="@+id/imageView5"android:layout_width="wrap_content"android:layout_height="wrap_content"app:srcCompat="@drawable/info" /><TextViewandroid:layout_width="wrap_content"android:layout_height="wrap_content"android:layout_gravity="center"android:text="@string/_system_info"/></LinearLayout><LinearLayoutandroid:background="@drawable/loground"android:layout_marginLeft="15dp"android:layout_marginRight="15dp"android:layout_marginBottom="10dp"android:layout_marginTop="10dp"android:layout_height="match_parent"android:orientation="vertical"android:gravity="center"> //垂直布局<ImageViewandroid:id="@+id/imageView6"android:layout_width="wrap_content"android:layout_height="wrap_content"app:srcCompat="@drawable/internet" /><TextViewandroid:layout_width="wrap_content"android:layout_height="wrap_content"android:layout_gravity="center"android:text="@string/_internet"/></LinearLayout></TableRow><TableRowandroid:layout_width="match_parent"android:layout_height="match_parent"android:orientation="horizontal"android:layout_weight="1"><LinearLayoutandroid:background="@drawable/loground"android:layout_marginLeft="15dp"android:layout_marginRight="15dp"android:layout_marginBottom="10dp"android:layout_marginTop="10dp"android:layout_height="match_parent"android:orientation="vertical"android:gravity="center"> //垂直布局<ImageViewandroid:id="@+id/imageView7"android:layout_width="wrap_content"android:layout_height="wrap_content"app:srcCompat="@drawable/language" /><TextViewandroid:layout_width="wrap_content"android:layout_height="wrap_content"android:layout_gravity="center"android:text="@string/_language"/></LinearLayout><LinearLayoutandroid:background="@drawable/loground"android:layout_marginLeft="15dp"android:layout_marginRight="15dp"android:layout_marginBottom="10dp"android:layout_marginTop="10dp"android:layout_height="match_parent"android:orientation="vertical"android:gravity="center"> //垂直布局<ImageViewandroid:id="@+id/imageView8"android:layout_width="wrap_content"android:layout_height="wrap_content"app:srcCompat="@drawable/notifycation" /><TextViewandroid:layout_width="wrap_content"android:layout_height="wrap_content"android:layout_gravity="center"android:text="@string/_set_notifycation"/></LinearLayout></TableRow></TableLayout>为了增加你的APP的使用更为广泛,上面代码还设置了汉语和英语的语言切换。你在 res 目录下面创建values-zh-rCN、values-en-rUS文件夹,并在这两个文件夹下创建相应的strings.xml文件。在values-zh-rCN文件夹下的strings.xml文件中 添加如下代码(values-en-rUS文件夹中以此类推添加英语。):
<resources><string name="app_name">手机信息页面</string><string name="menu_settings">设置</string><string name="hello_world">你好,世界!</string><string name="_cloud">云通信</string><string name="_bluetooth">蓝牙</string><string name="_gesture">自定义手势</string><string name="_gps">定位</string><string name="_system_info">系统信息</string><string name="_internet">网络</string><string name="_language">语言设置</string><string name="_set_notifycation">通知栏设置</string></resources>然后这个简单的界面就完成了,最后的效果就是文章开始的图片。如果还有疑问或者有不对的地方,还望提出或指正。 ~谢谢你的浏览~

相关文章推荐
- android如何利用html进行布局设计入门
- android中进行布局管理界面_一、利用ListView进行布局
- android开发学习---layout布局、显示单位和如何进行单元测试
- 如何把android中布局文件(.xml)与相关的类(.java)进行关联?
- Android UI 实现表格布局
- Android UI--表格布局
- 【Android】利用表格布局,Android中xml文件与java的交互制作登录界面
- 如何利用Handler更新android的UI
- 【Android】利用相对布局布置更新软件的style为主题对话框的Activity,利用layout_weight属性对表格布局的行划分
- Android如何利用ksoap2进行sql server操作实现登陆功能
- Android UI之TableLayout(表格布局)
- Android UI控件系列:TableLayout(表格布局)
- Android -- UI布局管理,相对布局,线性布局,表格布局,绝对布局,帧布局
- Android-UI布局---RecyclerView学习(二)利用它做的相册集效果
- Android UI布局如何固定底部元素
- Android-x86入门之--如何利用android-x86取代模拟器进行应用程序的开发
- Android UI Design:表格布局(Table Layouts)
- 如何像表格table一样对层div进行轻松布局
- 利用c标签根据list数据源进行表格布局
- Android中使用GridView进行应用程序UI布局的教程