深度学习笔记(1):caffe 添加新层 attention LSTM layer和LSTM layer代码精读
2017-03-08 14:33
696 查看
总结一下最近的工作:LSTM layer 代码,caffe 加入新层 Attention LSTM layer
LSTM layer
关键代码如下,可以参考图1进行阅读,图一来自博客
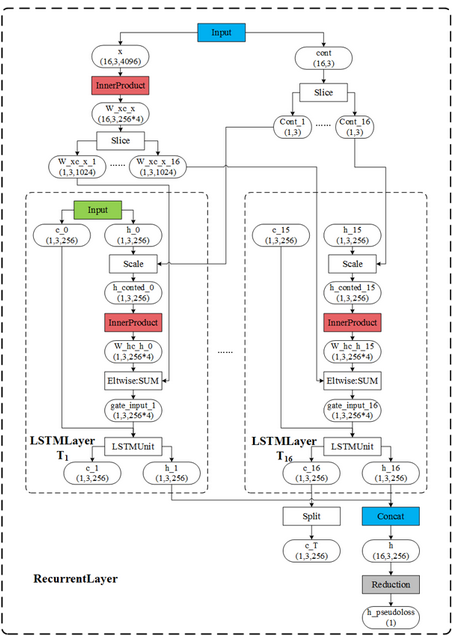
上面是LSTMlayer的代码分析,整体流程比较清晰,但是由于Attention Model 的提出,很多模型需要attention LSTM,而caffe 没有alstm layer,因此博主自己写了个ALSTM layer,由于篇幅比较长,换下一篇写。
LSTM layer
关键代码如下,可以参考图1进行阅读,图一来自博客
namespace caffe {
template <typename Dtype>
void LSTMLayer<Dtype>::RecurrentInputBlobNames(vector<string>* names) const {
names->resize(2);
(*names)[0] = "h_0";
(*names)[1] = "c_0"; //定义h_0,c_0 的输入
}
template <typename Dtype>
void LSTMLayer<Dtype>::RecurrentOutputBlobNames(vector<string>* names) const {
names->resize(2);
(*names)[0] = "h_" + this->int_to_str(this->T_);
(*names)[1] = "c_T"; // 定义输出,不同时刻的h_t
}
template <typename Dtype>
void LSTMLayer<Dtype>::OutputBlobNames(vector<string>* names) const {
names->resize(1);
(*names)[0] = "h"; // 最终输出h
}
template <typename Dtype>
void LSTMLayer<Dtype>::FillUnrolledNet(NetParameter* net_param) const {
const int num_output = this->layer_param_.recurrent_param().num_output();
CHECK_GT(num_output, 0) << "num_output must be positive";
const FillerParameter& weight_filler =
this->layer_param_.recurrent_param().weight_filler();
const FillerParameter& bias_filler =
this->layer_param_.recurrent_param().bias_filler(); // 权重W和偏差Bias
// Add generic LayerParameter's (without bottoms/tops) of layer types we'll
// use to save redundant code.
LayerParameter hidden_param;
hidden_param.set_type("InnerProduct");
hidden_param.mutable_inner_product_param()->set_num_output(num_output * 4);
hidden_param.mutable_inner_product_param()->set_bias_term(false);
hidden_param.mutable_inner_product_param()->set_axis(2);
hidden_param.mutable_inner_product_param()->
mutable_weight_filler()->CopyFrom(weight_filler);
LayerParameter biased_hidden_param(hidden_param);
biased_hidden_param.mutable_inner_product_param()->set_bias_term(true);
biased_hidden_param.mutable_inner_product_param()->
mutable_bias_filler()->CopyFrom(bias_filler);
LayerParameter sum_param;
sum_param.set_type("Eltwise");
sum_param.mutable_eltwise_param()->set_operation(
EltwiseParameter_EltwiseOp_SUM);
LayerParameter slice_param;
slice_param.set_type("Slice");
slice_param.mutable_slice_param()->set_axis(0);
LayerParameter split_param;
split_param.set_type("Split");
BlobShape input_shape;
input_shape.add_dim(1); // eg:1x3x256,256是lstm层设置的,3为buffersize或则通道数
input_shape.add_dim(this->N_);
input_shape.add_dim(num_output);
net_param->add_input("c_0");
net_param->add_input_shape()->CopyFrom(input_shape);
net_param->add_input("h_0");
net_param->add_input_shape()->CopyFrom(input_shape);
LayerParameter* cont_slice_param = net_param->add_layer();
cont_slice_param->CopyFrom(slice_param);
cont_slice_param->set_name("cont_slice");
cont_slice_param->add_bottom("cont");
cont_slice_param->mutable_slice_param()->set_axis(1); // cont 为0或则1,slice
// Add layer to transform all timesteps of x to the hidden state dimension.
// W_xc_x = W_xc * x + b_c
{
LayerParameter* x_transform_param = net_param->add_layer();
x_transform_param->CopyFrom(biased_hidden_param);
x_transform_param->set_name("x_transform");
x_transform_param->add_param()->set_name("W_xc");
x_transform_param->add_param()->set_name("b_c");
x_transform_param->add_bottom("x");
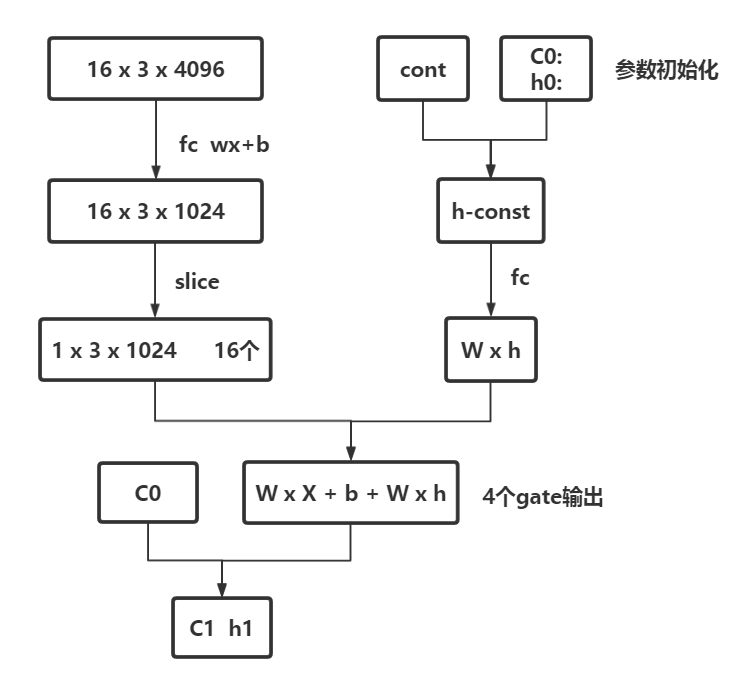
x_transform_param->add_top("W_xc_x");//全连接层,W x X+ b ,实际上对应着下图的维度的变化,最后一维必须要变成1024
} //这样才能和4个gate对应,因为W x X+ b 包含了4个gate,可以看做[[],[],[],[]].因此维度需要为1024,!
LayerParameter* x_slice_param = net_param->add_layer();
x_slice_param->CopyFrom(slice_param);
x_slice_param->add_bottom("W_xc_x");
x_slice_param->set_name("W_xc_x_slice"); //维度变换完成后,需要slice //举例,一个视频,10帧,则一帧一帧的输入,这样应该好理解一点,参考下图
LayerParameter output_concat_layer;
output_concat_layer.set_name("h_concat");
output_concat_layer.set_type("Concat");
output_concat_layer.add_top("h");
output_concat_layer.mutable_concat_param()->set_axis(0); //lstm每一个T都输出h_t,至于你取哪一个或者都去,取决于你的prototxt代码的编写
for (int t = 1; t <= this->T_; ++t) { // 开始实现 平铺 LSTM 层,可以看 这里
string tm1s = this->int_to_str(t - 1);
string ts = this->int_to_str(t);
cont_slice_param->add_top("cont_" + ts);
x_slice_param->add_top("W_xc_x_" + ts);
// Add layers to flush the hidden state when beginning a new
// sequence, as indicated by cont_t.
// h_conted_{t-1} := cont_t * h_{t-1}
//
// Normally, cont_t is binary (i.e., 0 or 1), so:
// h_conted_{t-1} := h_{t-1} if cont_t == 1
// 0 otherwise
{
LayerParameter* cont_h_param = net_param->add_layer();
cont_h_param->CopyFrom(sum_param);
cont_h_param->mutable_eltwise_param()->set_coeff_blob(true);
cont_h_param->set_name("h_conted_" + tm1s);
cont_h_param->add_bottom("h_" + tm1s);
cont_h_param->add_bottom("cont_" + ts);
cont_h_param->add_top("h_conted_" + tm1s); // h_conted 的产生,这个根据cont_slice 决定,与cont_slice 相乘
}
// Add layer to compute
// W_hc_h_{t-1} := W_hc * h_conted_{t-1}
{
LayerParameter* w_param = net_param->add_layer();
w_param->CopyFrom(hidden_param);
w_param->set_name("transform_" + ts);
w_param->add_param()->set_name("W_hc");
w_param->add_bottom("h_conted_" + tm1s);
w_param->add_top("W_hc_h_" + tm1s);
w_param->mutable_inner_product_param()->set_axis(2); // 计算 W X H
}
// Add the outputs of the linear transformations to compute the gate input.
// gate_input_t := W_hc * h_conted_{t-1} + W_xc * x_t + b_c
// = W_hc_h_{t-1} + W_xc_x_t + b_c
{
LayerParameter* input_sum_layer = net_param->add_layer();
input_sum_layer->CopyFrom(sum_param);
input_sum_layer->set_name("gate_input_" + ts);
input_sum_layer->add_bottom("W_hc_h_" + tm1s);
input_sum_layer->add_bottom("W_xc_x_" + ts);
if (this->static_input_) {
input_sum_layer->add_bottom("W_xc_x_static");
}
input_sum_layer->add_top("gate_input_" + ts); //根据公式,计算4个gate的输出
}
// Add LSTMUnit layer to compute the cell & hidden vectors c_t and h_t.
// Inputs: c_{t-1}, gate_input_t = (i_t, f_t, o_t, g_t), cont_t
// Outputs: c_t, h_t
// [ i_t' ]
// [ f_t' ] := gate_input_t
// [ o_t' ]
// [ g_t' ]
// i_t := \sigmoid[i_t']
// f_t := \sigmoid[f_t']
// o_t := \sigmoid[o_t']
// g_t := \tanh[g_t']
// c_t := cont_t * (f_t .* c_{t-1}) + (i_t .* g_t)
// h_t := o_t .* \tanh[c_t]
{
LayerParameter* lstm_unit_param = net_param->add_layer();
lstm_unit_param->set_type("LSTMUnit");
lstm_unit_param->add_bottom("c_" + tm1s);
lstm_unit_param->add_bottom("gate_input_" + ts);
lstm_unit_param->add_bottom("cont_" + ts);
lstm_unit_param->add_top("c_" + ts);
lstm_unit_param->add_top("h_" + ts);
lstm_unit_param->set_name("unit_" + ts); //4 个 gate 输入值进行不同函数的非线性变换
}
output_concat_layer.add_bottom("h_" + ts); // 中间隐藏层的状态输出
} // for (int t = 1; t <= this->T_; ++t)
{
LayerParameter* c_T_copy_param = net_param->add_layer();
c_T_copy_param->CopyFrom(split_param);
c_T_copy_param->add_bottom("c_" + this->int_to_str(this->T_));
c_T_copy_param->add_top("c_T");
}
net_param->add_layer()->CopyFrom(output_concat_layer); //split:将C_T复制几份,分别给不同的layer,这些上层layer共享这个blob
}
INSTANTIATE_CLASS(LSTMLayer);
REGISTER_LAYER_CLASS(LSTM); //LSTM layer 的注册
} // namespace caffe上面是LSTMlayer的代码分析,整体流程比较清晰,但是由于Attention Model 的提出,很多模型需要attention LSTM,而caffe 没有alstm layer,因此博主自己写了个ALSTM layer,由于篇幅比较长,换下一篇写。

相关文章推荐
- 深度学习笔记(2):caffe 加新层 Attention LSTM layer
- Caffe实现多标签输入,添加数据层(data layer)
- 怎样在caffe中添加layer以及caffe中triplet loss layer的实现
- 在caffe中添加自定义的layer
- 【caffe实用技巧与bug排查】三步添加新layer及可能出现的bug
- caffe添加Layer,复现Feature Learning based Deep Supervidsed Hashing with PL
- 【caffe-Windows】新层添加——LSTM
- 如何在caffe中添加新的Layer
- windows caffe 添加UpsampleLayer BNLayer以支持SegNet网络结构
- caffe中添加自定义的layer
- caffe 加权交叉熵损失函数层(weighted sigmoid_cross_entropy_loss_layer)添加方法
- 在 caffe 中添加 FaceNet 中 Triplet Loss Layer
- 原始caffe添加CenterLoss_layer
- 在caffe中添加自定义的layer
- 如何在caffe中添加新的Layer
- 如何在caffe中添加新的Layer
- 在caffe中添加新的Layer
- 为caffe添加最简单的全通层AllPassLayer
- caffe 中添加新的layer
- caffe中lstm的实现以及lstmlayer的理解