windows10+eclipse neon+hadoop2.6.4(伪分布式)远程连接虚拟机环境搭建
2017-03-03 00:25
507 查看
0.需要用到的工具
jdk(我的是1.8)
hadoop-eclipse-plugin-2.6.4.jar(这里我提供已编译好的包 下载地址,若是其他版本可自行搜索或用ant和hadoop源代码自行编译)
eclipse(我的版本是neon)
hadoop-2.6.4.tar.gz
hadoop.dll 和 winutil.exe(提供下载:下载地址)
1.将hadoop-2.6.4.tar.gz解压
2.Windows下的环境配置
配置HADOOP_HOME环境变量
添加HADOOP_HOME 路径为你的hadoop目录
编辑PATH 添加%HADOOP%\bin
防止项目运行时报错,将hadoop.dll和winutils.exe(上面有下载链接)拷贝到hadoop中的bin目录下
然后将hadoop.dll 拷贝到 C:\windows\system32下
3.更改hdfs-site.xml文件,改成以下内容,若没有则添加
修改后重启Hadoop
4.将hadoop-eclipse-plugin-2.6.4.jar 放到eclipse的plugins目录中
5.打开eclipse,windows》 preference 找到Hadoop Map/Reduce 设置你的hadoop目录

6.显示hadoop连接配置界面,windows》show view》other 找到Hadoop Map/Reduce
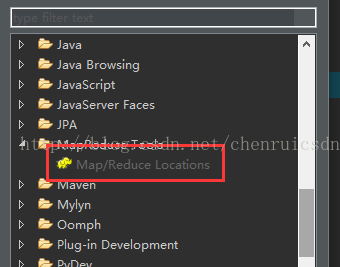
在下方会显示hadoop map/reduce 窗口

右键点击空白处,选择New Hadoop Location 弹出此窗口

Location name:随便填
Host:都填你的虚拟机ip地址
User name:本地的windows用户名称(须修改你本地windows账户名称为你的hadoop用户名称或者 在hadoop集群下新建一个与windows账户名相同的账户):
7.配置好后点击 Finish,点击项目管理器上的hadoop服务器名旁边的小三角展开目录,若成功连接则会显示目录

8.运行wordcount实例
创建一个map/reduce project,新建项目new》file》other》map/reduce project
创建类 org.apache.hadoop.examples.WordCount
在WordCount.java,写入以下代码
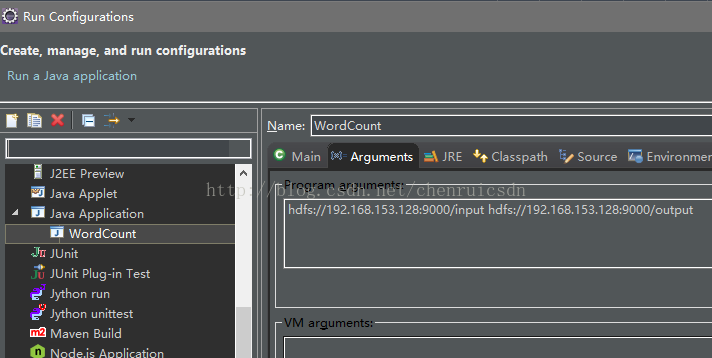
右键点击WordCount.java 选择Run as》Run configuration 选择Arguments
添加以下内容
input是你的输入目录 output是你的输出目录,可自行更改
之后点击Run,程序会开始运行。
9.运行完成后,右键点击项目资源管理器上的hadoop服务器,点击refresh,即可看到输出文件夹,part-r-00000 就是输出结果

jdk(我的是1.8)
hadoop-eclipse-plugin-2.6.4.jar(这里我提供已编译好的包 下载地址,若是其他版本可自行搜索或用ant和hadoop源代码自行编译)
eclipse(我的版本是neon)
hadoop-2.6.4.tar.gz
hadoop.dll 和 winutil.exe(提供下载:下载地址)
1.将hadoop-2.6.4.tar.gz解压
2.Windows下的环境配置
配置HADOOP_HOME环境变量
添加HADOOP_HOME 路径为你的hadoop目录
编辑PATH 添加%HADOOP%\bin
防止项目运行时报错,将hadoop.dll和winutils.exe(上面有下载链接)拷贝到hadoop中的bin目录下
然后将hadoop.dll 拷贝到 C:\windows\system32下
3.更改hdfs-site.xml文件,改成以下内容,若没有则添加
<property>
<name>dfs.permissions</name>
<value>false</value>
</property>
目的是为了防止windows连接Hadoop服务器时被拒绝报错:org.apache.hadoop.security.AccessControlException: Permission denied:
修改后重启Hadoop
4.将hadoop-eclipse-plugin-2.6.4.jar 放到eclipse的plugins目录中
5.打开eclipse,windows》 preference 找到Hadoop Map/Reduce 设置你的hadoop目录
6.显示hadoop连接配置界面,windows》show view》other 找到Hadoop Map/Reduce
在下方会显示hadoop map/reduce 窗口
右键点击空白处,选择New Hadoop Location 弹出此窗口
Location name:随便填
Host:都填你的虚拟机ip地址
User name:本地的windows用户名称(须修改你本地windows账户名称为你的hadoop用户名称或者 在hadoop集群下新建一个与windows账户名相同的账户):
7.配置好后点击 Finish,点击项目管理器上的hadoop服务器名旁边的小三角展开目录,若成功连接则会显示目录
8.运行wordcount实例
创建一个map/reduce project,新建项目new》file》other》map/reduce project
创建类 org.apache.hadoop.examples.WordCount
在WordCount.java,写入以下代码
package org.apache.hadoop.examples;

import java.io.IOException;
import java.util.StringTokenizer;

import org.apache.hadoop.conf.Configuration;
import org.apache.hadoop.fs.Path;
import org.apache.hadoop.io.IntWritable;
import org.apache.hadoop.io.Text;
import org.apache.hadoop.mapreduce.Job;
import org.apache.hadoop.mapreduce.Mapper;
import org.apache.hadoop.mapreduce.Reducer;
import org.apache.hadoop.mapreduce.lib.input.FileInputFormat;
import org.apache.hadoop.mapreduce.lib.output.FileOutputFormat;
import org.apache.hadoop.util.GenericOptionsParser;

public class WordCount {

public static class TokenizerMapper
extends Mapper<Object, Text, Text, IntWritable>{

private final static IntWritable one = new IntWritable(1);
private Text word = new Text();

public void map(Object key, Text value, Context context
) throws IOException, InterruptedException {
StringTokenizer itr = new StringTokenizer(value.toString());
while (itr.hasMoreTokens()) {
word.set(itr.nextToken());
context.write(word, one);
}
}
}

public static class IntSumReducer
extends Reducer<Text,IntWritable,Text,IntWritable> {
private IntWritable result = new IntWritable();

public void reduce(Text key, Iterable<IntWritable> values,
Context context
) throws IOException, InterruptedException {
int sum = 0;
for (IntWritable val : values) {
sum += val.get();
}
result.set(sum);
context.write(key, result);
}
}

public static void main(String[] args) throws Exception {
Configuration conf = new Configuration();
String[] otherArgs = new GenericOptionsParser(conf, args).getRemainingArgs();
if (otherArgs.length < 2) {
System.err.println("Usage: wordcount <in> [<in>...] <out>");
System.exit(2);
}
Job job = new Job(conf, "word count");
job.setJarByClass(WordCount.class);
job.setMapperClass(TokenizerMapper.class);
job.setCombinerClass(IntSumReducer.class);
job.setReducerClass(IntSumReducer.class);
job.setOutputKeyClass(Text.class);
job.setOutputValueClass(IntWritable.class);
for (int i = 0; i < otherArgs.length - 1; ++i) {
FileInputFormat.addInputPath(job, new Path(otherArgs[i]));
}
FileOutputFormat.setOutputPath(job,
new Path(otherArgs[otherArgs.length - 1]));
System.exit(job.waitForCompletion(true) ? 0 : 1);
}
}
右键点击WordCount.java 选择Run as》Run configuration 选择Arguments
添加以下内容
hdfs://你的虚拟机ip:9000/input hdfs://你的虚拟机ip:9000/output
input是你的输入目录 output是你的输出目录,可自行更改
之后点击Run,程序会开始运行。
9.运行完成后,右键点击项目资源管理器上的hadoop服务器,点击refresh,即可看到输出文件夹,part-r-00000 就是输出结果

相关文章推荐
- CentOS6.5虚拟机下搭建Hadoop伪分布式环境
- Hadoop2.6.4伪分布式环境搭建
- hadoop+hbase+zookeeper 分布式集群搭建 + eclipse远程连接hdfs 完美运行
- 本地虚拟机通过hadoop和spark搭建分布式环境
- 手动搭建搭建Hadoop虚拟机集群与windows远程开发环境
- hadoop+hbase+zookeeper 分布式集群搭建 + eclipse远程连接hdfs 完美运行
- 在oracle Virtual Box 虚拟机中搭建hadoop1.2.1完全分布式环境(转自康哥的博客)
- hadoop+hbase+zookeeper 分布式集群搭建 + eclipse远程连接hdfs 完美运行
- Windows环境下采用eclipse连接虚拟机中的Hadoop伪分布式集群
- 在Win7虚拟机下搭建Hadoop2.6.0伪分布式环境
- Hadoop-2.7.2&Hbase-1.2.2&Hive1.2.1(远程模式)&zookeeper-3.4.8全分布式环境搭建
- vmare Ubuntu 下Hadoop 开发环境搭建eclipse win10 远程连接 安装与问题处理
- Hadoop-Windows下的Eclipse开发环境搭建,远程虚拟机Hadoop服务器
- 在oracle Virtual Box 虚拟机中搭建hadoop1.2.1完全分布式环境
- 本地搭建Hadoop伪分布式环境之二:XShell连接Ubuntu
- 阿里云虚拟机搭建Hadoop伪分布式环境
- 本地搭建Hadoop伪分布式环境之一:虚拟机的安装
- 虚拟机中Hadoop分布式环境搭建
- Centos7 下 Hadoop 2.6.4 分布式集群环境搭建
- Centos7 下 Hadoop 2.6.4 分布式集群环境搭建