区域填充的扫描线算法
2017-02-24 13:38
423 查看
区域填充的扫描线算法适用于内点表示的4连通区域。算法的基本过程是:给定种子点(x, y),先填充种子点所在扫描线上的位于给定区域的区段,然后确定与该区段相连通的上下两条扫描线上的位于给定区域的区段,并保存下来。对保存下来的区段,反复这个过程,直到没有要处理的区段为止。
如下图所示:
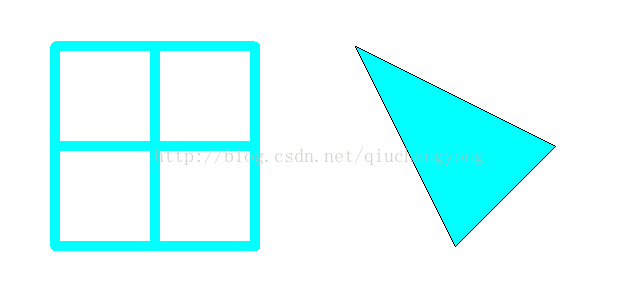
一个原来是灰色的田字和三角形区域,使用鼠标在区域里面点击一下,就会被填充为青色。
以下是填充函数的主要代码:
typedef struct { int y, xLeft, xRight; } Span;
#define STACK_SIZE 100//max stack size is 100
Span S[STACK_SIZE];
int top = 0;
void SetStackEmpty()
{
top = 0;
}
bool isStackEmpty()
{
return top == 0;
}
bool PushStack(Span *pS)
{
if (top < STACK_SIZE)//stack is not full
{
S[top] = *pS;
top++;
return true;
}
else
return false;
}
bool PopStack(Span *pS)
{
if (top > 0)
{
top--;
*pS = S[top];
return true;
}
else
return false;
}
void ScanLineFill4(HDC hdc, int x, int y, int oldColor, int newColor)
{
Span span;
span.y = y;
span.xLeft = x;
while (GetPixel(hdc, span.xLeft, span.y) == oldColor)
{
SetPixel(hdc, span.xLeft, span.y, newColor);
span.xLeft--;
}
if (span.xLeft == x)//not a seed point actually
return;
else
span.xLeft++;//compansate
span.xRight = x + 1;
while (GetPixel(hdc, span.xRight, span.y) == oldColor)
{
SetPixel(hdc, span.xRight, span.y, newColor);
span.xRight++;
}
if (span.xRight == x + 1)//cannot extend to right
span.xRight = x;
else
span.xRight--;//compansate
SetStackEmpty();
PushStack(&span);
while (!isStackEmpty())
{
PopStack(&span);
Span S;//new span
{
S.y = span.y + 1;
S.xLeft = span.xLeft;
bool xLeftNotSet = false;
while (GetPixel(hdc, S.xLeft, S.y) == oldColor)
{
S.xLeft--;
}
if (S.xLeft == span.xLeft)//xLeft is not set
xLeftNotSet = true;
else
S.xLeft++;//compansate
int i = S.xLeft;
while (i <= span.xRight)
{
while (GetPixel(hdc, i, S.y) == oldColor)
{
if (xLeftNotSet)
{
S.xLeft = i;
xLeftNotSet = false;
}
SetPixel(hdc, i, S.y, newColor);
i++;
}
if (i > S.xLeft)
{
S.xRight = i - 1;
PushStack(&S);
xLeftNotSet = true;
}
while (i <= span.xRight && GetPixel(hdc, i, S.y) != oldColor)
{
i++;
}
}
}
{//similar to above
S.y = span.y - 1;
S.xLeft = span.xLeft;
bool xLeftNotSet = false;
while (GetPixel(hdc, S.xLeft, S.y) == oldColor)
{
S.xLeft--;
}
if (S.xLeft == span.xLeft)//xLeft is not set
xLeftNotSet = true;
else
S.xLeft++;//compansate
int i = S.xLeft;
while (i <= span.xRight)
{
while (GetPixel(hdc, i, S.y) == oldColor)
{
if (xLeftNotSet)
{
S.xLeft = i;
xLeftNotSet = false;
}
SetPixel(hdc, i, S.y, newColor);
i++;
}
if (i > S.xLeft)
{
S.xRight = i - 1;
PushStack(&S);
xLeftNotSet = true;
}
while (i <= span.xRight && GetPixel(hdc, i, S.y) != oldColor)
{
i++;
}
}
}
}
}
程序环境VC/GDI,完整的程序从这里下载:http://download.csdn.net/detail/qiuchangyong/9762900
如下图所示:
一个原来是灰色的田字和三角形区域,使用鼠标在区域里面点击一下,就会被填充为青色。
以下是填充函数的主要代码:
typedef struct { int y, xLeft, xRight; } Span;
#define STACK_SIZE 100//max stack size is 100
Span S[STACK_SIZE];
int top = 0;
void SetStackEmpty()
{
top = 0;
}
bool isStackEmpty()
{
return top == 0;
}
bool PushStack(Span *pS)
{
if (top < STACK_SIZE)//stack is not full
{
S[top] = *pS;
top++;
return true;
}
else
return false;
}
bool PopStack(Span *pS)
{
if (top > 0)
{
top--;
*pS = S[top];
return true;
}
else
return false;
}
void ScanLineFill4(HDC hdc, int x, int y, int oldColor, int newColor)
{
Span span;
span.y = y;
span.xLeft = x;
while (GetPixel(hdc, span.xLeft, span.y) == oldColor)
{
SetPixel(hdc, span.xLeft, span.y, newColor);
span.xLeft--;
}
if (span.xLeft == x)//not a seed point actually
return;
else
span.xLeft++;//compansate
span.xRight = x + 1;
while (GetPixel(hdc, span.xRight, span.y) == oldColor)
{
SetPixel(hdc, span.xRight, span.y, newColor);
span.xRight++;
}
if (span.xRight == x + 1)//cannot extend to right
span.xRight = x;
else
span.xRight--;//compansate
SetStackEmpty();
PushStack(&span);
while (!isStackEmpty())
{
PopStack(&span);
Span S;//new span
{
S.y = span.y + 1;
S.xLeft = span.xLeft;
bool xLeftNotSet = false;
while (GetPixel(hdc, S.xLeft, S.y) == oldColor)
{
S.xLeft--;
}
if (S.xLeft == span.xLeft)//xLeft is not set
xLeftNotSet = true;
else
S.xLeft++;//compansate
int i = S.xLeft;
while (i <= span.xRight)
{
while (GetPixel(hdc, i, S.y) == oldColor)
{
if (xLeftNotSet)
{
S.xLeft = i;
xLeftNotSet = false;
}
SetPixel(hdc, i, S.y, newColor);
i++;
}
if (i > S.xLeft)
{
S.xRight = i - 1;
PushStack(&S);
xLeftNotSet = true;
}
while (i <= span.xRight && GetPixel(hdc, i, S.y) != oldColor)
{
i++;
}
}
}
{//similar to above
S.y = span.y - 1;
S.xLeft = span.xLeft;
bool xLeftNotSet = false;
while (GetPixel(hdc, S.xLeft, S.y) == oldColor)
{
S.xLeft--;
}
if (S.xLeft == span.xLeft)//xLeft is not set
xLeftNotSet = true;
else
S.xLeft++;//compansate
int i = S.xLeft;
while (i <= span.xRight)
{
while (GetPixel(hdc, i, S.y) == oldColor)
{
if (xLeftNotSet)
{
S.xLeft = i;
xLeftNotSet = false;
}
SetPixel(hdc, i, S.y, newColor);
i++;
}
if (i > S.xLeft)
{
S.xRight = i - 1;
PushStack(&S);
xLeftNotSet = true;
}
while (i <= span.xRight && GetPixel(hdc, i, S.y) != oldColor)
{
i++;
}
}
}
}
}
程序环境VC/GDI,完整的程序从这里下载:http://download.csdn.net/detail/qiuchangyong/9762900

相关文章推荐
- 线性扫描+种子填充算法 实现区域填充
- 算法系列之十二:多边形区域填充算法--改进的扫描线填充算法
- 多边形区域填充算法--改进的扫描线填充算法
- 算法系列之十二:多边形区域填充算法--改进的扫描线填充算法
- opengl实现直线扫描算法和区域填充算法
- 多边形的扫描转换与区域填充算法
- 区域填充之扫描线算法
- 【区域填充】中的扫描线填充算法,活性边表AET,新边表NET
- opengl实现直线扫描算法和区域填充算法
- 区域填充之扫描线算法(续)
- 基于扫描种子线算法的多边形区域填充实现
- 算法系列之十二:多边形区域填充算法--改进的扫描线填充算法
- 二维区域扫描线填充算法的实现
- 算法系列之十二:多边形区域填充算法--改进的扫描线填充算法 .
- 算法系列之十二:多边形区域填充算法--几种边标志填充算法 .
- 扫描线填充算法 & 指针操作要注意的地方
- 算法系列之十二:多边形区域填充算法--几种边标志填充算法
- 快速扫描算法提取鱼眼图像有效区域
- 算法系列之十二:多边形区域填充算法--扫描线种子填充算法
- 算法系列之十二:多边形区域填充算法--扫描线种子填充算法