第一个Flask程序
2017-02-19 16:21
656 查看
本文将简要的介绍Flask的各部分作用,并编写并运行第一个最简单的Flask程序。
1. 初始化
所有Flask程序都必须创建一个程序实例。Web服务器使用一种名为Web服务器网关接口(Web Server Gateway Interface,WSGI)的协议,把接收自客户端的所有请求都转交给这个对象处理。程序实例是Flask类的对象,经常使用如下代码创建:
>yum -y install python-pip
>pip install flask
Flask类的构造函数只有一个必须指定的参数,即程序主模块或包的名字。在大多数程序中,Python的__name__变量就是所需要的值,这个变量决定程序的根目录,以便稍后能够找到相对于程序根目录的资源文件位置。
2.路由和视图函数
客户端(例如Web浏览器)把请求发送给Web服务器,Web服务器再把请求发送给Flask程序实例。程序实例需要知道对每个URL请求运行哪些代码,所以保存了一个URL到Python函数的映射关系。处理URL和函数之间关系的程序称之为路由(router)。
在Flask程序中定义路由的最简便方式,是使用程序实例提供的app.route修饰器,把修饰的函数注册为路由。下面的例子说明了如何使用这个修饰器声明路由:
视图函数:像index()这样的函数称为视图函数。视图函数返回的响应可以是包含HTML的简单字符串,也可以是复杂的表单。
对于http://www.example.com/{username}这样的URL,只需要在route修饰器中使用特殊的句法即可,例如:
路由中的动态部分默认使用字符串,不过也可使用类型定义。例如,路由/user/<int:id>只会匹配动态片段id为整数的URL。Flask支持在路由中使用int,float和path类型。path类型也是字符串,但不把斜线视作分隔符,而将其作为冬天片段的一部分。
3.启动服务器
程序实例用run方法启动Flask集成的开发Web服务器:
Hello.py:
有一些选项参数可被app.run()函数接受用于设置Web服务器的操作模式。在开发过程中启用调试模式会带来一些便利,比如说激活调试器和重载程序。要想采用调试模式,可以把app.run的debug参数设置为True。
启动服务器:

在浏览器中输入:http://10.15.230.29:5000 或者命令行输入:curl -X GET http://10.15.230.29:5000

在浏览器中输入:http://10.15.230.29:5000/wahaha 命令行输入:curl -X GET http://10.15.230.29:5000/wahaha

在浏览器中输入:http://10.15.230.29:5000/name/age

当输入了以上地址,程序不知道如何吹了,因此会向浏览器返回错误代码404(Not Found)。
4.响应
make_response:Flask视图函数还可以返回Response对象。make_response()函数可接收1个,2个,3个参数(和视图函数的返回值一样),并返回一个Response对象。
abort:用于返回错误,参数是状态码。
jsonify:按照json的方式返回值。
下面再看一下一段示例代码:
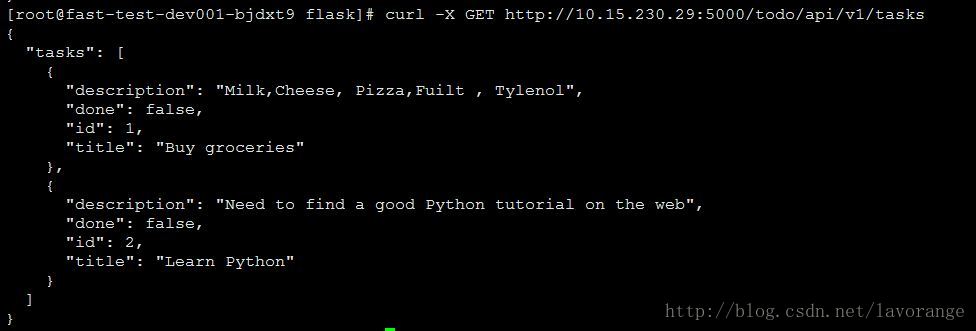
>curl -X GET http://localhost:5000/todo/api/v1/tasks
再调用第二个API:'/todo/api/v1/tasks/haha',获取id=2的信息,有三种请求方式:
>curl -X GET -H "Content-Type: application/json" http://localhost:5000/todo/api/v1/tasks/haha -d '{"id":"2"}'
注:return make_response(jsonify({'tasks':tasks[int(request.json.get('id',""))-1]}),200)
>curl -X GET -d "id=2" http://127.0.0.1:5000/todo/api/v1/tasks/haha
>curl -X GET http://127.0.0.1:5000/todo/api/v1/tasks/haha?id=2
注:return make_response(jsonify({'tasks':tasks[int(request.args['id']-1]}),200)
或者:return make_response(jsonify({'tasks':tasks[int(request.values['id']-1]}),200)
request.data:contains the incoming request data as string in case it came with a minetype Flask does not handle
request.args:if you want the parameters in the URL
request.form:if you want the information in the body(as sent by a html POST form)
request.values:if you want both
app.run的参数为:
host:server host
port:server port
use_debugger:flag whether to default to using the Werkzeug debugger. This can be overriden in the command line by passing the -d or -D flag.Default to False,for security.
use_reloader:flag whether to use the auto-reloader.Default to True when debugging. This can be overriden in the command line by passing the -r/-R flag.
threaded:should the process handle each request in a seperate thread?
processes:number of processes to spawn
passthrough_errors:disable the error catching.This means that the server will die on errors but it can be useful to hook debuggers in (pdb etc)
ssl_crt : path to ssl certificate file
ssl_key : path to ssl key file
Author:忆之独秀
Email:leaguenew@qq.com
注明出处:http://blog.csdn.net/lavorange/article/details/55548185
1. 初始化
所有Flask程序都必须创建一个程序实例。Web服务器使用一种名为Web服务器网关接口(Web Server Gateway Interface,WSGI)的协议,把接收自客户端的所有请求都转交给这个对象处理。程序实例是Flask类的对象,经常使用如下代码创建:
from flask import Flask
app = Flask(__name__)
当然在使用Flask之前要安装flask
>yum -y install python-pip
>pip install flask
Flask类的构造函数只有一个必须指定的参数,即程序主模块或包的名字。在大多数程序中,Python的__name__变量就是所需要的值,这个变量决定程序的根目录,以便稍后能够找到相对于程序根目录的资源文件位置。
2.路由和视图函数
客户端(例如Web浏览器)把请求发送给Web服务器,Web服务器再把请求发送给Flask程序实例。程序实例需要知道对每个URL请求运行哪些代码,所以保存了一个URL到Python函数的映射关系。处理URL和函数之间关系的程序称之为路由(router)。
在Flask程序中定义路由的最简便方式,是使用程序实例提供的app.route修饰器,把修饰的函数注册为路由。下面的例子说明了如何使用这个修饰器声明路由:
@app.route('/')
def index():
return '<h1>Hello World!</h1>'index()函数注册为程序根地址的处理程序。如果部署程序的服务器域名为www.example.com,在浏览器中访问http://www.example.com/后,会触发服务器执行index()函数。这个函数的返回值称为响应,在客户端接收到的内容。如果客户端是Web浏览器,响应就是显示给用户查看的文档。视图函数:像index()这样的函数称为视图函数。视图函数返回的响应可以是包含HTML的简单字符串,也可以是复杂的表单。
对于http://www.example.com/{username}这样的URL,只需要在route修饰器中使用特殊的句法即可,例如:
@app.route('/<username>')
def usr(username):
return '<h1>Hello,%s!</h1>' % username尖括号中的内容就是动态部分,任何能匹配静态部分的URL都会映射到这个路由上。调用视图函数时,Flask会将冬天部分作为参数传入函数。路由中的动态部分默认使用字符串,不过也可使用类型定义。例如,路由/user/<int:id>只会匹配动态片段id为整数的URL。Flask支持在路由中使用int,float和path类型。path类型也是字符串,但不把斜线视作分隔符,而将其作为冬天片段的一部分。
3.启动服务器
程序实例用run方法启动Flask集成的开发Web服务器:
Hello.py:
#!/usr/bin/python在这里只要直接执行程序就会启动Web服务器。服务器启动后,会进入轮询,等待并处理请求。轮询会一直运行,直到程序停止,比如按Ctril-C键。
import os
import sys
import logging.config
import flask
import socket
from flask import Flask,jsonify
from flask import request
from flask import abort
from flask import make_response
app = Flask(__name__)
@app.route('/')
def index():
return '<h1>Hello World!</h1>'
@app.route('/<username>') def usr(username): return '<h1>Hello,%s!</h1>' % username
if __name__ == "__main__":
hostname = socket.gethostname()
ip = socket.gethostbyname( hostname )
app.run( host=ip,port=5000,debug=False )
有一些选项参数可被app.run()函数接受用于设置Web服务器的操作模式。在开发过程中启用调试模式会带来一些便利,比如说激活调试器和重载程序。要想采用调试模式,可以把app.run的debug参数设置为True。
启动服务器:
在浏览器中输入:http://10.15.230.29:5000 或者命令行输入:curl -X GET http://10.15.230.29:5000
在浏览器中输入:http://10.15.230.29:5000/wahaha 命令行输入:curl -X GET http://10.15.230.29:5000/wahaha
在浏览器中输入:http://10.15.230.29:5000/name/age
当输入了以上地址,程序不知道如何吹了,因此会向浏览器返回错误代码404(Not Found)。
4.响应
make_response:Flask视图函数还可以返回Response对象。make_response()函数可接收1个,2个,3个参数(和视图函数的返回值一样),并返回一个Response对象。
abort:用于返回错误,参数是状态码。
jsonify:按照json的方式返回值。
下面再看一下一段示例代码:
#!/usr/bin/python

import socket
import os
import sys
from flask import Flask,jsonify
from flask import request
from flask import abort
from flask import make_response

app = Flask(__name__)

tasks = [
{
'id':1,
'title':u'Buy groceries',
'description':u'Milk,Cheese, Pizza,Fuilt , Tylenol',
'done':False
},
{
'id':2,
'title':u'Learn Python',
'description':u'Need to find a good Python tutorial on the web',
'done':False
}
]

@app.route('/')
def get():
return 'hello world\n'

@app.route('/todo/api/v1/tasks',methods=['GET'])
def get_tasks():
return jsonify({'tasks':tasks})

@app.route('/todo/api/v1/tasks/haha',methods=['GET','POST'])
def get_task_by_id():
return make_response(jsonify({'tasks':tasks[int(request.json.get('id',""))-1]}),200)

if __name__ == '__main__':
hostname = socket.gethostname()
ip = socket.gethostbyname( hostname )
app.run(debug=False,host=ip,port=5000)首先调用第一个API:'/todo/api/v1/tasks'来获取所有task:>curl -X GET http://localhost:5000/todo/api/v1/tasks
再调用第二个API:'/todo/api/v1/tasks/haha',获取id=2的信息,有三种请求方式:
>curl -X GET -H "Content-Type: application/json" http://localhost:5000/todo/api/v1/tasks/haha -d '{"id":"2"}'
注:return make_response(jsonify({'tasks':tasks[int(request.json.get('id',""))-1]}),200)
>curl -X GET -d "id=2" http://127.0.0.1:5000/todo/api/v1/tasks/haha
>curl -X GET http://127.0.0.1:5000/todo/api/v1/tasks/haha?id=2
注:return make_response(jsonify({'tasks':tasks[int(request.args['id']-1]}),200)
或者:return make_response(jsonify({'tasks':tasks[int(request.values['id']-1]}),200)
request.data:contains the incoming request data as string in case it came with a minetype Flask does not handle
request.args:if you want the parameters in the URL
request.form:if you want the information in the body(as sent by a html POST form)
request.values:if you want both
app.run的参数为:
host:server host
port:server port
use_debugger:flag whether to default to using the Werkzeug debugger. This can be overriden in the command line by passing the -d or -D flag.Default to False,for security.
use_reloader:flag whether to use the auto-reloader.Default to True when debugging. This can be overriden in the command line by passing the -r/-R flag.
threaded:should the process handle each request in a seperate thread?
processes:number of processes to spawn
passthrough_errors:disable the error catching.This means that the server will die on errors but it can be useful to hook debuggers in (pdb etc)
ssl_crt : path to ssl certificate file
ssl_key : path to ssl key file
Author:忆之独秀
Email:leaguenew@qq.com
注明出处:http://blog.csdn.net/lavorange/article/details/55548185

相关文章推荐
- (二)2 第一个flask程序
- 第一个简单的flask程序(有问题,求大神帮忙解决)
- flask安装及第一个程序
- 第一个简单的flask程序(有问题,求大神帮忙解决)
- Flask学习日志一(2)-第一个flask程序
- 【Flask】flask 第一个程序解析
- 第一个简单的flask程序(有问题,求大神帮忙解决)
- 【Flask】我的第一个Flask程序
- 用FLask框架写第一个小程序
- 用flask开发博客(1)——第一个简单程序
- 程序的基本结构:第一个Flask程序
- Flask教程1—Flask的简介、安装及第一个程序
- Flask零基础到项目实战(二)第一个flask程序
- Python(二) Flask 第一个程序 HelloWorld!
- Hibernate入门02 - 第一个Hibernate程序
- 用Eclipse MyEclipse WebLogic8.1开发第一个Web程序
- 我的第一个PHP程序--用户登录页面
- 简易黑白棋--我的第一个程序
- 在第一个程序中加入active object使球运动起来
- 我的第一个JSP(Hello World)程序