第一个Struts2实例之hello world!
2017-02-19 15:43
417 查看
Struts官网: http://struts.apache.org/
Struts2框架预先实现了一些功能
1:请求数据自动封装
2:文件上传的功能
3:对国际化功能的简化
4:数据校验的功能
第一:首先需要说明的是Struts就是基于MVC模式的框架!(struts其实也是servlet封装,提高开发效率!)
第二:Struts开发步骤:
1. web项目,引入struts - jar包
2. web.xml中,引入struts的核心功能,配置过滤器
3. 开发action
4. 配置action --->src/struts.xml
下面详细介绍一下第一个struts2的开发流程:
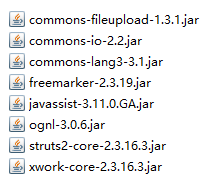
1. 创建动态web项目,引入struts - jar包(这里引入8个jar包,如下所示。很容易就可以得到就不分享了哦)
[b]
[/b]
commons-fileupload-1.3.1.jar 【文件上传相关包】
commons-io-2.2.jar
commons-lang3-3.1.jar 【struts对java.lang包的扩展】
freemarker-2.3.19.jar 【struts对标签模板库jar文件】
javassist-3.11.0.GA.jar 【struts对字节码的处理相关jar】
ognl-3.0.6.jar 【Ognl表达式功能支持表】
struts2-core-2.3.16.3.jar 【struts2核心功能包】
xwork-core-2.3.16.3.jar 【xwork核心包】
2. 在web.xml中,引入struts的核心功能,配置过滤器(已经加了注释,不作多叙述)
Tomcat启动---》加载自身web.xml---》加载所有项目的web.xml
通过在项目的web.xml中引入过滤器
struts2的核心功能的初始化,是通过过滤器完成的。
[b][b]此处插一句,配置过滤器的时候,filter-class里面的内容我是这样获取的,因为写法是死的,如图,仅供参考。[/b][/b]
[b][b]<filter-class>org.apache.struts2.dispatcher.ng.filter.StrutsPrepareAndExecuteFilter</filter-class>[/b][/b]

双击点开之后,复制此句即可。

3. 开发action,此处习惯继承了ActionSupport.
4. 配置action --->src/struts.xml
配置struts.xml的时候使用下面的模板,在上面直接进行加工即可。
最后了,当然直接运行就行了,结果如下所示:
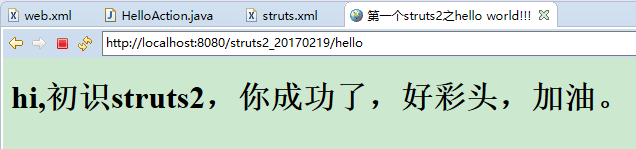
这个是在浏览器运行的结果:

Struts2框架预先实现了一些功能
1:请求数据自动封装
2:文件上传的功能
3:对国际化功能的简化
4:数据校验的功能
第一:首先需要说明的是Struts就是基于MVC模式的框架!(struts其实也是servlet封装,提高开发效率!)
第二:Struts开发步骤:
1. web项目,引入struts - jar包
2. web.xml中,引入struts的核心功能,配置过滤器
3. 开发action
4. 配置action --->src/struts.xml
下面详细介绍一下第一个struts2的开发流程:
1. 创建动态web项目,引入struts - jar包(这里引入8个jar包,如下所示。很容易就可以得到就不分享了哦)
[b]
[/b]
commons-fileupload-1.3.1.jar 【文件上传相关包】
commons-io-2.2.jar
commons-lang3-3.1.jar 【struts对java.lang包的扩展】
freemarker-2.3.19.jar 【struts对标签模板库jar文件】
javassist-3.11.0.GA.jar 【struts对字节码的处理相关jar】
ognl-3.0.6.jar 【Ognl表达式功能支持表】
struts2-core-2.3.16.3.jar 【struts2核心功能包】
xwork-core-2.3.16.3.jar 【xwork核心包】
2. 在web.xml中,引入struts的核心功能,配置过滤器(已经加了注释,不作多叙述)
Tomcat启动---》加载自身web.xml---》加载所有项目的web.xml
通过在项目的web.xml中引入过滤器
struts2的核心功能的初始化,是通过过滤器完成的。
<?xml version="1.0" encoding="UTF-8"?>
<web-app xmlns:xsi="http://www.w3.org/2001/XMLSchema-instance" xmlns="http://java.sun.com/xml/ns/javaee" xsi:schemaLocation="http://java.sun.com/xml/ns/javaee http://java.sun.com/xml/ns/javaee/web-app_3_0.xsd" id="WebApp_ID" version="3.0">
<display-name>struts2_20170219</display-name>
<welcome-file-list>
<welcome-file>index.html</welcome-file>
<welcome-file>index.htm</welcome-file>
<welcome-file>index.jsp</welcome-file>
<welcome-file>default.html</welcome-file>
<welcome-file>default.htm</welcome-file>
<welcome-file>default.jsp</welcome-file>
</welcome-file-list>

<!-- 其他过滤器 -->

<!-- 引入struts2的核心过滤器 -->
<filter>
<!-- 过滤器的名称 -->
<filter-name>struts2</filter-name>
<!-- 过滤器类 -->
<filter-class>org.apache.struts2.dispatcher.ng.filter.StrutsPrepareAndExecuteFilter</filter-class>
</filter>
<filter-mapping>
<!-- 过滤器名称 -->
<filter-name>struts2</filter-name>
<!-- 过滤器映射 -->
<url-pattern>/*</url-pattern>
</filter-mapping>
</web-app>
[b][b]此处插一句,配置过滤器的时候,filter-class里面的内容我是这样获取的,因为写法是死的,如图,仅供参考。[/b][/b]
[b][b]<filter-class>org.apache.struts2.dispatcher.ng.filter.StrutsPrepareAndExecuteFilter</filter-class>[/b][/b]
双击点开之后,复制此句即可。
3. 开发action,此处习惯继承了ActionSupport.
package com.bie;

import com.opensymphony.xwork2.ActionSupport;

/**
* @author BieHongLi
* @version 创建时间:2017年2月19日 下午3:08:53
* 开发action,处理请求
*/
public class HelloAction extends ActionSupport{

private static final long serialVersionUID = 1L;

/**
* 重写execute,处理请求的方法
*/
@Override
public String execute() throws Exception {
System.out.println("访问到了action,正在 处理请求");
System.out.println("hello world!!! struts2");
return SUCCESS;
}

}
4. 配置action --->src/struts.xml
<?xml version="1.0" encoding="UTF-8" ?>
<!DOCTYPE struts PUBLIC
"-//Apache Software Foundation//DTD Struts Configuration 2.0//EN"
"http://struts.apache.org/dtds/struts-2.0.dtd">

<struts>
<!-- 生命包 -->
<package name="helloWorld" extends="struts-default">
<!-- 定义action -->
<action name="hello" class="com.bie.HelloAction" method="execute">
<!-- 显示成功的jsp页面 -->
<result name="success">success.jsp</result>
</action>
</package>
</struts>
配置struts.xml的时候使用下面的模板,在上面直接进行加工即可。
<?xml version="1.0" encoding="UTF-8" ?>
<!DOCTYPE struts PUBLIC
"-//Apache Software Foundation//DTD Struts Configuration 2.0//EN"
"http://struts.apache.org/dtds/struts-2.0.dtd">

<struts>

</struts>
最后了,当然直接运行就行了,结果如下所示:
这个是在浏览器运行的结果:

相关文章推荐
- 第一个Struts2实例之hello world!
- Struts2 第一个实例学习
- AS3.0第一个实例:(Hello World)
- struts2(1)--第一个hello world
- 细谈struts2(二)开发第一个struts2的实例
- Struts2 Hello World 实例
- 第一个Struts2的实例:
- struts2(二)开发第一个struts2的实例
- 第一个Struts2入门经典实例
- Struts2第一个实例HelloWorld
- Struts2 Hello World实例
- struts2第一个实例和配置文件介绍
- Java程序员从笨鸟到菜鸟之(三十七)细谈struts2(二)开发第一个struts2的实例
- Struts2 Hello World 实例
- 学习struts2的第一个小实例
- Java程序员从笨鸟到菜鸟之(三十七)细谈struts2(二)开发第一个struts2的实例
- struts2之第一个实例
- Struts2的第一个应用实例
- 第一个struts2实例
- Struts2第一个例子Hello World!