Ubuntu Server安装Apache HBase
2017-02-16 17:13
447 查看
安装完Hadoop之后急切有种想体验一下Apache HBase的操作,于是就有了这篇文章。
JDK:确保已安装JDK
解压HBase文件
root@ubuntu:/usr/local# mv hbase-1.2.4 hbase
root@ubuntu:/usr/local# cd /
root@ubuntu:/# chown -R hduser:hadoop /usr/local/hbase
root@ubuntu:/# chmod 777 /usr/local/hbase/bin/*.sh
root@ubuntu:/#
#Java install home
export JAVA_HOME=/usr/lib/jvm/java-7-openjdk-amd64
# HBase class path
export HBASE_CLASSPATH=/usr/local/hbase/lib
#By HBase to control Zookeeper start or stop
export HBASE_MANAGES_ZK=true
# pids path -solve exception
export HBASE_PID_DIR=/home/hduser/pids
(2)配置hbase-site.xml,该文件位于/usr/local/hbase-1.2.4/conf
hbase.master是指定运行HMaster的服务器及端口号;
hbase.master.maxclockskew是用来防止HBase节点之间时间不一致造成regionserver启动失败,默认值是30000;
hbase.rootdir指定HBase的存储目录;
hbase.cluster.distributed设置集群处于分布式模式;hbase.zookeeper.quorum设置Zookeeper节点的主机名,它的值个数必须是奇数;
hbase.zookeeper.property.dataDir设置Zookeeper的目录,默认为/tmp,dfs.replication设置数据备份数,集群节点小于3时需要修改,本次试验是一个节点,所以修改为1。
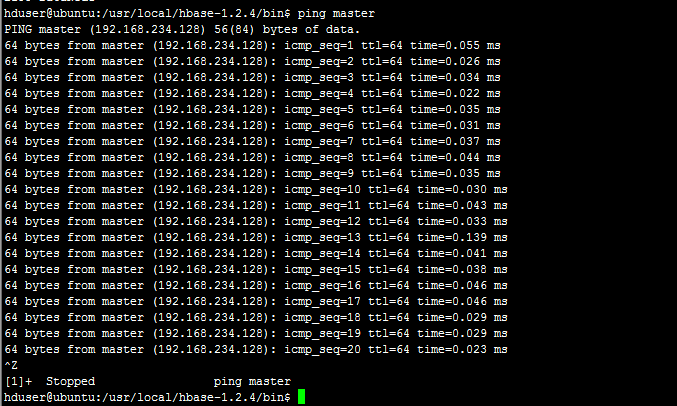
注:master需要设置/etc/hosts文件:127.0.0.1 master;设置完成后可以试一下是否设置成功
(3)配置regionservers,该文件位于/usr/local/hbase/conf设置所运行HBase的机器,此文件配置和hadoop中的slaves类似,一行指定一台机器,本次试验仅用一台机器,设置master即可,默认是:localhost。
(4)设置HBase环境变量,文件位于/etc/profile
在文件末尾添加:
第三步:运行测试
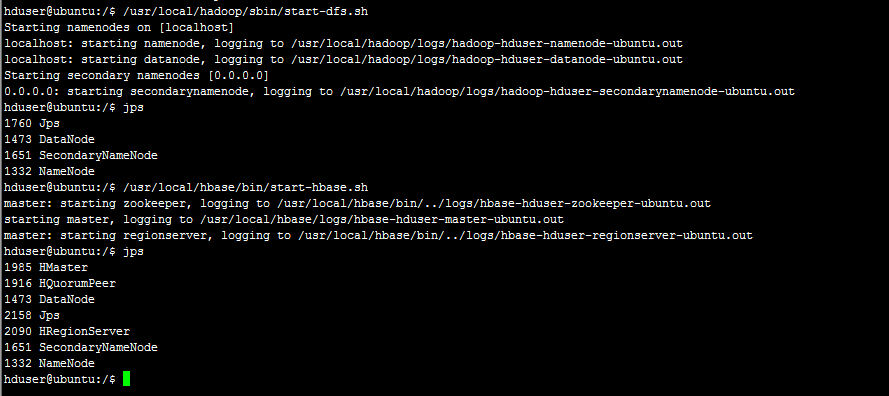
先启动Hadoop再启动HBase:
进入命令窗口和帮助
HBase安装目录后执行bin/hbase shell,进入HBase shell交互模式,通过执行help命令,将输出一系列帮助信息如下:

输入help输出如下:
1、打开Hbase shell
hduser@ubuntu:/usr/local/hbase$ hbase shell
2、查询表List
hbase(main):001:0> list
3、建表(create)
hbase(main):008:0> create 'scores','grad','course'
4、添加数据(表scores,rowkey为zkb 列族grad,列名为”” 值为5)
hbase(main):013:0> put 'scores','zkd','grade:','5'
5、 给zkb这一行的数据的列族course添加一列<math,97> (put)
hbase(main):016:0> put 'scores','zkd','course:math','97'
6、查询某一条数据(get),根据rowkey查找
hbase(main):024:0> get 'scores','zkd'
7、查询多条数据(scan)
格式:scan命令可以指定startrow,stoprow来scan多个row,例如:scan 'user_test',{COLUMNS =>'info:username',LIMIT =>10, STARTROW => 'test',STOPROW=>'test2'}, {}里边的是可选项
hbase(main):003:0> scan 'scores',{COLUMNS=>'course:art',LIMIT=>1,STARTROW=>'a',STOPROW=>'z'}
8、删除记录(只有一个column)
delete 'scores','1','course:art'
9、删除rowkey的所有column
deleteall 'scores','1'
10、删除scores表
hbase(main):004:0> disable 'scores'
hbase(main):005:0> drop 'scores'
注意:操作过程中可能会因为zookeeper报错:ERROR: Can't get master address from ZooKeeper; znode data == null。
错误原因:用户无法写入zookeeper文件,导致znode data为空。
解决方法:
(1)在hbase-site.xml指定一个运行hbase的用户有写入文件权限的目录作为zookeeper数据目录,如
(2)hbase-site.xml文件中的
rootdir中的IP设定很重要,需要设定对应的IP与core-site.xml中fs.defaultFS中的路径不相同
异常处理
HBase stop异常
stopping hbasecat: /tmp/hbase-mango-master.pid: No such file or directory
默认情况下pid文件保存在/tmp目录下,/tmp目录下的文件很容易丢失(重启后基本就会删除),解决办法:在hbase-env.sh中修改pid文件的存放路径
解决方法:
在hbase-env.sh中修改pid文件的存放路径创建用户的pids目录:
命令生成:hbase-mango-master.pid文件
OpenJDK 64位服务器VM警告:无法分配内存。
关于本文配置文件的下载:HBase配置文件与HBase doc文档
Linux环境
Linux :Ubuntu server 15.04Welcome to Ubuntu 15.04 (GNU/Linux 3.19.0-15-generic x86_64) * Documentation: https://help.ubuntu.com/ Your Ubuntu release is not supported anymore. For upgrade information, please visit: http://www.ubuntu.com/releaseendoflife New release '15.10' available. Run 'do-release-upgrade' to upgrade to it.
JDK:确保已安装JDK
hduser@ubuntu:/$ java -version
java version "1.7.0_95"
OpenJDK Runtime Environment (IcedTea 2.6.4) (7u95-2.6.4-0ubuntu0.15.04.1)
OpenJDK 64-Bit Server VM (build 24.95-b01, mixed mode)
hduser@ubuntu:/$
下载HBase稳定版本1.2.x
http://ftp.wayne.edu/apache/hbase/解压HBase文件
Last login: Tue Feb 14 20:22:43 2017 from 192.168.234.1
root@ubuntu:~# cd /usr/local
root@ubuntu:/usr/local# ls
bin  etc  games  hadoop  hbase-1.2.4-bin.tar.gz  include  lib  man  sbin  share  src  tomcat
root@ubuntu:/usr/local# tar zxf hbase-1.2.4-bin.tar.gz
root@ubuntu:/usr/local# ls
bin  etc  games  hadoop  hbase-1.2.4  hbase-1.2.4-bin.tar.gz  include  lib  man  sbin  share  src  tomcat
root@ubuntu:/usr/local#
分配HBase用户分组及操作权限
将文件名由/usr/local/hbase-1.2.4改为/usr/local/hbase,并为/usr/local/hbase分配hadoop分组的hduser用户下:root@ubuntu:/usr/local# mv hbase-1.2.4 hbase
root@ubuntu:/usr/local# cd /
root@ubuntu:/# chown -R hduser:hadoop /usr/local/hbase
root@ubuntu:/# chmod 777 /usr/local/hbase/bin/*.sh
root@ubuntu:/#
修改HBase相关的配置文件
(1)配置hbase-env.sh,该文件在/usr/local/hbase/conf设置以下值:#Java install home
export JAVA_HOME=/usr/lib/jvm/java-7-openjdk-amd64
# HBase class path
export HBASE_CLASSPATH=/usr/local/hbase/lib
#By HBase to control Zookeeper start or stop
export HBASE_MANAGES_ZK=true
# pids path -solve exception
export HBASE_PID_DIR=/home/hduser/pids
(2)配置hbase-site.xml,该文件位于/usr/local/hbase-1.2.4/conf
<configuration>

<property>
<name>hbase.master</name>
<value>master:6000</value>
</property>

<property>
<name>hbase.master.maxclockskew</name>
<value>180000</value>
</property>

<property>
<name>hbase.rootdir</name>
<value>hdfs://master:9000/hbase</value>
</property>

<property>
<name>hbase.cluster.distributed</name>
<value>true</value>
</property>

<property>
<name>hbase.zookeeper.quorum</name>
<value>master</value>
</property>

<property>
<name>hbase.zookeeper.property.dataDir</name>
<value>/home/${user.name}/tmp/zookeeper</value>
</property>

<property>
<name>dfs.replication</name>
<value>1</value>
</property>

</configuration>属性说明:hbase.master是指定运行HMaster的服务器及端口号;
hbase.master.maxclockskew是用来防止HBase节点之间时间不一致造成regionserver启动失败,默认值是30000;
hbase.rootdir指定HBase的存储目录;
hbase.cluster.distributed设置集群处于分布式模式;hbase.zookeeper.quorum设置Zookeeper节点的主机名,它的值个数必须是奇数;
hbase.zookeeper.property.dataDir设置Zookeeper的目录,默认为/tmp,dfs.replication设置数据备份数,集群节点小于3时需要修改,本次试验是一个节点,所以修改为1。
注:master需要设置/etc/hosts文件:127.0.0.1 master;设置完成后可以试一下是否设置成功
(3)配置regionservers,该文件位于/usr/local/hbase/conf设置所运行HBase的机器,此文件配置和hadoop中的slaves类似,一行指定一台机器,本次试验仅用一台机器,设置master即可,默认是:localhost。
(4)设置HBase环境变量,文件位于/etc/profile
在文件末尾添加:
#HBase Environment
export HBASE_HOME=/usr/local/hbase
export PATH=$PATH:$HBASE_HOME/bin
使修改生效:
source /etc/profile
第三步:运行测试
先启动Hadoop再启动HBase:
HBase Shell操作工具
进入命令窗口和帮助
HBase安装目录后执行bin/hbase shell,进入HBase shell交互模式,通过执行help命令,将输出一系列帮助信息如下:输入help输出如下:
hbase(main):003:0> help
HBase Shell, version 1.2.4, r67592f3d062743907f8c5ae00dbbe1ae4f69e5af, Tue Oct 25 18:10:20 CDT 2016
Type 'help "COMMAND"', (e.g. 'help "get"' -- the quotes are necessary) for help on a specific command.
Commands are grouped. Type 'help "COMMAND_GROUP"', (e.g. 'help "general"') for help on a command group.

COMMAND GROUPS:
Group name: general
Commands: status, table_help, version, whoami

Group name: ddl
Commands: alter, alter_async, alter_status, create, describe, disable, disable_all, drop, drop_all, enable, enable_all, exists, get_table, is_disabled, is_enabled, list, locate_region, show_filters

Group name: namespace
Commands: alter_namespace, create_namespace, describe_namespace, drop_namespace, list_namespace, list_namespace_tables

Group name: dml
Commands: append, count, delete, deleteall, get, get_counter, get_splits, incr, put, scan, truncate, truncate_preserve

Group name: tools
Commands: assign, balance_switch, balancer, balancer_enabled, catalogjanitor_enabled, catalogjanitor_run, catalogjanitor_switch, close_region, compact, compact_rs, flush, major_compact, merge_region, move, normalize, normalizer_enabled, normalizer_switch, split, trace, unassign, wal_roll, zk_dump

Group name: replication
Commands: add_peer, append_peer_tableCFs, disable_peer, disable_table_replication, enable_peer, enable_table_replication, list_peers, list_replicated_tables, remove_peer, remove_peer_tableCFs, set_peer_tableCFs, show_peer_tableCFs

Group name: snapshots
Commands: clone_snapshot, delete_all_snapshot, delete_snapshot, list_snapshots, restore_snapshot, snapshot

Group name: configuration
Commands: update_all_config, update_config

Group name: quotas
Commands: list_quotas, set_quota

Group name: security
Commands: grant, list_security_capabilities, revoke, user_permission

Group name: procedures
Commands: abort_procedure, list_procedures

Group name: visibility labels
Commands: add_labels, clear_auths, get_auths, list_labels, set_auths, set_visibility

SHELL USAGE:
Quote all names in HBase Shell such as table and column names.  Commas delimit
command parameters.  Type <RETURN> after entering a command to run it.
Dictionaries of configuration used in the creation and alteration of tables are
Ruby Hashes. They look like this:

{'key1' => 'value1', 'key2' => 'value2', ...}

and are opened and closed with curley-braces.  Key/values are delimited by the
'=>' character combination.  Usually keys are predefined constants such as
NAME, VERSIONS, COMPRESSION, etc.  Constants do not need to be quoted.  Type
'Object.constants' to see a (messy) list of all constants in the environment.

If you are using binary keys or values and need to enter them in the shell, use
double-quote'd hexadecimal representation. For example:

hbase> get 't1', "key\x03\x3f\xcd"
hbase> get 't1', "key\003\023\011"
hbase> put 't1', "test\xef\xff", 'f1:', "\x01\x33\x40"

The HBase shell is the (J)Ruby IRB with the above HBase-specific commands added.
For more on the HBase Shell, see http://hbase.apache.org/book.html hbase(main):004:0>
HBase Shell 操作示例
hbase shell常用的操作命令有create,describe,disable,drop,list,scan,put,get,delete,deleteall,count,status等,通过help可以看到详细的用法。1、打开Hbase shell
hduser@ubuntu:/usr/local/hbase$ hbase shell
2、查询表List
hbase(main):001:0> list
3、建表(create)
hbase(main):008:0> create 'scores','grad','course'
4、添加数据(表scores,rowkey为zkb 列族grad,列名为”” 值为5)
hbase(main):013:0> put 'scores','zkd','grade:','5'
5、 给zkb这一行的数据的列族course添加一列<math,97> (put)
hbase(main):016:0> put 'scores','zkd','course:math','97'
6、查询某一条数据(get),根据rowkey查找
hbase(main):024:0> get 'scores','zkd'
7、查询多条数据(scan)
格式:scan命令可以指定startrow,stoprow来scan多个row,例如:scan 'user_test',{COLUMNS =>'info:username',LIMIT =>10, STARTROW => 'test',STOPROW=>'test2'}, {}里边的是可选项
hbase(main):003:0> scan 'scores',{COLUMNS=>'course:art',LIMIT=>1,STARTROW=>'a',STOPROW=>'z'}
8、删除记录(只有一个column)
delete 'scores','1','course:art'
9、删除rowkey的所有column
deleteall 'scores','1'
10、删除scores表
hbase(main):004:0> disable 'scores'
hbase(main):005:0> drop 'scores'
注意:操作过程中可能会因为zookeeper报错:ERROR: Can't get master address from ZooKeeper; znode data == null。
错误原因:用户无法写入zookeeper文件,导致znode data为空。
解决方法:
(1)在hbase-site.xml指定一个运行hbase的用户有写入文件权限的目录作为zookeeper数据目录,如
<property>
<name>hbase.zookeeper.property.dataDir</name>
<value>/home/hduser/zookeeper</value>
</property>
(2)hbase-site.xml文件中的
<property>
<name>hbase.rootdir</name>
<value>hdfs://localhost:49002/hbase</value>
</property>
rootdir中的IP设定很重要,需要设定对应的IP与core-site.xml中fs.defaultFS中的路径不相同
<property>
<name>fs.defaultFS</name>
<value>hdfs://localhost:9000</value>
</property>
stopping hbasecat: /tmp/hbase-mango-master.pid: No such file or directory
默认情况下pid文件保存在/tmp目录下,/tmp目录下的文件很容易丢失(重启后基本就会删除),解决办法:在hbase-env.sh中修改pid文件的存放路径
解决方法:
在hbase-env.sh中修改pid文件的存放路径创建用户的pids目录:
export HBASE_PID_DIR=/home/hduser/pids
命令生成:hbase-mango-master.pid文件
touch hbase-mango-master.pid
虚拟机内存不足
OpenJDK 64-Bit Server VM warning: INFO: os::commit_memory(0x00000000de530000, 10813440, 0) failed; error='Cannot allocate memory' (errno=12)
OpenJDK 64位服务器VM警告:无法分配内存。
关于本文配置文件的下载:HBase配置文件与HBase doc文档

相关文章推荐
- Ubuntu Server系列各项服务的安装和维护 Apache压力测试
- ubuntu 64 server 干净环境安装php5.3.10+mysql5.5.20+apache2.2.22
- Ubuntu Server 安装 Subversion实现精细的目录访问权限控制 安装Subversion和Apache sudo apt-get install subversion li
- Ubuntu 14.04 安装Apache、MySQL、PHP、JDK7、Tomcat7、vsFTPd、Open SSH Server快速步骤
- Ubuntu Server系列各项服务的安装和维护 Apache安全
- Ubuntu Server安装Apache Hadoop
- ubuntu 64 server 环境安装php5.3.10+mysql5.5.20+apache2.2.22
- HBase-0.90.3安装(Ubuntu Server11.04+Hadoop-0.20.2)
- Ubuntu下安装配置Apache http server
- [置顶] Ubuntu 14.04 安装svn server和Apache
- Ubuntu server 10.04安装apache+passenger+ruby+rails+mysql环境
- ubuntu server 安装wordpress+mysql+apache+php
- ubuntu下安装apache http server
- Ubuntu 12.04 64bit上安装Apache Traffic Server 4.1.2
- ubuntu server 10.04:apache1:安装ssl
- Ubuntu Server 下 Apache的安装和设置 ZT
- Ubuntu Server 14.04 安装+安全Web服务器(linux+apache+mysql+php)搭建流程(更新)
- Ubuntu Server 下 Apache的安装和设置
- ubuntu-11.10-server-i386学习笔记-Apache安装
- ubuntu-11.10-server-i386学习笔记-Apache安装