用maven搭建SpringMVC框架(一)
2017-02-02 00:21
330 查看
1 先到apache官网下载maven
2 下载后解压
3 配置maven环境变量

4 eclipse已经集成了maven 所以不用再安装插件了
5 maven下载速度过慢 不妨修改一下国内镜像 到maven目录中的conf中编辑setting.xml
<mirrors>
<!-- 阿里云仓库 -->
<mirror>
<id>alimaven</id>
<mirrorOf>central</mirrorOf>
<name>aliyun maven</name>
<url>http://maven.aliyun.com/nexus/content/repositories/central/</url>
</mirror>
<!-- 中央仓库1 -->
<mirror>
<id>repo1</id>
<mirrorOf>central</mirrorOf>
<name>Human Readable Name for this Mirror.</name>
<url>http://repo1.maven.org/maven2/</url>
</mirror>
<!-- 中央仓库2 -->
<mirror>
<id>repo2</id>
<mirrorOf>central</mirrorOf>
<name>Human Readable Name for this Mirror.</name>
<url>http://repo2.maven.org/maven2/</url>
</mirror>
</mirrors>
6 本项目使用jdk1.8版本 默认jdk为1.8
<profile>
<id>jdk-1.8</id>
<activation>
<activeByDefault>true</activeByDefault>
<jdk>1.8</jdk>
</activation>
<properties>
<maven.compiler.source>1.8</maven.compiler.source>
<maven.compiler.target>1.8</maven.compiler.target>
<maven.compiler.compilerVersion>1.8</maven.compiler.compilerVersion>
</properties>
</profile>
6 将setting文件文件用户文件夹中的.m2中
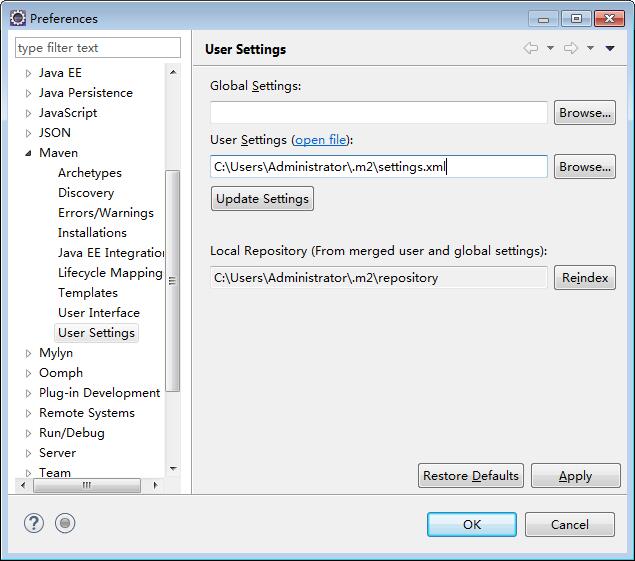
7 eclipse配置该文件 window-->Preferences-->Maven-->User Setting
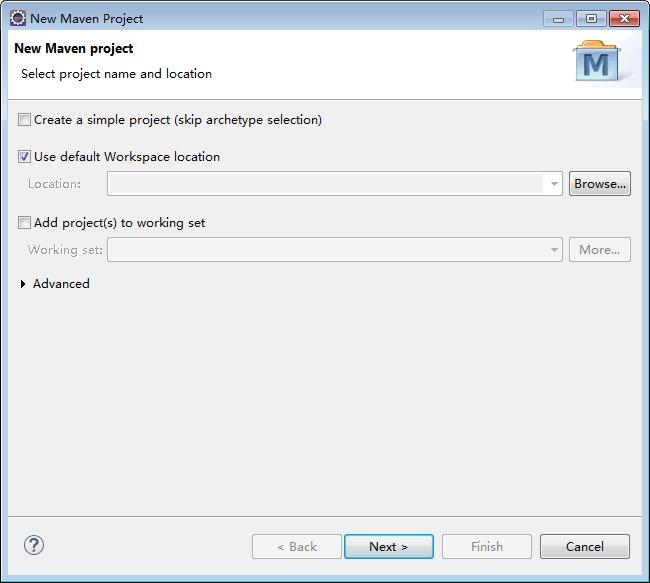
7 创建maven项目 File-->New-->Maven project -->next
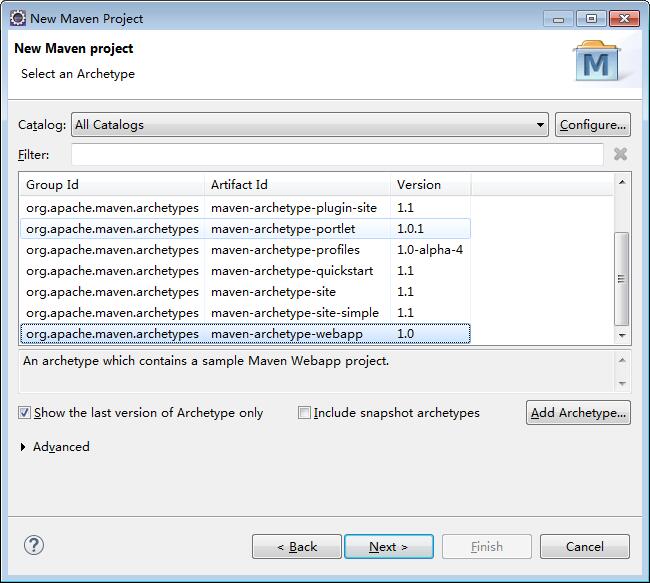
8 选择 maven-archetype-webapp-->next-->名字自己起 最后finish
2 下载后解压
3 配置maven环境变量
4 eclipse已经集成了maven 所以不用再安装插件了
5 maven下载速度过慢 不妨修改一下国内镜像 到maven目录中的conf中编辑setting.xml
<mirrors>
<!-- 阿里云仓库 -->
<mirror>
<id>alimaven</id>
<mirrorOf>central</mirrorOf>
<name>aliyun maven</name>
<url>http://maven.aliyun.com/nexus/content/repositories/central/</url>
</mirror>
<!-- 中央仓库1 -->
<mirror>
<id>repo1</id>
<mirrorOf>central</mirrorOf>
<name>Human Readable Name for this Mirror.</name>
<url>http://repo1.maven.org/maven2/</url>
</mirror>
<!-- 中央仓库2 -->
<mirror>
<id>repo2</id>
<mirrorOf>central</mirrorOf>
<name>Human Readable Name for this Mirror.</name>
<url>http://repo2.maven.org/maven2/</url>
</mirror>
</mirrors>
6 本项目使用jdk1.8版本 默认jdk为1.8
<profile>
<id>jdk-1.8</id>
<activation>
<activeByDefault>true</activeByDefault>
<jdk>1.8</jdk>
</activation>
<properties>
<maven.compiler.source>1.8</maven.compiler.source>
<maven.compiler.target>1.8</maven.compiler.target>
<maven.compiler.compilerVersion>1.8</maven.compiler.compilerVersion>
</properties>
</profile>
6 将setting文件文件用户文件夹中的.m2中
7 eclipse配置该文件 window-->Preferences-->Maven-->User Setting
7 创建maven项目 File-->New-->Maven project -->next
8 选择 maven-archetype-webapp-->next-->名字自己起 最后finish

相关文章推荐
- 搭建最简单的SpringMVC框架(使用maven)
- springmvc mybatis redis mysql maven搭建基本开发框架 (三)
- Intellij IDEA搭建maven+注解SpringMVC框架
- IntelliJ IDEA 搭建基于Maven 的SSM(一)(spring,springMvc,Mybatis)框架整合
- 搭建最简单的SpringMVC框架(使用maven)
- 搭建最简单的SpringMVC框架(使用maven)
- springmvc mybatis redis mysql maven搭建基本开发框架 (三)
- maven整合SpringMVC和mybatis框架搭建
- springmvc mybatis redis mysql maven搭建基本开发框架 (一)
- SpringMVC框架入门配置 IDEA下搭建Maven项目
- Eclipse利用Maven2搭建SpringMVC框架的Web工程
- SpringMVC框架入门配置 IDEA下搭建Maven项目
- 搭建最简单的SpringMVC框架(使用maven)
- 用maven搭建SpringMVC框架(二)
- 搭建最简单的SpringMVC框架(使用maven)
- springmvc mybatis redis mysql maven搭建基本开发框架 (一)
- 搭建最简单的SpringMVC框架(使用maven)
- springmvc mybatis redis mysql maven搭建基本开发框架 (二)
- IDEA下搭建SpringMvc框架+maven
- 基于maven从头搭建springMVC框架