spring boot security oauth2 实现第三方登录
2017-01-24 14:39
381 查看
添加过滤器
private Filter ssoFilter() {
CompositeFilter filter = new CompositeFilter();
List<Filter> filters = new ArrayList<>();
filters.add(ssoFilter(facebook(), "/login/facebook"));
filters.add(ssoFilter(github(), "/login/github"));
filter.setFilters(filters);
return filter;
}
private Filter ssoFilter(ClientResources client, String path) {
OAuth2ClientAuthenticationProcessingFilter filter = new OAuth2ClientAuthenticationProcessingFilter(path);
OAuth2RestTemplate template = new OAuth2RestTemplate(client.getClient(), oauth2ClientContext);
filter.setRestTemplate(template);
UserInfoTokenServices tokenServices = new UserInfoTokenServices(
client.getResource().getUserInfoUri(), client.getClient().getClientId());
tokenServices.setRestTemplate(template);
filter.setTokenServices(tokenServices);
return filter;
}
添加一个CompositeFilter,这里面有一组OAuth2ClientAuthenticationProcessingFilter拦截器,分别拦截github,facebook等实现第三方登录
CompositeFilter的位置
首先看拦截器链

第6个
ApplicationFilterConfig[name=springSecurityFilterChain, filterClass=org.springframework.boot.web.servlet.DelegatingFilterProxyRegistrationBean$1]
其中包含了springsecurity的一系列拦截器,如下
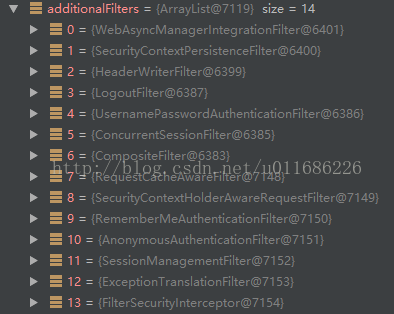
看到了CompositeFilter

oauth2流程,以github为例
首先过滤器拦截login/github(这个是自己配置的) 然后发现没有授权码,将用户重定向到github页面进行授权, https://github.com/login/oauth/authorize?client_id=4f06c1dd2c0ecc9adfe2&redirect_uri=http://127.0.0.1:8080/login/github&response_type=code&state=5hLsa9 redirect_uri是回调地址,要和在github配置的Authorization callback URL一致,state是我们的服务端生成的
如果用户同意,则回调在github配置的Authorization callback URL,并且带上授权码,以及之前生成的state
http://127.0.0.1:8080/login/github?code=e31c7ee0b4fec76644f9&state=mz3AtX 服务端会使用授权码code去github获取令牌 https://github.com/login/oauth/access_token grant_type=authorization_code&code=8d4c3ce6e0ecdb0840b5&redirect_uri=http%3A%2F%2F127.0.0.1%3A8080%2Flogin%2Fgithub&client_id=4f06c1dd2c0ecc9adfe2&client_secret=11596f35d4243f7969b3839fd076d5e9938d049b
获取令牌之后会从github获取用户信息,然后重定向到首页。
http://spring.io/guides/tutorials/spring-boot-oauth2/ https://my.oschina.net/u/1778309/blog/498822?p={{page}} https://developer.github.com/v3/oauth/ http://www.ruanyifeng.com/blog/2014/05/oauth_2_0.html
http://blog.csdn.net/w1054993544/article/details/78932614
private Filter ssoFilter() {
CompositeFilter filter = new CompositeFilter();
List<Filter> filters = new ArrayList<>();
filters.add(ssoFilter(facebook(), "/login/facebook"));
filters.add(ssoFilter(github(), "/login/github"));
filter.setFilters(filters);
return filter;
}
private Filter ssoFilter(ClientResources client, String path) {
OAuth2ClientAuthenticationProcessingFilter filter = new OAuth2ClientAuthenticationProcessingFilter(path);
OAuth2RestTemplate template = new OAuth2RestTemplate(client.getClient(), oauth2ClientContext);
filter.setRestTemplate(template);
UserInfoTokenServices tokenServices = new UserInfoTokenServices(
client.getResource().getUserInfoUri(), client.getClient().getClientId());
tokenServices.setRestTemplate(template);
filter.setTokenServices(tokenServices);
return filter;
}
添加一个CompositeFilter,这里面有一组OAuth2ClientAuthenticationProcessingFilter拦截器,分别拦截github,facebook等实现第三方登录
CompositeFilter的位置
首先看拦截器链
第6个
ApplicationFilterConfig[name=springSecurityFilterChain, filterClass=org.springframework.boot.web.servlet.DelegatingFilterProxyRegistrationBean$1]
其中包含了springsecurity的一系列拦截器,如下
看到了CompositeFilter
oauth2流程,以github为例
首先过滤器拦截login/github(这个是自己配置的) 然后发现没有授权码,将用户重定向到github页面进行授权, https://github.com/login/oauth/authorize?client_id=4f06c1dd2c0ecc9adfe2&redirect_uri=http://127.0.0.1:8080/login/github&response_type=code&state=5hLsa9 redirect_uri是回调地址,要和在github配置的Authorization callback URL一致,state是我们的服务端生成的
如果用户同意,则回调在github配置的Authorization callback URL,并且带上授权码,以及之前生成的state
http://127.0.0.1:8080/login/github?code=e31c7ee0b4fec76644f9&state=mz3AtX 服务端会使用授权码code去github获取令牌 https://github.com/login/oauth/access_token grant_type=authorization_code&code=8d4c3ce6e0ecdb0840b5&redirect_uri=http%3A%2F%2F127.0.0.1%3A8080%2Flogin%2Fgithub&client_id=4f06c1dd2c0ecc9adfe2&client_secret=11596f35d4243f7969b3839fd076d5e9938d049b
获取令牌之后会从github获取用户信息,然后重定向到首页。
http://spring.io/guides/tutorials/spring-boot-oauth2/ https://my.oschina.net/u/1778309/blog/498822?p={{page}} https://developer.github.com/v3/oauth/ http://www.ruanyifeng.com/blog/2014/05/oauth_2_0.html
http://blog.csdn.net/w1054993544/article/details/78932614

相关文章推荐
- 使用第三方CA证书实现智能卡登录
- 【Android应用开发详解】第01期:第三方授权认证(一)实现第三方授权登录、分享以及获取用户资料
- 使用share SDK实现第三方授权登录、分享综合(2.x版本)
- js调用qq互联api实现第三方登录
- js如何调用qq互联api实现第三方登录
- 不用第三方软件实现用户限时登录
- 【Android应用开发详解】第01期:第三方授权认证(一)实现第三方授权登录、分享以及获取用户资料
- 【Android应用开发详解】第01期:第三方授权认证(一)实现第三方授权登录、分享以及获取用户资料
- 【Android应用开发详解】第01期:第三方授权认证(一)实现第三方授权登录、分享以及获取用户资料
- js如何调用qq互联api实现第三方登录
- 【Android应用开发详解】第01期:第三方授权认证(一)实现第三方授权登录、分享以及获取用户资料
- Objective-C ,ios,iphone开发基础:使用第三方库FMDB连接sqlite3 数据库,实现简单的登录
- Objective-C ,ios,iphone开发基础:使用第三方库FMDB连接sqlite3 数据库,实现简单的登录
- 实现第三方授权登录、分享以及获取用户资料
- 【Android】第三方QQ账号登录的实现
- 新浪微博第三方登录实现
- Objective-C ,ios,iphone开发基础:使用第三方库FMDB连接sqlite3 数据库,实现简单的登录
- 【Android应用开发详解】第01期:第三方授权认证(一)实现第三方授权登录、分享以及获取用户资料
- CAS 实现站内单点登录及实现第三方 OAuth、OpenId 登录(二)
- CAS 实现站内单点登录及实现第三方 OAuth、OpenId 登录(四)