php7 wamp本地开发环境搭建
2017-01-16 10:20
766 查看
搭建php本地开发环境 :
首先我的版本是Apache:2.4.23 PHP:7.0.10 MySQL:5.7.14
在网上下载目前最新的wamp集成包
http://www.wampserver.com/#wampserver-64-bits-php-5-6-25-php-7
我下载的是WAMPSERVER 64 BITS(X64)3.0.6的版本

Wamp的安装比较简单,下载完解压缩安装好后,就可以开始配置自己的环境了。
打开wamp,如果wamp显示为绿色表示运行成功(记住每次配置生效后都要点Restart services,配置才可以生效)

在本地安装了wamp环境,首先配置apache服务器
默认的根目录是D:\wamp\www,使用起来非常不方便
1,找到httpd.conf文件
D:\web\wamp64\bin\apache\apache2.4.23\conf\httpd.conf
2,找到这个地方
#
# DocumentRoot: The directory out of whichyou will serve your
# documents. By default, all requests aretaken from this directory, but
# symbolic links and aliases may be used topoint to other locations.
#
DocumentRoot "D:/web/website"
<Directory"D:/web/website/">
修改DocunmentRoot 和Directory为自己的根目录
3,修改访问权限()
<Directory"D:/web/website/">
#
#Possible values for the Options directive are "None","All",
#or any combination of:
# Indexes IncludesFollowSymLinks SymLinksifOwnerMatch ExecCGI MultiViews
#
#Note that "MultiViews" must be named *explicitly* --- "OptionsAll"
#doesn't give it to you.
#
#The Options directive is both complicated and important. Please see
#http://httpd.apache.org/docs/2.4/mod/core.html#options
#for more information.
#
Options +Indexes +FollowSymLinks +Multiviews
#
#AllowOverride controls what directives may be placed in .htaccess files.
#It can be "All", "None", or any combination of thekeywords:
# AllowOverride FileInfoAuthConfig Limit
#
AllowOverride all
#
#Controls who can get stuff from this server.
#
# onlineoffline tag - don't remove
Require all granted
</Directory>
<Directory />
AllowOverride none
Require all granted
</Directory>
Apache2.4以后的版本修改权限都不再是allow from all,deny from all,而是改成
Require all granted,Require all denied
4,修改默认主页
找到下面代码
<IfModule dir_module>
DirectoryIndex index.php index.php3 index.html index.htm
</IfModule>
默认主页是index.php如果没有就找index.php3以此类推。注意顺序,每个页面之间需要加一个空格隔开。
5,配置httpd-vhosts.conf
DocumentRootD:/web/website
<Directory "D:/web/website/">
Options+Indexes +Includes +FollowSymLinks +MultiViews
AllowOverrideAll
Require all granted
</Directory>
将根目录和权限重新设置一下即可
自此,在浏览器中输入localhost或自己的ip地址测试即可看到自己的网页,说明基本配置成功。
配置MySQL数据库
点击图标中的phpmyadmin或者输入http://localhost/phpmyadmin/进入管理页面
默认账户为root密码为空
点击进入后

在导入中,可以导入之前写好的sql表
如果因为重装导致代码无法链接上数据库问题,可以在账户中新开一个有权限的账户来解决问题。
配置php,将它换成7.0.10

配置phpstorm
下载phpstorm,我使用的版本是10.0.1
https://www.jetbrains.com/phpstorm/
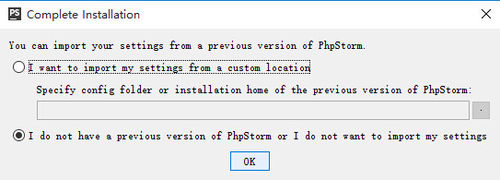
· 如果是首次安装,会弹出“Complete Installation(安装完成)”窗口,根据需要是否导入你的设置,如果没有直接选择第2个单选按钮“I not have...”如下图所示。
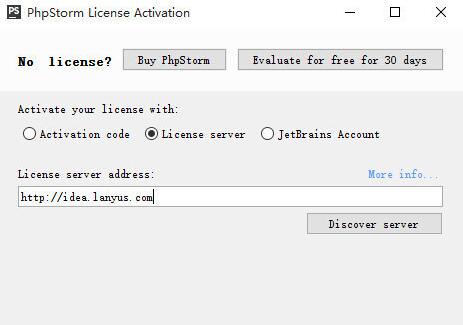
· 进入“许可证激活”窗口,在“Activate your license with:”选项中选择第2个单选按钮“License Server”如下图所示,然后在“License serveraddress”一项中输入如下图所示,然后点击“OK”按钮即可。如果http://idea.lanyus.com激活无效,在网上搜一下其它的license
server address,谷歌你懂得!
· 进入到“欢迎”界面,然后会弹出一个“初始化设置”窗口,一般默认点击“OK”即可,如下图所示:

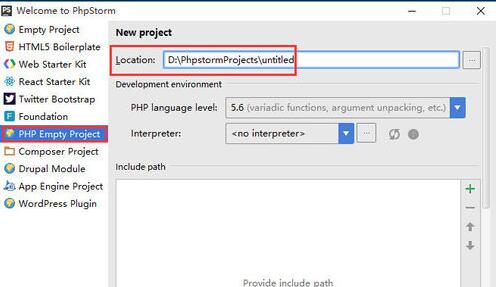
· 选择创建的工程以及设置工程的工作空间,然后点击“Create”按钮,如下图所示:
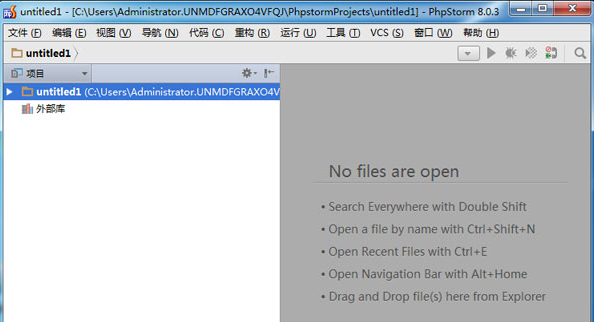
· 最后进入到“PhpStorm10”IDE界面,如下图所示:

· 如果在试用阶段,可以点击菜单栏上的“Help”→“Register...”,如下图所示。

· 然后,依然弹出“许可证激活”窗口,选择“License server”单选按钮,然后在“License serveraddress”一项中输入如下图所示,然后点击“OK”按钮即可。
一般出现Thank you for licensing PhpStorm说明激活成功!

Phpstorm汉化
1.将安装目录下D:\JetBrains\PhpStorm10.0.1\lib目录下的resources_en.jar文件复制出来,并更名为resources_cn.jar
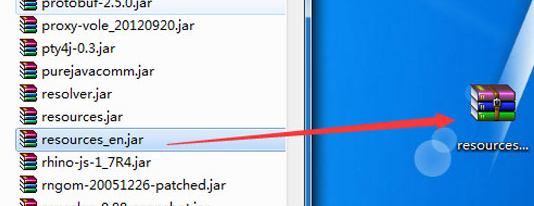
2、双击打开resources_cn.jar(注意是打开而不是解压出来),将下载的汉化包zh_CN目录下的所有文件拖到刚才打开的resources_cn.jar文件内的messages目录中,并保存

3、将resources_cn.jar文件复制回C:\ProgramFiles \JetBrains\phpstorm10.0.3\lib目录,完毕!

4、打开之后,界面如下。
首先我的版本是Apache:2.4.23 PHP:7.0.10 MySQL:5.7.14
在网上下载目前最新的wamp集成包
http://www.wampserver.com/#wampserver-64-bits-php-5-6-25-php-7
我下载的是WAMPSERVER 64 BITS(X64)3.0.6的版本
Wamp的安装比较简单,下载完解压缩安装好后,就可以开始配置自己的环境了。
打开wamp,如果wamp显示为绿色表示运行成功(记住每次配置生效后都要点Restart services,配置才可以生效)
在本地安装了wamp环境,首先配置apache服务器
默认的根目录是D:\wamp\www,使用起来非常不方便
1,找到httpd.conf文件
D:\web\wamp64\bin\apache\apache2.4.23\conf\httpd.conf
2,找到这个地方
#
# DocumentRoot: The directory out of whichyou will serve your
# documents. By default, all requests aretaken from this directory, but
# symbolic links and aliases may be used topoint to other locations.
#
DocumentRoot "D:/web/website"
<Directory"D:/web/website/">
修改DocunmentRoot 和Directory为自己的根目录
3,修改访问权限()
<Directory"D:/web/website/">
#
#Possible values for the Options directive are "None","All",
#or any combination of:
# Indexes IncludesFollowSymLinks SymLinksifOwnerMatch ExecCGI MultiViews
#
#Note that "MultiViews" must be named *explicitly* --- "OptionsAll"
#doesn't give it to you.
#
#The Options directive is both complicated and important. Please see
#http://httpd.apache.org/docs/2.4/mod/core.html#options
#for more information.
#
Options +Indexes +FollowSymLinks +Multiviews
#
#AllowOverride controls what directives may be placed in .htaccess files.
#It can be "All", "None", or any combination of thekeywords:
# AllowOverride FileInfoAuthConfig Limit
#
AllowOverride all
#
#Controls who can get stuff from this server.
#
# onlineoffline tag - don't remove
Require all granted
</Directory>
<Directory />
AllowOverride none
Require all granted
</Directory>
Apache2.4以后的版本修改权限都不再是allow from all,deny from all,而是改成
Require all granted,Require all denied
4,修改默认主页
找到下面代码
<IfModule dir_module>
DirectoryIndex index.php index.php3 index.html index.htm
</IfModule>
默认主页是index.php如果没有就找index.php3以此类推。注意顺序,每个页面之间需要加一个空格隔开。
5,配置httpd-vhosts.conf
DocumentRootD:/web/website
<Directory "D:/web/website/">
Options+Indexes +Includes +FollowSymLinks +MultiViews
AllowOverrideAll
Require all granted
</Directory>
将根目录和权限重新设置一下即可
自此,在浏览器中输入localhost或自己的ip地址测试即可看到自己的网页,说明基本配置成功。
配置MySQL数据库
点击图标中的phpmyadmin或者输入http://localhost/phpmyadmin/进入管理页面
默认账户为root密码为空
点击进入后
在导入中,可以导入之前写好的sql表
如果因为重装导致代码无法链接上数据库问题,可以在账户中新开一个有权限的账户来解决问题。
配置php,将它换成7.0.10
配置phpstorm
下载phpstorm,我使用的版本是10.0.1
https://www.jetbrains.com/phpstorm/
· 如果是首次安装,会弹出“Complete Installation(安装完成)”窗口,根据需要是否导入你的设置,如果没有直接选择第2个单选按钮“I not have...”如下图所示。
· 进入“许可证激活”窗口,在“Activate your license with:”选项中选择第2个单选按钮“License Server”如下图所示,然后在“License serveraddress”一项中输入如下图所示,然后点击“OK”按钮即可。如果http://idea.lanyus.com激活无效,在网上搜一下其它的license
server address,谷歌你懂得!
· 进入到“欢迎”界面,然后会弹出一个“初始化设置”窗口,一般默认点击“OK”即可,如下图所示:
· 选择创建的工程以及设置工程的工作空间,然后点击“Create”按钮,如下图所示:
· 最后进入到“PhpStorm10”IDE界面,如下图所示:
· 如果在试用阶段,可以点击菜单栏上的“Help”→“Register...”,如下图所示。
· 然后,依然弹出“许可证激活”窗口,选择“License server”单选按钮,然后在“License serveraddress”一项中输入如下图所示,然后点击“OK”按钮即可。
一般出现Thank you for licensing PhpStorm说明激活成功!
Phpstorm汉化
1.将安装目录下D:\JetBrains\PhpStorm10.0.1\lib目录下的resources_en.jar文件复制出来,并更名为resources_cn.jar
2、双击打开resources_cn.jar(注意是打开而不是解压出来),将下载的汉化包zh_CN目录下的所有文件拖到刚才打开的resources_cn.jar文件内的messages目录中,并保存
3、将resources_cn.jar文件复制回C:\ProgramFiles \JetBrains\phpstorm10.0.3\lib目录,完毕!
4、打开之后,界面如下。

相关文章推荐
- 使用WAMP搭建PHP本地开发环境
- 使用WAMP搭建PHP本地开发环境
- php---本地开发及测试环境搭建(Wamp)
- 使用WAMP搭建PHP本地开发环境
- php开发环境搭建—ZendStudio+wamp
- 快速搭建PHP开发环境WAMP+ZendStudio+ZendDebugger
- phpwamp开发环境搭建详解,phpwamp绿色集成环境开发环境一键搭建
- 本地搭建php开发环境-windows
- WAMP实战演练之Apache-httpd-2.4.9+MySQL-5.6.17+PHP-5.5.10开发环境搭建
- (转)快速搭建PHP开发环境WAMP+ZendStudio+ZendDebugger
- 手把手搭建WAMP+PHP+SVN开发环境
- 一刻钟搭建apache+php开发环境(适用于本地安装wordpress、discuz,ecshop安装失败估计是php版本太高)
- 配置本地环境之PHP开发环境的搭建
- PHPwamp开发环境搭建详解
- PHP开发使用xampp搭建本地开发环境
- Ubuntu搭建本地PHP开发环境
- Win10下搭建绿色版基于WAMP的PHP开发环境
- windows快速搭建本地apache php mysql开发环境,多站点域名访问
- ubuntu 搭建php本地开发环境
- WAMP搭建本地开发环境