JAVA NIO入门讲解1
2017-01-14 21:27
323 查看
NIO基本概述[^3]
NIO主要围绕三个核心组件:Channel、Buffer、Selector;以及若干核心工具类:Pipe、FileLock、Charset、Files、Channels(用于IO和NIO转换)NIO有两个核心概念,即==通道(channel)和缓冲区(buffer)==,其核心就是从通道中读取数据到缓冲区,或者从缓冲区中读取数据写入通道。
IO的核心概念主要是字符流和字节流,因此NIO面向的是缓冲区,而IO直接就是面对流。
NIO是非阻塞的(Non-Blocking IO),==只要把数据交给缓冲区,剩下的就可以不用管了==,直接用线程去处理其他事情就可以。而阻塞模型的话,线程必须阻塞等待流的IO完成。
NIO可以使用Selector实现多路复用功能。
通道是全双工的,可以实现异步读写,而流是单向的,只能单向读或单向写,也就是单工的。
JDK1.4提供了对非阻塞IO(NIO)的支持,JDK1.5_update10版本使用epoll替代了传统的select/poll,极大的提升了NIO通信的性能。Java 1.7 增加了异步IO
Channel通道
主要分以下几个具体实现类,分别针对不同的实现,比如文件、UDP、TCP。FileChannel - 文件,路径参看[^6]
DatagramChannel – UDP
SocketChannel – TCP
ServerSocketChannel – TCP,监听网络请求,为每个请求建立SocketChannel

FileChannel
该类是一个抽象类,但其对象是线程安全的,多个线程运行并发调用该对象。影响通道位置或者影响文件大小的操作都是单线程的(single-threaded)。如果有一个线程已经在执行会影响通道位置或文件大小的操作,那么其他尝试进行此类操作之一的线程必须等待。并发行为也会受到底层的操作系统或文件系统影响。[^7]
因为当前操作系统大部分的文件I/O还不支持异步请求,因而大部分情况下的FileChannel总是阻塞式的。该通道不能直接创建,一个FileChannel只能读写一个File对象,具有和File对象相同的文件访问权限,且只能通过调用File对象(RandomAccessChannel、FileInputStream、FileOutputStream)的getChannel方法获取[^7]。
简单示例
读文件的具体案例可以参看“Buffer缓存区的简单示例”。写文件的案例如下[^9][^10]:/**
* 将内容写入文件中,如果文件已经存在,则附加在后面,否则新建文件
*
* @param stringContent
* @param filePath
* @param isAppend 判断是否追加还是覆盖
*/
public static boolean writeStringToFile(final String stringContent, final String filePath, final boolean isAppend) {
return AccessController.doPrivileged(new PrivilegedAction<Boolean>() {
@Override
public Boolean run() {
if (StringUtils.isBlank(stringContent)) {
return false;
}
File file = checkFile(filePath);
if (file == null) {
//文件读取失败
return false;
}
RandomAccessFile randomAccessFile = null;
FileChannel fileChannel = null;
ByteBuffer byteBuffer = null;
try {
randomAccessFile = new RandomAccessFile(file, "rw");
fileChannel = randomAccessFile.getChannel();
byte[] bytes = stringContent.getBytes(Charset.forName("utf-8"));
byteBuffer = ByteBuffer.wrap(bytes);
int byteLength = bytes.length, length = 0;
if (isAppend) {
//判断是追加
fileChannel.position(file.length());
} else {
fileChannel.position(0);
//强制指定长度
fileChannel.truncate(byteLength);
}
while (byteBuffer.hasRemaining()) {
fileChannel.write(byteBuffer);
}
//强制刷新到文件系统
fileChannel.force(true);
return true;
} catch (FileNotFoundException e) {
//文件读取失败
return false;
} catch (IOException e) {
//写文件失败
return false;
} finally {
if (randomAccessFile != null) {
try {
randomAccessFile.close();
} catch (IOException e) {
;
}
}
if (fileChannel != null) {
try {
fileChannel.close();
} catch (IOException e) {
;
}
}
if (byteBuffer != null) {
byteBuffer.clear();
}
}
}
});
}
/**
* 判断当前文件是否存在,如果不存在则创建,否则直接返回File描述文件对象
* <pre>
* 注意:如果该文件是一个目录,则直接返回null
* </pre>
*
* @param filePath
* @return
*/
public static File checkFile(final String filePath) {
if (StringUtils.isNotBlank(filePath)) {
final File file = new File(filePath);
if (file.isDirectory()) {
//如果是目录,则直接返回null
return null;
}
if (file.exists()) {
//如果文件已经存在,则直接返回文件描述对象
return file;
}else{
//如果文件不存在,则直接创建文件
return AccessController.doPrivileged(new PrivilegedAction<File>() {
@Override
public File run() {
try {
boolean success = file.createNewFile();
if(success){
return file;
}
return null;
} catch (IOException e) {
}
return null;
}
});
163c1
}
}
return null;
}注意[^8][^10]:
FileDescriptor类是读写文件的核心,代表一个独立于系统的隐式句柄流。看下面的JDK说明:
Instances of the file descriptor class serve as an opaque handle to the underlying machine-specific structure representing an open file, an open socket, or another source or sink of bytes. The main practical use for a file descriptor is to create a FileInputStream or FileOutputStream to contain it.
FileDescriptor类作为一个隐式句柄,可用于代表与底层机器适配的一个打开文件、一个打开的socket,另一个数据源或字节槽。最主要的用法是用于创建FileInputStream或FileOutputStream以包含它。(注:我们常用的System.in/System.out/System.err就是包含了这个)
File类是一个独立于系统的、不可变的(immutable)目录或文件分层路径名抽象(An abstract representation of file and directory pathnames),可用于“抽象路径名(an abstract pathname)与路径字符串(a pathname string)的转换”(路径包含绝对路径和相对路径,前者说明定位文件或目录不需要额外信息,而后者还需要系统属性user.dir配合,user.dir属性是指当前应用JVM启动的地址),也可以描述文件和目录信息,比如文件大小、名称、是否存在、获取父亲目录地址(getParent)等信息,不能用于改变或读写文件内容,读写内容是通过FileDescriptor句柄流实现的。java.nio.file包提供了更加丰富的抽象及工具类。
RandomAccessFile、FileInputStream和FileOutputStream用于内容的读写(三个类内包含有一个FileDescriptor对象,即一个打开文件的句柄流)。
RandomAccessFile是Java输入输出流体系中功能最丰富的文件内容访问类,他提供 了众多的方法来访问文件,它既可以读取文件的内容,也可以说向文件输出数据,本身不带缓冲读写,和FileInputStream、FileOutputStream等一样,直接按字节读写时,性能不可接受[^14].
RandomAccessFile的操作模式model,支持r/rw/rws/rwd,不支持只w的情况,其中rw下,如果文件不存在会尝试创建,rws和rwd比较类似于filechannel.fore(),即修改会同步刷新到文件系统,但开销大。
从JDK1.4开始,RandomAccessFile的绝大部分功能都能使用“内存映射文件(memory-mapped files)”实现。
MappedByteBuffer内存映射文件
以上简单示例有个问题,就是当文件太大时,将文件内容(String)直接放在内存中是不可取的。(当然,对于大文件的直接覆盖,更好的方式是,先将原旧文件直接删除,再新建)内存映射文件就是为了解决创建或修改因文件内容太大而无法放入内存的文件,有了内存映射文件(这里的内存是虚拟内存,不是物理内存[^12]),你就可以认为文件已经全部读进了内存,然后把它当成一个非常大的数组来访问。
MappedByteBuffer fileChannel.map(FileChannel.MapMode mode, long position, long size)将此通道的文件区域直接映射到内存中。注意,你必须指明,它是从文件的哪个位置开始映射的,映射的范围又有多大;也就是说,它还可以映射一个大文件的某个小片断。[^10]
读写内存映射文件是操作系统来负责的,因此,即使你的Java程序在写入内存后就挂掉了,只要操作系统工作正常,数据就会写入磁盘。[^15]
MapMode有三种模式:
READ_ONLY 只读模式,如果进行了写操作,会抛出 java.nio.ReadOnlyBufferException 异常。 channel为r模式
READ_WRITE 读写模式, channel为rw模式
PRIVATE 私有模式,即Copy-on-write模式,该模式下的修改不会反应到最终文件上,其他相同映射的对象无法获取到修改,修改会造成拷贝。 channel为rw模式
ByteBuffer的子类,因此它具备了ByteBuffer的所有方法,但新添了以下方法:
force()将缓冲区的内容强制刷新到存储设备中去, rw模式
load()将存储设备中的数据加载到内存中
isLoaded()位置内存中的数据是否与存储设置上同步
注意:
MappedByteBuffer一旦创建就不会依赖于Channel,即便channel关闭了,Map依旧存在且有效。最大可以映射2G大文件???这个疑问其实不对,主要想表达的意思是String最大的byte数目是INTEGER.MAX_VALUE(String里面是一个char[],数组最大的长度为Integer.MAX_VALUE),而整型的最大值为2147483648=2GB,而且MappedByteBuffer.put(byte[] src, int offset, int length), length也是为int,因此一个buffer对象最大只能处理2G,如果要处理更大的,则需要用多个buffer映射。但是最终数组大小最多多少,还是要看不同的jvm实现,请参看[^13]。
JDK说明
For most operating systems, mapping a file into memory is more expensive than reading or writing a few tens of kilobytes of data via the usual read and write methods. From the standpoint of performance it is generally only worth mapping relatively large files into memory.
对于大多数操作系统,如果只是读写几千kb的数据,那么映射文件到内存,比用通常方式read和write方法都更代价高昂。
The buffer and the mapping that it represents will remain valid until the buffer itself is garbage-collected.
这块内存映射会一直有效直到垃圾回收掉。—这是个缺点,因为没有unmap方法。可以使用以下方法释放,但是 sun.misc.Cleaner类是JDK才有的[^12]。
Netty提供了PooledByteBufAllocator,基于内存池的缓冲区重用机制,性能提高了23倍[22].
/**
* 释放MappedBytedBuffer
*
* @param buffer
* @throws Exception
*/
public static void clean(final Object buffer) throws Exception {
AccessController.doPrivileged(new PrivilegedAction() {
public Object run() {
try {
Method getCleanerMethod = buffer.getClass().getMethod("cleaner", new Class[0]);
getCleanerMethod.setAccessible(true);
sun.misc.Cleaner cleaner = (sun.misc.Cleaner) getCleanerMethod.invoke(buffer, new Object[0]);
cleaner.clean();
} catch (Exception e) {
e.printStackTrace();
}
return null;
}
});

}

//以上方法不是很好,其实对于直接缓存都实现了DirectBuffer接口,该接口有clean方法,因此更好的方式是如下:
public static void clean(final Object buffer) {
AccessController.doPrivileged(new PrivilegedAction() {
public Object run() {
try {
if(buffer instanceof DirectBuffer){
((DirectBuffer)buffer).cleaner().clean();
}
} catch (Exception e) {
e.printStackTrace();
}
return null;
}
});
}简单示例:
/**
* 采用内存映射文件方式写入大文件,写入方式为追加
*
* @param stringContent
* @param filePath
* @param isAppend      true-追加方式,false-非追加方式
* @return
*/
public static boolean appendStringToLargeFile(final String stringContent, final String filePath, final boolean isAppend) {
return AccessController.doPrivileged(new PrivilegedAction<Boolean>() {
@Override
public Boolean run() {
if (StringUtils.isBlank(stringContent)) {
return false;
}
File file = checkFile(filePath);
if (file == null) {
//获取文件失败
return false;
}

RandomAccessFile randomAccessFile = null;
FileChannel fileChannel = null;
MappedByteBuffer mappedByteBuffer = null;
try {
randomAccessFile = new RandomAccessFile(file, "rw");
fileChannel = randomAccessFile.getChannel();
byte[] bytes = stringContent.getBytes(Charset.forName("utf-8"));
long offset = 0, byteLength = bytes.length, length = file.length();
if (isAppend) {
//判断是追加
offset = length;
fileChannel.position(length);
fileChannel.truncate(length + byteLength);
} else {
fileChannel.position(0);
//强制指定长度
fileChannel.truncate(byteLength);
}
//把文件的更改刷新到文件
fileChannel.force(true);
mappedByteBuffer = fileChannel.map(FileChannel.MapMode.READ_WRITE, offset, byteLength);
//内存映射文件和fileChannel以及randomAccessFile无关
fileChannel.close();
randomAccessFile.close();

//写内容
mappedByteBuffer.put(bytes, 0, bytes.length);
//把内容刷到文件中去
mappedByteBuffer.force();
return true;
} catch (FileNotFoundException e) {
return false;
} catch (IOException e) {
return false;
} finally {
if (randomAccessFile != null) {
try {
randomAccessFile.close();
} catch (IOException e) {
;
}
}
if (fileChannel != null) {
try {
fileChannel.close();
} catch (IOException e) {
;
}
}
if (mappedByteBuffer != null) {
//释放内存映射文件
clean(mappedByteBuffer);
mappedByteBuffer = null;
}
}
}
});
}
数据写入实验对比结果(编码UTF-8,MBP OS X EI Capitan 10.11.6,2.7 GHz Intel Core i7,8 GB 1600 MHz DDR3):
| type | time | filesize | circulation |
|---|---|---|---|
| MappedByteBuffer | 3719ms | 357.9M | 1次,357.9M/次 |
| FileChannel | 3256ms | 357.9M | 1次,357.9M/次 |
| MappedByteBuffer(并发,10线程) | 3968ms | 357.9M | 1次,357.9M/次 |
| type | time | filesize | circulation |
|---|---|---|---|
| MappedByteBuffer | 50590ms | 3.58G | 10次,357.9M/次 |
| FileChannel | 48324ms | 3.58G | 10次,357.9M/次 |
| MappedByteBuffer(并发,10线程) | 34089ms | 3.58G | 10次,357.9M/次 |
| type | time | filesize | circulation |
|---|---|---|---|
| MappedByteBuffer | 125418ms(2.09m) | 8.95G | 25次,357.9M/次 |
| FileChannel | 124429ms(2.07m) | 8.95G | 25次,357.9M/次 |
| MappedByteBuffer(并发,10线程) | 83360ms(1.389m) | 8.95G | 25次,357.9M/次 |
| type | time | filesize | circulation |
|---|---|---|---|
| MappedByteBuffer | 211020ms(3.517m) | 17.9G | 50次,357.9M/次 |
| FileChannel | 215895ms(3.598m) | 17.9G | 50次,357.9M/次 |
| MappedByteBuffer(并发,10线程) | 144047ms(2.401m) | 17.9G | 50次,357.9M/次 |
| type | time | filesize | circulation |
|---|---|---|---|
| MappedByteBuffer | 511407ms(8.523m) | 35.79G | 100次,357.9M/次 |
| FileChannel | 509991ms(8.499m) | 35.79G | 100次,357.9M/次 |
| MappedByteBuffer(并发,10线程) | 284581ms(4.743m) | 35.79G | 100次,357.9M/次 |
如果读写内容必须经过内存,内存映射文件的性能和直接使用FileChannel配合Buffer方式其实差距不大,而且大部分时候还不如(主要是创建和销毁direct bytebuffer开销大),如以上测试。
如果读写内容必须经过内存,则内存映射方式方便适用于并发读写固定大小的大文件,并配合FileLock使用。否则,不建议使用。
如果读写内容不经过内存,而只是进行文件从一个channel到另一个channel的读写操作,则建议使用直接缓存(Direct-Buffer,例如file.map,file.transferTo,file.transferFrom),这样可以省去内容拷贝到JVM堆内存的开销,请参看[^17]

ServerSocketChannel
TCP服务器Channel包含有非阻塞模式和阻塞模式,两者通过serverSocketChannel.configureBlocking(false)方法进行配置。非阻塞模式
当调用服务器的accept方法监听请求时,不会阻塞等待,而是直接返回,如果此时没有请求过来,则会直接返回null。因此当采用非阻塞模式时,需要进行判空处理。
//设置为非阻塞模式
serverSocketChannel.configureBlocking(false);
while (true) {
SocketChannel socketChannel = serverSocketChannel.accept();
if(socketChannel != null){
SelectionKey selectionKey = socketChannel.register(selector, SelectionKey.OP_READ);
}
}
阻塞模式
当调用服务器的accept方法监听请求时,会阻塞等待,直到有请求过来,因此不需要进行判空处理。
//设置为阻塞模式
serverSocketChannel.configureBlocking(true);
while (true) {
SocketChannel socketChannel = serverSocketChannel.accept();
SelectionKey selectionKey = socketChannel.register(selector, SelectionKey.OP_READ);
}
利用FileChannel进行通道之间数据交换
FileChannel抽象类比Channel接口多了几个用于交换数据的方法。size() 返回文件的字节数。
transferFrom,从其他ReadableByteChannel可读字节通道中获取数据,写入FileChannel。
transferTo,从FileChannel,写入数据到其他WritableByteChannel可写字节通道。
transferTo和transferFrom方法比直接拷贝要高效,见下面说明:
JDK说明
This method is potentially much more efficient than a simple loop that reads from this channel and writes to the target channel. Many operating systems can transfer bytes directly from the filesystem cache to the target channel without actually copying them.
这个方法比简单的从一个channel中循环拷贝数据,并写入目标channel要高效,因为许多操作系统允许直接从文件系统缓存中,写入目标通道,而无需要真实进行拷贝。
如下图所示,类似于内存映射文件方式(fileChannel.map),transferTo/from并不会进行JVM内存的拷贝动作,因此相比较传统拷贝方式,性能提升有60%以上.
这个数据有待求证,来自于:
http://files.blogjava.net/killme2008/NIO%20trick%20and%20trap.pdf.zip


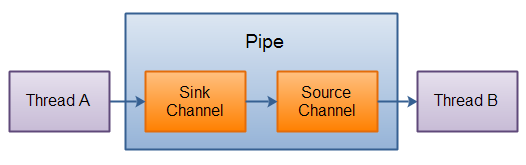
利用Pipe管道线程之间数据通讯
Pipe工具类可以用于构建一对Channel,即可写的Sink通道和可读的Source通道。(图片来自并发编程网)
Scatter与Gather
Channel数据流分发与收集器,常用于将一个channel的数据流分发到不同的buffer,或者汇集不同的buffer数据流到一个channel中。比如将Http的Header、Cookie、Body分发到不同的Buffer处理,处理完成后,再汇总到一个channel中。说明[^3]
分发器(scatter): 从Channel中读取是指在读操作时将读取的数据写入多个buffer中。因此,Channel将从Channel中读取的数据“分散(scatter)”到多个Buffer中。
收集器(gather): 写入Channel是指在写操作时将多个buffer的数据写入同一个Channel,因此,Channel 将多个Buffer中的数据“聚集(gather)”后发送到Channel。
遗憾的是,目前Scatter只是简单的依据Buffer容量和位置进行分发,无法做到依据特定标志位进行动态分发。
示例[^3]
//分发器(scatter)
ByteBuffer header = ByteBuffer.allocate(128);
ByteBuffer body   = ByteBuffer.allocate(1024);
ByteBuffer[] bufferArray = { header, body };
channel.read(bufferArray);
//收集器(gather)
ByteBuffer header = ByteBuffer.allocate(128);
ByteBuffer body   = ByteBuffer.allocate(1024);
//write data into buffers
ByteBuffer[] bufferArray = { header, body };
channel.write(bufferArray);
Channel中文乱码问题[^5]
Channel中使用了Charset工具集来解决编码问题,可以使用该工具集获取CharsetDecoder和CharsetEncoder来进行解码和编码。ByteBuffer byteBuffer = null;//字节码源码
CharBuffer charBuffer = null;//字符码解码
//解码器
CharsetDecoder charsetDecoder = Charset.forName("utf-8").newDecoder();
byteBuffer.flip();
//解码并输入到charBuffer
charsetDecoder.decode(byteBuffer, charBuffer, false);
charBuffer.flip();
//读取charBufferBuffer缓冲区
ByteBuffer有两种模式[^12][^17][^16][^18][^19]:直接模式,即DirectByteBuffer,不在JVM堆上分配内存,而是使用系统级的内存分配(使用unsafe的 unsafe.allocateMemory(size)),因而可以使用到系统级的内存管理系统服务,比如虚拟内存,从而实现读写超过JVM堆内存大小的文件。可以通过-XX:MaxDirectMemorySize=来指定Direct ByteBuffer实例最多可以使用的内存总数。如指定-XX:MaxDirectMemorySize=1024,则系统中所有存活的Direct ByteBuffer总内存数不能超过1024字节。使用该方式,需要注意构建和析构成本比较大。可以直接使用ByteBuffer.allocateDirect(int capacity)调用unsafe本地方法分配c heap。(参看:http://blog.csdn.net/xieyuooo/article/details/7547435)。

图片来自[^16],请看详细说明。
间接模式,即HeapXXXBuffer,即在JVM堆上分配内存,由JVM负责内存分配释放,因而最大不能超过Xmx值。可以直接使用ByteBuffer.allocate(int capacity)分配JVM heap。

间接模式在read和write文件内容时,其实也会默默的转换成直接模式再进行读写操作到文件系统的,所以相当于间接多了一层开销。
基本分类
针对不同的数据类型,Buffer提供了你能通过IO发送的基本数据类型:byte, short, int, long, float, double 和 char。ByteBuffer <-实现- HeapByteBuffer
CharBuffer <-实现- HeapCharBuffer
DoubleBuffer <-实现- HeapDoubleBuffer
FloatBuffer <-实现- HeapFloatBuffer
IntBuffer <-实现- HeapIntBuffer
LongBuffer <-实现- HeapLongBuffer
ShortBuffer <-实现- HeapShortBuffer
MappedByteBuffer <-实现- DirectByteBuffer

ByteBuffer是基本类型,可以通过asXXXBuffer方法转换为其他类型。

基本原理
Buffer需要理解三个参数capacity、limit、position,说明如下:capacity就是缓冲区的大小,表示可以写入最多多少数据,比如可以写1024个byte、long等数据,如果满了,必须清空才能继续写入。该值是固定不变的。
position,在写模式中,记录已经写入了多少数据,每写一位,position加1;在读模式中,记录已经读取了多少数据,每读一位,position加1。positon的取值范围为[0, capacity)
limit,在读模式中,表示可以最大读取多少位数据,调用flip设置读模式的时候,会将position的值设置到limit;在写模式中,表示可以最大写入多少位数据,调用clear设置写模式时,会将capacity的值设置到limit。
(图片来源于并发编程网[^3])
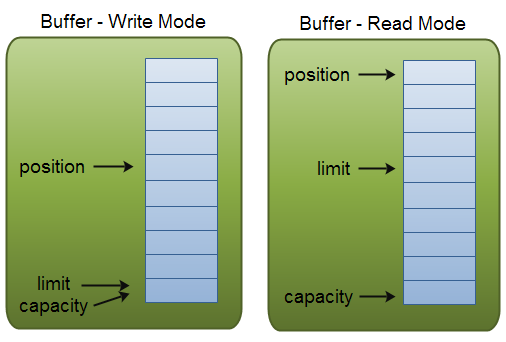
上面的地址小,下面的地址大,capacity就是allocate分配的大小。
左图说明:
调用clear后,设置为写模式,即设值limit=capacity,position=0,mark=-1。后面每写一位,position++
右图说明:
调用flip后,设置为读模式,即设值limit=position,position=0,mark=-1。后面每读一位,position++,如果要多次读取重复数据,可以调用rewind方法,该方法设值position=0,mark=-1,也就是重新开始读。
使用说明
使用的基本流程都是:先分配空间(allocate(capacity)),再使用(Channel.read(buffer))或buffer.put(xxx)方法写入数据,具体使用步骤如下:将数据写入Buffer缓冲区
将状态翻转(调用flip函数),从写模式切换为读模式。即设值limit=position,position=0,mark=-1
从Buffer中读取数据
状态翻转(调用clear方法或compact方法,清空缓冲区),从度模式切换回写模式。clear()方法会清空整个缓冲区,compact()方法只会清除已经读过的数据,任何未读的数据都被移到缓冲区的起始处,新写入的数据将放到缓冲区未读数据的后面。
Buffer无法扩展,因为其具体的实现类基本都是包级别权限,无法直接使用。
简单示例
public static String loadFileToString(final String filePath) {
return AccessController.doPrivileged(new PrivilegedAction<String>() {
@Override
public String run() {
FileChannel channel = null;
RandomAccessFile randomAccessFile = null;
ByteBuffer byteBuffer = null;//字节码源码
CharBuffer charBuffer = null;//字符码解码
//解码器
CharsetDecoder charsetDecoder = Charset.forName("utf-8").newDecoder();
try {
randomAccessFile = new RandomAccessFile(filePath, "r");
channel = randomAccessFile.getChannel();
byteBuffer = ByteBuffer.allocate(1024);
charBuffer = CharBuffer.allocate(1024);
int readByte = channel.read(byteBuffer);
StringBuffer stringBuffer = new StringBuffer("");
while (readByte != -1) {
//状态翻转,从写模式切换为读模式
byteBuffer.flip();
//解码并输入到charBuffer
charsetDecoder.decode(byteBuffer, charBuffer, false);
charBuffer.flip();
while (charBuffer.hasRemaining()) {
//将所有数据都读取完毕
stringBuffer.append(charBuffer.get());
}
//清空全部缓冲区
byteBuffer.clear();
charBuffer.clear();
readByte = channel.read(byteBuffer);
}
return stringBuffer.toString();
} catch (FileNotFoundException e) {
return null;
} catch (IOException e) {
return null;
} finally {
if (randomAccessFile != null) {
try {
randomAccessFile.close();
} catch (IOException e) {
;
}
}
if (channel != null) {
try {
channel.close();
} catch (IOException e) {
;
}
}
if (byteBuffer != null) {
byteBuffer.clear();
}
if (charBuffer != null) {
charBuffer.clear();
}
}
}
});
}
其他方法
mark和reset方法用来记录一个读写位置position,即设值mark=position
后续可以使用reset方法恢复,即设值postion=mark
equals和compareTo方法
Selector多路复用器[^4]
允许单个线程处理多个Channel的神器,如下图所示(图片来源于并发编程网[^3]),使用时先想Selector中注册Channel,然后线程调用selector()方法,该方法会监听事件,比如链接事件、数据事件等。好处是避免占用过多内存,避免线程之间的频繁切换。
注意:
FileChannel因为没有继承SelectableChannel,因而无法配合Selector进行使用,其他三种Channel可以。
一般流程:
向selector中注册Channel及感兴趣的事件。
从selector中选择已经发生特定事件的Channel进行操作。
SelectionKey事件类型(操作集合)
| Type | Name | Description | Channel Type |
|---|---|---|---|
| OP_ACCEPT | 接收就绪 | Server通道准备好接收其他连接请求,或者发生了异常 | server-socket channel |
| OP_CONNECT | 连接就绪 | SocketChannel通道快要建立好连接,或发生了异常 | socket channel |
| OP_READ | 读就绪 | 多路复用器检测到SocketChannel通道缓存数据已经读取完毕,可以进行读取,或已经到达了流的尾部,或者被远端关闭了连接,或者发生了异常 | socket channel |
| OP_WRITE | 写就绪 | 多路复用器检测到SocketChannel通道已经空闲可以写入数据(Sokect空闲时都是可写的),或者被远端关闭了连接,或者发生了异常 | socket channel |
因为这些操作类型都是位值,因此如果同时对多个操作感兴趣,可以如下进行操作:
int ops = SelectionKey.OP_READ | SelectionKey.OP_CONNECT
一般情况下写事件,只有当通道阻塞时,暂时无法发送全部数据时,才需要进行注册,等通道可以写入时,则进行写入,并判断是否写入完全,写完即可取消事件,甚至关闭通道。
SelectionKey常用方法
channel 获取Channelselector 获取selector
interestOps 获取当前Channel关注的事件,可以通过位操作进行判断是否关注了某事件
readOps 获取当前Channel已经发生的事件
isAcceptable 判断是否接收就绪
isConnectable 判断是否连接就绪
isReadable 判断是否读就绪
isWritable 判断是否写就绪
cancel 将当前SelectionKey设置为失效,并添加到cancelled-key set中,下次selection操作会从key set中删除,该方法允许多次调用,一旦调用后,就无法逆转。注意调用该方法是同步进行的,因此会影响其他同Selector中的cannel和selection操作
isValid 判断SelectionKey是否被cannel掉
attach和attachment 用于附加对象到Channel,一般用于Channel识别。一次只能附加一个对象,多次附加,会把之前的对象丢弃。
Selector常用方法
Selection操作,判断是否有事件发生int select()
该方法会阻塞,直到有事件发生,或调用了wakeup方法,或线程被中断。返回channel个数
int select(long timeout)
该方法也会阻塞,直到有事件发生,或调用了wakeup方法,或线程被中断,或者超时。返回channel个数
int selectNow()
该方法不会阻塞,如果当前没有事件发生,则返回0,如果有则返回具体channel个数
wakeup()
该方法会将当前正在阻塞的Selection操作,立即返回。而且如果当前的并没有被阻塞,则下一次调用阻塞的Selection操作,也会被立即返回。在多次阻塞之间,调用多次该方法,只有一次视为生效。
获取事件
selectedKeys()
获取当前已经发生事件的Channel,即返回“已选择键集(selected key set)”。
关闭Selector
close()
关闭当前selector,但并不会关闭Channel。
向selector中注册Channel及感兴趣的事件
首先创建selector创建channel
将channel注册到selector,并标注关注的事件类型,以及附加attach对象进行标识
例如:socketChannel.register(selector, SelectionKey.OP_READ, ChannelType.READ_FILE)
简单示例
DataSource dataSource = DataSource.instance();
ServerSocketChannel serverSocketChannel = null;
Selector selector = null;
try {
//创建多路复用器
selector = Selector.open();
//创建服务器channel
serverSocketChannel = ServerSocketChannel.open();
//服务器Channel绑定监听端口
serverSocketChannel.socket().bind(new InetSocketAddress(dataSource.getServerPort()));
//设置为非阻塞模式
serverSocketChannel.configureBlocking(false);
while (true) {
SocketChannel socketChannel = serverSocketChannel.accept();
if(socketChannel != null){
//将当前创建的channel注册到Selector,并监听OP_READ事件
SelectionKey selectionKey = socketChannel.register(selector, SelectionKey.OP_READ);
}
}
} catch (IOException e) {
System.out.println("创建服务器失败!");
e.printStackTrace();
} finally {
if (serverSocketChannel != null){
try {
serverSocketChannel.close();
} catch (IOException e) {
;
}
}
if(selector != null){
try {
selector.close();
} catch (IOException e) {
;
}
}
}
从selector中选择已经发生特定事件的Channel进行操作
有两个步骤:判断是否有事件发生,即判断是否有已选择的key(selected-key set是否大于0)
通过selector获取已选择的key集合
注意:
从selector获取已选择的selectionKey,并处理后,需要手动将其从selected-key set中删除,否则下次调用select()的时候,还是会将其记录在内的。
简单示例
while(true){
try {
if(selector.select() > 0){
//说明有事件发生
Set<SelectionKey> selectionKeys = selector.selectedKeys();
Iterator<SelectionKey> iterator = selectionKeys.iterator();
SelectionKey selectionKey = null;
while (iterator.hasNext()){
selectionKey = iterator.next();
if(selectionKey.isValid()){
//判断事件类型
if(selectionKey.isAcceptable()){
//处理接收就绪事件
handleAccept(selectionKey);
}
if(selectionKey.isConnectable()){
//处理连接就绪事件
handleConnect(selectionKey);
}
if(selectionKey.isReadable()){
//处理读就绪事件
handleRead(selectionKey);
}
if(selectionKey.isWritable()){
//处理写就绪事件
handleWrite(selectionKey);
}
}
//处理完毕后需要从selected-key set中删除
iterator.remove();
}
}
} catch (IOException e) {
;
}
}
AIO
从JDK1.7开始,Java新增了NIO2.0,即包含有AIO(异步IO),NIO的缺点是随着client连接数的增加,线程的数量也是成正比线性增加,如果连接数过多,会造成线程吃爆内存,访问速度下降,甚至程序挂掉。而AIO可以做到一个线程处理多个客户端连接,在后续章节会补充这部分内容。常见问题
在非阻塞模式下,碰到无法正常请求的情况:ServerSocketChannel必须将自己的OP_ACCP注册到一个selector中
必须在同一个selector中注册ServerSocketChannel获取到的SocketChannel
1和2最好在同一个线程中执行,否则会造成2无法正常注册
在主线程中,最好把channel中的数据卸载完毕后,再交给子线程处理,当然解析数据应该放到子线程
HTTP心跳包问题
Socket.sendUrgentData(0xFF)(-1)是用来发生心跳包,保持长连接的方法,在读写流时需要自行判断是否为心跳包,否则会造成读写异常。
java.nio.channels.ClosedChannelException
at sun.nio.ch.SocketChannelImpl.ensureReadOpen(SocketChannelImpl.java:257)
at sun.nio.ch.SocketChannelImpl.read(SocketChannelImpl.java:300)
at com.peterliu.simplemock.channel.ReadFileChannelHandler.handleRead(ReadFileChannelHandler.java:69)
at com.peterliu.simplemock.channel.HandlerTask$1.run(HandlerTask.java:54)
at java.util.concurrent.Executors$RunnableAdapter.call(Executors.java:511)
at java.util.concurrent.FutureTask.run(FutureTask.java:266)
at java.util.concurrent.ThreadPoolExecutor.runWorker(ThreadPoolExecutor.java:1142)
at java.util.concurrent.ThreadPoolExecutor$Worker.run(ThreadPoolExecutor.java:617)
at java.lang.Thread.run(Thread.java:745)
写在最后
后续会开源一个完全用NIO实现的轻量级静态服务器,类似于APACHE服务器的功能,但做的要简单。[1]: http://www.importnew.com/19816.html 攻破JAVA NIO技术壁垒
[2]: http://weixiaolu.iteye.com/blog/1479656 Java NIO原理图文分析及代码实现
[3]: http://ifeve.com/java-nio-all/ Java NIO 系列教程
[5]: http://blog.csdn.net/chuyouyinghe/article/details/51461082 nio FileChannel中文乱码问题
[6]: http://blog.csdn.net/snannan_268/article/details/5511614 java获取当前路径的几种方法
[7]: http://zachary-guo.iteye.com/blog/1465475 NIO - FileChannel
[8]: http://blog.csdn.net/yinzhijiezhan/article/details/44489049 用File和RandomAccessFile新建一个文件
[9]: http://www.cnblogs.com/jiangyi-uestc/p/5700752.html Java如何判断文件或者文件夹是否在?不存在如何创建?
[10]: http://blog.csdn.net/akon_vm/article/details/7429245 Java RandomAccessFile用法
[11]: http://bbs.csdn.net/topics/390755701 用java多线程统计超大数据文件(1TB以上)中出现次数最多的人名
[12]: http://langgufu.iteye.com/blog/2107023 java大文件读写操作,java nio 之MappedByteBuffer,高效文件/内存映射
[13]: http://rensanning.iteye.com/blog/2012067 Java数组的长度到底能有多大?
[14]: http://www.2cto.com/kf/201408/324519.html MappedByteBuffer高速缓存文件、RandomAccessFile随机访问
[15]: http://itindex.net/detail/49906-java-%E5%86%85%E5%AD%98-%E6%98%A0%E5%B0%84 为何要在Java中使用内存映射文件(Memory Mapped File)或者MappedByteBuffer
[16]: http://www.cnblogs.com/xubenben/p/4424398.html MappedByteBuffer以及ByteBufer的底层原理
[17]: http://blog.csdn.net/chenyi8888/article/details/5343315 Direct vs non-direct ByteBuffer
[18]: http://www.molotang.com/articles/997.html ByteBuffer使用和实现以及文件内存映射
[19]: http://blog.jobbole.com/104880/ 深入浅出 MappedByteBuffer
[20]: http://docs.oracle.com/javase/6/docs/technotes/guides/io/index.html Java I/O
[21]: http://www.infoq.com/cn/articles/netty-high-performance/ Netty系列之Netty高性能之道
