nginx用户认证
2017-01-07 13:27
344 查看
nginx并不想apache一样,nginx所有的模块均为静态编译的,而apache绝大多数模块都可以分为静态编译和动态编译两种。
我们在上一片日志搭建了discuz论坛,disucz论坛地址为http://www.test.com/forum.php,我们对此做用户认证。
这里需要借助于apache的htpasswd工具,如果没有这个工具,直接yum install -y httpd,安装之后就可以使用这个工具!
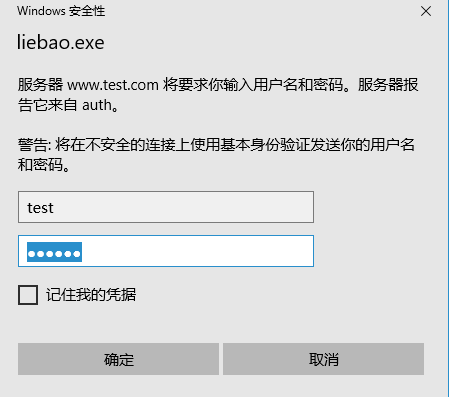
然后再次登录论坛就得输入刚设置的用户和密码,这个密码并不是论坛的账号和密码!
需要注意的是这样设置完之后,点击确定会发现原网页并没有解析出来,而是出现的源代码;这是因为location的匹配规则导致的,需要在做用户认证的那个location块种加入支持php解析的语句!
整个虚拟主机的配置文件如下:
我们在上一片日志搭建了discuz论坛,disucz论坛地址为http://www.test.com/forum.php,我们对此做用户认证。
[root@lnmp ~]# cd /usr/local/nginx/conf/vhosts
[root@lnmp vhosts]# vim discuz.conf
server
{
listen      80;
server_name www.test.com;
index       index.html index.htm index.php;
root        /data/www;

location ~ .*forum\.php$ {                  #这一部分为用户认证

auth_basic             "auth";
auth_basic_user_file  /usr/local/nginx/conf/htpasswd;
}

location ~ \.php$ {
include fastcgi_params;
fastcgi_pass 127.0.0.1:9000;
fastcgi_index index.php;
fastcgi_param SCRIPT_FILENAME /data/www$fastcgi_script_name;
}

}配置文件配置之后,需要重新加载配置文件,加载之前需要检测配置文件是否正确。[root@lnmp vhosts]# /usr/local/nginx/sbin/nginx -t nginx: the configuration file /usr/local/nginx/conf/nginx.conf syntax is ok nginx: configuration file /usr/local/nginx/conf/nginx.conf test is successful [root@lnmp vhosts]# service nginx restart Stopping Nginx: [ OK ] Starting Nginx: [ OK ]然后需要创建密码文件,也就是做认证是指定的文件/usr/local/nginx/conf/htpasswd
这里需要借助于apache的htpasswd工具,如果没有这个工具,直接yum install -y httpd,安装之后就可以使用这个工具!
[root@lnmp ~]# htpasswd -c -m /usr/local/nginx/conf/htpasswd test
New password:
Re-type new password:
Adding password for user test
第一次使用这个命令需要用-c选项,之后再使用就不需要了!添加了test用户,密码为123456!
然后再次登录论坛就得输入刚设置的用户和密码,这个密码并不是论坛的账号和密码!
需要注意的是这样设置完之后,点击确定会发现原网页并没有解析出来,而是出现的源代码;这是因为location的匹配规则导致的,需要在做用户认证的那个location块种加入支持php解析的语句!
整个虚拟主机的配置文件如下:
server
{
listen      80;
server_name www.test.com;
index       index.html index.htm index.php;
root        /data/www;

location ~ .*forum\.php$ {

auth_basic             "auth";
auth_basic_user_file  /usr/local/nginx/conf/htpasswd;
include fastcgi_params;
fastcgi_pass 127.0.0.1:9000;
fastcgi_index index.php;
fastcgi_param SCRIPT_FILENAME /data/www$fastcgi_script_name;
}

location ~ \.php$ {
include fastcgi_params;
fastcgi_pass 127.0.0.1:9000;
fastcgi_index index.php;
fastcgi_param SCRIPT_FILENAME /data/www$fastcgi_script_name;
}

}也可以使用curl测试:[root@lnmp vhosts]# curl -x127.0.0.1:80 -u test:123456 http://www.test.com/forum.php -I HTTP/1.1 200 OK Server: nginx/1.4.4 Date: Wed, 04 Jan 2017 05:23:56 GMT Content-Type: text/html; charset=gbk Connection: keep-alive X-Powered-By: PHP/5.3.27 Set-Cookie: eRNT_2132_saltkey=e3JOxpX5; expires=Fri, 03-Feb-2017 05:23:56 GMT; path=/; httponly Set-Cookie: eRNT_2132_lastvisit=1483503836; expires=Fri, 03-Feb-2017 05:23:56 GMT; path=/ Set-Cookie: eRNT_2132_sid=SnsZSg; expires=Thu, 05-Jan-2017 05:23:56 GMT; path=/ Set-Cookie: eRNT_2132_lastact=1483507436%09forum.php%09; expires=Thu, 05-Jan-2017 05:23:56 GMT; path=/ Set-Cookie: eRNT_2132_onlineusernum=2; expires=Wed, 04-Jan-2017 05:28:56 GMT; path=/ Set-Cookie: eRNT_2132_sid=SnsZSg; expires=Thu, 05-Jan-2017 05:23:56 GMT; path=/

相关文章推荐
- Nginx 用户认证
- nginx配置用户认证
- nginx用户认证与htpasswd命令
- nginx让用户通过用户名密码认证访问web页面
- CentOS7 Nginx配置--虚拟主机、用户认证、域名重定向、访问日志
- Nginx安装与配置:默认虚拟主机、用户认证和域名重定向
- Nginx安装、默认虚拟主机、用户认证、域名重定向
- Linux命令:nginx安装配置及基于用户认证访问
- nginx 验证默认虚拟主机和用户认证(设置网站需要账号密码访问)
- 11-4 12 Nginx安装 默认虚拟主机 用户认证 域名重定向
- LAMP架构(nginx安装,默认虚拟主机,用户认证,域名重定向,nginx配置文件详解)
- nginx让用户通过用户名密码认证访问web页面
- LNMP—Nginx的用户认证
- LNMP架构 (2)之 Nginx安装、默认虚拟主机、用户认证、域名重定向、配置文件详解
- nginx用户认证配置( Basic HTTP authentication)
- nginx介绍,nginx安装,配置nginx默认虚拟主机,nginx用户认证,域名重定向
- 【LNMP】Nginx安装、Nginx默认虚拟主机、Nginx用户认证和Nginx域名重定向
- nginx让用户通过用户名密码认证访问web页面
- Nginx中配置用户服务器访问认证的方法示例
- nginx用户认证