MFS如何迁移数据之替换存储节点
2017-01-06 18:04
579 查看
公司使用MFS分布式搭建共享存储,默认副本数设置为2,数据节点(chunkserver)目前为6台。
近日因为某些原因需要替换掉一台存储节点。
在不影响使用的前提下进行替换。通过官方文档的提示建议先remove磁盘之后在停掉节点。
参考MFS官方地址:https://moosefs.com/documentation/faq.html
it is not wise to disconnect a chunk server if this server contains the
only copy of a chunk in the file system (the CGI monitor will mark these
in orange). You can also disconnect (change) an individual hard drive.
The scenario for this operation would be:
Mark the disk(s) for removal (see How to mark a disk for removal?)
Reload the chunkserver process
Wait for the replication (there should be no "undergoal" or "missing" chunks marked in yellow, orange or red in CGI monitor)
Stop the chunkserver process
Delete entry(ies) of the disconnected disk(s) in mfshdd.cfg
Stop the chunkserver machine
Remove hard drive(s)
Start the machine
Start the chunkserver process
When you want to mark a disk for removal from a chunkserver, you need to edit the chunkserver's mfshdd.cfg configuration file and put an asterisk '*' at the start of the line with the disk that is to be removed. For example, in this mfshdd.cfg we have marked "/mnt/hdd" for removal:
/mnt/hda
/mnt/hdb
/mnt/hdc
*/mnt/hdd
/mnt/hde
After changing the mfshdd.cfg you need to reload chunkserver (on Linux Debian/Ubuntu: service moosefs-pro-chunkserver reload).
简单来说就是让你编辑存储节点的“mfshdd.cfg”这个文件在被挂载的磁盘前面添加一个 * 号,之后重启进程。
这里我使用ps查看mfs进程 并使用kill -9 杀掉进程 之后启动mfschunkserver start
通过访问mfsmaster CGI web界面得知:
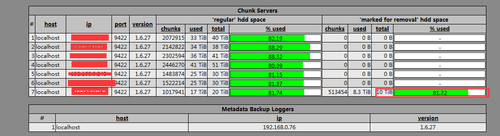
红框内可以看到这里已经显示这台存储节点上面有一块10TB的盘被remove
这种方法经过我个人的测试发觉迁移数据异常的缓慢,so 决定直接干掉这个节点!杀掉进程观察mfs集群发觉并没有影响到我正常使用。
接下来新增节点:
接下来启动chunkserver
# /opt/mfs-1.6.27/sbin/mfschunkserver start
在web界面查看,已经新增的节点。这里可以看出mfs已经自动的开始了数据的迁移了。

说到这里不得不提的一点“副本数”!!!!注意如果你设置的副本为1的话不建议使用直接干掉一个节点这种粗鲁的办法。
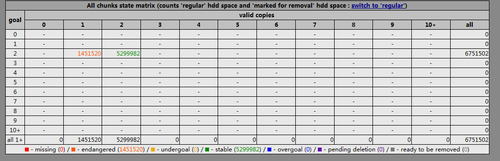
在web见面info选项卡中可以看出,这个矩阵横坐标表示现在已经存在磁盘上的副本数,纵坐标表示你设置的副本数。
那个橙色的数字就表示,设置的副本数是2。
最后温馨提示:数据有风险 操作需谨慎!!
近日因为某些原因需要替换掉一台存储节点。
在不影响使用的前提下进行替换。通过官方文档的提示建议先remove磁盘之后在停掉节点。
参考MFS官方地址:https://moosefs.com/documentation/faq.html
Is it possible to add/remove chunkservers and disks on the fly?
You can add/remove chunk servers on the fly. But keep in mind thatit is not wise to disconnect a chunk server if this server contains the
only copy of a chunk in the file system (the CGI monitor will mark these
in orange). You can also disconnect (change) an individual hard drive.
The scenario for this operation would be:
Mark the disk(s) for removal (see How to mark a disk for removal?)
Reload the chunkserver process
Wait for the replication (there should be no "undergoal" or "missing" chunks marked in yellow, orange or red in CGI monitor)
Stop the chunkserver process
Delete entry(ies) of the disconnected disk(s) in mfshdd.cfg
Stop the chunkserver machine
Remove hard drive(s)
Start the machine
Start the chunkserver process
When you want to mark a disk for removal from a chunkserver, you need to edit the chunkserver's mfshdd.cfg configuration file and put an asterisk '*' at the start of the line with the disk that is to be removed. For example, in this mfshdd.cfg we have marked "/mnt/hdd" for removal:
/mnt/hda
/mnt/hdb
/mnt/hdc
*/mnt/hdd
/mnt/hde
After changing the mfshdd.cfg you need to reload chunkserver (on Linux Debian/Ubuntu: service moosefs-pro-chunkserver reload).
简单来说就是让你编辑存储节点的“mfshdd.cfg”这个文件在被挂载的磁盘前面添加一个 * 号,之后重启进程。
这里我使用ps查看mfs进程 并使用kill -9 杀掉进程 之后启动mfschunkserver start
通过访问mfsmaster CGI web界面得知:
红框内可以看到这里已经显示这台存储节点上面有一块10TB的盘被remove
这种方法经过我个人的测试发觉迁移数据异常的缓慢,so 决定直接干掉这个节点!杀掉进程观察mfs集群发觉并没有影响到我正常使用。
接下来新增节点:
# tar -xf mfs-1.6.27-1.tar.gz # cd mfs-1.6.27
# useradd mfs -s /sbin/nologin
# ./configure --prefix=/opt/mfs-1.6.27 --with-default-user=mfs --with-default-group=mfs
# make && make install
完毕(安装软件这里不再多说,太简单)
cd /opt/mfs-1.6.27/etc/mfs
注意这两个文件:
-rw-r--r--. 1 root root  534 1月   6 09:36 mfschunkserver.cfg
-rw-r--r--. 1 root root  78 1月    6 09:37 mfshdd.cfg
# grep -v "^#" mfschunkserver.cfg
MASTER_HOST = 192.168.0.100
这里填写master地址,其他默认即可。
# grep -v "^#" mfshdd.cfg

/data1
/data2
/data3

以上三个目录为我的挂载点,这里需要注意更改属组和属主
chown -R mfs.mfs /data1 /data2 /data3
接下来启动chunkserver
# /opt/mfs-1.6.27/sbin/mfschunkserver start
在web界面查看,已经新增的节点。这里可以看出mfs已经自动的开始了数据的迁移了。
说到这里不得不提的一点“副本数”!!!!注意如果你设置的副本为1的话不建议使用直接干掉一个节点这种粗鲁的办法。
在web见面info选项卡中可以看出,这个矩阵横坐标表示现在已经存在磁盘上的副本数,纵坐标表示你设置的副本数。
那个橙色的数字就表示,设置的副本数是2。
最后温馨提示:数据有风险 操作需谨慎!!

相关文章推荐
- "如何将本地开发的系统迁移到云端,数据存储问题
- "如何将本地开发的系统迁移到云端,数据存储问题
- "如何将本地开发的系统迁移到云端,数据存储问题
- "如何将本地开发的系统迁移到云端,数据存储问题
- ABAP--如何进行sap的金额数据存储和显示之间的转换(CURRENCY_AMOUNT_DISPLAY_TO_SAP)
- 十分钟内学会:存储在二维表的树结构如何进行指定深度节点的查询
- 如何在触发器或存储过程中实现变量数据表
- 如何根据数据表做批量查询替换?
- 手游rpg如何有效的节省地图数据的存储空间
- 如何利用网络附加存储设备(NAS)构建数据备份(本地及远程数据备份)、数据容灾解决方案
- 在.net中如何把调用存储过程代码写入数据连接层中
- 如何在JAVA程序中使用Struct一次传入多条数据给Oracle的存储过程。
- 如何以对象的形式存储数据
- 一个数据文件如何存储
- 如何得到数据绑定的树节点的父节点
- 数据迁移管理系统综述(在线近线离线分级存储)
- 对应诺言,写了篇文章,“如何使用Serialization 进行文件存储/读取数据 (上)”, 请大家评评。
- ABAP--如何进行sap的金额数据存储和显示之间的转换(CURRENCY_AMOUNT_DISPLAY_TO_SAP)
- 客户机如何存储会话数据?
- 数据迁移存储过程